Set up a serverless architecture for handling large messages using Scaleway's NATS, Serverless Functions, and Object Storage.
In this tutorial, we will build a simple architecture to store and automatically convert images to PDF. The focus is on transferring large messages using a messaging service, specifically the Scaleway NATS server. Our setup involves using the Object Storage service for image storage and the Serverless Functions service for conversion.
We show how to provision all the required Scaleway resources via Terraform/OpenTofu, but you can also use the console, the API or one of our other supported developer tools.
You can retrieve the full source code in this repository, so you can choose to either jump straight into the code or else follow along with the step-by-step explanation below to create the architecture yourself.
Before you start
To complete the actions presented below, you must have:
- A Scaleway account logged into the console
- Owner status or IAM permissions allowing you to perform actions in the intended Organization
- Installed Terraform/OpenTofu on your local machine
- Set up authentication for the Terraform/OpenTofu provider
- Installed Docker on your local machine
- Installed NATS CLI on your local machine
- AWS CLI configured with Scaleway credentials
Architecture
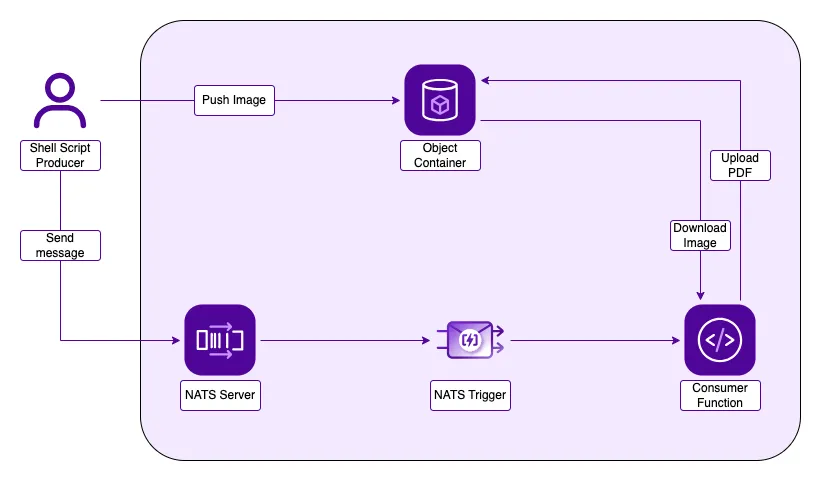
This tutorial's architecture is very simple, consisting of two main components:
- A producer implemented as a shell script responsible for uploading an image to the Object Storage bucket and sending a message to the NATS server.
- A consumer implemented as a serverless Python function designed to receive the message, parse it, extract the image URL, download it from the bucket, convert it to a PDF, and then re-upload the resulting PDF.
Three essential services are required to ensure everything is working together:
- An Object Storage bucket for storing the image file.
- A Scaleway NATS server responsible for receiving and dispatching messages sent by our producer.
- A triggering mechanism in NATS that forwards the message to our consumer.
Prepare the infrastructure
-
Create a
main.tffile, which we will use to provision all our Scaleway resources and infrastructure. Paste the following code to import the necessary providers.terraform { required_providers { scaleway = { source = "scaleway/scaleway" } null = { source = "hashicorp/null" } random = { source = "hashicorp/random" } archive = { source = "hashicorp/archive" } } required_version = ">= 0.13" }The Scaleway provider is needed, but also three providers from HashiCorp that we will use later in the tutorial.
-
Include two variables to enable the secure passage of your Scaleway credentials. Then initialize the Scaleway provider in the
fr-par-1region.variable "scw_access_key_id" { type = string sensitive = true } variable "scw_secret_access_key" { type = string sensitive = true } provider "scaleway" { zone = "fr-par-1" } -
Create a
terraform.tfvarsfile and add your Scaleway access key and access key ID to it.scw_access_key_id = "YOUR_SCW_SECRET_KEY_ID" scw_secret_access_key = "YOUR_SCW_SECRET_KEY" -
Continuing in the
main.tffile, add the following Terraform/OpenTofu code to create an Object Storage bucket that will be used for storing your images.resource "random_id" "bucket" { byte_length = 8 } resource "scaleway_object_bucket" "large_messages" { name = "large-messages-${random_id.bucket.hex}" } resource "scaleway_object_bucket_acl" "large_messages" { bucket = scaleway_object_bucket.large_messages.id acl = "private" } output "bucket_name" { value = scaleway_object_bucket.large_messages.name description = "Bucket name to use with the producer script" }In this code, the resource
random_id.bucketgenerates a random ID, which is then passed to the object bucket to ensure its uniqueness. Additionally, ascaleway_object_bucket_aclACL is applied to the bucket, setting it to private and outputting the bucket name for use in your producer. -
Add these resources to create a NATS account and your NATS credentials file:
resource "scaleway_mnq_nats_account" "large_messages" {
  name = "nats-acc-large-messages"
}

resource "scaleway_mnq_nats_credentials" "large_messages" {
  name       = "nats-large-messages-creds"
  account_id = scaleway_mnq_nats_account.large_messages.id
}

resource "local_file" "nats_credential" {
  content         = scaleway_mnq_nats_credentials.large_messages.file
  filename        = "large-messages.creds"
  file_permission = 644
}

output "nats_url" {
  value       = scaleway_mnq_nats_account.large_messages.endpoint
  description = "NATS url to use with the producer script"
}
We also output the NATS server URL.
-
Run
terraform initandterraform applyto create the resources in your Scaleway account.
Create the producer
As mentioned earlier, the producer will be implemented as a straightforward shell script.
-
Create a file named
upload_img.sh. Inside it, define two variables using Terraform/OpenTofu commands to retrieve the bucket name and the NATS URL.SCW_BUCKET="$(terraform output bucket_name)" SCW_NATS_URL="$(terraform output nats_url)" -
Configure the NATS CLI with the NATS URL and the credentials file.
nats context save large-messages --server=$SCW_NATS_URL --creds=./large-messages.creds
nats context select large-messages
Our script takes the file path that we want to upload as the first parameter.
To upload the file, we will use the AWS CLI configured with the Scaleway endpoint and credentials because Scaleway Object storage is fully compliant with S3.
-
Pass the path to the AWS CLI command as follows:
aws s3 cp $1 s3://$SCW_BUCKET -
Paste the following command into the script to have it send a message to your NATS server, including the name of the uploaded file.
nats pub large-messages $(basename $1)
Create the consumer
We continue using the Scaleway ecosystem and deploy the consumer using a Serverless Function in Python.
-
Create a folder
function. Inside the folder, create another folderhandlerwith a file namedlarge_messages.py. -
In addition to the
handlerfolder, create arequirements.txtfile. Your directory structure should resemble the following: You should have a structure like the following:function/ ├── handler/ │ └── large_messages.py └── requirements.txt -
In the
requirements.txtadd:boto3 img2pdfWithin the serverless function, we use two Python libraries. First,
boto3is configured similarly to AWS CLI, enabling the download and upload of files to the bucket. Second,img2pdfis used to convert our image into a PDF format. -
Next create the code of your function. In the file
large_messages.py, import the libraries that we need and create an empty handler function.import os import boto3 from botocore.exceptions import ClientError import img2pdf from PIL import Image def handle(event, context): return { "body": { "message": "Hello world!" }, "statusCode": 200 } -
Before proceeding with the function's logic, improve the Terraform/OpenTofu code by adding the following code to your
main.tffile:resource "null_resource" "install_dependencies" { provisioner "local-exec" { command = <<-EOT cd function [ -d "./function/package" ] && rm -rf ./package PYTHON_VERSION=3.11 docker run --rm -v $(pwd):/home/app/function --workdir /home/app/function rg.fr-par.scw.cloud/scwfunctionsruntimes-public/python-dep:$PYTHON_VERSION \ pip3 install --upgrade -r requirements.txt --no-cache-dir --target ./package cd .. EOT } triggers = { hash = filesha256("./function/handler/large_messages.py") } } data "archive_file" "function_zip" { type = "zip" source_dir = "./function" output_path = "./function.zip" depends_on = [null_resource.install_dependencies] }The
null_resourceis used to download and package the correct versions of the libraries that we use with the function. Refer to the documentation on Python dependencies for more information. -
Create the function namespace.
resource "scaleway_function_namespace" "large_messages" { name = "large-messages-function" description = "Large messages namespace" } -
Add the resource to set up the function.
resource "scaleway_function" "large_messages" {
  namespace_id = scaleway_function_namespace.large_messages.id
  runtime      = "python311"
  handler      = "handler/large_messages.handle"
  privacy      = "private"
  zip_file     = "function.zip"
  zip_hash     = data.archive_file.function_zip.output_sha256
  deploy       = true
  memory_limit = "2048"
  environment_variables = {
    ENDPOINT_URL  = scaleway_object_bucket.large_messages.api_endpoint
    BUCKET_REGION = scaleway_object_bucket.large_messages.region
    BUCKET_NAME   = scaleway_object_bucket.large_messages.name
  }
  secret_environment_variables = {
    ACCESS_KEY_ID     = var.scw_access_key_id
    SECRET_ACCESS_KEY = var.scw_secret_access_key
  }

  depends_on = [data.archive_file.function_zip]
}
The code sets up the function and connects it to the namespace. It tells the system to use Python version 3.11 and specifies which part of the Python file should run (the handler). It also adds important information, like environment variables and secrets, that our function will need to work correctly. Essential environment variables and secrets to use in our function logic are also added.
-
Create the function trigger to "wake up" the function when a NATS message comes in.
resource "scaleway_function_trigger" "large_messages" {
  function_id = scaleway_function.large_messages.id
  name        = "large-messages-trigger"
  nats {
    account_id = scaleway_mnq_nats_account.large_messages.id
  subject    = "large-messages"
  }
}
It defines which account ID and subject to observe for getting messages.
-
Go back to
large_messages.pyand get the environment variables outside thehamdlerfunction.endpoint_url = os.getenv("ENDPOINT_URL") bucket_region = os.getenv("BUCKET_REGION") bucket_name = os.getenv("BUCKET_NAME") access_key_id = os.getenv("ACCESS_KEY_ID") secret_access_key = os.getenv("SECRET_ACCESS_KEY") -
Get the input file name from the body, define the PDF file name from this, and set up the Amazon S3 client to upload the file with Scaleway credentials.
input_file = event['body'] output_file = os.path.splitext(input_file)[0] + ".pdf" s3 = boto3.client('s3', endpoint_url=endpoint_url, region_name=bucket_region, aws_access_key_id=access_key_id, aws_secret_access_key=secret_access_key -
Outside the
handlefunction, create a new functionconvert_img_to_pdf.def convert_img_to_pdf(img_path, pdf_path): image = Image.open(img_path) pdf_bytes = img2pdf.convert(image.filename) file = open(pdf_path, "wb") file.write(pdf_bytes) image.close() file.close() print("Successfully made pdf file") -
Download the image from the bucket using the Amazon S3 client.
s3.download_file(bucket_name, input_file, input_file) print("Object " + input_file + " downloaded") -
Convert the image with the dedicated function and reupload it in the bucket.
convert_img_to_pdf(input_file, output_file) s3.upload_file(output_file, bucket_name, output_file) print("Object " + input_file + " uploaded") -
Put a
try/exceptaround the code to gracefully handle any errors coming from the Object Storage client.try: s3.download_file(bucket_name, input_file, input_file) print("Object " + input_file + " downloaded") convert_img_to_pdf(input_file, output_file) s3.upload_file(output_file, bucket_name, output_file) print("Object " + input_file + " uploaded") except ClientError as e: print(e) return { "body": { "message": e.response['Error']['Message'] }, "statusCode": e.response['Error']['Code'] }
Test your work
All the infrastructure and the code of your function are ready, and you can now test your converter.
# Make sure your infrastructure is provisioned
terraform init
terraform apply

# Use your producer script
./upload_img.sh test.png #It can be any type of image
Conclusion, going further
In this introductory tutorial, we have demonstrated the usage of the Scaleway NATS server, along with other services from the Scaleway ecosystem, to facilitate the transfer of large messages surpassing the typical size constraints. There are possibilities to expand upon this tutorial for various use cases, such as:
- Extending the conversion capabilities to handle different document types like
docx. - Sending URLs directly to NATS and converting HTML content to PDF.
Visit our Help Center and find the answers to your most frequent questions.
Visit Help Center