Monitoring Instances with Zabbix on Ubuntu Jammy Jellyfish (22.04 LTS)
Zabbix is a powerful open-source software that offers real-time monitoring for servers, virtual machines, network devices, and web applications. Monitoring metrics such as network utilization, CPU load, and disk space consumption are collected by Zabbix and then stored in a database.
This monitoring tool enables users to determine the health status of their IT infrastructure and analyze data over time. The insights provided by Zabbix can be used to plan upgrades to the infrastructure when requirements grow.
In this tutorial, we will use two Scaleway General Purpose Ubuntu Jammy Jellyfish (22.04 LTS) Instances. One Instance will be a server hosting the Zabbix application, while the other will be a client being monitored. Following this tutorial will teach you how to set up Zabbix and take control of your IT infrastructure.
Before you start
To complete the actions presented below, you must have:
- A Scaleway account logged into the console
- Owner status or IAM permissions allowing you to perform actions in the intended Organization
- An SSH key
- 2 Instances running Ubuntu Jammy Jellyfish (22.O4 LTS)
- Installed a LEMPStack on the Instance acting as the server
Installing the Zabbix server
- Download the repository configuration package. Refer to the Zabbix website for the latest version of the repository.
wget https://repo.zabbix.com/zabbix/6.4/ubuntu/pool/main/z/zabbix-release/zabbix-release_6.4-1+ubuntu22.04_all.deb - Install the repository configuration with the help of
dpkg.dpkg -i zabbix-release* - Update the APT package cache to use the newly installed repository.
apt update - Install the Zabbix server, the web frontend and
zabbix-agentwhich collects information about the Instance itself.apt -y install mariadb-server zabbix-server-mysql zabbix-frontend-php zabbix-nginx-conf zabbix-sql-scripts zabbix-agent
Setting up the MariaDB database
Data of the Zabbix server is stored in a rational database and the application comes with support for MariaDB (MySQL) and PostgreSQL. It is also possible to store data in NoSQL databases, like Elasticsearch.
This tutorial uses a MariaDB database with Zabbix.
-
Log into MariaDB with the user root and the password set during the installation.
mysql -uroot -p -
Create the Zabbix database and set the charset to UTF-8.
create database zabbix character set utf8mb4 collate utf8mb4_bin; -
Create a user for the Zabbix server and set their password to
secure_zabbix_mariadb_password. Then, grant the user access to the previously created database, so they can use it.create user zabbix@localhost identified by 'secure_zabbix_mariadb_password'; grant all privileges on zabbix.* to zabbix@localhost; -
Flush the privileges to apply the new configuration.
flush privileges; -
Exit the MariaDB console.
quit; -
Set up the database schema and import the data into the database that was previously created. Since the file is compressed, use
zcat. When prompted, enter the password for the MariaDB user that was previously created. If the data is imported successfully, there will be no output.zcat /usr/share/zabbix-sql-scripts/mysql/server.sql.gz | mysql --default-character-set=utf8mb4 -uzabbix -p zabbix -
Disable the
log_bin_trust_function_creatorsoption after importing the schema into your database.mysql -uroot -p password mysql> set global log_bin_trust_function_creators = 0; mysql> quit; -
Set the password in the Zabbix configuration file by opening it in a text editor (i.e.
nano).nano /etc/zabbix/zabbix_server.confScroll down to this section.
### Option: DBPassword
#       Database password.
#       Comment this line if no password is used.
#
# Mandatory: no
# Default:
# DBPassword=
Uncomment the line
# DBPasswordby removing the leading hash and setting the password (DBPassword=secure_zabbix_mariadb_password) for the Zabbix MariaDB user. Then save the file and quit the text editor.
Configuring Nginx
-
Create an Nginx configuration file for the Zabbix web interface and open it in a text editor. Make sure to replace
zabbix.example.comwith the hostname of your Instance.nano /etc/nginx/sites-available/zabbix.example.com -
Copy the following content into the configuration file.
server { listen 8080; server_name zabbix.example.com; root /usr/share/zabbix; index index.php; location = /favicon.ico { log_not_found off; } location / { try_files $uri $uri/ =404; } location /assets { access_log off; expires 10d; } location ~ /\.ht { deny all; } location ~ /(api\/|conf[^\.]|include|locale) { deny all; return 404; } location /vendor { deny all; return 404; } location ~ [^/]\.php(/|$) { fastcgi_pass unix:/var/run/php/zabbix.sock; fastcgi_split_path_info ^(.+\.php)(/.+)$; fastcgi_index index.php; fastcgi_param DOCUMENT_ROOT /usr/share/zabbix; fastcgi_param SCRIPT_FILENAME /usr/share/zabbix$fastcgi_script_name; fastcgi_param PATH_TRANSLATED /usr/share/zabbix$fastcgi_script_name; include fastcgi_params; fastcgi_param QUERY_STRING $query_string; fastcgi_param REQUEST_METHOD $request_method; fastcgi_param CONTENT_TYPE $content_type; fastcgi_param CONTENT_LENGTH $content_length; fastcgi_intercept_errors on; fastcgi_ignore_client_abort off; fastcgi_connect_timeout 60; fastcgi_send_timeout 180; fastcgi_read_timeout 180; fastcgi_buffer_size 128k; fastcgi_buffers 4 256k; fastcgi_busy_buffers_size 256k; fastcgi_temp_file_write_size 256k; } } -
Create a symlink to activate the new server block.
ln -s /etc/nginx/sites-available/zabbix.example.com /etc/nginx/sites-enabled/ -
Check the spelling syntax of the Nginx configuration.
nginx -t -
If no errors were detected, restart Nginx to activate the new configuration.
systemctl restart nginx.service -
Start the Zabbix service and enable it to be started automatically during the system startup.
systemctl restart zabbix-server zabbix-agent nginx php8.1-fpm && systemctl enable zabbix-server zabbix-agent nginx php8.1-fpm
Configuring the Zabbix web interface
- Type the domain name of your Zabbix Instance (e.g.
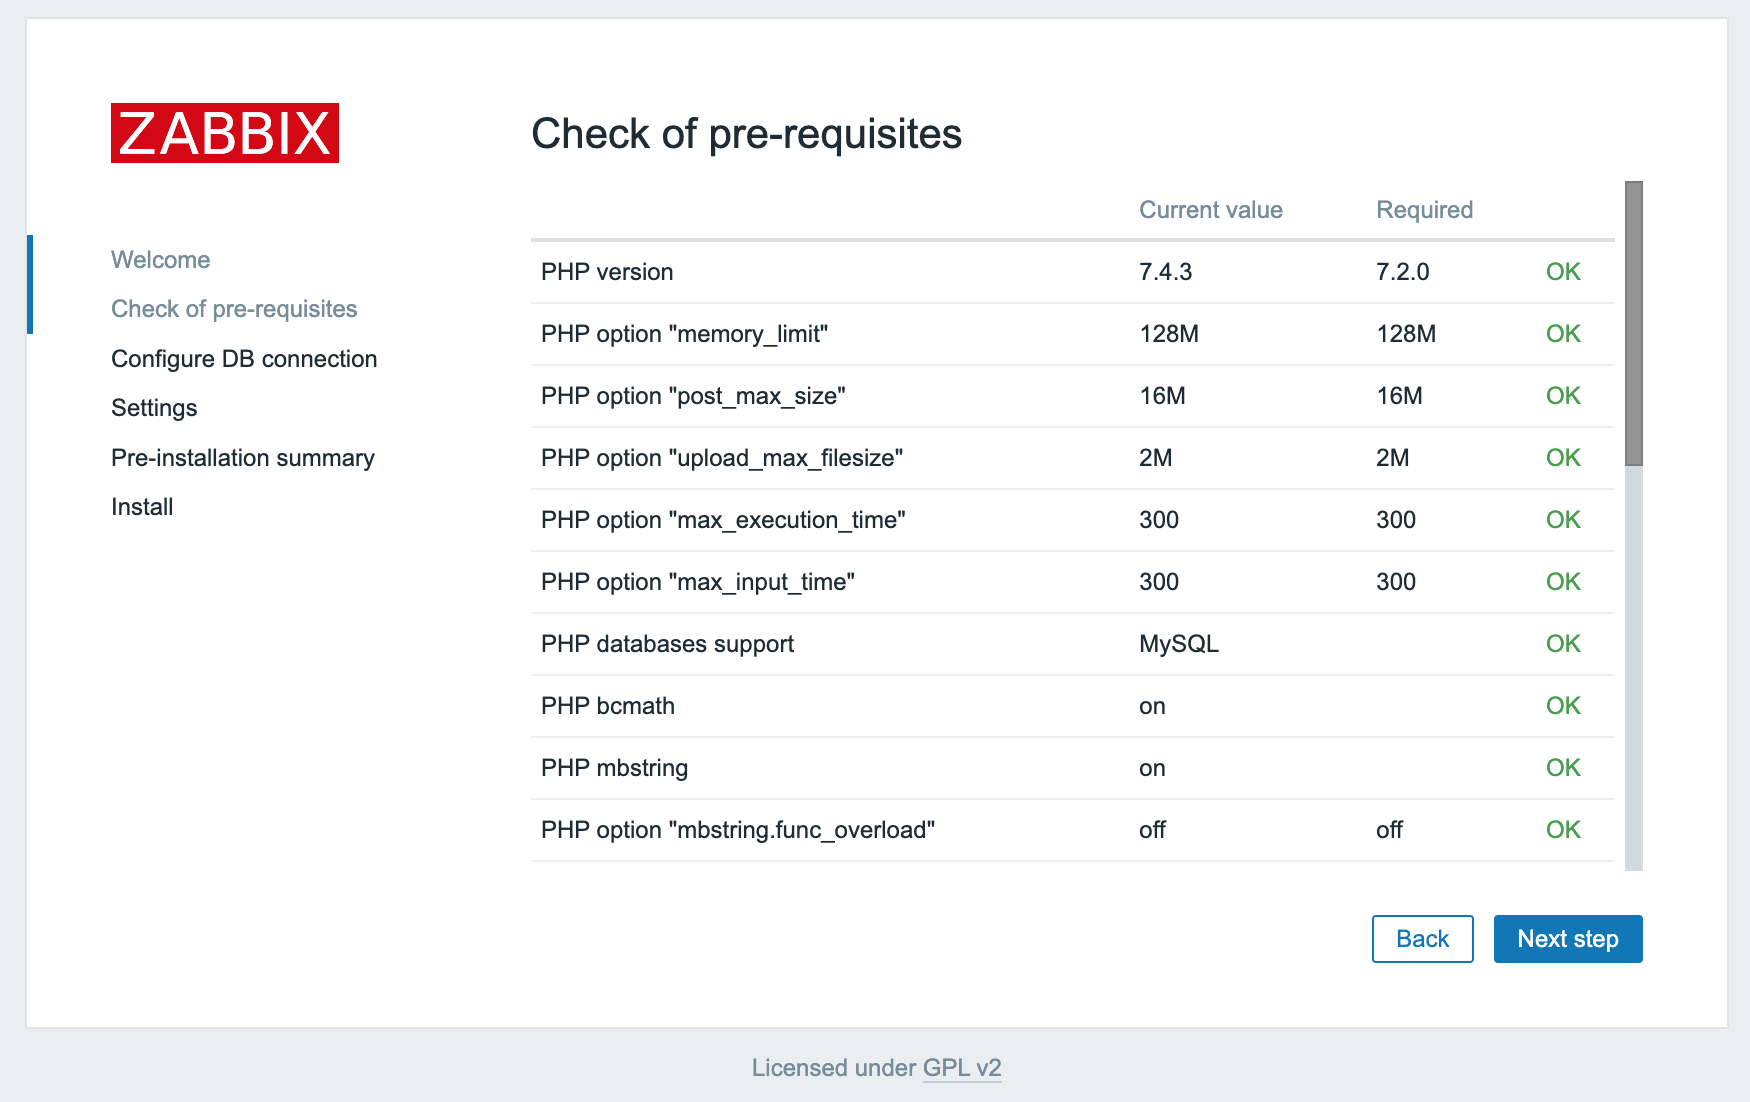
http://zabbix.example.com:8080) in a web browser and open the page. The Installation wizard displays. Click Next step to launch it.A check of pre-requirements displays, all of the values must have the status OK.
- Click Next step to continue.
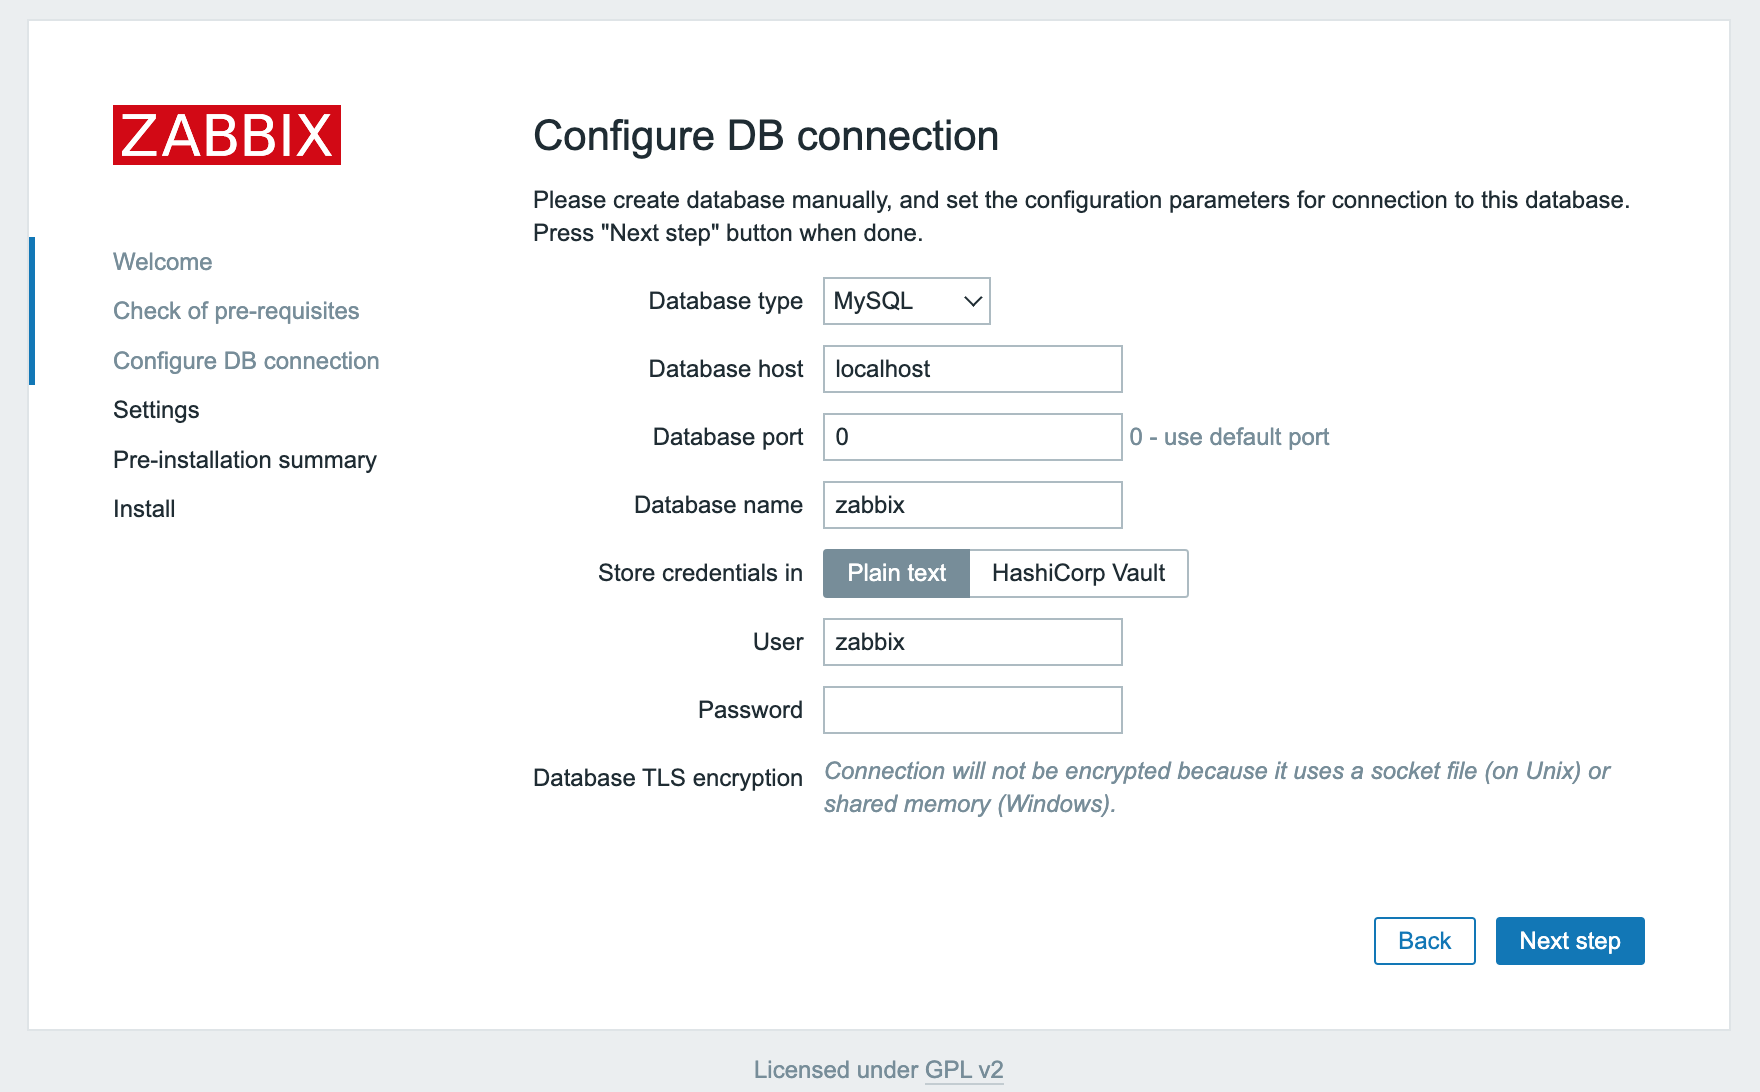
- Enter the MariaDB (MySQL) database information. They are already configured for the Zabbix server, but the web interface requires them too. Click Next step once the information is filled in the form.
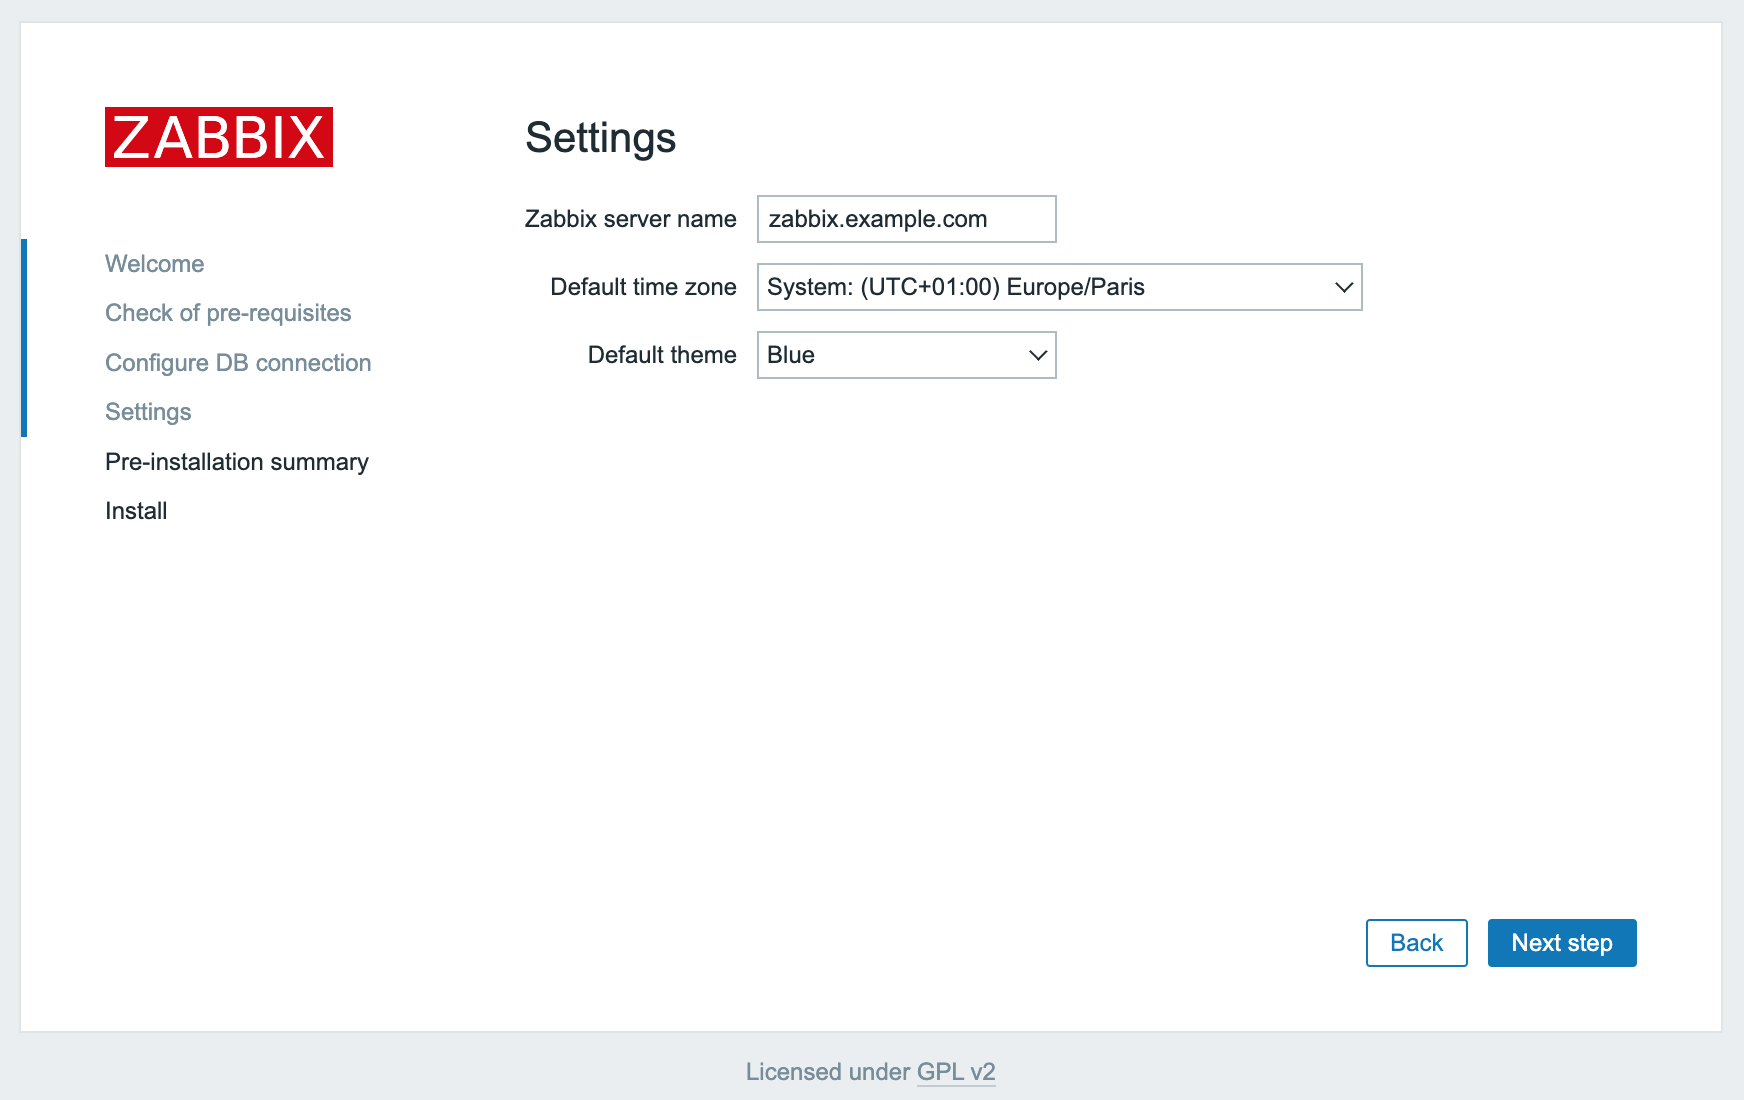
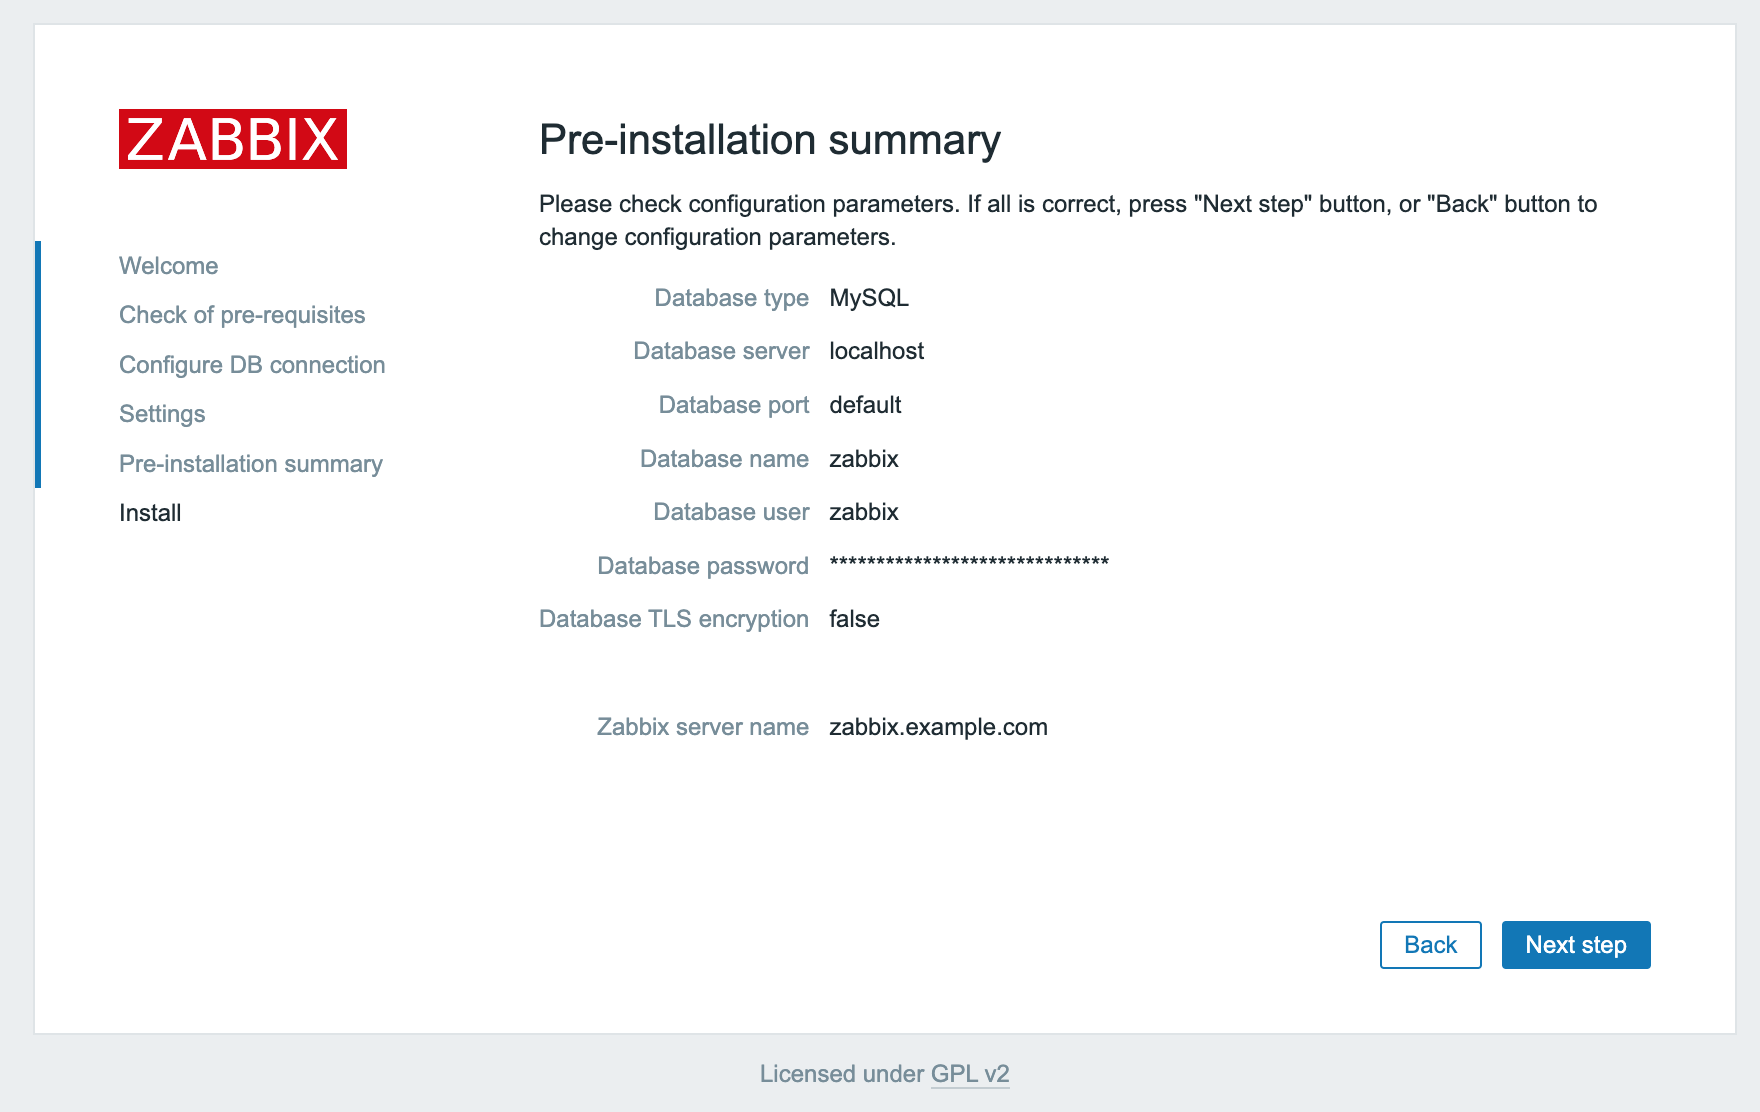
- Click Next step to continue. A pre-installation summary displays.
- Check that all given information is correct and click Next step to continue.
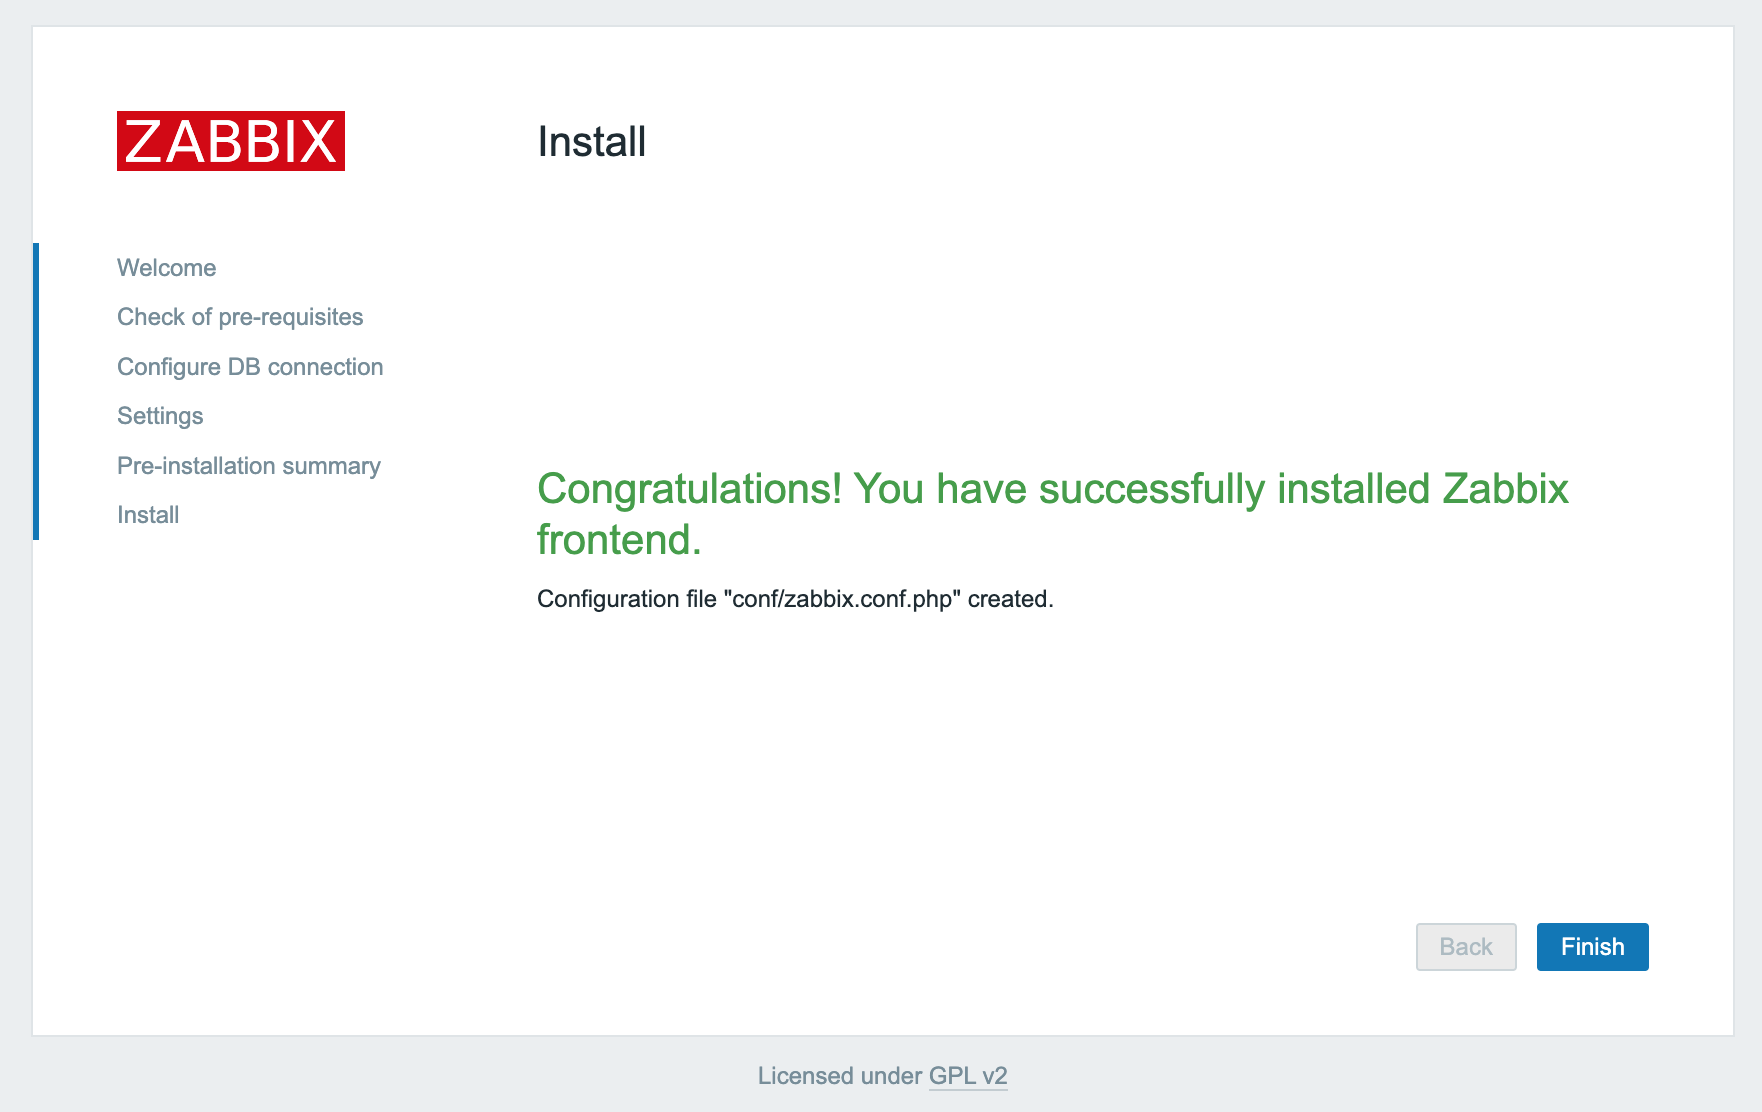
- Click Finish to complete the installation of the Zabbix web interface.
Configuring Zabbix agent
-
Log into the second Instance via SSH.
-
Download and install the repository configuration. As on the server, the Zabbix repository needs to be added to apt, to be able to use the latest release of the tool.
wget https://repo.zabbix.com/zabbix/6.2/ubuntu/pool/main/z/zabbix-release/zabbix-release_6.2-4%2Bubuntu22.04_all.deb dpkg -i zabbix-release* -
Update the APT package index.
apt update -
Install
zabbix-agent.apt install zabbix-agent -
Generate a pre-shared key (PSK) to secure the connection between server and agent.
sh -c "openssl rand -hex 32 > /etc/zabbix/zabbix_agentd.psk" && cat /etc/zabbix/zabbix_agentd.pskAn output as the following displays. Take note of it, as it will be required later.
01134cd49a5a27cc07d8469ebe9610841ce4062337d7cbaa337a4290682b6acc -
Open the Zabbix Agent configuration file in a text editor (i.e.
nano).nano /etc/zabbix/zabbix_agentd.conf -
Scroll down until the following block displays on the screen.
### Option: Server
#       List of comma delimited IP addresses, optionally in CIDR notation, or DNS names of Zabbix servers and $
#       Incoming connections will be accepted only from the hosts listed here.
#       If IPv6 support is enabled then '127.0.0.1', '::127.0.0.1', '::ffff:127.0.0.1' are treated equally
#       and '::/0' will allow any IPv4 or IPv6 address.
#       '0.0.0.0/0' can be used to allow any IPv4 address.
#       Example: Server=127.0.0.1,192.168.1.0/24,::1,2001.db8::/32,zabbix.example.com
#
# Mandatory: yes, if StartAgents is not explicitly set to 0
# Default:
# Server=

Server=127.0.0.1
Replace
127.0.0.1with the IP of the Zabbix server instance. -
Scroll down further in the configuration file until the
TLSConnectblock displays on the screen.### Option: TLSConnect # How the agent should connect to server or proxy. Used for active checks. # Only one value can be specified. # unencrypted - connect without encryption # psk - connect using TLS and a pre-shared key # cert - connect using TLS and a certificate # # Mandatory: yes, if TLS certificate or PSK parameters are defined (even for 'unencrypted' connection) # Default: # TLSConnect=unencryptedUncomment the line
# TLSConnect=unencryptedand modify it as follows.TLSConnect=psk. -
Scroll down to the
TLSAcceptblock which manages incoming connections.### Option: TLSAccept # What incoming connections to accept. # Multiple values can be specified, separated by commas. # unencrypted - accept connections without encryption # psk - accept connections secured with TLS and a pre-shared key # cert - accept connections secured with TLS and a certificate # # Mandatory: yes, if TLS certificate or PSK parameters are defined (even for 'unencrypted' connection) # Default: # TLSAccept=unencryptedUncomment the line
# TLSAccept=unencryptedand modify it as follows:TLSAccept=psk. -
Scroll down to the
TLSPSKIdentityblock in the configuration file.### Option: TLSPSKIdentity # Unique, case sensitive string used to identify the pre-shared key. # # Mandatory: no # Default: # TLSPSKIdentity=Uncomment the last line of the block and set a unique name to identify the PSK used:
TLSPSKIdentity=ZabbixPSK-01. This value is used as PSK ID when adding the host through the Zabbix web interface. -
Scroll down to the
TLSPSKFileblock in the configuration file to provide the file path to the key generated in a previous step.### Option: TLSPSKFile # Full pathname of a file containing the pre-shared key. # # Mandatory: no # Default: # TLSPSKFile=Uncomment the last line of the block and set the path to the PSK file:
TLSPSKFile=/etc/zabbix/zabbix_agentd.psk. Then save the file and exit the editor. -
Restart the
zabbix-agentservice and enable it to start automatically during the system boot.systemctl restart zabbix-agent.service systemctl enable zabbix-agent.service -
If
ufwis installed and active on the Instance, allow traffic on port 10050.ufw allow 10050/tcp
Adding a host to Zabbix
- Open a web browser and navigate to your Zabbix server Instance (i.e.
http://zabbix.example.com/). Enter the Username Admin and Password zabbix, then click Sign in. You are logged in and the Zabbix dashboard displays.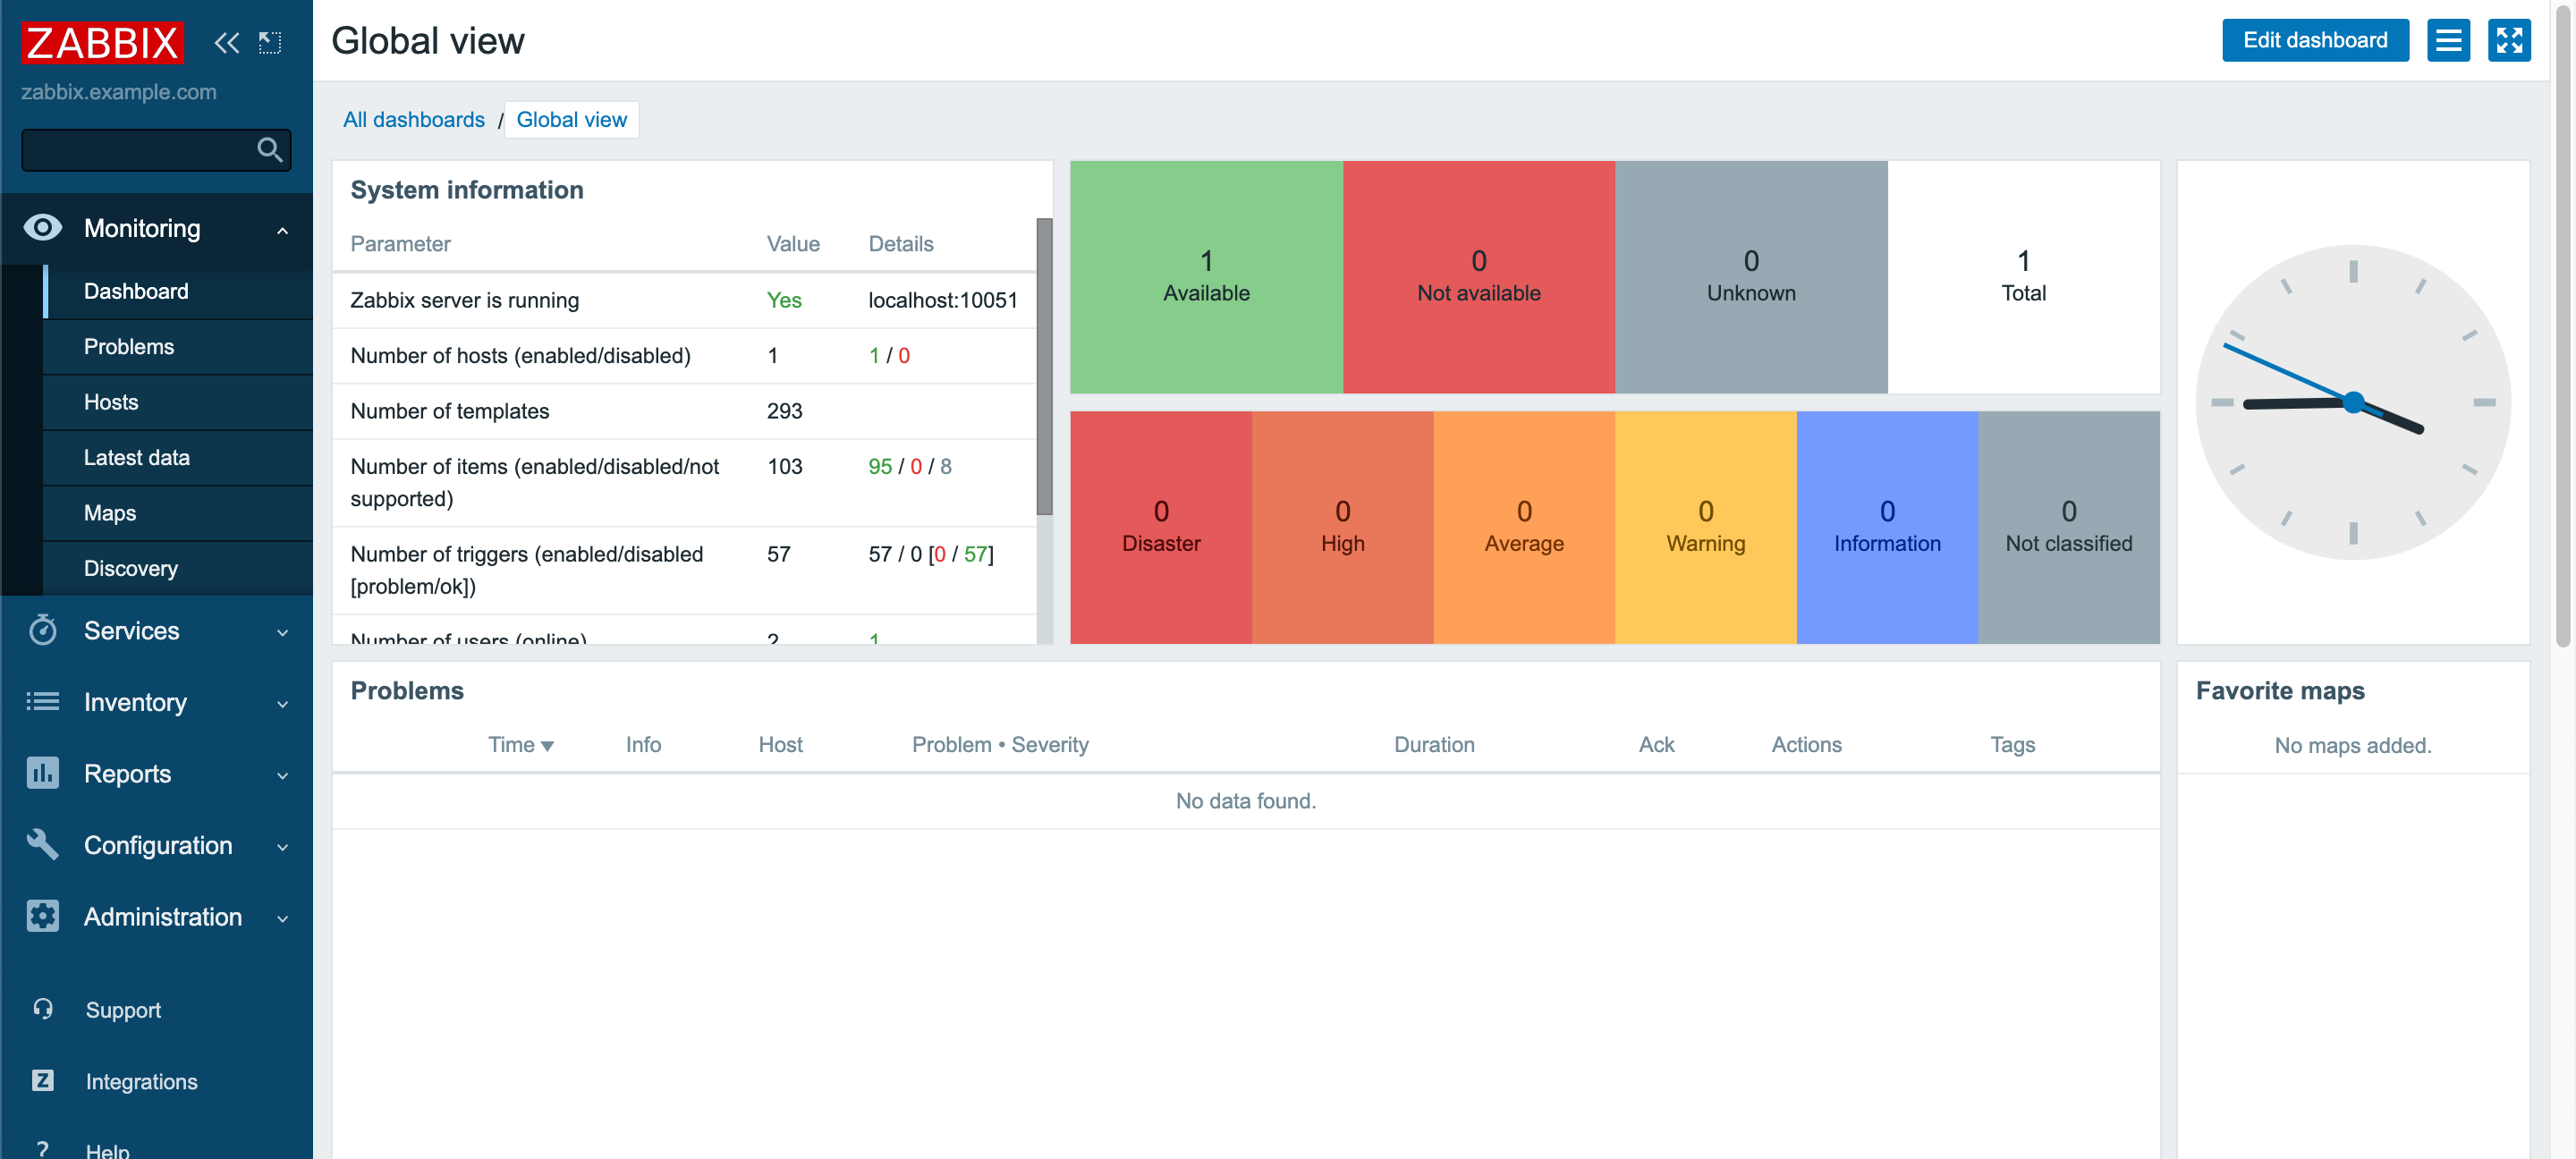
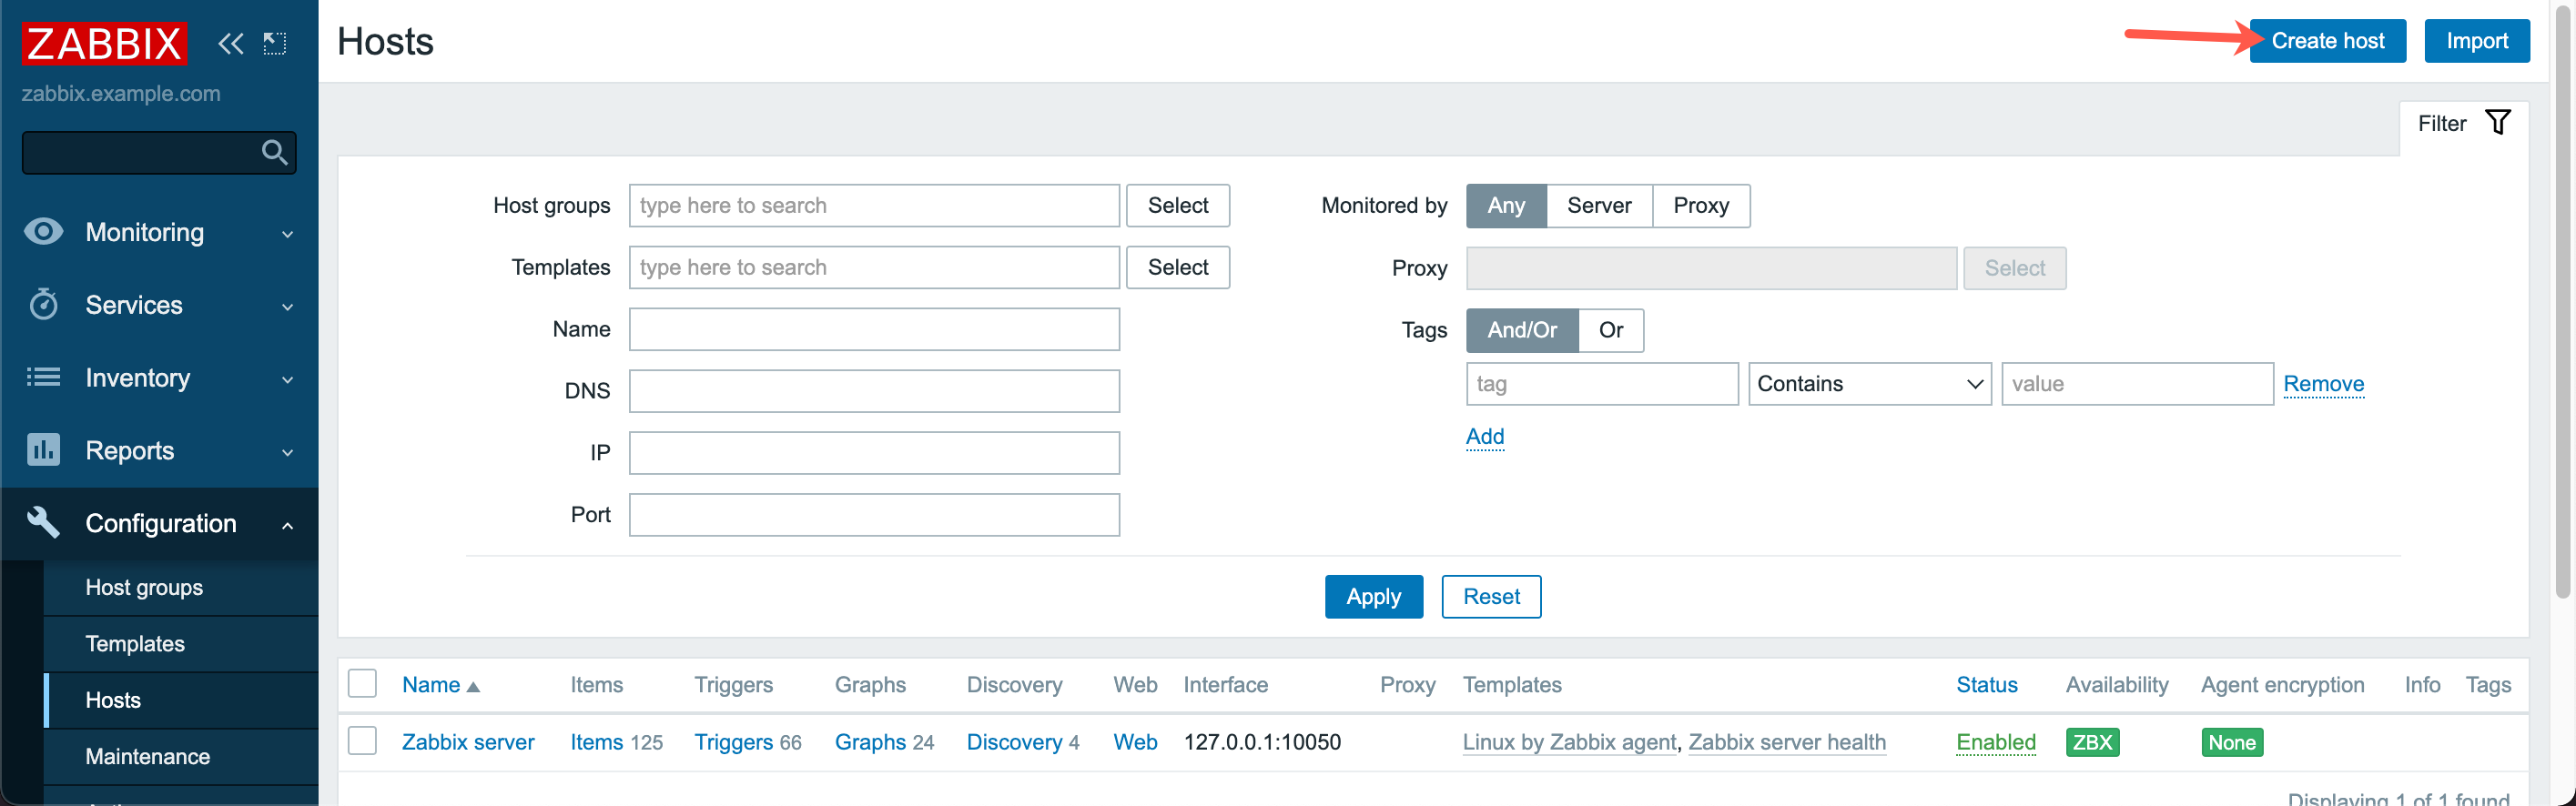
- Click Configuration, then Hosts. On the hosts page, click Create Host to add the second Instance.
- Enter the Host name of the second Instance and its IP address. Optionally one or several groups can be chosen to bundle Instances in groups.
- Click Templates to choose a configuration template for the instance. Select
Templates/Operating systems->Linux by Zabbix agentand click Select.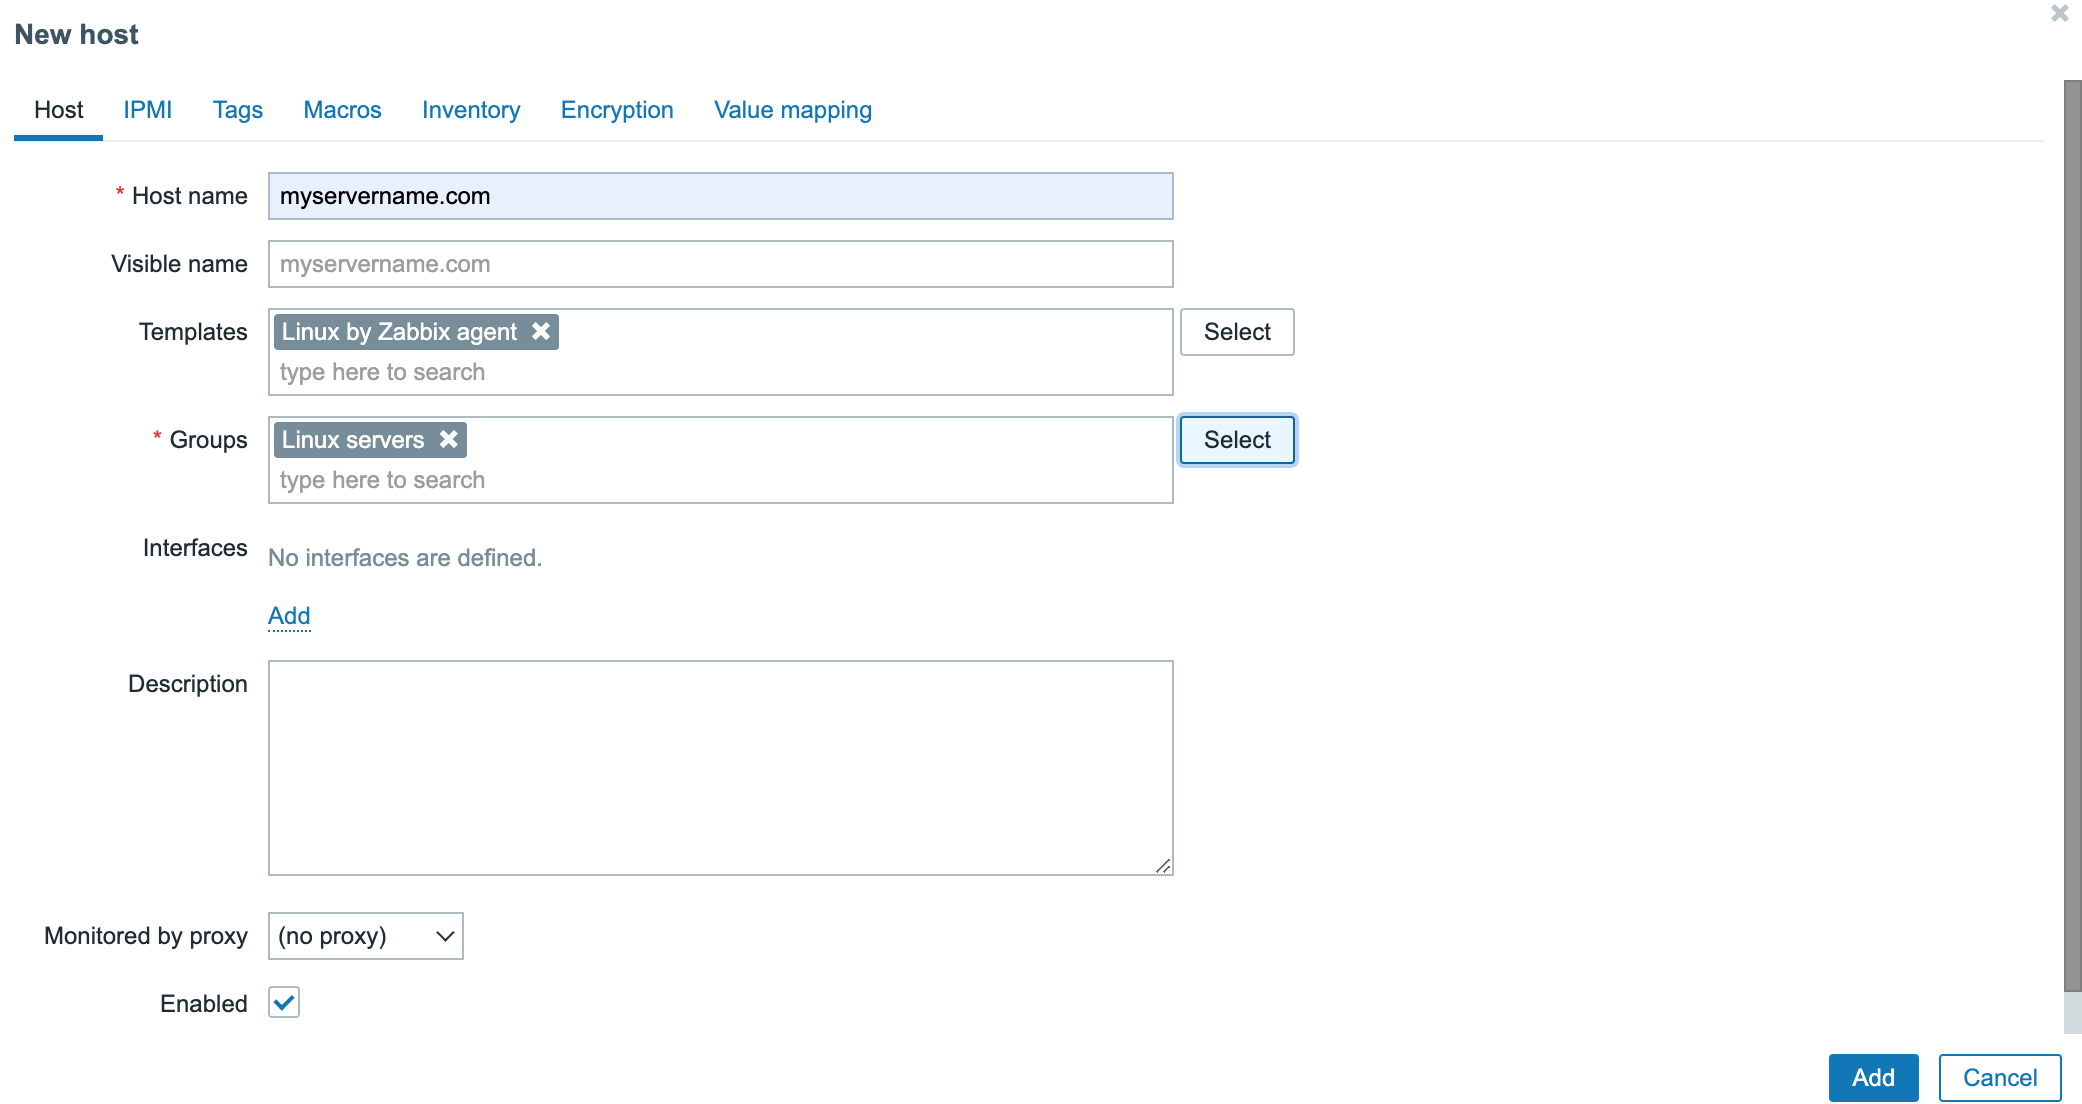
- Click the Encryption tab and set PSK for both Connections to host and Connections from host. Set PSK identity to the value of the
TLSPSKIdentityconfigured in the Zabbix Agent configuration (i.e. ZabbixPSK-01) and set the PSK value to the key generated during the configuration of the Agent. Once set, click Add at the bottom of the page to add the Instance to Zabbix.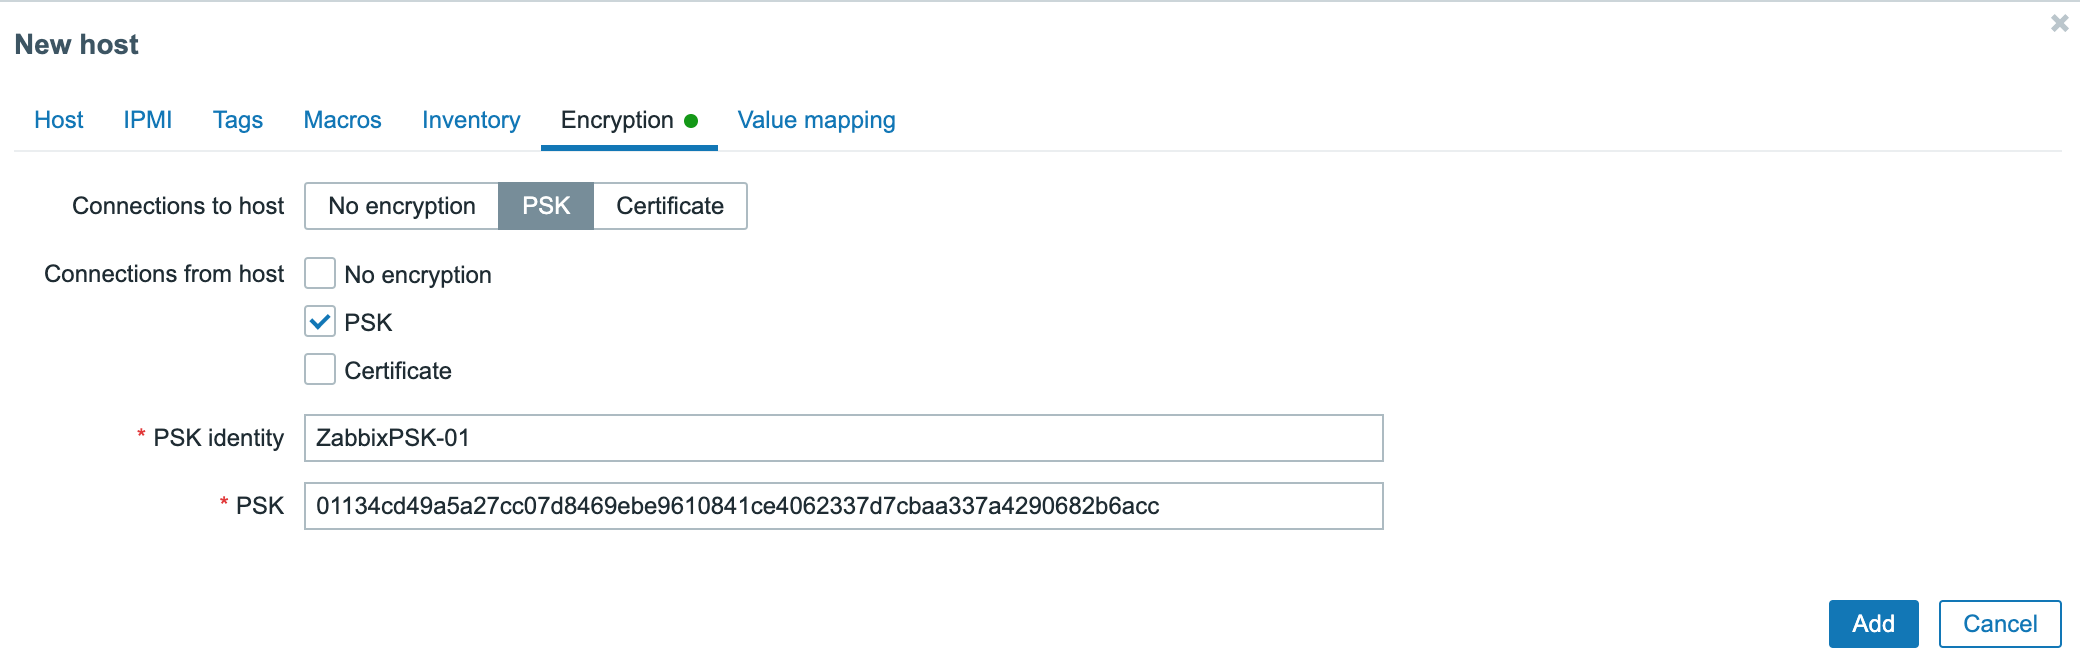
- Once added, wait for about one minute before reloading the server list. The new Instance appears and the labels ZBX and PSK indicate that the Zabbix agent is running on the Instance and that the connection is encrypted with a pre-shared key.
Adding users
-
Click Administration in the navigation bar on the top of the page, then on Users
-
Click Create user to create a new user account.
-
Fill in the details of the new user. Required information are.
- Alias - The login of the user.
- Name - The first name of the user.
- Surname - The family name of the user.
- Groups - The groups to which the user belongs. Choose Zabbix Administrators to create a new admin user.
- Password and Password confirmation.
All other values are already pre-set in working condition.
Once all information is set, click Add to create the user.
Configuring email notifications
Zabbix proposes a wide range of notification plugins including emails, jabber, SMS and many more to get alerted in case of an issue.
- To configure email notifications, click Administration, then on Media types in the navigation bar on the top of the page. A list of all pre-configured notification options displays.
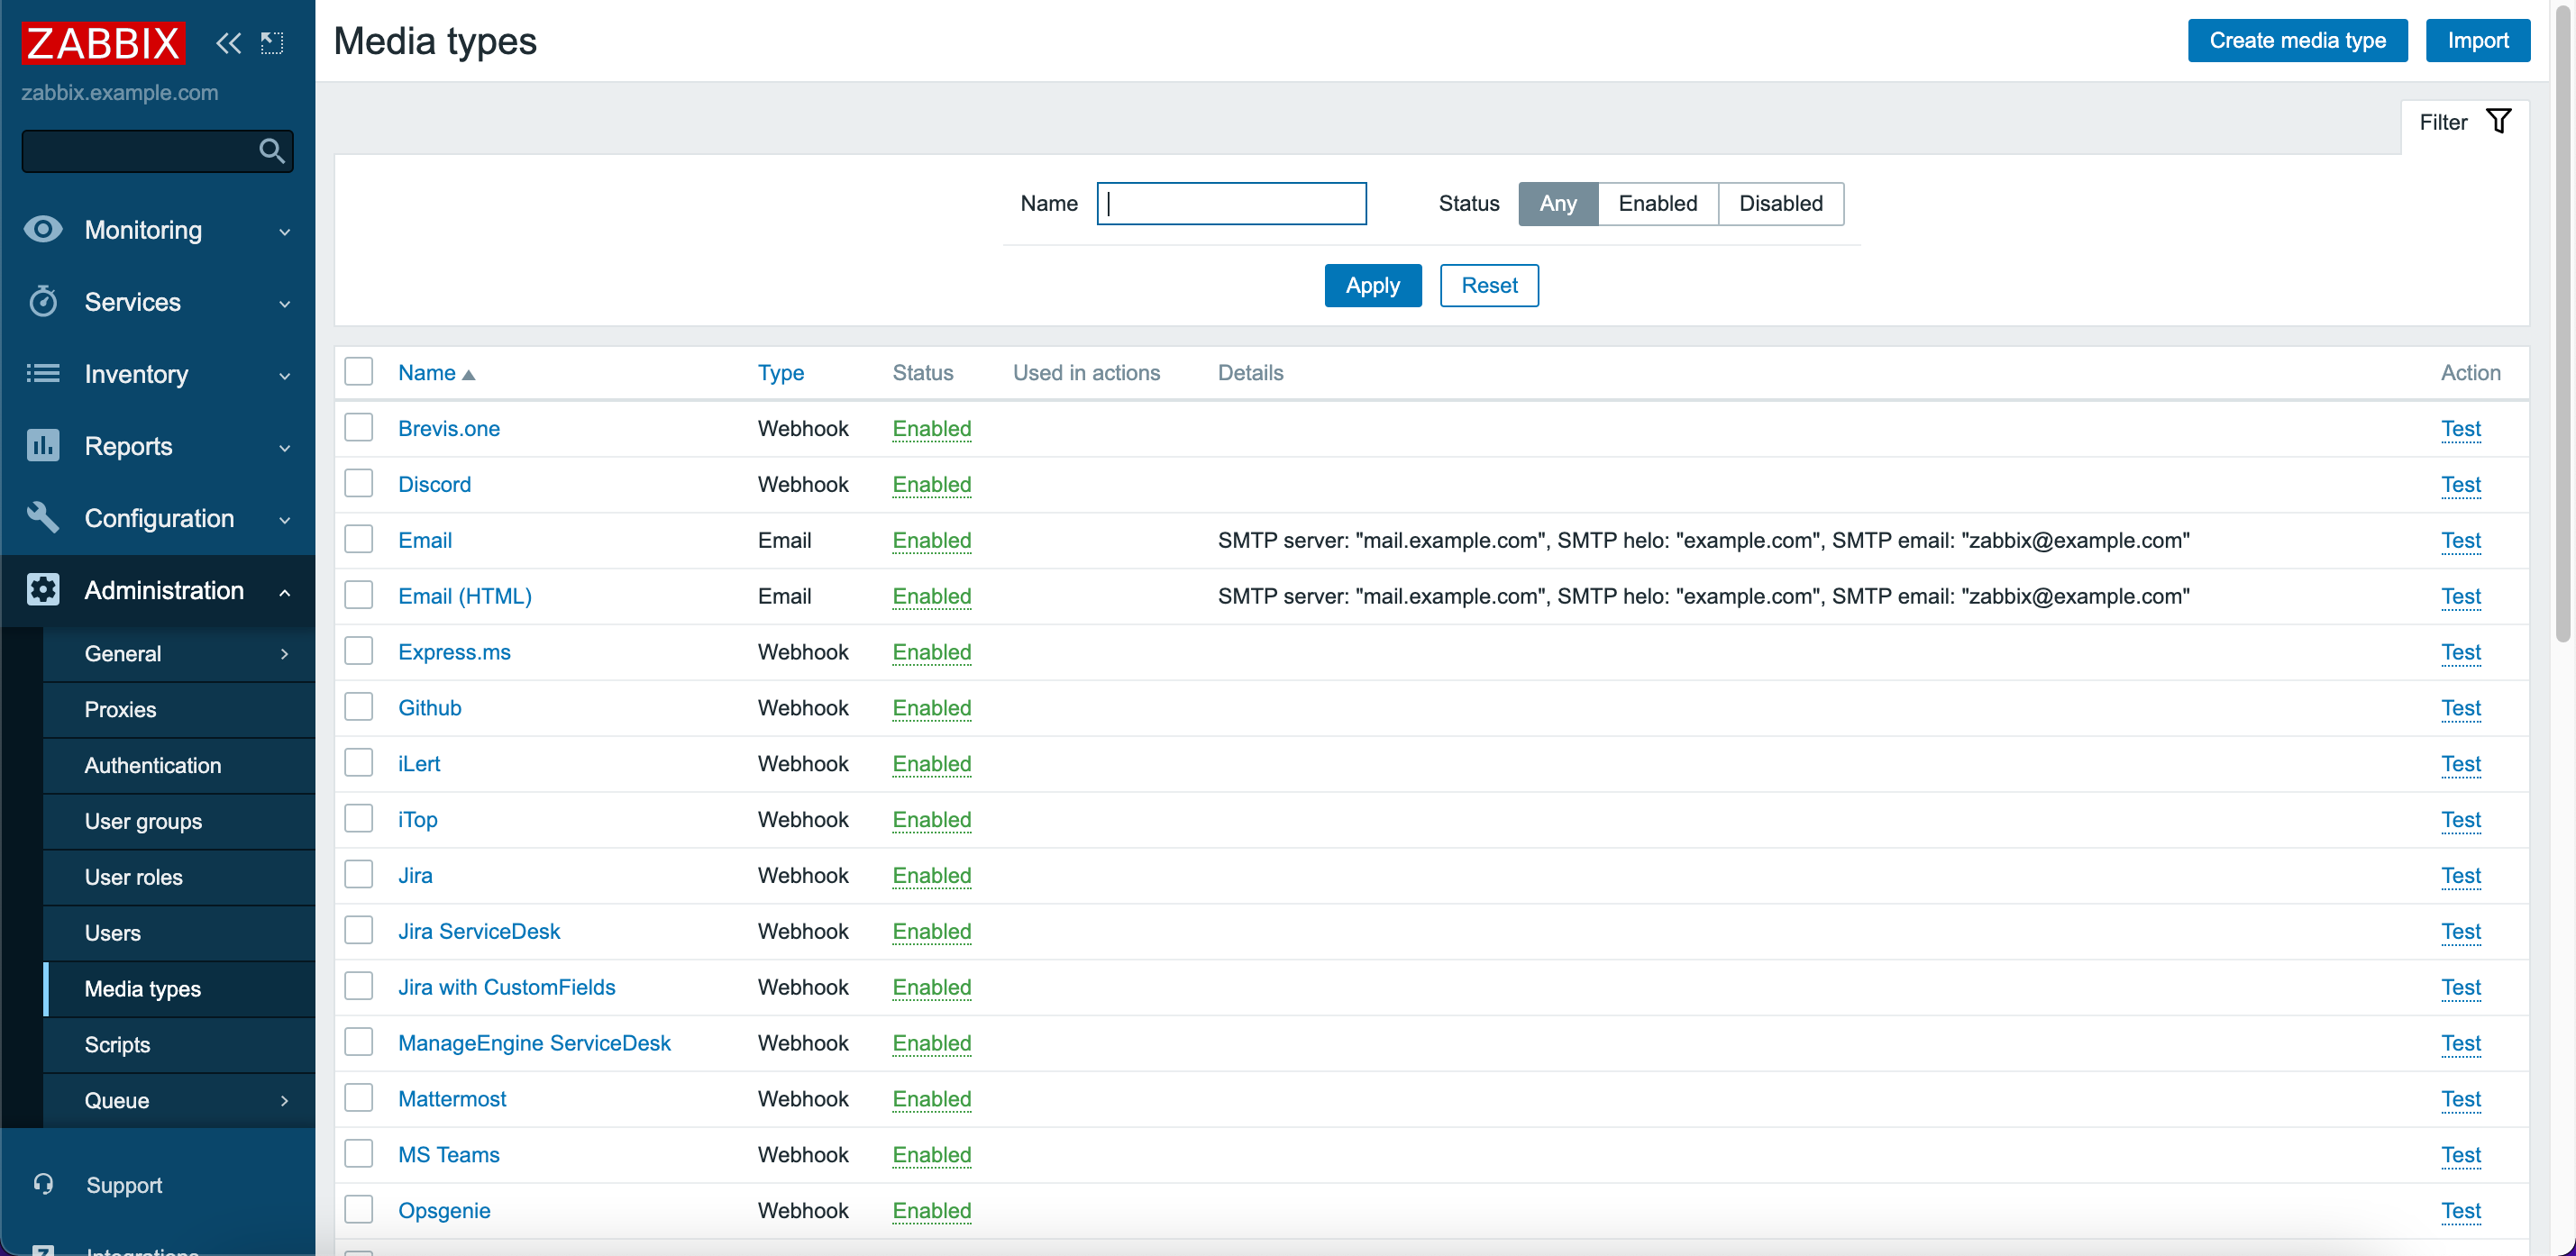
- Click Email to edit the settings. Enter the SMTP credentials of your email provider and update the configuration by clicking on Update.
- Click Administration in the navigation bar on the top of the page, then on Users
- Click the Alias of the user to modify.
- Click the Media tab, then on Add to configure a new notification
- Enter the destination email address and notification time ranges, then click Add.
- Click Update to make the modifications effective. An email notification is being sent on each event.
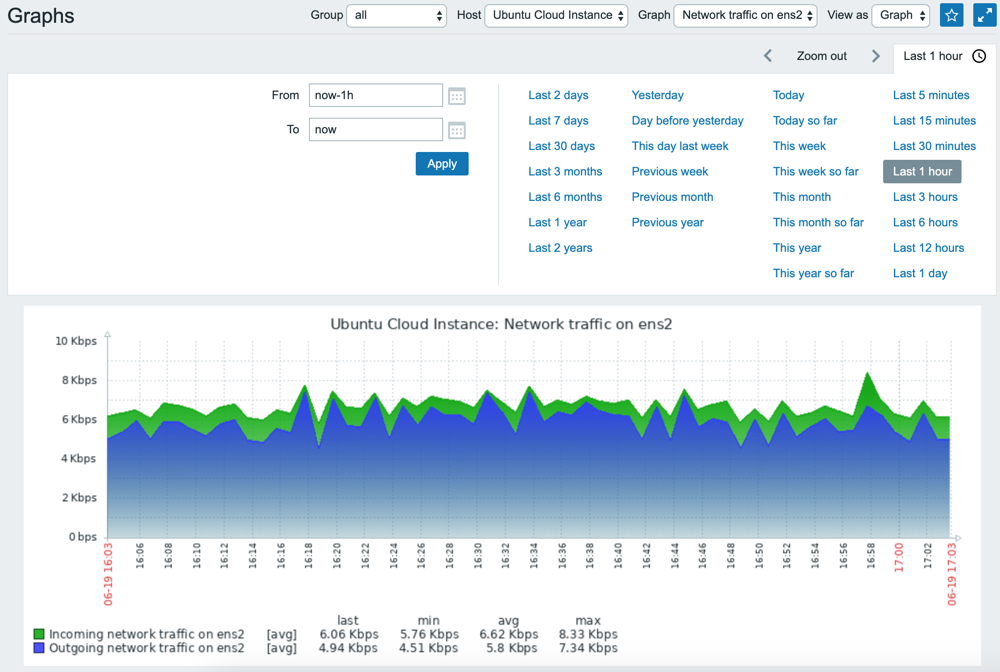
Displaying status graphs
Zabbix collects status information of the Instances and generates status graphs from them.
- Click Monitoring, then on Graphs in the navigation bar at the top of the page.
- Select the Instance and the services to display, then choose the desired time frame for the graph.
This setup allows basic monitoring of Instances. For more information on how to monitor devices and services with Zabbix, refer to the official documentation.
Visit our Help Center and find the answers to your most frequent questions.
Visit Help Center