Setting up a private mesh VPN with WireGuard®
WireGuard is a modern VPN (Virtual Private Network) software. It is designed to be cross-platform and run almost anywhere. Compared to other similar software, it is faster, more secure, and simpler.
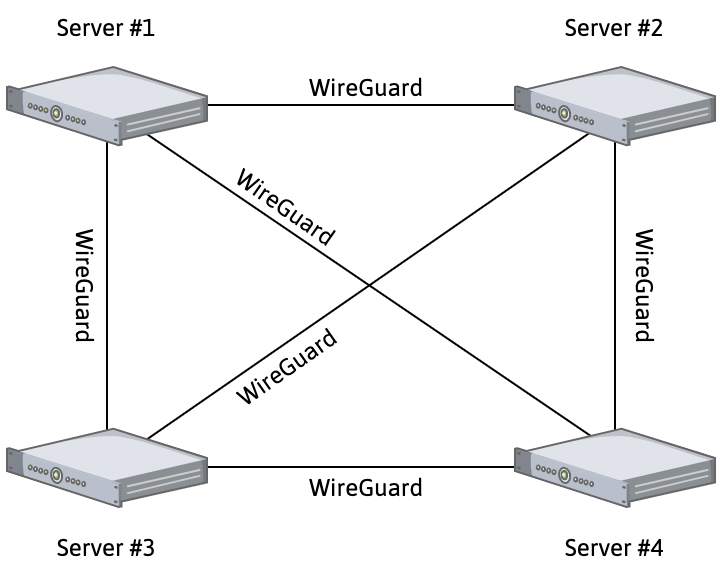
In this tutorial, we show you how to use WireGuard to spin up a private mesh network to create a secure private connection between your different servers and Instances. A mesh network allows your devices to communicate with each other using a Virtual Private Network without the need for a central server:
We use two Ubuntu Instances, one located in the PAR-1 region, and the other located in the AMS-1 region, and create a virtual network between them.
Before you start
To complete the actions presented below, you must have:
- A Scaleway account logged into the console
- Owner status or IAM permissions allowing you to perform actions in the intended Organization
- An SSH key
- 2 Instances running a Linux kernel ≥ 3.10
Downloading and installing WireGuard
-
Log into each of your Instances using SSH:
ssh root@my.compute.instance.ip -
Update and upgrade your system, install the kernel headers for your version, and install WireGuard using
apt:apt update && apt upgrade -y apt install linux-headers-$(uname --kernel-release) # installs the right kernel headers for your version apt install wireguard -
Run
wgto make sure WireGuard is installed. You should get no output, indicating that WireGuard was correctly installed. You can runmodprobe wireguardto check that the WireGuard kernel module has loaded. Depending on your system configuration, a reboot might be required to activate thewireguardmodule. -
Generate the public and private keys for WireGuard:
cd /etc/wireguard umask 077 wg genkey | tee privatekey | wg pubkey > publickey -
Run
cat privatekeyandcat publickeyfor both Instances to retrieve their private and public keys. An output similar to the following displays:
root@scw-instance-ams1:/etc/wireguard#  cat privatekey
uJHRlma4LK8maULzMHWATJtGLs9yPvv+/+Rqj8UKU3k=
root@scw-instance-ams1:/etc/wireguard# cat publickey
ioytQhwtItPx0mnAyCRBaarxL5x5a3q5dUg2mthdlTw=
Configuring WireGuard manually
Smaller VPNs can be configured using the wg0.conf configuration file of WireGuard. The following parameters are set in the configuration file:
192.168.1.1is a randomly chosen private IP address for the VPN interface of the virtual Instances located inPAR-1.192.168.1.2is a randomly chosen private IP address for the VPN interface of the virtual Instances located inAMS-1.- The
Endpointis the public IP address of every other Instance. 52345is a randomly chosen UDP port number used for the communication of the VPN.
On the first Instance
Create the directory in which you will save your file using the following command mkdir -p /etc/wireguard.
Create the file /etc/wireguard/wg0.conf using the following command: nano /etc/wireguard/wg0.conf and paste the following content. Replace the values in the brackets as necessary:
[Interface]
PrivateKey = <PAR-1-instance-private-key>
Address = 192.168.1.1
ListenPort = 52345

[Peer]
PublicKey = <AMS-1-instance-public-key>
AllowedIPs = 192.168.1.2
Endpoint = <AMS-1-instance-public-IP>:52345
Your file should look like the following:
[Interface]
PrivateKey = IMR/CZzu5hVJNPqWXhj+H4cHUbCPlvn91VwN3jVNOGw=
Address = 192.168.1.2
ListenPort = 52345

[Peer]
PublicKey = vIsJ+ZXVc8t8mkkpUIaqHKu9hE8PERT0lxb5nowDkx8=
AllowedIPs = 192.168.1.1
Endpoint = 163.172.141.6:52345
On the second Instance:
Create the directory in which you will save your file using the following command mkdir -p /etc/wireguard.
Create the file /etc/wireguard/wg0.conf using the following command: nano /etc/wireguard/wg0.conf and paste the following content. Replace the values in the brackets as necessary:
[Interface]
PrivateKey = <AMS-1-instance-private-key>
Address = 192.168.1.2
ListenPort = 52345

[Peer]
PublicKey = <PAR-1-instance-public-key>
AllowedIPs = 192.168.1.1
Endpoint = <PAR-1-instance-public-IP>:52345
Enabling the WireGuard VPN
-
Enable and start WireGuard on both Instances using
systemctl:systemctl enable wg-quick@wg0.service systemctl start wg-quick@wg0.service -
Test the VPN connection on each Instance using the
pingcommand:root@PAR-1:~# ping 192.168.1.2 PING 192.168.1.2 (192.168.1.2) 56(84) bytes of data. 64 bytes from 192.168.1.2: icmp_seq=1 ttl=64 time=2.87 ms 64 bytes from 192.168.1.2: icmp_seq=2 ttl=64 time=0.992 ms 64 bytes from 192.168.1.2: icmp_seq=3 ttl=64 time=1.37 ms 64 bytes from 192.168.1.2: icmp_seq=4 ttl=64 time=1.21 ms 64 bytes from 192.168.1.2: icmp_seq=5 ttl=64 time=1.57 ms ©64 bytes from 192.168.1.2: icmp_seq=6 ttl=64 time=1.43 ms --- 192.168.1.2 ping statistics --- 6 packets transmitted, 6 received, 0% packet loss, time 5008ms rtt min/avg/max/mdev = 0.992/1.577/2.873/0.607 msroot@AMS-1:~# ping 192.168.1.1 PING 192.168.1.1 (192.168.1.1) 56(84) bytes of data. 64 bytes from 192.168.1.1: icmp_seq=1 ttl=64 time=1.72 ms 64 bytes from 192.168.1.1: icmp_seq=2 ttl=64 time=1.45 ms 64 bytes from 192.168.1.1: icmp_seq=3 ttl=64 time=1.35 ms 64 bytes from 192.168.1.1: icmp_seq=4 ttl=64 time=1.35 ms 64 bytes from 192.168.1.1: icmp_seq=5 ttl=64 time=1.25 ms 64 bytes from 192.168.1.1: icmp_seq=6 ttl=64 time=1.44 ms --- 192.168.1.1 ping statistics --- 6 packets transmitted, 6 received, 0% packet loss, time 5008ms rtt min/avg/max/mdev = 1.257/1.429/1.724/0.148 msAs you can see, each Instance responds to the
pingcommand of the other peer, indicating that the VPN connection is active.
You can now transfer data between your Instances over a secure private network connection.
Automating configuration generation
When managing a large number of machines in a WireGuard mesh network, configuring them manually can be time-consuming. Several projects facilitate the automated generation of WireGuard configurations to manage your mesh networks with ease. We will use a Python script called WireGuard Mesh Configurator to generate the configurations for our Instances.
You can carry out the following steps on your local machine, or any Instance:
-
Make sure
git,python3-pip, andpython3are installed on your machine:apt install git python3-pip python3 libncurses-dev -y -
Clone the GitHub repository of the script you need for the configuration:
git clone https://github.com/k4yt3x/wg-meshconf -
Enter the script's directory and install the requirements for it:
cd wg-meshconf pip install 'wg-meshconf@git+https://github.com/k4yt3x/wg-meshconf.git' -
Create a new configuration:
wg-meshconf init -
Type
wg-meshconf addpeer <PEERNAME> --address=<SUBNET>to create a new peer. Make sure you replace the information between brackets as necessary.wg-meshconf addpeer peer1 --address=192.168.19.21/24Repeat this step for all peers in the mesh network.
-
Run
wg-meshconf showpeersto make sure your peers have been added correctly.┏━━━━━━━┳━━━━━━━━━━━━━━━━━━┳━━━━━━━━━━━━┳━━━━━━━━━━━━━━━━━━━━━━━━━━━━━━━━━━━━━━┓ ┃ Name ┃ Address ┃ ListenPort ┃ PrivateKey ┃ ├───────┼──────────────────┼────────────┼──────────────────────────────────────┤ │ peer1 │ 192.168.19.21/24 │ 51820 │ cLtiGRp0mGzVwnKVf9skY9mxYv78EtPA0x4… │ ├───────┼──────────────────┼────────────┼──────────────────────────────────────┤ │ peer2 │ 192.168.2.0/24 │ 51820 │ 4EzxxPIadfpQzIFE0dyPqLGoZrm49iHy04X… │ └───────┴──────────────────┴────────────┴──────────────────────────────────────┘ -
Use the following command to generate the configuration files for all peers
wg-meshconf genconfig. The configuration files will be named after the peers' names. By default, all configuration files are exported into a subdirectory namedoutput. -
Access a specific configuration file using the following commands:
cd output cat user1.conf -
Copy the created WireGuard configuration files to each Instance using any method you like (SFTP, FTPS, plain copy & paste, etc.). Make sure to store the configuration at
/etc/wireguard/wg0.confto be able to use thewg-quickcommand for express configuration. -
SSH into each of the Instance peers and configure WireGuard. We use the
wg-quickcommand to create an interface using our generated configuration and make it a service, so the interface will be configured automatically during system boot. Repeat this step on any of the peers.wg-quick up wg0 systemctl enable wg-quick@wg0.service
You have now configured a mesh network using WireGuard which allows your Instances to communicate between themselves via a private and encrypted connection. As there is no central server, the network will continue to work if one of the peers fails.
For more information about WireGuard, refer to the official documentation.
“WireGuard” is a registered trademark of Jason A. Donenfeld.
Visit our Help Center and find the answers to your most frequent questions.
Visit Help Center