How to use Private Networks with your Mac mini
Private Networks allow your Mac mini to communicate in an isolated and secure network with other Scaleway resources. This is an optional-billed feature for Mac mini.
When the feature is activated, each Mac mini can be connected to one or several Private Networks, letting you build your own network topologies. Private Networks’ built-in DHCP server manages the allocation of private IP addresses for Mac mini servers (and other resources) when they are attached to the network.
For full information about Scaleway Private Networks and VPC, see our dedicated documentation and best practice guide.
Before you start
To complete the actions presented below, you must have:
- A Scaleway account logged into the console
- Owner status or IAM permissions allowing you to perform actions in the intended Organization
- A Mac mini
How to enable the Private Networks feature
Before you can attach your Mac mini to a Private Network, you must enable the feature. This can be done during Mac mini creation or afterwards. These instructions show how to enable the feature after the creation of the Mac mini.
- Click Apple silicon in the Bare Metal section of the side menu. The Apple silicon splash page displays.
- Click the Mac mini you want to enable Private Networks on. The Mac mini's Overview page displays.
- In the Private Networks feature section, click Enable Private Networks to enable the feature. A pop-up displays, asking you to confirm that you want to enable Private Networks, and showing the estimated cost.
- Click Enable Private Networks.
Private Networks are enabled, and you are returned to your Mac mini's Overview page.
How to disable the Private Networks feature
You can disable the Private Networks feature at any time after activating it.
- Click Apple silicon in the Bare Metal section of the side menu. The Apple silicon splash page displays.
- Click the Mac mini you want to disable Private Networks on. The Mac mini's Overview page displays.
- In the Private Networks feature panel, use the toggle icon toggle button to disable the feature. A pop-up displays, asking you to confirm that you want to disable Private Networks.
- Click Disable Private Networks.
Private Networks are disabled, and you are returned to your Mac mini's Overview page. Any Private Networks previously attached to the Mac mini are now detached.
How to attach a Mac mini to a Private Network
- Click Apple silicon in the Bare Metal section of the side menu. The Apple silicon splash page displays.
- Click the Mac mini you want to attach to a Private Network. The Mac mini's Overview page displays.
- Click the Private Networks tab.
- Click + Attach to a Private Network. A pop-up displays.
- Select the Private Network you want to attach the Mac mini to. You can either auto-allocate an available IP from the Private Network's pool (default) or reserve a specific IP for your Mac mini using IPAM.
- Click Attach to Private Network.
The Mac mini is attached to the Private Network, and you are returned to the Private Networks tab. The IPv4 and the IPv6 addresses for the Mac mini on the Private Network are displayed, along with the ID of the VLAN interface that was created.
Once you have attached the resource, some manual configuration of the network interface is required. See the next section for full details.
How to configure the VLAN interface on your Mac mini for Private Networks
You must configure the virtual network interface on each Mac mini you have attached to a Private Network. Traffic from the public internet and traffic from a Private Network will pass through the same network interface of the Mac mini. We must therefore separate the traffic by adding a VLAN interface.
To configure the interface, you must connect to your Mac mini, either via SSH or the remote desktop, and carry out the instructions given.
Via SSH and networksetup
- Make a note of your Mac mini's VLAN ID. You can view this in the Scaleway console, in the Private Networks tab of the Mac mini in question.
- Connect to your Mac mini via SSH.
- Use the following command to bring up the interface. Ensure you replace
<VLAN_ID>with the VLAN_ID from step one.sudo networksetup -createVLAN pn en0 <VLAN_ID> - Check that the interface has been brought up with the following command:
You should see a response similar to the following:
sudo networksetup -listVLANsVLAN User Defined Name: pn Parent Device: en0 Device ("Hardware" Port): vlan0 Tag: 3548
No configuration is required for your Mac mini's IP address on the Private Network, as this is automatically managed by Scaleway DHCP. You can view the IP address in the Scaleway console, in the Mac mini's Private Networks tab.
Via remote desktop
- Make a note of your Mac mini's VLAN ID. You can view this in the Scaleway console, in the Private Networks tab of the Mac mini in question.
- Access the Mac mini's remote desktop.
- Go to System Settings > Network, then click ...v and select Manage Virtual Interfaces from the menu that displays.

- Click + > New VLAN to add a new virtual interface.

- Enter a VLAN name of your choice, the VLAN ID from step 1 in the Tag field, and Ethernet as the interface. Click Done.
The VLAN interface is created. You can check its status in the Network tab, and see its full details by clicking on it.
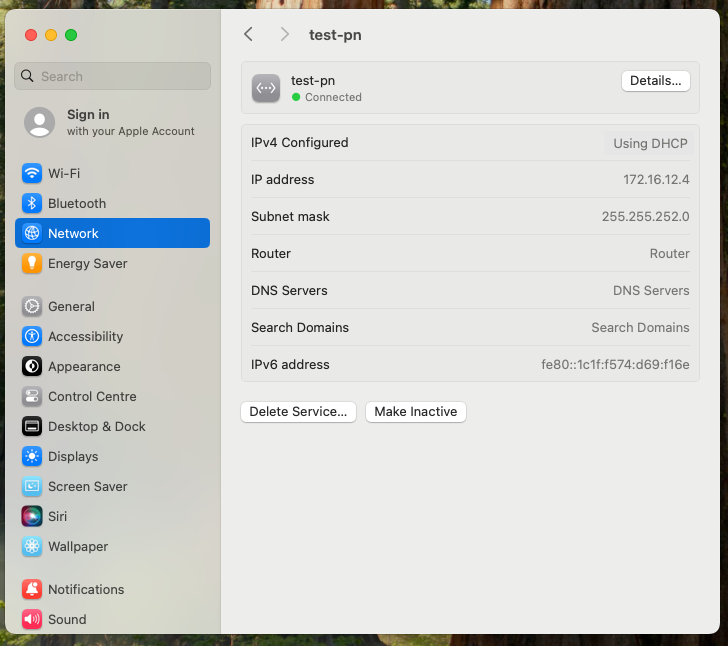
No configuration is required for your Mac mini's IP address on the Private Network, as this is automatically managed by Scaleway DHCP.
How to detach a Mac mini from a Private Network
- Click Apple silicon in the Bare Metal section of the side menu. The Apple silicon splash page displays.
- Click the Mac mini you want to detach from a Private Network. The Mac mini's Overview page displays.
- Click the Private Networks tab.
- Click the unlink icon unlink icon next to the Private Network you want to detach from the Mac mini. A pop-up displays, asking you to confirm that you want to detach the resource.
- Click Detach resource.
The Mac mini is detached from the Private Network, and you are returned to the Private Networks tab. You can reattach it at any time.