Installing and Configuring WireGuard® on Linux as a VPN server
WireGuard® is a VPN (Virtual Private Network) software designed for simplicity and efficiency. It is distinguished by its small codebase, which aims to reduce complexity and potential security vulnerabilities, and offers faster performance compared to some other VPN solutions, due to its streamlined design.
In terms of security, WireGuard uses modern cryptographic protocols, including Curve25519, ChaCha20, and Poly1305, focusing on established cryptographic methods.
It is compatible with various platforms, such as Windows, macOS, Linux, iOS, and Android, making it versatile for different users and environments.
Before you start
To complete the actions presented below, you must have:
- A Scaleway account logged into the console
- Owner status or IAM permissions allowing you to perform actions in the intended Organization
- An SSH key
- An Instance configured with local boot and running on a Linux kernel ≥ 3.10
Installing and Configuring WireGuard on the server
The installation process is based on Ubuntu. Documentation regarding other platforms is available on the WireGuard website.
- Connect to your Instance via SSH.
- Install Linux kernel headers and WireGuard.
sudo apt update && apt upgrade -y
sudo apt install linux-headers-$(uname --kernel-release) # installs the right kernel headers for your version
sudo apt install wireguard
Once WireGuard is installed, you can check that the installation succeeded by running: wg. No output means that the installation has succeeded. To check that the WireGuard kernel module has loaded you can run sudo modprobe wireguard.
Generating public and private keys on the server
WireGuard relies on public/private key authentication (asymmetric cryptography). You must create these keys, which can be done with the wg genkey and wg pubkey subcommands.
- Create a directory to store the keys:
mkdir -p /etc/wireguard/keys - Create the public and private key. The creation of the private key is done with
wg genkeyand the public key is generated by piping it intowg pubkey.umasktells the system to set the permissions of the new files to600.cd /etc/wireguard/keys umask 077 wg genkey | tee privatekey | wg pubkey > publickey
Configuring WireGuard server
The first step is to choose an IP range that will be used by the server. The private IP ranges defined by the RFC 1918 are the following:
10.0.0.0/8172.16.0.0/12192.168.0.0/16
For this tutorial, we will use 192.168.66.0/24 which is inside the 192.168.0.0/16 range. The server will have the following IP address: 192.168.66.1.
It is also required to choose a port, which will be exposed publicly, for the server to listen on. Here it will be 8999. Note that the standard documentation port is usually 51820.
Create the file /etc/wireguard/wg0.conf with the following content:
[Interface]
PrivateKey = <private key of the server>
Address = 192.168.66.1/32
ListenPort = 8999
Configuring the Linux, macOS, or Windows WireGuard client
-
Install WireGuard. On Linux, you can install WireGuard the same way you did for the server. To install WireGuard on macOS just run:
brew install wireguard-tools. You can also use the Mac App Store application. To install WireGuard on Windows you can find the executable on the WireGuard installation page, but this guide will not cover the Windows use case. -
Create the key pair:
mkdir -p /etc/wireguard/keys cd /etc/wireguard/keys umask 077 wg genkey | tee privatekey | wg pubkey > publickey -
Create the configuration file
/etc/wireguard/wg0.conf:[Interface] PrivateKey = <private key of the client> Address = 192.168.66.2/32 DNS = 1.1.1.1 [Peer] PublicKey = <public key of the server> Endpoint = <public ip of the server>:8999 AllowedIPs = 0.0.0.0/0 PersistentKeepalive = 25It is quite similar to the server configuration. The
DNSline specifies the DNS resolver for the client. TheEndpointtells WireGuard where to connect.AllowedIPsconfigures which IP range will be forwarded to the VPN server.In this case,
0.0.0.0/0means that all the traffic from the client will go through the VPN. If you only want to communicate within the VPN network, you can set192.168.66.0/24.PersistentKeepalivetells WireGuard to send a UDP packet every 25 seconds, this is useful if you are behind a NAT and you want to keep the connection alive. -
Add the peer configuration to the server. Just add the following to your
/etc/wireguard/wg0.confon the server:[Peer] PublicKey = <public key of the client> AllowedIPs = 192.168.66.2/32 # the ip address in the VPN network of the client you just created
Configuring the Android or iOS WireGuard client
You can download the official WireGuard Android client from Google Play, and the official WireGuard iOS Client from the iOS App Store (this guide will only cover Android, but the steps are the same).
There are two ways to configure the Android or iOS client. The easiest one is to follow the previous part and once the configuration file is done, export it with qrencode like this: qrencode -t ansiutf8 < path/to/phone.conf. Finally, scan the generated QR code with the WireGuard application.
For the second way, follow these steps:
- Download and open the application and click the + icon and select Create from scratch.

- Click GENERATE to generate the key pair (copy the public key to use on the server). The rest is like the Linux client configuration, fill in the addresses, DNS servers, and name. Now you will need to add the server as a peer.
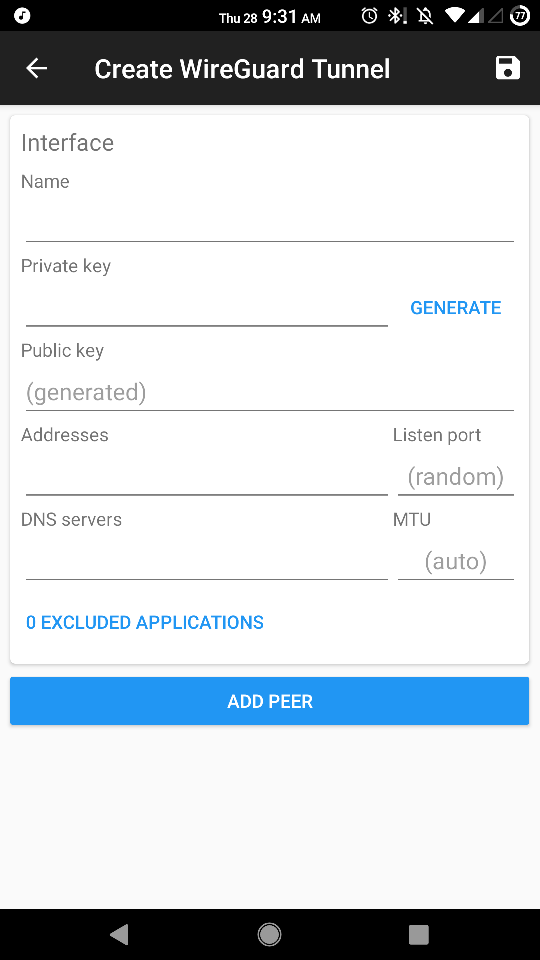
- Click ADD PEER and add the public key of the server, the public IP of the server, and the port on which it is listening. If you decide to route all the traffic through the VPN, read the Important section above.

- Add the following to the server's
/etc/wireguard/wg0.conf:[Peer] PublicKey = <public key of the android client> AllowedIPs = 192.168.66.3/32 # the ip address in the VPN network of the client you just created
Launching WireGuard server
Now that everything is configured, you can launch the WireGuard server with:
wg-quick up wg0Start the client with the same command:
wg-quick up wg0You can also enable the start of WireGuard at boot time with the following command:
systemctl enable wg-quick@wg0.serviceYou can check the connection with the wg command (client or server):
# wg # on the client
interface: wg0
  public key: <public key of the client>
  private key: (hidden)
  listening port: 57576
  fwmark: 0xca6c

peer: <public key of the server>
  endpoint: <public IP of the server>:8999
  allowed ips: 0.0.0.0/0
  latest handshake: 50 seconds ago
  transfer: 8.35 KiB received, 18.00 KiB sent
  persistent keepalive: every 25 seconds

# ping 192.168.66.1
PING 192.168.66.1 (192.168.66.1) 56(84) bytes of data.
64 bytes from 192.168.66.1: icmp_seq=1 ttl=64 time=3.50 ms
64 bytes from 192.168.66.1: icmp_seq=2 ttl=64 time=4.53 ms
--- 192.168.66.1 ping statistics ---
2 packets transmitted, 2 received, 0% packet loss, time 3ms
rtt min/avg/max/mdev = 3.499/4.015/4.532/0.520 ms

# curl ifconfig.co
<public IP of the server>
As you can see, you can ping the VPN server through the VPN and all your traffic is being routed through the VPN server.
For more information, you can check the WireGuard website.
"WireGuard" is a registered trademark of Jason A. Donenfeld.
Visit our Help Center and find the answers to your most frequent questions.
Visit Help Center