Getting started with Kubernetes Part 4 - Storage
This tutorial accompanies the fourth video demonstration in our series to help users get started with Kubernetes. We walk you through Kubernetes fundamentals for beginners. In this installment, we show you how to add storage to your Scaleway Kubernetes Kapsule.
First, we address the question of why we might need to add storage to our cluster, comparing persistent storage with system storage, and digging into stateless vs. stateful applications. We then show how to create a stateful application in a cluster via a StatefulSet object, which provisions persistent storage via a PersistentVolumeClaim, which in turn provisions and manages storage using the Scaleway Block Storage product.
Previous videos in this series covered the basics of containers and Docker, deploying an app with Kapsule, and adding a Load Balancer.
Before you start
To complete the actions presented below, you must have:
- A Scaleway account logged into the console
- Owner status or IAM permissions allowing you to perform actions in the intended Organization
- An API key
- A Kubernetes Kapsule
- Kubectl configured on your machine
Fundamental storage concepts
System volume vs persistent volumes
It is important to differentiate between Kubernetes system volumes and persistent volumes. This tutorial is concerned with persistent volumes, which can be provisioned and then used by applications inside the cluster to store data. Kubernetes system volumes are created automatically but can only be used by the Kubernetes system itself to store essential files. This is summed up in the table below:
| System volume | Persistent volume |
|---|---|
| For the k8s system itself | For applications in the cluster |
| Ephemeral (lives and dies with the node) | Persistent (beyond the life of a pod/node) |
| Auto-created | Must be provisioned |
You can view your cluster's system volumes in the Block Storage > Volumes section of the console, and see how they are linked to the Instances that make up the nodes of your cluster. However, you should not attempt to use or manage these volumes - leave it to Kubernetes Kapsule.
Stateless applications vs stateful applications
What kind of applications need to use persistent volumes? To answer this, we must understand the difference between stateless and stateful applications.
Stateless applications do not need to load or save data: each request to the application is independent. There may be data in the payload of the request, but has not been retrieved from a previously saved state. A request to a search engine is a good example of this.
Stateful applications do need to save and load data. Most modern applications are stateful, such as online banking which needs to be able to store and retrieve all your transaction history, and online shopping which stores and remembers your previous orders. To run stateful applications in Kubernetes, we need to provision persistent storage volumes where they can store the data that gives them their state.
| Stateless applications | Stateful applications |
|---|---|
| Do not load or save data | Save and load data |
| Each request is independent and doesn't use previous data | Need to retrieve stored data |
| Examples: microservice, whoami, search engine request | Examples: most modern applications (online banking, online shopping) |
| "Original" Kubernetes | Kubernetes has now adapted to incorporate statefulness |
| Do not need to provision storage | Must provision storage |
How do we provision storage?
Provisioning Block Storage volumes
Cloud providers such as Scaleway provide and default StorageClasses for their managed Kubernetes products. StorageClasses define the classes of storage the provider can offer for the cluster. The user can list the StorageClasses available by using the command kubectl get storageclass.
Scaleway provides Block Storage as its StorageClass, meaning that we offer persistent storage for Kapsule clusters via our Block Storage product.
Cloud providers also provide a Container Storage Interface (CSI) for their managed clusters. This is a standardized interface allowing communication between Kubernetes and the cloud provider's own storage products. CSI and StorageClasses make dynamic volume provisioning possible, whereby Kubernetes Kapsule users can create storage volumes for their clusters on demand. They simply describe the storage required by referring to a StorageClass, and this is provisioned from Scaleway by the CSI.
Kubernetes objects
To provision persistent Block Storage resources in this tutorial, we will use a PersistentVolumeClaim. This is a Kubernetes object, which requests and claims a PersistentVolume resource. The PersistentVolumeClaim object requests a specific size, access mode, and StorageClass for the PersistentVolume, meaning we can describe what we want without needing to worry about how it is provisioned.

In our previous tutorial we used a Deployment object to deploy a stateless application. In this tutorial, we will use a StatefulSet object to deploy a stateful application.
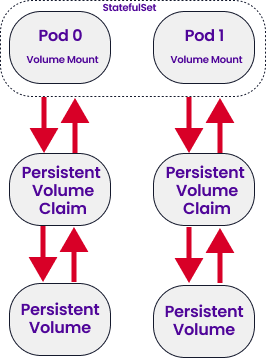
Both Deployments and StatefulSets manage the deployment and scaling of a set of Pods with identical replications of a containerized application. But StatefulSets can also provision and manage persistent storage for their Pods, via PersistentVolumeClaims. What's more, to ensure data consistency and synchronicity as Pods read and write to storage, the Pods of a StatefulSet have sticky, persistent identities as shown below:
Step 1: Create StatefulSet from YAML manifest
-
Open a terminal, and run the following command to check that you can connect to your cluster:
kubectl get all -
Create a new file called
statefulset.yaml:nano statefulset.yamlThis file will be a manifest for our StatefulSet object. It will describe the stateful application we want to deploy in the cluster and the persistent storage volumes that are required for the application.
-
Copy and paste the following text into the file:
apiVersion: apps/v1
kind: StatefulSet
metadata:
  name: ss-csi-scw
spec:
  serviceName: ss-csi-scw
  replicas: 5
  selector:
    matchLabels:
      app: ss-csi-scw
      provider: scaleway
  template:
    metadata:
      labels:
        app: ss-csi-scw
        provider: scaleway
    spec:
      containers:
      - name: busy-pvc-scw
        image: busybox
        volumeMounts:
        - mountPath: "/data"
          name: csi-vol-scw
        command: ["sleep", "3600"]
  volumeClaimTemplates:
  - metadata:
      name: csi-vol-scw
    spec:
      accessModes: ["ReadWriteOnce"]
      storageClassName: sbs-default
      resources:
        requests:
          storage: 1Gi
Essentially, we are creating a StatefulSet object, with 5 replica Pods, running a lightweight container called busybox that will just sleep in the background for an hour. The StatefulSet will create a PersistentVolumeClaim for each Pod, creating a 1 GB Scaleway Block Storage volume for each Pod, mounted at /data. For a full explanation of the various fields in the yaml manifest, see below:
- apiVersion specifies which version of the Kubernetes API to use to create the object
- kind specifies the kind of object defined in this YAML file, here a StatefulSet
- metadata helps uniquely identify our StatefulSet object: we give it a name (
ss-csi-scw), and a label. - spec specifies the desired behavior of the StatefulSet. There are many sub-parts here:
- serviceName is the name used to create identities for the Pods
- replicas defines the number of replica Pods to create
- selector defines how the StatefulSet finds which Pods to manage, using a label
- template describes the template for the Pods that will be created:
- metadata helps uniquely identify the Pods, with the label
- spec specifies the desired behavior of each Pod.
- containers defines the container to use for each Pod: we call the container
busy-pvw-scwand tell it to use thebusyboximage. This is a minimalistic, lightweight image with just a shell environment. It will just be used as an easy example for this demo, without actually doing anything. The volumeMount is specified at location/data, for the storage volume calledcsi-vol-scw. We also give a command to the container to sleep for 3600 seconds (1 hour) to keep it active for our tutorial so that it doesn't simply launch and then shut down.
- containers defines the container to use for each Pod: we call the container
- volumeClaimTemplates define the templates for the PersistentVolumeClaims that the StatefulSet will create for each Pod, which will themselves trigger the creation and management of corresponding persistent volumes.
- metadata helps uniquely identify the volume claim, we use the same label as before
- spec defines the desired specification of the volume.
- accessMode declares that the volume can be read-write by a single node
- storageClassName defines the name of the storage class to use
- resources defines how much storage we want (1 gigabyte).
-
Tell Kubernetes to create the StatefulSet from the manifest we just created with the following command:
kubectl create -f statefulset.yamlA message displays to confirm the creation of the StatefulSet.
Step 2: Check the creation of Block Storage volumes
-
Run the following command in the terminal to check the progress of the creation of your StatefulSet:
kubectl get allIt may take a few minutes for all 5 replica Pods to be created, but when this process has finished you should see an output similar to the following:
NAME                READY   STATUS    RESTARTS    AGE
pod/ss-csi-scw-0    1/1     Running   0           63s
pod/ss-csi-scw-1    1/1     Running   0           57s
pod/ss-csi-scw-2    1/1     Running   0           42s
pod/ss-csi-scw-3    1/1     Running   0           32s
pod/ss-csi-scw-4    1/1     Running   0           22s


NAME                          READY   AGE
statefulset.apps/ss-csi-scw   5/5     63s
Note that each Pod has its own identity.
You can now check the creation of the volumes for the StatefulSet in the Scaleway console:
-
Open a browser and go to console.scaleway.com.
-
Select Storage > Block Storage from the side menu. You should see five Block Storage volumes, each linked to an Instance comprising a node of your cluster. This shows that the CSI of your Kubernetes Kapsule has indeed created 5 Block Storage volumes, one for each of the Pods specified for the StatefulSet.
Step 3: Resize the cluster and note the effect on Block Storage volumes
Next, we see what happens if we resize our cluster to scale the number of replicas up or down, and what effect this has on the associated Block Storage volumes.
-
Run the following command in the terminal, to reduce the number of replicas to 0:
kubectl scale statefulsets ss-csi-scw --replicas=0 -
Run the following command in the terminal, to check that the pre-existing replica Pods have terminated. You may need to run it a few times, as the process can take a few minutes:
kubectl get allYou should see each Pod change to a status of
Terminating, before disappearing from the list of cluster resources. -
In the browser, go back to the Block Storage section of the Scaleway console. You should see that the Block Storage volumes still exist but are now detached from their corresponding Pods.
Next, we see what happens if we resize the cluster again to scale back up to 5 Pods.
-
In the terminal, run the following command:
kubectl scale ss-csi-scw --replicas=5As before, you can run a
kubectl get allto ensure that the Pods are being recreated. -
Return to the Block Storage section of the Scaleway console. You should see that all the volumes have reattached to a cluster node: they have found their corresponding Pod thanks to their sticky identities, meaning any previous data stored is still available.
This exemplifies the convenience of managing Kubernetes storage in this way, with a high level of automation to ensure that storage volumes and Pods can easily find each other.
Going further - volume snapshots
Try creating snapshots for your volumes. A snapshot is a consistent, instantaneous copy of a Block Storage volume at a certain point in time. Snapshots are useful for backing up data and facilitating data recovery.
You can make snapshots by creating a manifest for a VolumeSnapshot object and applying it with kubectl. Refer to the official Kubernetes documentation for help with this. You can then check the creation of the snapshot in the Storage > Block Storage > Snapshots section of the console.
It is also possible to create volumes from existing snapshots, again full details are available in the official Kubernetes documentation.
Visit our Help Center and find the answers to your most frequent questions.
Visit Help Center