Getting started with Kubernetes Part 3 - Load Balancers
This tutorial accompanies the third video demonstration in our series to help users get started with Kubernetes. We walk you through Kubernetes fundamentals for beginners. In this installment, we show you how to create a Load Balancer for your Scaleway Kubernetes Kapsule.
First, we address the question of why we need a Load Balancer for our cluster, comparing it with the NodePort service we used in the previous tutorial. We then explain how to create a Load Balancer, check it out in the Scaleway console, and finally test that we can access our cluster's deployed application at the Load Balancer's IP address.
The next and final video in this series will look at the topic of persistent storage for a Kubernetes cluster.
Before you start
To complete the actions presented below, you must have:
- A Scaleway account logged into the console
- Owner status or IAM permissions allowing you to perform actions in the intended Organization
- A valid API key
- Followed the first and second tutorials in this series
- A Kubernetes Kapsule cluster running with the
whoamiapplication deployed on it.
Where were we?
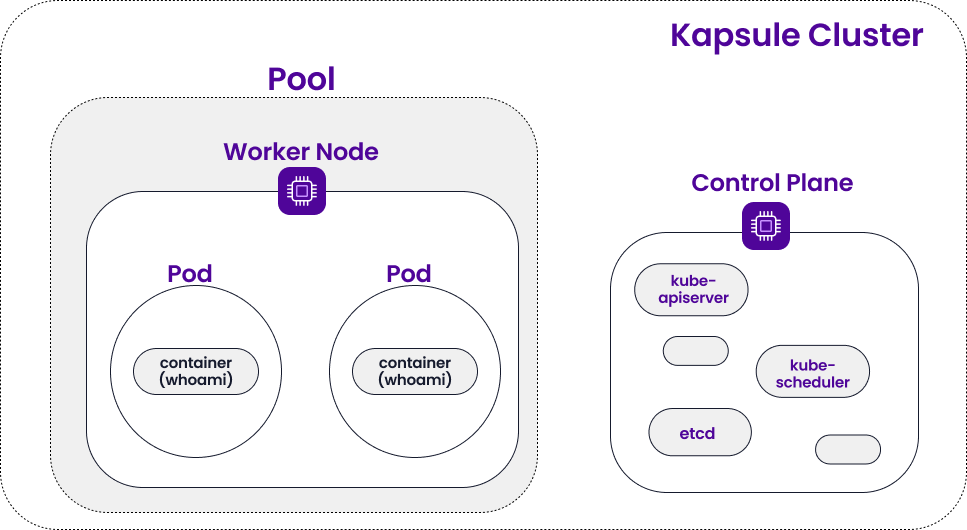
In our previous tutorials, we created a Kubernetes Kapsule and deployed the containerized whoami application to it. This is what our cluster looked like at the end of the last tutorial:
Why do we need a Load Balancer?
By default, Kubernetes clusters are not exposed to the internet. This means that external users cannot access the application deployed in our cluster.
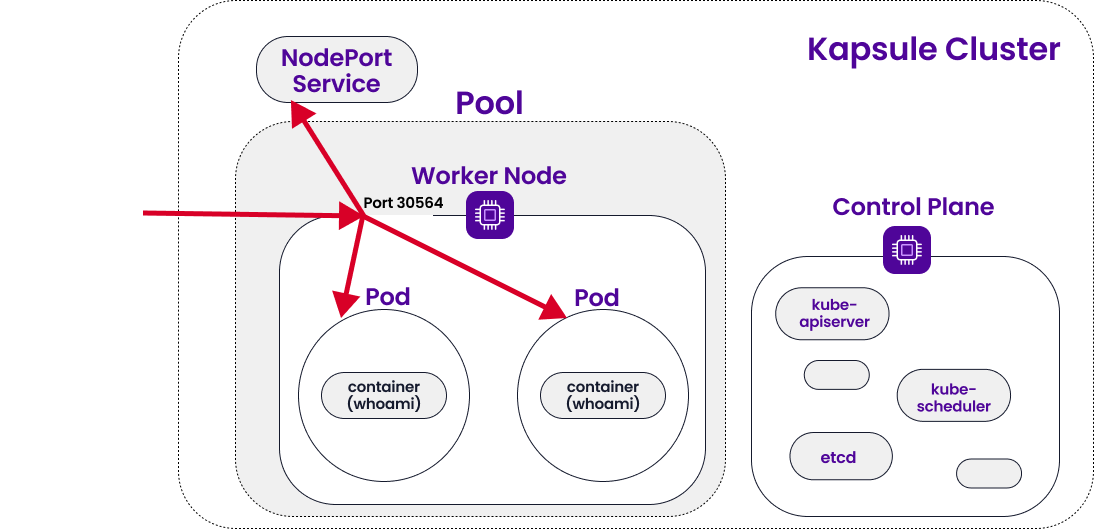
In the previous tutorial, we solved this problem by creating a NodePort Service for our cluster. NodePort is a Kubernetes service that opens a port on each node that contains Pods for the specified deployment. It then forwards any external traffic received on that port to the right Pods. This allowed us to go to our node’s external IP address in a browser (specifying the open port), and we were served our web application.
As mentioned, NodePort is a Service. It is important to differentiate between Services and Deployments in Kubernetes. Both of these are Kubernetes abstractions:
- Deployments keep a set of Pods running with containerized applications.
- Services enable network access to a specified set of Pods.
Why can’t we just keep using NodePort instead of a Load Balancer?
NodePort is great for quick testing and can be adequate for single-node, uncomplicated clusters. It is also free. However, due to security and management reasons, it is not ideal for production. You are limited in which port numbers can be opened, and as your cluster scales in complexity, maybe containing many microservices, NodePort gets less practical to use.
LoadBalancer is also a Kubernetes Service, just like NodePort, and it is the standard service to use when you want to expose your cluster to the internet.
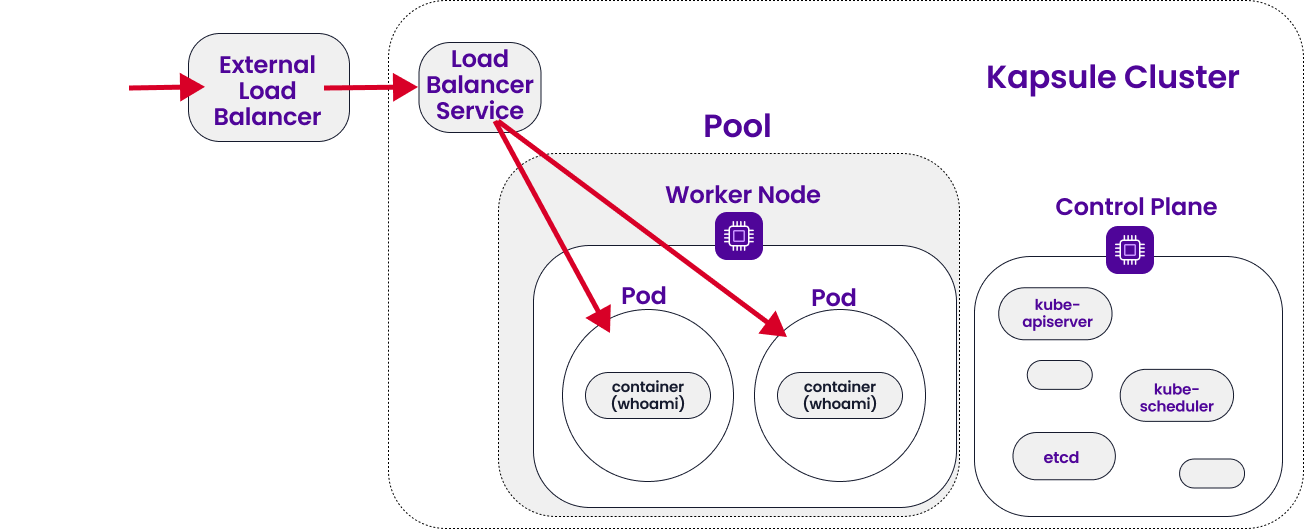
The LoadBalancer Service within your cluster creates an external Load Balancer. This external Load Balancer has a single IP address that forwards all traffic to the LoadBalancer Service within your cluster, which then forwards it to the right Pods.
LoadBalancer supports multiple protocols and multiple ports per service and is much more secure than NodePort. It provides all those things that are important and valued when it comes to Cloud Native technology: predictability, scalability, and high availability.
How do we create a Load Balancer?
First, we create the LoadBalancer Service on our cluster by connecting to it via kubectl and creating a YAML manifest to specify the Service.
Then, the cluster’s Cloud Controller Manager (a component of the Kapsule’s control plane, managed by Scaleway) takes care of creating the external Scaleway Load Balancer and is responsible for all of its configuration and management. We can check the console, though, to see that the Load Balancer has indeed been created.
We use kubectl to check the IP address of our Load Balancer, and then we are ready to test.
Step 1: Create a Load Balancer from a YAML manifest
- Open a terminal, and run the following command to check the state of your cluster:
You should see two Pods, the NodePort Service created during the previous tutorial (along with the basic default ClusterIP Service), the deployment, and the two ReplicaSets.
kubectl get all - Delete the NodePort Service with the following command:
In our case, we called our NodePort service
kubectl delete svc name-of-nodeport-servicemydeployment, so the command iskubectl delete svc mydeployment. - Create a new file called
lb.yaml:This file will be a manifest for our LoadBalancer Service.nano lb.yaml - Copy and paste the following text into the file:
apiVersion: v1 kind: Service metadata: name: myloadbalancer labels: app: mydeployment spec: type: LoadBalancer ports: - port: 8000 name: http targetPort: 8000 selector: app: mydeployment- apiVersion specifies which version of the Kubernetes API to use to create the object
- kind specifies the kind of object defined in this YAML file, here a Service
- metadata helps uniquely identify our Service object: we give it a name (
myloadbalancer), and a label. - spec specifies the Service. It is of LoadBalancer type. We then go on to specify its ports. We can define many ports if we want, but here we just specify the necessary port
8000for ourwhoamiapp. Since8000is an HTTP port, we add a name tag and call ithttp. targetPort is the port where the container welcomes traffic (in our case, necessarily8000), port is the abstracted Service port. For simplicity, we set both as8000, though we could change port to something else. - selector tells the Service which Pods to redirect to: in this case, Pods with containers running the app we called
mydeploymentSave and exit the file.
- Tell Kubernetes to create the Load Balancer from the manifest we just created with the following command:
kubectl create -f lb.yaml
A message displays to confirm the creation of the Load Balancer.
Step 2: Check the Load Balancer on the console
- Open a browser and go to console.scaleway.com.
- Select Network > Load Balancers from the side menu.
A list of your Scaleway Load Balancers displays. You should see one with the tags
kapsuleandcluster=xxxx. This is the Load Balancer created by the Cloud Controller Manager of your Kubernetes Kapsule cluster when you created your LoadBalancer Service in the previous step. - Click the LoadBalancer to view its details.
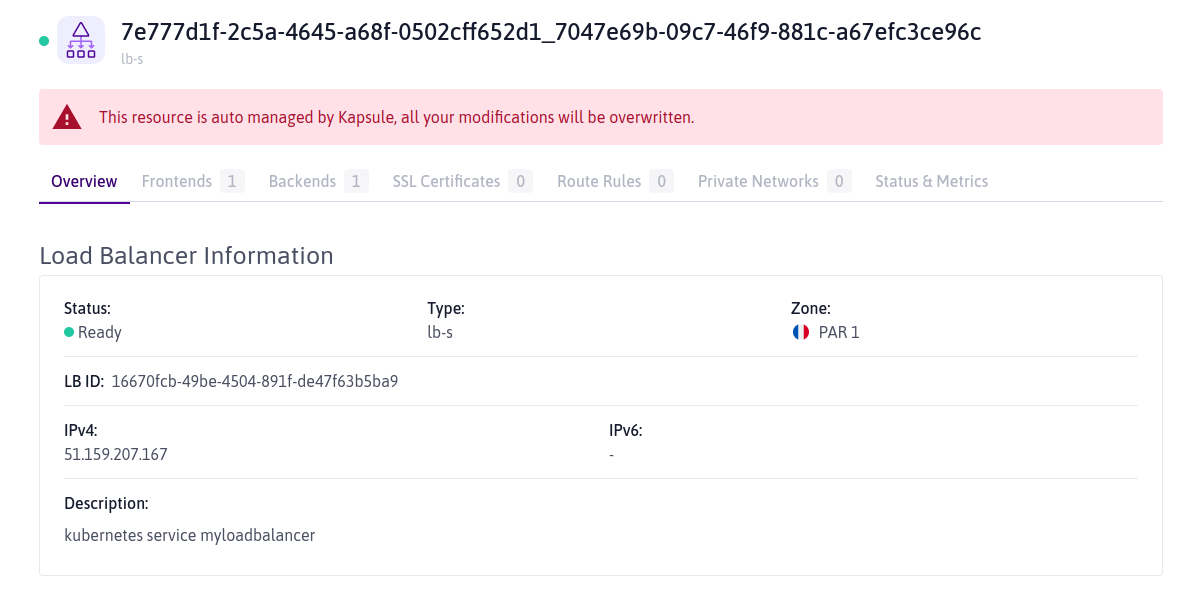
The Load Balancer is auto-managed by Kapsule, so no changes can be made here directly.
In the IPv4 field, the Load Balancer's IP address displays.
Step 3: Check Load Balancer IP via kubectl
Let's check that the IP address seen in the console is also known to our cluster:
- Run the following command:
kubectl get svcAn output similar to the following displays:
NAME             TYPE           CLUSTER-IP      EXTERNAL-IP      PORT(S)          AGE
kubernetes       ClusterIP      10.32.0.1       <none>           443/TCP          13d
myloadbalancer   LoadBalancer   10.43.204.154   51.159.207.167   8000:31725/TCP   27h
We see that the Load Balancer's external IP is the same as the one we saw in the console in the previous step.
Step 4: Test
In a browser, enter the external IP address of your Load Balancer, followed by the port 8000 that we opened, e.g., 158.58.37:8000.
A text similar to the following should display, showing that the containerized whoami application is running on our cluster and accessible through our Load Balancer:
I'm mydeployment-6579f975d55-fv4sxStep 5 (Optional): Annotate LoadBalancer on Kubernetes
Discover all annotations available for LoadBalancer on Kubernetes.
You will need to add an annotation directly to the LoadBalancer SVC.
Here is an example command: kubectl annotate svc <load-balancer-svc> service.beta.kubernetes.io/scw-loadbalancer-health-check-timeout=1m
Visit our Help Center and find the answers to your most frequent questions.
Visit Help Center