Getting started with Kubernetes Part 2 - Deploying an app with Kapsule
This tutorial accompanies the second video demonstration in our series to help users get started with Kubernetes. We walk you through Kubernetes fundamentals for beginners. In this installment, we show you how to deploy a containerized application with the Scaleway Kubernetes Kapsule.
First, we review some key Kubernetes terminology (including pools, nodes, and Pods) and then demonstrate how to create a Kubernetes Kapsule via the Scaleway console. Next, we show you how to install kubectl so you can connect to your cluster from the command line of your local machine, and how to create an image pull secret for your cluster.
We then demonstrate how to deploy the containerized application (via the whoami image that we created in the first video/tutorial) to our Kapsule cluster. Finally, we show how to use the Kubernetes NodePort service to expose a port, so we can test that the application is running at its endpoint.
Future videos will cover topics like load balancing and storage for your Kubernetes application.
Before you start
To complete the actions presented below, you must have:
- A Scaleway account logged into the console
- Owner status or IAM permissions allowing you to perform actions in the intended Organization
- A valid API key
- Followed the first tutorial in this series, and pushed the
whoamiimage to a Container Registry
Why do we need Kubernetes?
In our previous tutorial, we saw how to containerize an application. We achieved this by using Docker, an open-source platform for packaging applications into containers. We created and ran our containerized application on our local machine, and then pushed the container image to a Container Registry.
While manually running and managing one container image on one local machine is fine, in a production environment we might need huge amounts of containers running simultaneously on multiple machines. This is difficult to manage manually, and that is where Kubernetes can help us.
Key concepts: clusters, nodes, Pods and more
Before starting the practical steps of this tutorial, we review a few key Kubernetes concepts that must be understood first:
-
Kubernetes: An open-source container orchestration platform, which automates the deployment, management, and scaling of containerized applications.
-
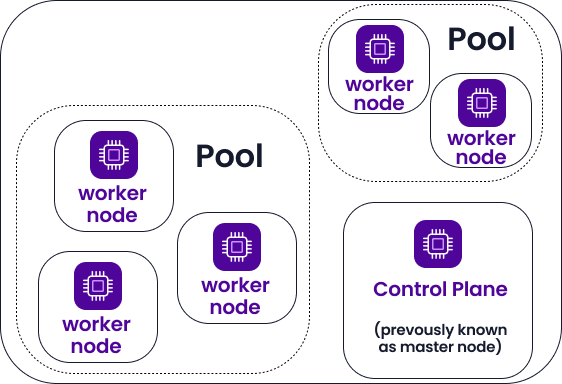
Cluster: If you're running Kubernetes, you're running a cluster. A cluster is a set of machines, called nodes, running containerized applications managed by Kubernetes. A cluster has several worker nodes and at least one control plane.
Cluster:

-
Node: A node may be a virtual or physical machine. In the case of Scaleway Kubernetes Kapsule, a node is an Instance.
-
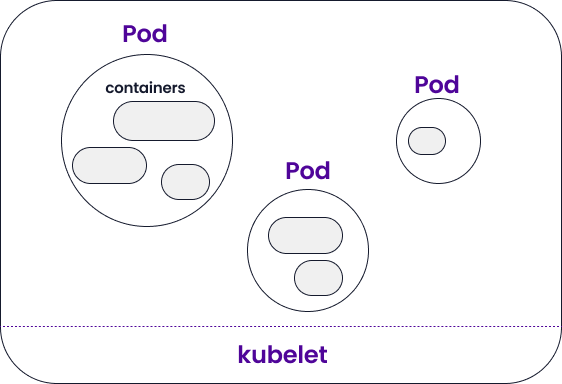
Worker node: Each worker node runs one or more containerized applications, which are grouped into Pods. Each worker node is managed by the control plane and contains the services necessary to run Pods.
Worker node:
-
Pod: A Pod is a bundle of containers working closely together. Containers grouped in Pods might share resources such as storage and networking.
-
Kubelet: The kubelet is the primary "node agent" that runs on each worker node. It ensures that its containers are running and healthy, and can register the node with the control plane's apiserver. Scaleway's Kubernetes Kapsule manages the kubelets for you.
-
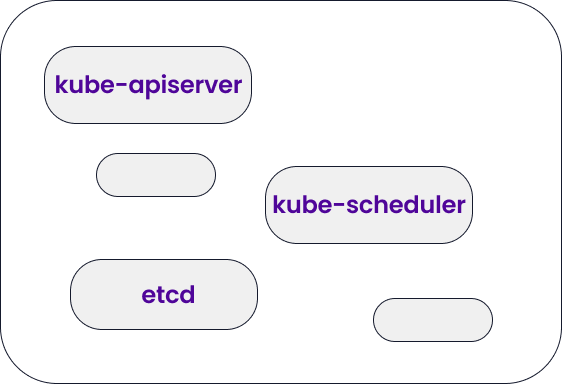
Control plane: The control plane, previously known as the master node, controls and manages the worker nodes and their Pods in the cluster. Scaleway's Kubernetes Kapsule takes care of all management of the control plane for you. The control plane consists of components such as the kube API server, which acts as the control plane's front end, the kube scheduler, which assigns Pods to nodes, etcd, which is a consistent and highly-available key value store to back cluster data, and more.
Control plane:
-
Pool: A pool is a group of worker nodes within the cluster that all have the same configuration. In the case of Scaleway Kubernetes Kapsule, all the nodes in the same pool will be of the same Instance type. You can add or remove pools of nodes to increase/decrease the computational power of your cluster.
Pool:
-
kubectl:
kubectlis the command line interface for running commands against Kubernetes clusters. You can usekubectlto connect to and manage your clusters from the command line.
-
Managed Kubernetes: Managed Kubernetes is when third-party providers take over some of the responsibility for setting up and operating Kubernetes. Scaleway has two managed Kubernetes products: Kubernetes Kapsule and Kubernetes Kosmos. Kapsule is our classic Kubernetes offer, where all nodes and their Pods in the cluster are managed by Scaleway and hosted on Scaleway Instances. Kosmos allows you to have multi-cloud clusters, with Pods hosted on nodes from different cloud providers.
In both cases, Scaleway walks you through the setup of your cluster and manages your control plane for free. All the control plane's components, and kubelets on the nodes, are fully managed. There is no need to connect to your nodes directly, as all actions and configurations can be done from the Scaleway console, via the kubectl command, the Scaleway Kapsule API, Terraform, or via OpenTofu. You can also monitor your cluster from the Kubernetes dashboard web interface.
Creating a Kubernetes Kapsule cluster
The first step in our tutorial is to create a Kubernetes Kapsule cluster. This can be achieved from the Scaleway console. Follow our dedicated how-to on creating a cluster, making sure to select Kapsule instead of Kosmos. You can leave all other settings at their default values.
Installing kubectl and connecting to your cluster
The next step is to install kubectl on your local machine and configure it to connect to your cluster. To do this, follow our dedicated how-to on connecting to a cluster with kubectl.
Create an image pull secret
In our previous tutorial, we saw how to containerize an application and create a Docker image of the application which we pushed to our Scaleway Container Registry. Logically, we next need to deploy that application image to our Kubernetes cluster. However, Kubernetes itself must be able to pull the image to its nodes. Generally, application images are in private container registries, so Kubernetes needs to be given access to pull. This access is given via image pull secrets. You might also hear these called "Docker secrets", or just "secrets".
-
Go to the command line of your local machine, and enter the following command:
kubectl create secret docker-registry registry-secret --docker-server=rg.fr-par.scw.cloud --docker-username=my-namespace --docker-password=$SCW_SECRET_KEYMake sure you replace
rg.fr-par.scw.cloudwith the endpoint of the container registry where you pushed thewhoamiimage from the first tutorial, andmy-namespacewith the relevant container registry namespace. You should also have created an API key and exported it as an environment variable called$SCW_SECRET_KEY. -
Run the following command to display the generated secret and check that everything went well.
kubectl get secret registry-secret --output=yaml
Deploying an application to the cluster
Now that we have created our cluster, connected to it with kubectl, and defined an image pull secret so that our cluster can pull the image it needs, we can define our deployment.
-
Create a file called
whoami-deployment.yamlon your local machine:nano whoami-deployment.yaml -
Paste the following code into the file, then save and exit:
apiVersion: apps/v1
kind: Deployment
metadata:
  name: mydeployment
  labels:
    app: mydeployment
spec:
  replicas: 2
  selector:
    matchLabels:
      app: mydeployment
  template:
    metadata:
      labels:
        app: mydeployment
    spec:
      containers:
        - name: mycontainer
          image: rg.fr-par.scw.cloud/videodemo/whoami:latest
      imagePullSecrets:
        - name: registry-secret
Be sure to replace
rg.fr-par.scw.cloud/videodemo/whoami:latestwith the relevant path to where yourwhoamiimage is stored in your container registry. -
Run the following command to deploy the deployment on the cluster:
kubectl apply -f whoami-deployment.yaml -
Run the following command to list all the cluster's resources. If everything went well with the deployment, you should see that your Pods are running:
kubectl get all -
Run the following command, replacing the Pod ID with an appropriate output from the previous command, to check that the application is running and listening on a port:
kubectl logs pod/mydeployment-5599cbcb56-x6lb8
Exposing the service for testing via NodePort (optional)
Our application is up and running, and we could just stop at this point. However, we can carry on and expose the port it is running on, so we can access the cluster's endpoint and check if the application is printing out its container ID as it should. We will achieve this via NodePort, a Kubernetes service that opens a port on every node of the cluster. Any traffic the cluster receives on this node is forwarded.
-
Run the following command to create a NodePort service. Replace
80with whatever port your Pod said it was listening on at the end of the previous section.kubectl expose deployment mydeployment --type NodePort --port 80 -
Use the following command to check that the Nodeport service is up and running:
kubectl get svcYou should see an output similar to the following:
NAME TYPE CLUSTER-IP EXTERNAL-IP PORT(S) AGE service/kubernetes ClusterIP 10.32.0.1 <none> 443/TCP 68d service/mydeployment NodePort 10.42.65.74 <none> 80:30564/TCP 6s -
Run the
get nodescommand to view extra information about each of your cluster's nodes:kubectl get nodes -o wideIn the output, one of the values you should see is your cluster's external IP:
-
Enter the following address in a browser. Replace
<external-IP>with your cluster's external IP, and<port>with the port that the NodePort service showed it was listening on in step 2 (e.g.30564):https://<external-IP>:<port>
You should see that the whoami application is printing the ID of the container it is running from within your cluster.
Useful links
- Video tutorial: Getting started with Kubernetes: Part 1 - Containers & Docker
- Written tutorial: Getting started with Kubernetes: Part 1 - Containers & Docker
- Video tutorial: Getting started with Kubernetes: Part 2 - Deploying an app with Kapsule
- Kubernetes Concepts
- Introduction to Kubernetes
- Kubernetes in 5 minutes
- Kubernetes Components
- Official Kubernetes documentation
Visit our Help Center and find the answers to your most frequent questions.
Visit Help Center