Deploying a multi-AZ Kubernetes cluster with Terraform/OpenTofu and Kapsule
Multi-AZ Kubernetes Kapsule is a configuration where a managed Kubernetes cluster is distributed across multiple isolated Availability Zones (AZs) within a Scaleway region, enhancing the resilience and availability of applications.
This configuration allows the system to withstand failures in one zone by replicating resources and workloads across multiple zones.
Before you start
To complete the actions presented below, you must have:
- A Scaleway account logged into the console
- A domain managed on the Scaleway Domains and DNS service
- Installed Terraform/OpenTofu on your local computer
Deploying the Kapsule Kubernetes cluster
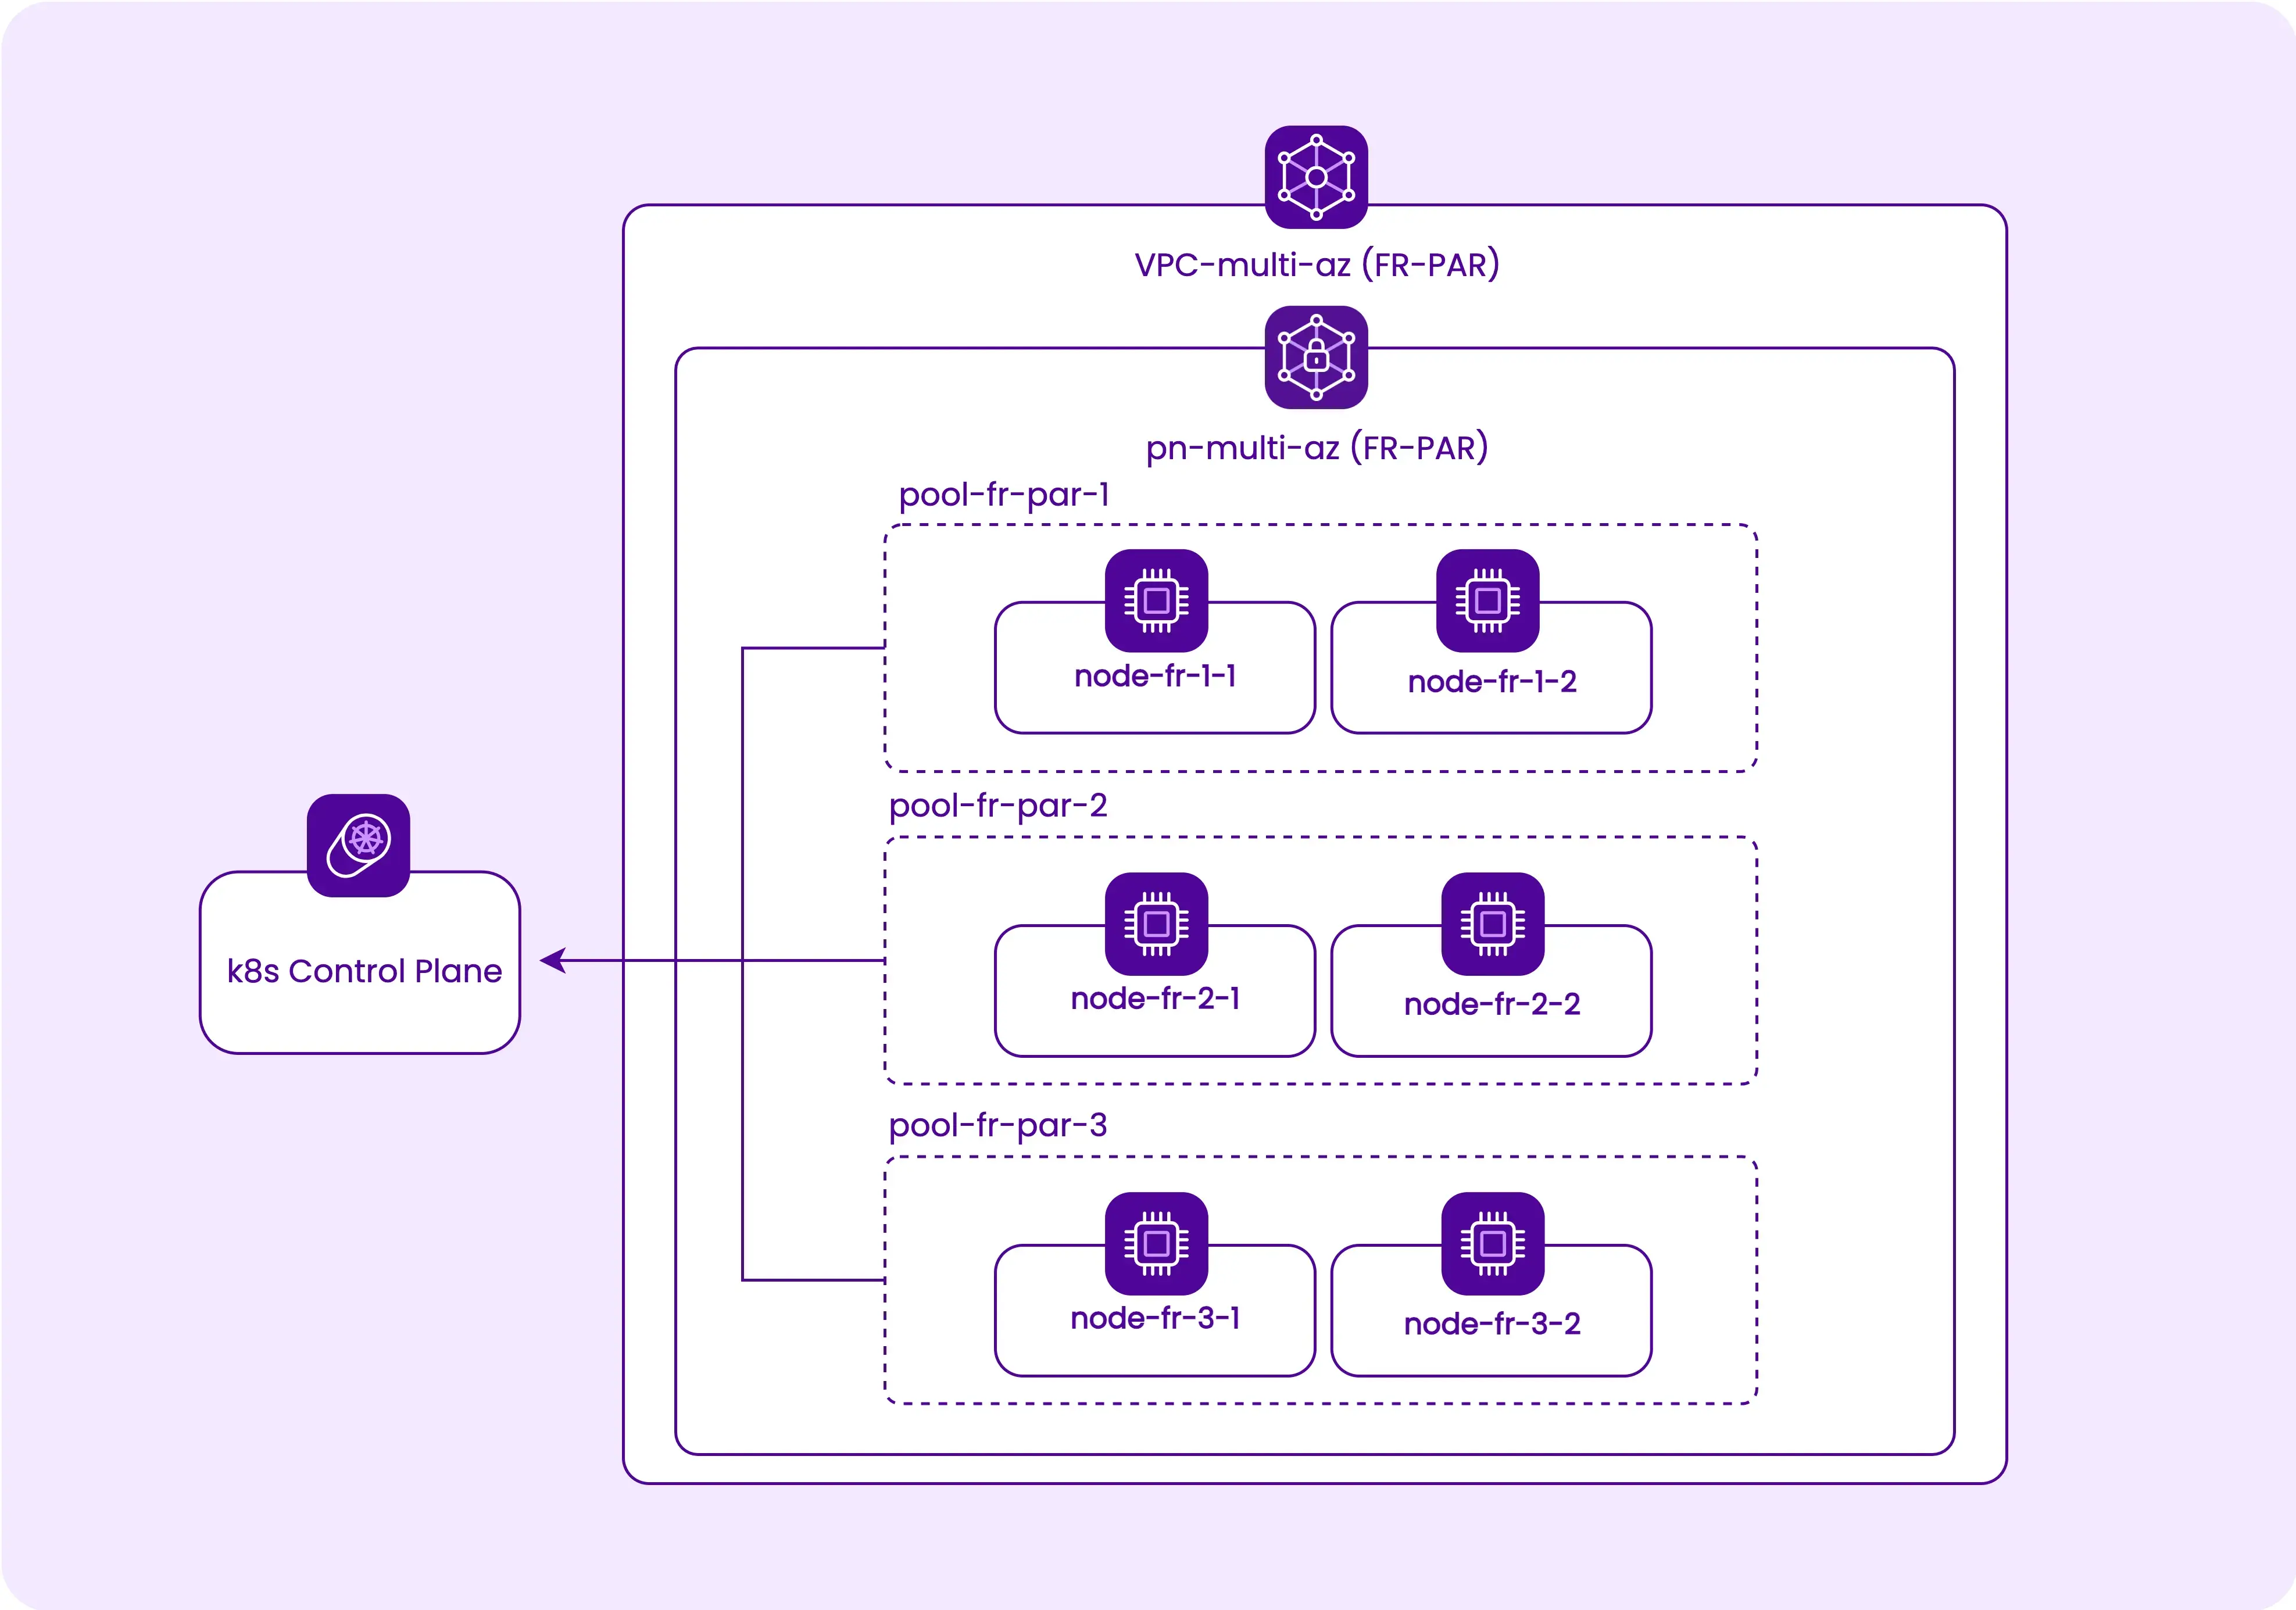
Start by creating a multi-AZ cluster on fr-par region, in a dedicated VPC and Private Network, with three pools of nodes, one in fr-par-1, one in fr-par-2, and one in fr-par-3, with two nodes each. The steps for achieving this via Terraform/OpenTofu are as follows:
-
Create a
main.tffile that will contain the Terraform/OpenTofu part of this project, and set the required providers and their versions.terraform { required_providers { scaleway = { source = "scaleway/scaleway" version = ">= 2.28.0" } kubernetes = { source = "hashicorp/kubernetes" version = ">=2.23.0" } helm = { source = "hashicorp/helm" version = "2.11.0" } local = { source = "hashicorp/local" version = "2.4.0" } kubectl = { source = "gavinbunney/kubectl" version = "1.14.0" } } required_version = ">= 1.0.0" } -
Add the Scaleway provider and its configuration. Refer to the Scaleway Terraform/OpenTofu provider documentation for more information on how to configure the provider.
provider "scaleway" { region = "fr-par" } -
Create a dedicated VPC and a Private Network where we will deploy the Kapsule cluster. VPC and Private Networks are region-wide, so you can use them to host a cluster spread across multiple Availability Zones.
resource "scaleway_vpc" "vpc_multi_az" { name = "vpc-multi-az" tags = ["multi-az"] } resource "scaleway_vpc_private_network" "pn_multi_az" { name = "pn-multi-az" vpc_id = scaleway_vpc.vpc_multi_az.id tags = ["multi-az"] } -
Add the Kapsule cluster and the three pools, each in a different Availability Zone but in the same Private Network, to effectively make the cluster multi-AZ. Refer to the Scaleway Terraform/OpenTofu provider documentation for available Kapsule parameters.
scaleway_k8s_clusterrequires no specific configuration for the multi-AZ mode.- The pools configuration
scaleway_k8s_poolwill get azoneparameter that allows placing each one in a different Availability Zone.
resource "scaleway_k8s_cluster" "kapsule_multi_az" { name = "kapsule-multi-az" tags = ["multi-az"] type = "kapsule" version = "1.30" cni = "cilium" delete_additional_resources = true autoscaler_config { ignore_daemonsets_utilization = true balance_similar_node_groups = true } auto_upgrade { enable = true maintenance_window_day = "sunday" maintenance_window_start_hour = 2 } private_network_id = scaleway_vpc_private_network.pn_multi_az.id } output "kapsule" { description = "Kapsule cluster id" value = scaleway_k8s_cluster.kapsule_multi_az.id } resource "scaleway_k8s_pool" "pool-multi-az" { for_each = { "fr-par-1" = "PRO2-XXS", "fr-par-2" = "PRO2-XXS", "fr-par-3" = "PRO2-XXS" } name = "pool-${each.key}" zone = each.key tags = ["multi-az"] cluster_id = scaleway_k8s_cluster.kapsule_multi_az.id node_type = each.value size = 2 min_size = 2 max_size = 3 autoscaling = true autohealing = true container_runtime = "containerd" root_volume_size_in_gb = 32 } -
Initialize your Terraform/OpenTofu configuration and apply it to create your resources.
terraform init
terraform apply
It may take up to 15 minutes for all the resources to be created and enter a Ready state.
-
Use the Scaleway CLI to retrieve the
kubeconfigfile, which contains the address of the cluster and the credentials, then use it to access the cluster:terraform output kapsule "fr-par/[CLUSTER-ID]" scw k8s kubeconfig install [CLUSTER-ID] kubectl config use-context [CONTEXT] -
List your nodes now to check that your cluster is ready and that there are two nodes per Availability Zone.
kubectl get nodes

NAME                                             STATUS   ROLES    AGE   VERSION
scw-kapsule-multi-az-pool-fr-par-1-61e22198f8c   Ready    <none>   89s   v1.30.2
scw-kapsule-multi-az-pool-fr-par-1-8334e772ced   Ready    <none>   82s   v1.30.2
scw-kapsule-multi-az-pool-fr-par-2-1bcf90f3683   Ready    <none>   90s   v1.30.2
scw-kapsule-multi-az-pool-fr-par-2-33265e85597   Ready    <none>   86s   v1.30.2
scw-kapsule-multi-az-pool-fr-par-3-44b14b7bbbd   Ready    <none>   84s   v1.30.2
scw-kapsule-multi-az-pool-fr-par-3-863491657c7   Ready    <none>   80s   v1.30.2
Nginx ingress controller as a stateless multi-AZ application
A very common pattern is to deploy an ingress controller to externally expose applications hosted inside the Kapsule cluster. Configuring a multi-AZ deployment of your ingress controller will greatly improve its resilience and scalability.
In this part, we will deploy an ingress-nginx in a multi-AZ, production-ready configuration, using the previously created Kapsule cluster. The official Helm for the nginx controller is full-featured, so we will use it through the Terraform/OpenTofu Helm provider.
- Healthy cluster
- Loss of one AZ
The domain used for this tutorial can be of type internal when bought with your Scaleway account, or of the external type if you want to re-use a domain bought with an external DNS registrar. If you choose the external method, you can follow the How to add an external domain to DNS documentation. If you don't want to delegate all your domains to your Scaleway account, import your domain, but do not change the name servers in your registrar. Then you can create a "DNS zone" in Scaleway on your external domain, and declare two NS records in your registrar matching this zone. For example, with a domain "your-domain.tld" imported in Scaleway, you can create a DNS zone "scw", and delegate this zone to your registrar by adding those two records:
scw 600 IN NS ns0.dom.scw.cloud.
scw 600 IN NS ns1.dom.scw.cloud.
The zone "scw.your-domain.tld" is now managed in your Scaleway account.
-
Create a new file
ingress-nginx.tfto store the deployment configuration of your ingress controller. The first step is to configurekubectlandhelmproviders to use the host and credentials generated by thescaleway_k8s_clusterresource when we created the Kapsule cluster.provider "kubernetes" { host = scaleway_k8s_cluster.kapsule_multi_az.kubeconfig[0].host token = scaleway_k8s_cluster.kapsule_multi_az.kubeconfig[0].token cluster_ca_certificate = base64decode(scaleway_k8s_cluster.kapsule_multi_az.kubeconfig[0].cluster_ca_certificate) } provider "kubectl" { host = scaleway_k8s_cluster.kapsule_multi_az.kubeconfig[0].host token = scaleway_k8s_cluster.kapsule_multi_az.kubeconfig[0].token cluster_ca_certificate = base64decode(scaleway_k8s_cluster.kapsule_multi_az.kubeconfig[0].cluster_ca_certificate) load_config_file = false } provider "helm" { kubernetes { host = scaleway_k8s_cluster.kapsule_multi_az.kubeconfig[0].host token = scaleway_k8s_cluster.kapsule_multi_az.kubeconfig[0].token cluster_ca_certificate = base64decode(scaleway_k8s_cluster.kapsule_multi_az.kubeconfig[0].cluster_ca_certificate) } } -
Use the
kubectlcommand below to get the label list of a node. We will use label sets on nodes to configure the distribution of the Pods on the cluster. You can see that multiple labels, set by thescaleway-cloud-controller-manager, contain information about theregionandzonewhere the node is deployed. The labeltopology.kubernetes.io/zone, at the end of the list, is particularly interesting in your case as it will allow us to know on which availability zone a Pod will be deployed.kubectl get node scw-kapsule-multi-az-pool-fr-par-1-51c432554c4 \ --template '{{range $k, $v := .metadata.labels}}{{printf "%s=%s\n" $k $v}}{{end}}' beta.kubernetes.io/arch=amd64 beta.kubernetes.io/instance-type=PRO2-XXS beta.kubernetes.io/os=linux failure-domain.beta.kubernetes.io/region=fr-par failure-domain.beta.kubernetes.io/zone=fr-par-1 k8s.scaleway.com/kapsule=6ee0a129-ee3b-4a89-ad4b-a74754441746 k8s.scaleway.com/managed=true k8s.scaleway.com/multi-az= k8s.scaleway.com/node=51c43255-4c42-449a-9e63-d734c357cd65 k8s.scaleway.com/pool=2d669c67-bb46-4e4f-93a0-a59834f6c6ba k8s.scaleway.com/pool-name=pool-fr-par-1 k8s.scaleway.com/runtime=containerd kubernetes.io/arch=amd64 kubernetes.io/hostname=scw-kapsule-multi-az-pool-fr-par-1-51c432554c4 kubernetes.io/os=linux node.kubernetes.io/instance-type=PRO2-XXS topology.csi.scaleway.com/zone=fr-par-1 topology.kubernetes.io/region=fr-par topology.kubernetes.io/zone=fr-par-1 -
Ensure you have at least two
ingress-nginxPods per Availability Zone. To do so, setreplicaCountto6. However, this alone won't guarantee distribution across zones. To that end, usetopologySpreadConstraintsto instruct the Kubernetes scheduler to distribute replicas based on thetopology.kubernetes.io/zonelabel, which can have values likefr-par-1,fr-par-2, orfr-par-3. You can find detailed documentation for Pod Topology Spread Constraints in the Kubernetes documentation. Also, there's an anti-affinity to prevent theingress-nginxPod from being scheduled on the same node in each AZ. Then, disable the default Kubernetes service creation by the Helm chart as it will be created through Terraform/OpenTofu later on to have multipleLoadBalancers.resource "helm_release" "nginx_ingress" { name = "ingress-nginx" namespace = "ingress-nginx" create_namespace = true repository = "https://kubernetes.github.io/ingress-nginx" chart = "ingress-nginx" values = [ <<-EOT controller: replicaCount: 6 topologySpreadConstraints: - topologyKey: topology.kubernetes.io/zone maxSkew: 1 whenUnsatisfiable: DoNotSchedule labelSelector: matchLabels: app.kubernetes.io/name: ingress-nginx app.kubernetes.io/instance: ingress-nginx app.kubernetes.io/component: controller affinity: podAntiAffinity: requiredDuringSchedulingIgnoredDuringExecution: - labelSelector: matchLabels: app.kubernetes.io/name: ingress-nginx app.kubernetes.io/instance: ingress-nginx app.kubernetes.io/component: controller topologyKey: "kubernetes.io/hostname" service: enabled: false EOT ] } -
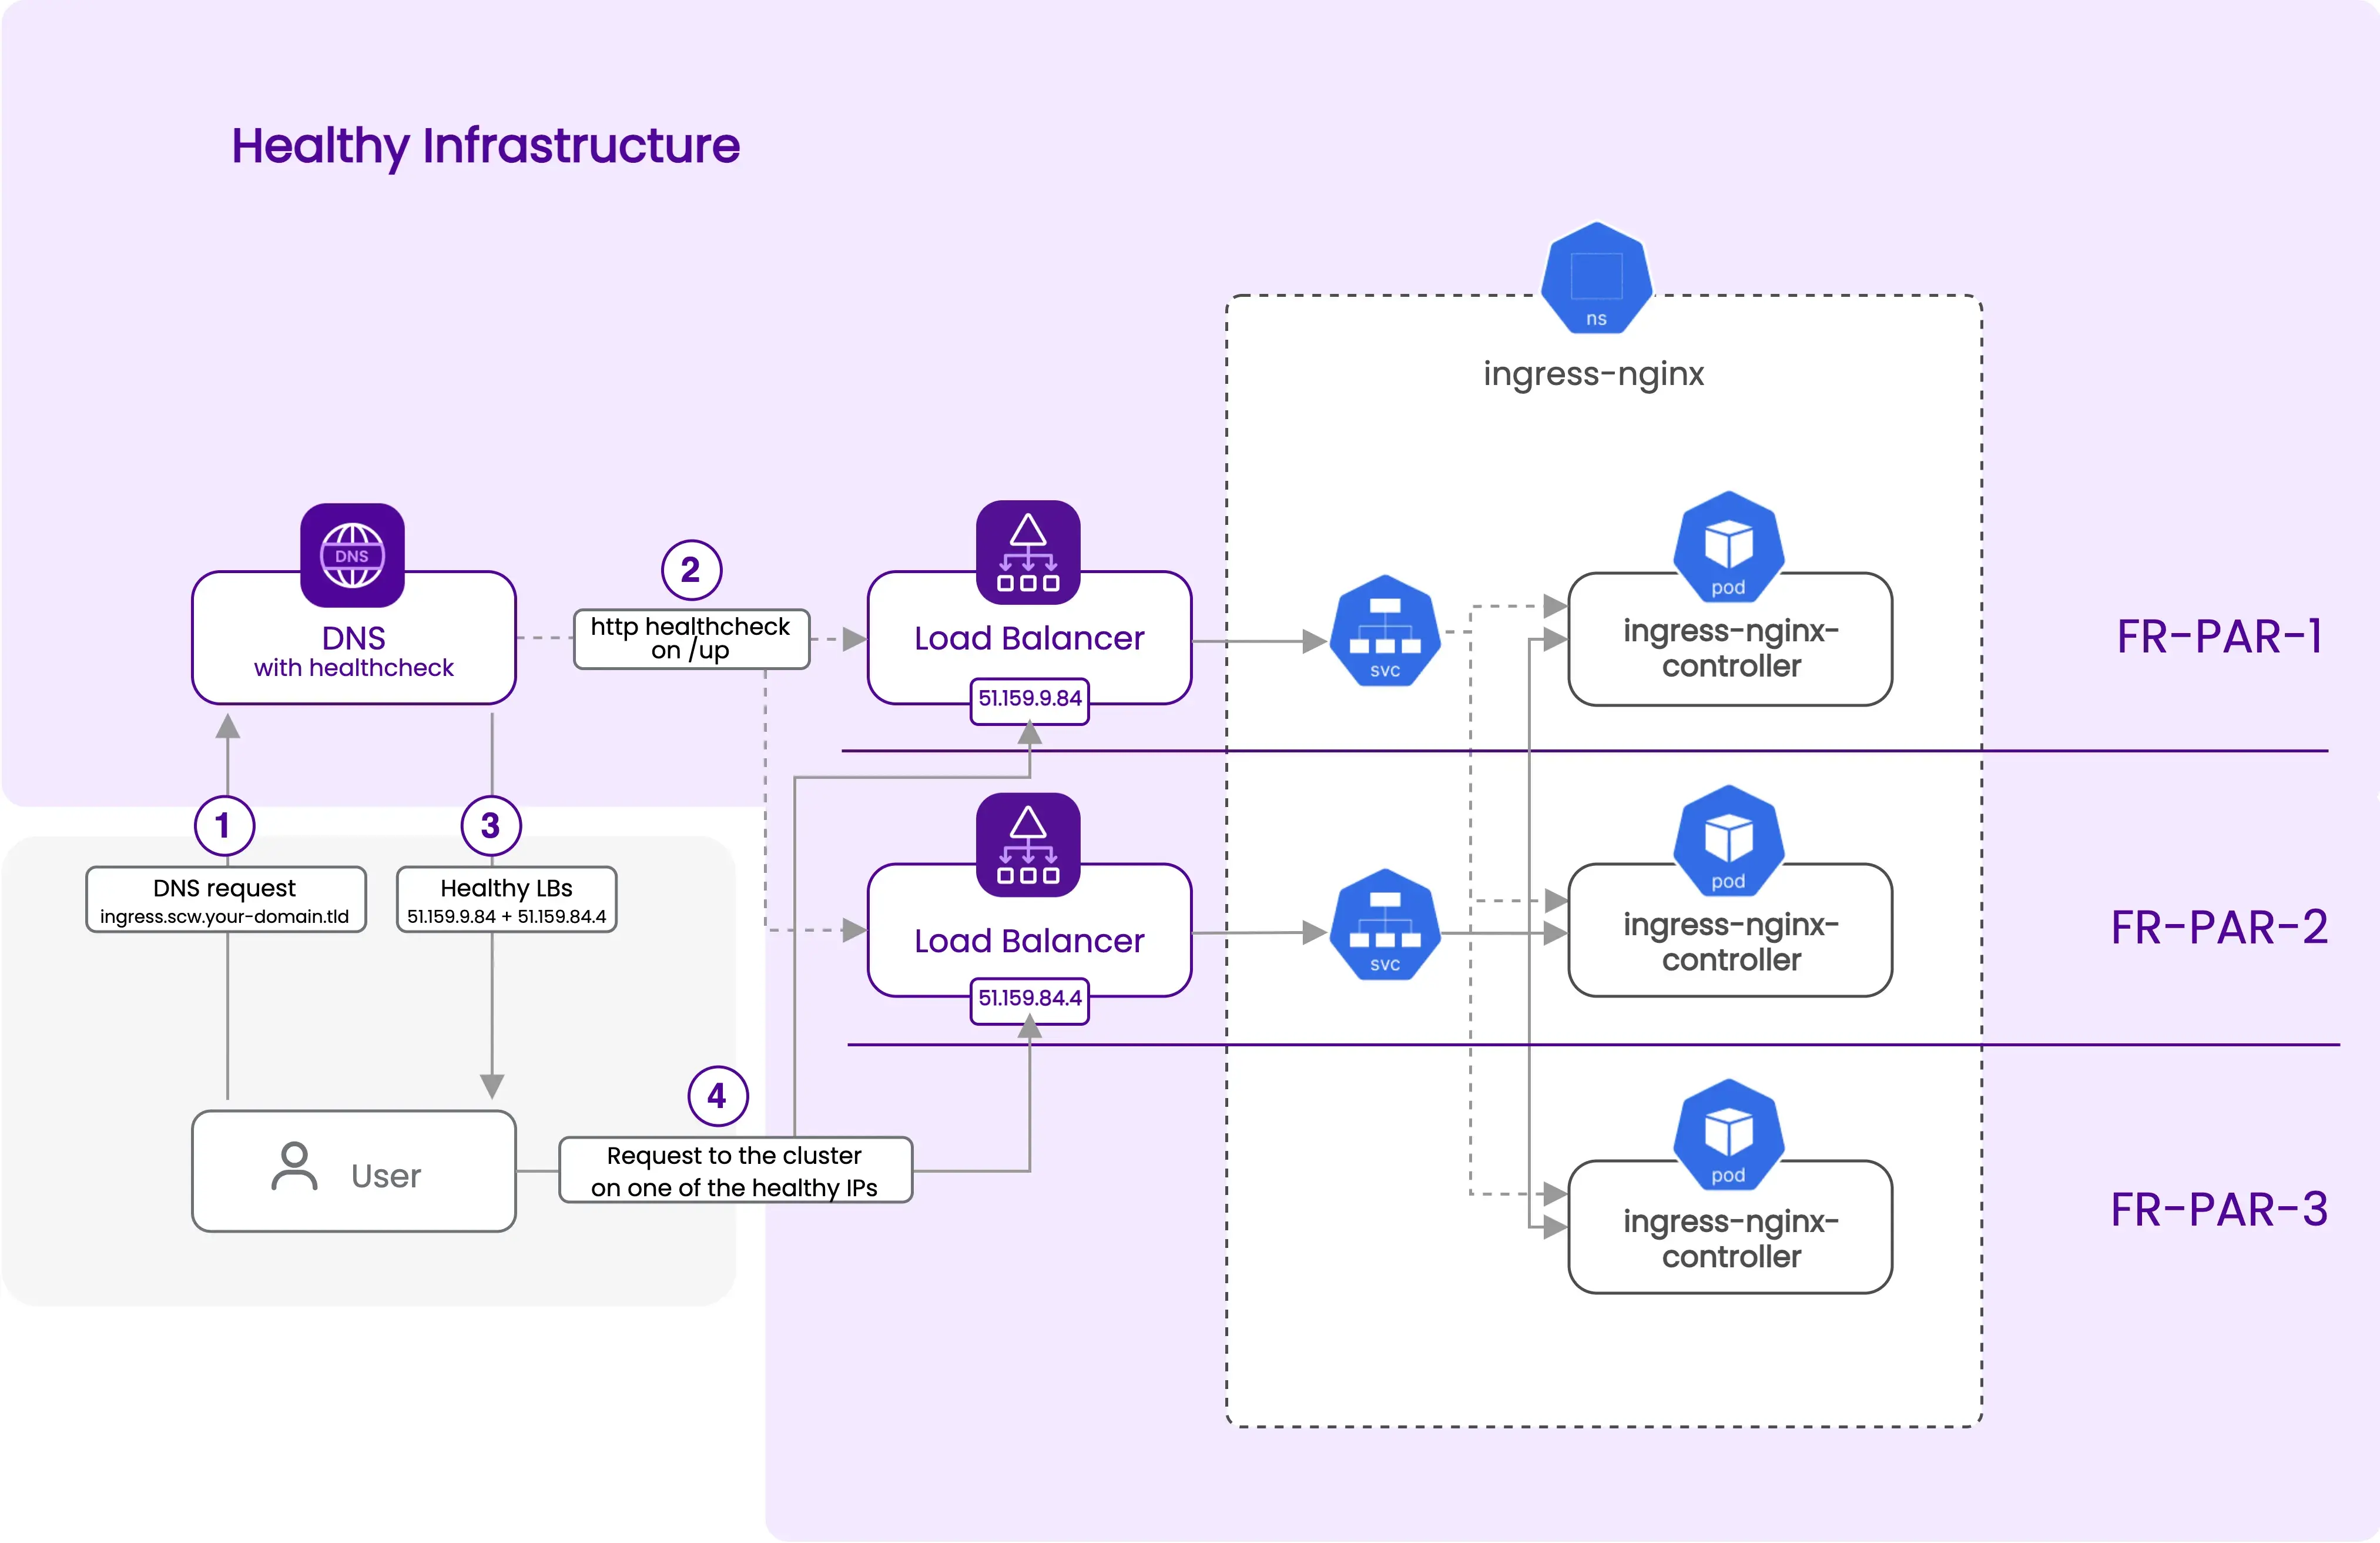
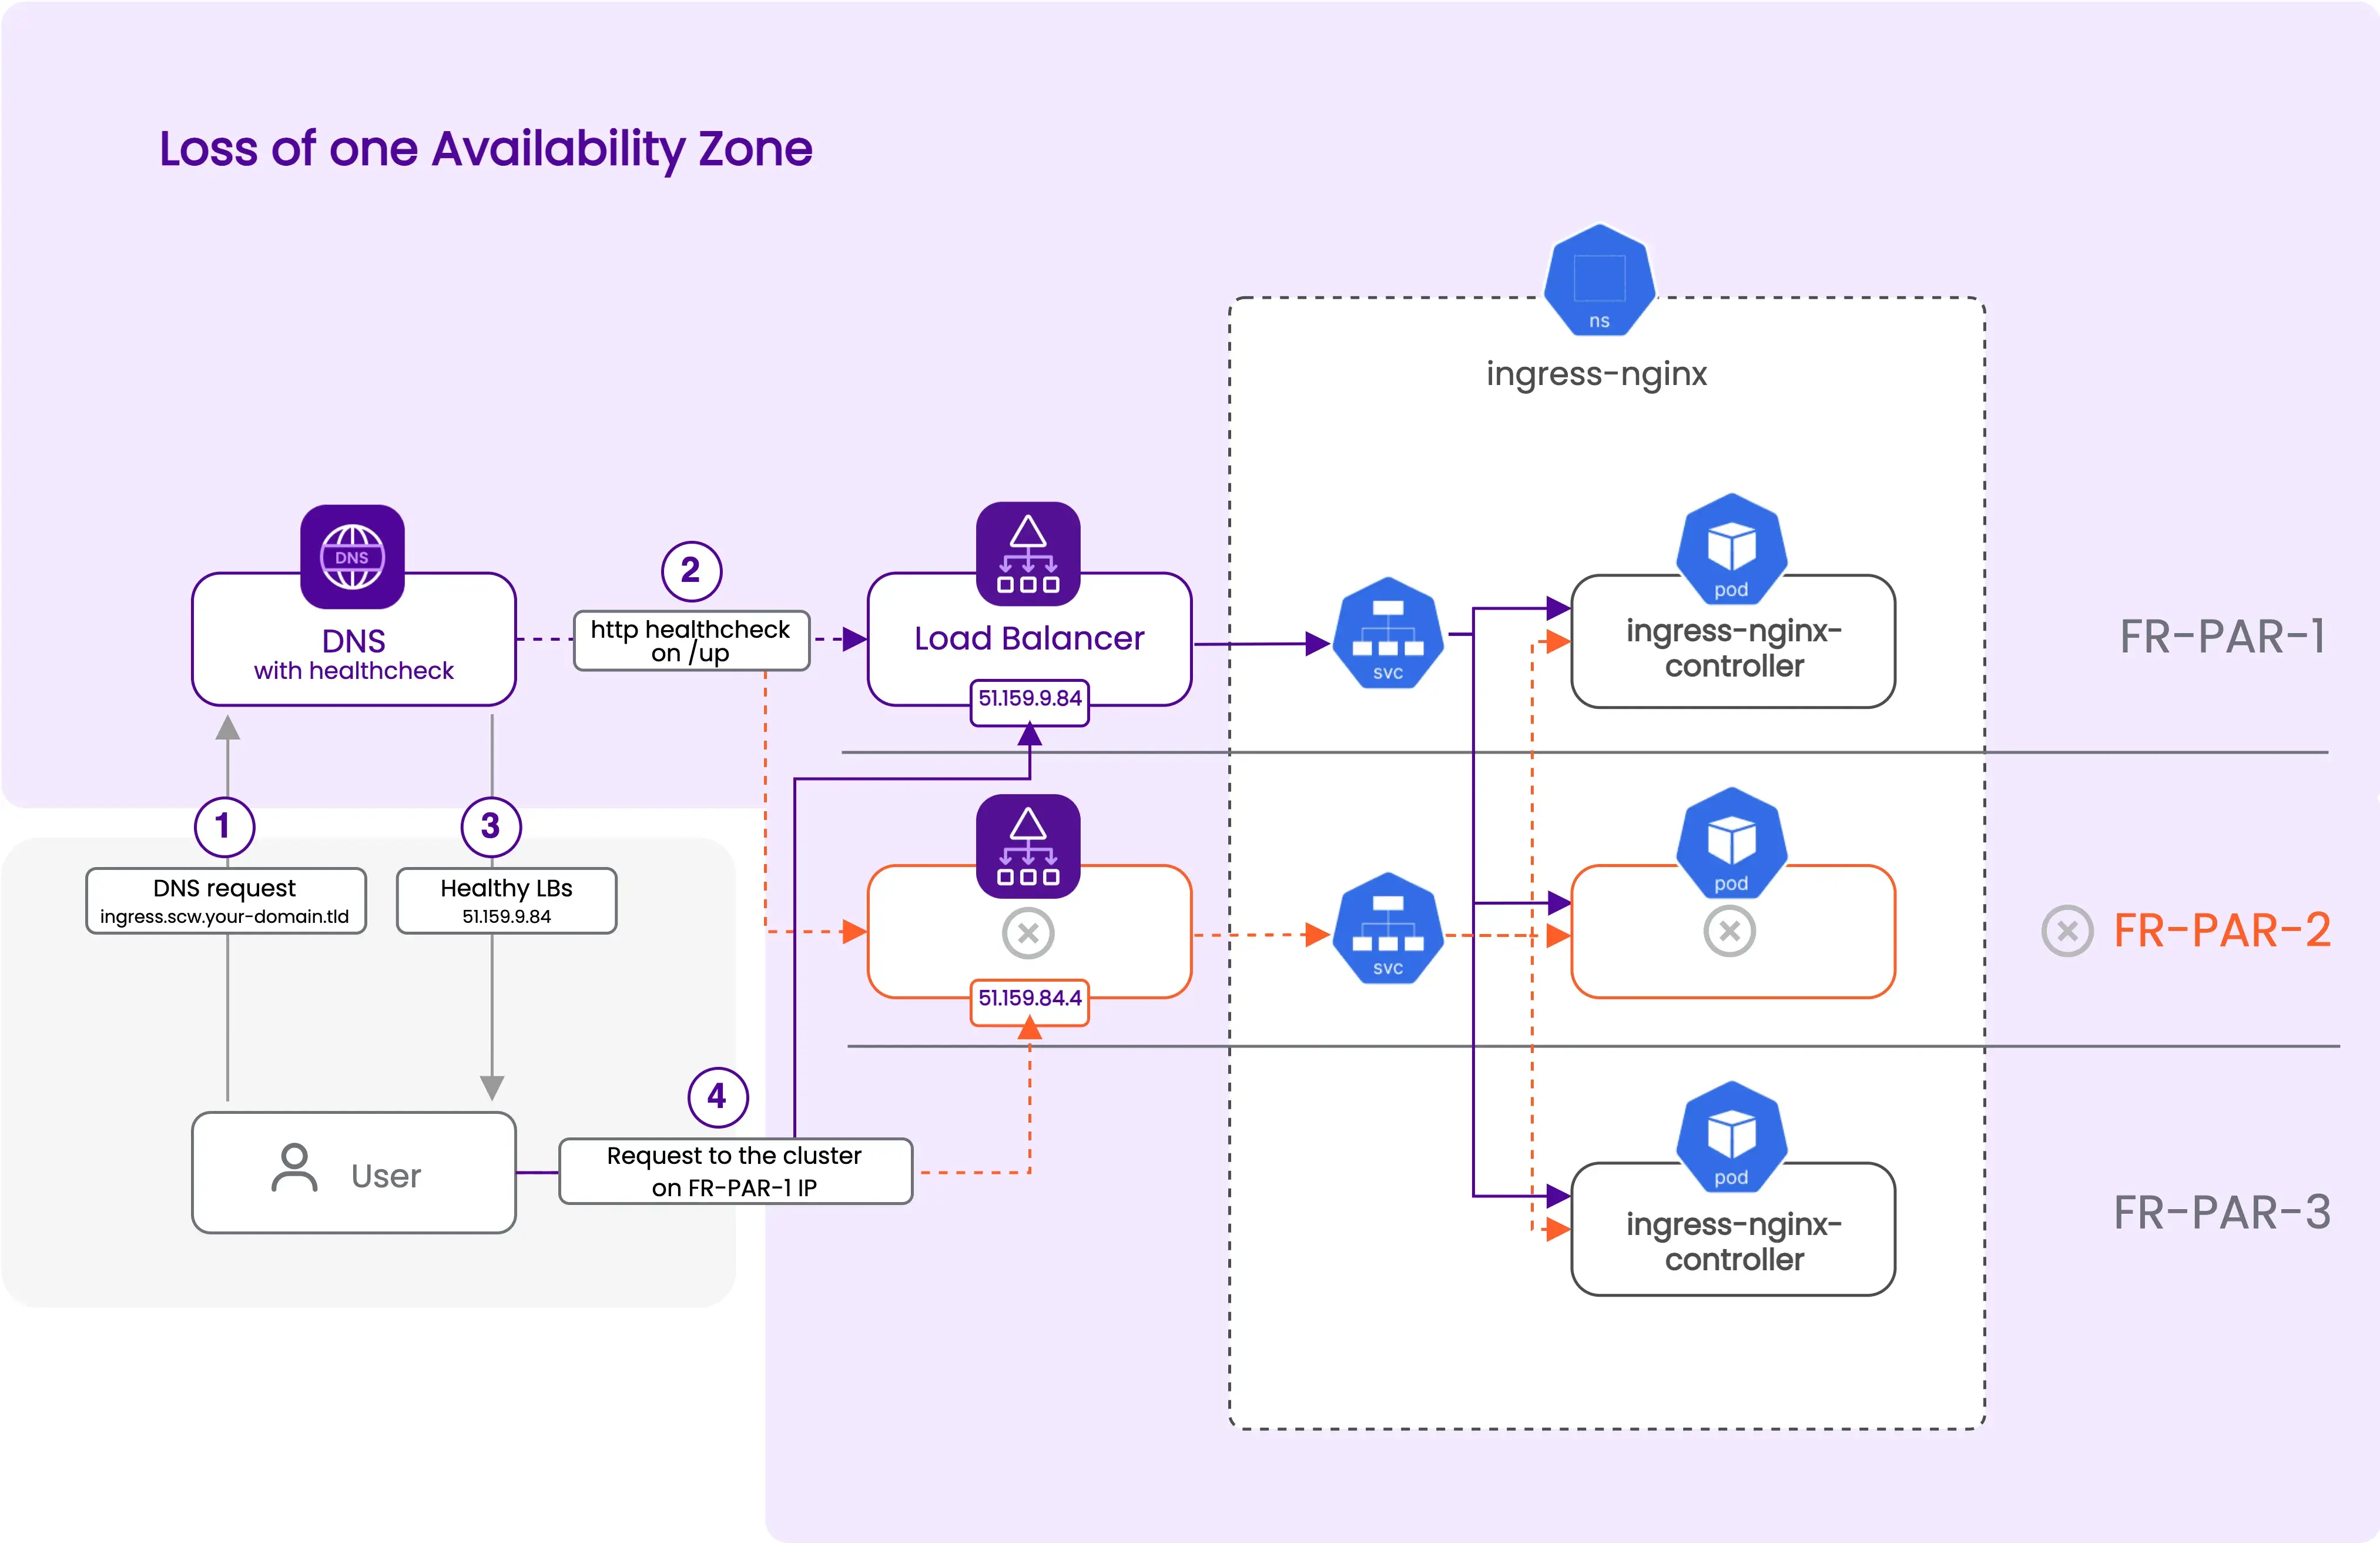
Add Kubernetes services of type
LoadBalancerto expose youringress-nginxPods. The important part here is that we will use theservice.beta.kubernetes.io/scw-loadbalancer-zoneannotation to create one load balancer per AZ. This annotation is used by thescaleway-cloud-controller-managerto create a load balancer in a specific AZ. In thefr-parregion, load balancers are available in two AZs, so we will have two load balancers. Each load balancer dispatches traffic to the healthy nodes of all the AZs. This means, in case of the loss of one AZ where one of the two load balancers is located, the other load balancer will still be available and will dispatch traffic to the healthy nodes, and their healthyingress-nginxPods, on the other AZs. The selector matches the labels set by the Helm chart on the ingress-nginx Pods, and the service exposes both HTTP and HTTPS ports. At the end of the resource, we tell Terraform/OpenTofu to ignore some labels and annotations that thescaleway-cloud-controller-managersets automatically, and that we do not want to override on the next Terraform/OpenTofu runs.resource "kubernetes_service" "nginx" { for_each = toset(["fr-par-1", "fr-par-2"]) metadata { name = "ingress-nginx-controller-${each.key}" namespace = helm_release.nginx_ingress.namespace annotations = { "service.beta.kubernetes.io/scw-loadbalancer-zone" : each.key } } spec { selector = { "app.kubernetes.io/name" = "ingress-nginx" "app.kubernetes.io/instance" = "ingress-nginx" "app.kubernetes.io/component" = "controller" } port { app_protocol = "http" name = "http" port = 80 protocol = "TCP" target_port = "http" } port { app_protocol = "https" name = "https" port = 443 protocol = "TCP" target_port = "https" } type = "LoadBalancer" } lifecycle { ignore_changes = [ metadata[0].annotations["service.beta.kubernetes.io/scw-loadbalancer-id"], metadata[0].labels["k8s.scaleway.com/cluster"], metadata[0].labels["k8s.scaleway.com/kapsule"], metadata[0].labels["k8s.scaleway.com/managed-by-scaleway-cloud-controller-manager"], ] } } -
Add the creation of a DNS record to direct the external traffic to the available load balancers. We assume that you have an internal or external domain configured in your account with a
scwzone, as described in the prerequisites part at the beginning of this section. In the code below, we useyour-domain.tldas a placeholder, so you need to replace it with your domain name. If you want to use a bare domain, remove the subdomain parameter from thescaleway_domain_zoneresource. In this configuration, we use thehttp_serviceblock to check that theingress-nginxservice is up and running via each load balancer on the two AZs. We retrieve the IPs of the LoadBalancers via the "EXTERNAL-IP" exposed by the Kubernetes services. The DNS record "ingress" under your domainscw.your-domain.tldwill resolve to all the IPs of the healthy load balancers, via the "all" strategy. So in case of the loss of one AZ, the DNS record will automatically be updated to resolve only to the IP of the healthy load balancer, and the traffic will be dispatched to the healthy nodes of the other AZs.
data "scaleway_domain_zone" "multi_az" {
    domain    = "your-domain.tld"
    subdomain = "scw"
}

resource "scaleway_domain_record" "multi_az" {
    dns_zone = data.scaleway_domain_zone.multi_az.id
    name     = "ingress"
    type     = "A"
    data     = kubernetes_service.nginx["fr-par-1"].status[0].load_balancer[0].ingress[0].ip
    ttl      = 60

    http_service {
        ips = [
            kubernetes_service.nginx["fr-par-1"].status[0].load_balancer[0].ingress[0].ip,
            kubernetes_service.nginx["fr-par-2"].status[0].load_balancer[0].ingress[0].ip,
        ]
        must_contain = ""
        url          = "http://ingress.scw.yourdomain.tld/healthz"
        user_agent   = "scw_dns_healthcheck"
        strategy     = "all"
    }
}-
Apply your configuration and wait for the deployment to be ready.
terraform apply -
Check that your nginx deployment is running and that the Pods are distributed across the different node pools in the different AZs.
kubectl get pods -n ingress-nginx -o wide NAME READY STATUS RESTARTS AGE IP NODE NOMINATED NODE READINESS GATES ingress-nginx-controller-6878d8d4b6-hkq44 1/1 Running 0 30m 100.64.9.233 scw-kapsule-multi-az-pool-fr-par-1-61e22198f8c <none> <none> ingress-nginx-controller-6878d8d4b6-mzc5q 1/1 Running 0 30m 100.64.11.78 scw-kapsule-multi-az-pool-fr-par-1-8334e772ced <none> <none> ingress-nginx-controller-6878d8d4b6-cgvt2 1/1 Running 0 30m 100.64.10.76 scw-kapsule-multi-az-pool-fr-par-2-1bcf90f3683 <none> <none> ingress-nginx-controller-6878d8d4b6-xmqm9 1/1 Running 0 30m 100.64.8.164 scw-kapsule-multi-az-pool-fr-par-2-33265e85597 <none> <none> ingress-nginx-controller-6878d8d4b6-4wbtj 1/1 Running 0 30m 100.64.7.201 scw-kapsule-multi-az-pool-fr-par-3-44b14b7bbbd <none> <none> ingress-nginx-controller-6878d8d4b6-mg9vp 1/1 Running 0 30m 100.64.6.210 scw-kapsule-multi-az-pool-fr-par-3-863491657c7 <none> <none> -
Check that both services of type LoadBalancer are up and get their external IPs.
kubectl get services -n ingress-nginx NAME TYPE CLUSTER-IP EXTERNAL-IP PORT(S) AGE ingress-nginx-controller-admission ClusterIP 10.42.12.8 <none> 443/TCP 31m ingress-nginx-controller-fr-par-1 LoadBalancer 10.41.26.168 195.154.68.56 80:32429/TCP,443:30842/TCP 14m ingress-nginx-controller-fr-par-2 LoadBalancer 10.42.96.9 51.159.85.96 80:30490/TCP,443:31351/TCP 14m -
Using your browser or curl command, check that
ingress-nginxis available. Since there is no ingress configured for the moment, it should respond with a 404 status code.curl http://195.154.68.56 <html> <head><title>404 Not Found</title></head> <body> <center><h1>404 Not Found</h1></center> <hr><center>nginx</center> </body> </html> -
With
digcommand, check that your DNS record is resolving to the IPs of all of the healthy load balancers.dig @ns1.dom.scw.cloud ingress.scw.your-domain.tld ... ;; ANSWER SECTION: ingress.scw.your-domain.tld. 60 IN A 195.154.68.56 ingress.scw.your-domain.tld. 60 IN A 51.159.85.96 ...
Your multi-AZ Ingress Nginx Controller should now be available on http://ingress.scw.your-domain.tld.
To automatically manage TLS certificates for your HTTPS ingresses, you can deploy the cert-manager.
Elasticsearch/Kibana as a stateful multi-AZ application
In this last section, you will deploy a multi-AZ Elasticsearch and a Kibana instance to query it. It will allow you to work with the stateful constraints imposed by the use of persistent volumes in a multi-AZ architecture. As a prerequisite, you need to have a default scw-bssd storage class with a volumeBindingMode set to WaitForFirstConsumer. You can check your cluster with the kubectl command below. Previous clusters were provisioned with the binding mode set to Immediate, so if you are in this case you need to update your cluster to the latest patch version (kubernetes >=1.24.17, >=1.25.13, >=1.26.8, >=1.27.5 or >=1.28.1). The storage class will be automatically updated to the new binding mode during the update.
kubectl get storageclasses.storage.k8s.io

NAME                 PROVISIONER        RECLAIMPOLICY   VOLUMEBINDINGMODE      ALLOWVOLUMEEXPANSION   AGE
scw-bssd (default)   csi.scaleway.com   Delete          WaitForFirstConsumer   true                   131m
scw-bssd-retain      csi.scaleway.com   Retain          WaitForFirstConsumer   true                   131m
It is important to use a storage class with the volumeBindingMode option set to WaitForFirstConsumer when deploying a multi-AZ application with persistent volumes.
This option ensures the volume is created only when the Pod is scheduled on a node, addressing the specific AZ requirement. Creating the volume before scheduling the Pod could result in the volume being placed randomly in an AZ, potentially causing attachment failures if the Pod is scheduled in a different AZ.
With the WaitForFirstConsumer option, volumes are created on the same AZ as the node where the Pod is scheduled, effectively spreading volumes across different AZs as Pods are distributed.
-
Create a new Terraform/OpenTofu file
elasticsearch.tffor this section. Deploying a clustered application commonly implies a more complex deployment logic. For Elasticsearch and Kibana, this logic is managed by ECK, the Elasticsearch operator for Kubernetes. It will be in charge of creating Elasticsearch nodes and configuring them to make a cluster. It will also automatically configure Kibana to connect to the Elasticsearch cluster. So the first thing to do is to deploy the ECK operator using its chart with the Helm provider.resource "helm_release" "eck" { name = "elastic-operator" namespace = "elastic-system" create_namespace = true repository = "https://helm.elastic.co" chart = "eck-operator" depends_on = [helm_release.nginx_ingress] } -
Create a namespace to deploy your Elasticsearch cluster and Kibana instance. We use the
depends_onparameter to make sure that the namespace is created after the ECK operator, so the Elasticsearch and Kibana CRDs are available before we try to create them.resource "kubernetes_namespace" "elasticsearch" { metadata { name = "elasticsearch" } depends_on = [helm_release.eck] } -
Create your multi-AZ Elasticsearch cluster using the "Elasticsearch" CRD provided by the ECK operator.
- Deploy an Elasticsearch cluster using
nodeSets, consisting of three Elasticsearch nodes, one in each AZ. These nodes will have persistent volumes to store data. - Now set the
storageClassNametoscw-bssd. This choice ensures that Elasticsearch volumes are correctly created in the respective AZs. - Then add the annotation
eck.k8s.elastic.co/downward-node-labels. This annotation instructs the operator to assign the labeltopology.kubernetes.io/zoneto each Pod it creates. This label serves as an environment variable to set thenode.attr.zoneparameter on each Elasticsearch node. This step enables Elasticsearch to allocate primary and replica shards to Pods in different AZs and nodes. - Finally, configure
topologySpreadConstraintsto distribute Pods across AZs based on thetopology.kubernetes.io/zonelabel defined on the nodes by Kapsule. For instance, if there are three node pools, each in a different AZ, and a nodesetcountof 3, this configuration will ensure one Pod per AZ. This redundancy ensures that even if one AZ experiences a failure, two Pods will continue to run in the other AZs, maintaining the necessary quorum of 2 nodes needed to elect a master node and keeping the Elasticsearch cluster available.
resource "kubectl_manifest" "elasticsearch" { yaml_body = <<YAML apiVersion: "elasticsearch.k8s.elastic.co/v1" kind: "Elasticsearch" metadata: name: "multi-az" namespace: "${kubernetes_namespace.elasticsearch.metadata[0].name}" annotations: "eck.k8s.elastic.co/downward-node-labels": "topology.kubernetes.io/zone" spec: version: "8.10.2" nodeSets: - name: "default" count: 3 volumeClaimTemplates: - metadata: name: "elasticsearch-data" spec: accessModes: - "ReadWriteOnce" resources: requests: storage: "1Gi" storageClassName: "scw-bssd" config: node.attr.zone: "$${ZONE}" cluster.routing.allocation.awareness.attributes: "k8s_node_name,zone" node.store.allow_mmap: false podTemplate: spec: containers: - name: "elasticsearch" env: - name: "ZONE" valueFrom: fieldRef: fieldPath: "metadata.annotations['topology.kubernetes.io/zone']" topologySpreadConstraints: - maxSkew: 1 topologyKey: "topology.kubernetes.io/zone" whenUnsatisfiable: "DoNotSchedule" labelSelector: matchLabels: "elasticsearch.k8s.elastic.co/cluster-name": "multi-az" "elasticsearch.k8s.elastic.co/statefulset-name": "multi-az-es-default" YAML } - Deploy an Elasticsearch cluster using
-
Deploy a Kibana instance, which will be automatically configured to connect to the Elasticsearch cluster. We use the same
topologySpreadConstraintsas for Elasticsearch to spread the Pods across the different AZs. We also use theeck.k8s.elastic.co/cluster-nameannotation to tell the operator to connect this Kibana instance to the Elasticsearch cluster named "multi-az" created before.resource "kubectl_manifest" "kibana" { yaml_body = <<YAML apiVersion: "kibana.k8s.elastic.co/v1" kind: "Kibana" metadata: name: "kibana" namespace: "${kubernetes_namespace.elasticsearch.metadata[0].name}" spec: version: "8.10.2" count: 3 elasticsearchRef: name: "multi-az" http: tls: selfSignedCertificate: disabled: true YAML } -
To expose Kibana to the outside world, create an Ingress resource that matches the host
kibana.scw.your-domain.tldand redirect traffic to the Kibana service. Once applied, it will allow you to access Kibana on https://kibana.scw.your-domain.tld using your browser.resource "kubernetes_ingress_v1" "kibana" { metadata { name = "kibana" namespace = kubernetes_namespace.elasticsearch.metadata[0].name } spec { ingress_class_name = "nginx" rule { host = "kibana.scw.your-domain.tld" http { path { backend { service { name = "kibana-kb-http" port { number = 5601 } } } } } } } } -
Create a DNS CNAME record for
kibana.scw.your-domain.tld, pointing to the A record of your ingress-nginx controller deployed in the second section. Since this A record,ingress.scw.your-domain.tld, is configured with health checks, it will automatically resolve to the IPs of the available load balancers, so in case of the loss of one AZ, the DNS record will automatically resolve to the IP of the healthy load balancer and the traffic will be dispatched to the healthy nodes of the other AZs, maintaining the availability of Kibana.resource "scaleway_domain_record" "kibana" { dns_zone = data.scaleway_domain_zone.multi_az.id name = "kibana" type = "CNAME" data = "ingress.scw.your-domain.tld." ttl = 300 keep_empty_zone = true } -
Apply your configuration and wait for the deployments of Elasticsearch and Kibana to be ready.
terraform apply -
Check that the Pods of your Elasticsearch cluster are spread across the different AZs, that your Elasticsarch cluster is healthy, and that Kibana is ready.
kubectl get pods -n elasticsearch -o wide NAME READY STATUS RESTARTS AGE IP NODE NOMINATED NODE READINESS GATES multi-az-es-default-0 1/1 Running 0 2m40s 100.64.6.118 scw-kapsule-multi-az-pool-fr-par-1-61e22198f8c <none> <none> multi-az-es-default-1 1/1 Running 0 2m40s 100.64.2.30 scw-kapsule-multi-az-pool-fr-par-2-1bcf90f3683 <none> <none> multi-az-es-default-2 1/1 Running 0 2m40s 100.64.4.74 scw-kapsule-multi-az-pool-fr-par-3-44b14b7bbbd <none> <none> kubectl get es NAME HEALTH NODES VERSION PHASE AGE multi-az green 3 8.10.2 Ready 2m48s kubectl get kibana NAME HEALTH NODES VERSION AGE kibana green 3 8.10.2 2m52s -
To access Kibana, open the URL
http://kibana.scw.your-domain.tldin your browser. You should see the Kibana login page. The default username iselasticand the password is the one generated by the ECK operator. You can retrieve it with the command below.kubectl get secret multi-az-es-elastic-user -o jsonpath='{.data.elastic}' -n elasticsearch | base64 --decode <your-elastic-user-password>
You have finished this tutorial, and have a full production-ready multi-AZ Kapsule cluster with a multi-AZ ingress controller and a multi-AZ Elasticsearch/Kibana cluster. You can now deploy your applications based on the same logic and enjoy the high availability of your Kubernetes cluster.
Visit our Help Center and find the answers to your most frequent questions.
Visit Help Center