Multi-Cloud Kubernetes best practices
Using Kubernetes in a Multi-Cloud environment can be challenging and requires the implementation of best practices. Learn a few good practices to implement a concrete multi-cloud strategy.

This article follows the first and second part of the Hands-On prepared for Devoxx Poland 2021.
⚠️ Warning reminder:
This article will balance between concept explanations and operations or commands that need to be performed by the reader.
If this icon 🔥 is present before an image, a command, or a file, you are required to perform an action.
So remember, when 🔥 is on, so are you!
Load Balancing traditionally allows service exposure using standard protocols such as HTTP or HTTPS. Often used to give an external access point to software end-users, Load Balancers are usually managed by Cloud providers.
When working with Kubernetes, a specific Kubernetes component manages the creation, configuration, and lifecycle of Load Balancers within a cluster.
The Cloud Controller Manager is the Kubernetes component that provides an interface for Cloud providers to manage Cloud resources from a cluster's configuration.
This component is especially in charge of the creation and deletion of Instances (in auto-healing and auto-scaling usage) and Load Balancers to expose the applications running in a Kubernetes cluster outside of it, making it available for external users.

Classic Kubernetes architecture with the CCM component within the Kubernetes Control-Plane
We will create a Multi-Cloud Load Balancer with Scaleway's Cloud Controller Manager which allows us to expose services and redirect traffic across both of our two providers (Scaleway and Hetzner).
For this exercise, we will be using an open source project called WhoAmI hosted on Github. The two main advantages are that the project is available as a docker image, and that once called, it outputs the identifier of the pod it runs on.
🔥 We are going to write a lb.yaml file which will contain:
deployment of our whoami application, with two replicas, a pod anti affinity to distribute our two pods on different providers, and expose its port 8000 inside the cluster.service of type LoadBalancer which maps the 8000 port of our pods to the standard HTTP port (80) and expose our application outside of the cluster.🔥
#lb.yaml---apiVersion: apps/v1kind: Deploymentmetadata: name: whoami labels: app: whoamispec: replicas: 2 selector: matchLabels: app: whoami template: metadata: labels: app: whoami spec: affinity: podAntiAffinity: requiredDuringSchedulingIgnoredDuringExecution: - labelSelector: matchExpressions: - key: app operator: In values: - whoami topologyKey: provider containers: - name: whoami image: jwilder/whoami ports: - containerPort: 8000---apiVersion: v1kind: Servicemetadata: name: scw-multicloud-lb labels: app: whoamispec: selector: app: whoami ports: - port: 80 targetPort: 8000 type: LoadBalancerNow that our yaml file is ready, we can create the deployment and the load balancer service at once.
🔥 kubectl apply -f lb.yaml
Output
deployment.apps/whoami created
service/scw-multicloud-lb created
🔥 We can list the services available in our cluster and see that our service of type LoadBalancer is ready and has been given an external-ip.
🔥 kubectl get services
Output
NAME TYPE CLUSTER-IP EXTERNAL-IP PORT(S)kubernetes ClusterIP 10.32.0.1 <none> 443/TCPscw-multicloud-lb LoadBalancer 10.35.41.56 51.159.11.31 80:31302/TCPAs we stated before, creating a Load Balancer service within a Kubernetes cluster results in the creation of a Load Balancer resource on the user account on the Cloud provider managing the Kubernetes cluster (via the CCM component).
If we connect to our Scaleway Console, we can see that a Load Balancer resource has been added to our account with the same attributed external-ip that we were given by listing our Kubernetes services.

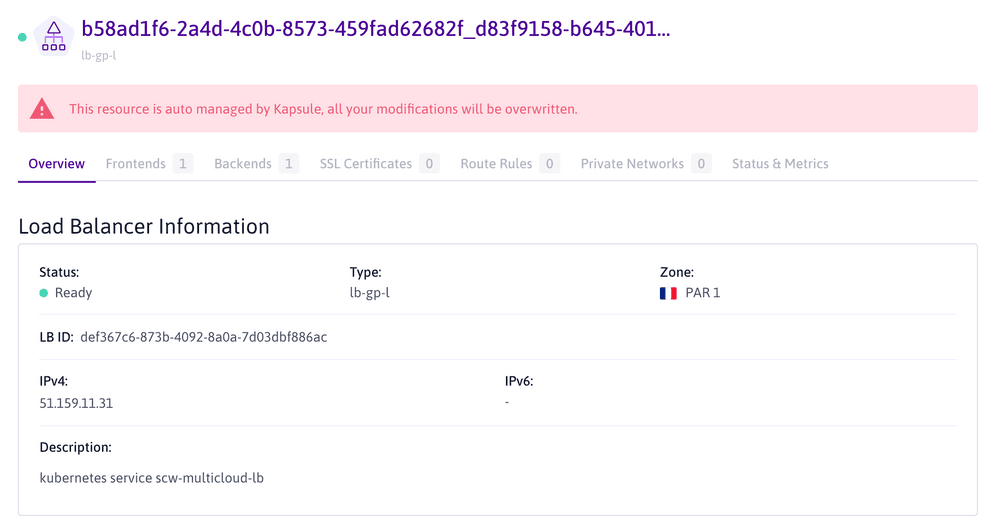
Since we created our Load Balancer service in the context of a Kubernetes Kosmos cluster (i.e. a Multi-Cloud environment), the CCM created a Multi-Cloud Scaleway Load Balancer to match our needs.
The project we deployed allows us to test the behavior of our Multi-Cloud Load Balancer. We already know that our two whoami pods run on different providers, but let's be sure that the traffic is redirected to both providers when it is called.
🔥 To do so, we will create a simple bash command to call our given external-ip. The whoami project should answer us its identifier.
🔥 while true; do curl http://51.159.11.31; sleep 1; done
Output
I'm whoami-59c74f5cf4-hxdwpI'm whoami-59c74f5cf4-hxdwpI'm whoami-59c74f5cf4-hxdwpI'm whoami-59c74f5cf4-kbfq4I'm whoami-59c74f5cf4-hxdwpI'm whoami-59c74f5cf4-hxdwpI'm whoami-59c74f5cf4-hxdwpI'm whoami-59c74f5cf4-kbfq4
When calling our service, we can see that we indeed have two different identifiers returned by our calls, those identifiers corresponding to our two pods running on nodes from our two different providers.
The Multi-Cloud Load Balancer created directly within our Kubernetes cluster can redirect traffic between different nodes from different Cloud providers for the same application (i.e. deployment).
If we want to verify this assessment, we can simply list our pods again and the nodes they run on.
🔥 kubectl get pods -o custom-columns=NAME:.metadata.name,NODE:.spec.nodeName,STATUS:.status.phase
Output
NAME NODE STATUS whomai-59c74f5cf4-hxdwp scw-kosmos-kosmos-scw-0937 Runningwhomai-59c74f5cf4-kbfq4 scw-kosmos-worldwide-b2db Running The last check we can do is to display the provider label associated with these two nodes, just to be sure they are on different Cloud providers.
🔥 kubectl get nodes scw-kosmos-kosmos-scw-09371579edf54552b0187a95 scw-kosmos-worldwide-b2db708b0c474decb7447e0d6 -o custom-columns=NAME:.metadata.name,PROVIDER:.metadata.labels.provider
Output
NAME PROVIDERscw-kosmos-kosmos-scw-09371579edf54552b0187a95 scalewayscw-kosmos-worldwide-b2db708b0c474decb7447e0d6 hetzner🔥 Now we can delete our deployment and Multi-Cloud Load Balancer service. To do so, we will start by deleting the service, which will result in the deletion of our Load Balancer resource in the Scaleway Console.
🔥 kubectl delete service scw-multicloud-lb
Output
service "scw-multicloud-lb" deleted
🔥 And then we can delete our deployment.
🔥 kubectl delete deployment whoami
Output
deployment.apps "whoami" deleted
In Kubernetes, nodes are considered dispensable, meaning they can be deleted, created, or replaced. This implies that local storage for Kubernetes usage is not a reliable solution, since the data stored locally on an instance would be lost in case of the Instance deletion or replacement.
The Container Storage Interface (or CSI) is a Kubernetes component running on all the managed nodes of a Kubernetes cluster.
It provides an interface for persistent storage management such as:
pods within a cluster.pod.Each Cloud Provider implements its own CSI plugin to create Storage resources on the user account. Additional storage resources created by Cloud providers CSI are usually visible in their Cloud Console with the instances information.
To understand the behavior of CSI plugins, we are going to create pods with default persistent volume claims for Scaleway and Hetzner nodes.
🔥 Creating a Scaleway Block Storage
Our first step will be to define a pod called csi-app-scw and attach a persistent volume claim to it. This should result in the creation of a pod and a block storage attached to it.
🔥
#pvc_on_scaleway.yaml---apiVersion: v1kind: PersistentVolumeClaimmetadata: name: pvc-scwspec: accessModes: - ReadWriteOnce resources: requests: storage: 10Gi---apiVersion: v1kind: Podmetadata: name: csi-app-scwspec: nodeSelector: provider: scaleway containers: - name: busy-pvc-scw image: busybox volumeMounts: - mountPath: "/data" name: csi-volume-scw command: ["sleep","3600"] volumes: - name: csi-volume-scw persistentVolumeClaim: claimName: pvc-scw🔥 We can apply our configuration and see what happens.
🔥 kubectl apply -f pvc_on_scaleway.yaml
Output
persistentvolumeclaim/pvc-scw created
pod/csi-app-scw created
By listing the pod, we see that it is running and in an healthy state.
🔥 kubectl get pod csi-app-scw
Output
NAME READY STATUS RESTARTS AGEcsi-app-scw 1/1 Running 0 37sDefault CSI storage class scw-bssd was found and created the persistent volume.
🔥 Now if we list the persistent volumes and persistent volume claims of our cluster, we can see the status if our block storage.
🔥 kubectl get pv -o custom-columns=NAME:.metadata.name,CAPACITY:.spec.capacity.storage,CLAIM:.spec.claimRef.name,STORAGECLASS:.spec.storageClassName
Output
NAME CAPACITY CLAIM STORAGECLASSpvc-8793d69a-3fbd-4ccf-8e88-ef36 10Gi pvc-scw scw-bssdWe can see that the default CSI Storage Class scw-bssd was found and created the persistent volume.
Our block storage was even created in our Scaleway account on our managed Scaleway Instance located in Amsterdam.

🔥 Creating a Hetzner Block Storage
🔥 In the same way as before, we are going to define a similar pod called csi-app-hetzner and attach a persistent volume claim to it. We should expect the same result as before with the Scaleway Instance.
🔥
#pvc_on_hetzner.yaml---apiVersion: v1kind: PersistentVolumeClaimmetadata: name: pvc-hetznerspec: accessModes: - ReadWriteOnce resources: requests: storage: 10Gi---apiVersion: v1kind: Podmetadata: name: csi-app-hetznerspec: nodeSelector: provider: hetzner containers: - name: busy-pvc-hetzner image: busybox volumeMounts: - mountPath: "/data" name: csi-volume-hetzner command: ["sleep","3600"] volumes: - name: csi-volume-hetzner persistentVolumeClaim: claimName: pvc-hetzner🔥 Let's apply our configuration for Hetzner.
🔥 kubectl apply -f pvc_on_hetzner.yaml
Output
persistentvolumeclaim/pvc-hetzner created
pod/csi-app-hetzner created
🔥 And list our csi-app-hetzner pod.
🔥 kubectl get pod csi-app-hetzner
Output
NAME READY STATUS RESTARTS AGEcsi-app-hetzner 0/1 Pending 0 76sThis time, we find ourselves with a pod stuck in pending state.
To understand what happened, we are going to have a closer look at our persistent volumes by listing their name and storage class.
🔥 kubectl get pv -o custom-columns=NAME:.metadata.name,CAPACITY:.spec.capacity.storage,CLAIM:.spec.claimRef.name,STORAGECLASS:.spec.storageClassName
Output
NAME CAPACITY CLAIM STORAGECLASSpvc-6f6d1aea-d8cd-43af-9c54-460a 10Gi pvc-hetzner scw-bssdpvc-8793d69a-3fbd-4ccf-8e88-ef36 10Gi pvc-scw scw-bssdThe default storage class of our Scaleway Managed Kubernetes engine being scw-bssd and the csi-app-hetzner pod being scheduled on the Hetzner Instance, the persistent volume could not be attached to the pod.
In fact, block storage can only be attached to Instances from the same Cloud provider.
🔥 To see the available storage classes available on a Kubernetes,cluster, we can execute the following command:
🔥 kubectl get StorageClass -o custom-columns=NAME:.metadata.name
Output
NAMEscw-bssdscw-bssd-retainWe see here that only Scaleway CSI is available, so the pod requiring to be on Hetzner Instance cannot schedule due to its incapacity to connect to a Scaleway Block Storage.
Then, let's try to focus on Scaleway Instances and create Block Storage on our two Instances, one managed, and the other unmanaged, and we will get back to Hetzner later.
In order to play with a lot of pods and persistent volumes, we are going to use Kubernetes statefulset object.
🔥 We are going to write a statefulset_on_scaleway.yaml file to configure a statefulset with:
-the namestatefulset-csi-scw
-ten replicas
-a node selector for pods to run on nodes with label provider=scaleway only
-a volume claim template to create block storages for each pods, using the scw-bssd storage class.
🔥
#statefulset_on_scaleway.yaml---apiVersion: apps/v1kind: StatefulSetmetadata: name: statefulset-csi-scwspec: serviceName: statefulset-csi-scw replicas: 10 selector: matchLabels: app: statefulset-csi-scw provider: scaleway template: metadata: labels: app: statefulset-csi-scw provider: scaleway spec: containers: - name: busy-pvc-scw image: busybox volumeMounts: - mountPath: "/data" name: csi-vol-scw command: ["sleep","3600"] volumeClaimTemplates: - metadata: name: csi-vol-scw spec: accessModes: [ "ReadWriteOnce" ] storageClassName: scw-bssd resources: requests: storage: 1Gi🔥 Let's apply our file.
🔥 kubectl apply -f statefulset_on_scaleway.yaml
Output
statefulset.apps/statefulset-csi-scw created
🔥 Each pods of our statefulset is being created progressively.
🔥 kubectl get statefulset -w
Output
NAME READY AGEstatefulset-csi-scw 0/10 16sstatefulset-csi-scw 1/10 32sstatefulset-csi-scw 2/10 62sstatefulset-csi-scw 3/10 90sstatefulset-csi-scw 4/10 2m1s[...]🔥 Once all pods available, we can list them with the associated node they have been scheduled on.
🔥 kubectl get pods -o wide | awk '{print $1"\t"$7}' | grep statefulset-csi-scw
Output
statefulset-csi-scw-0 scw-kosmos-kosmos-scw-0937statefulset-csi-scw-1 scw-kosmos-kosmos-scw-0937statefulset-csi-scw-2 scw-kosmos-kosmos-scw-0937statefulset-csi-scw-3 scw-kosmos-kosmos-scw-0937statefulset-csi-scw-4 scw-kosmos-kosmos-scw-0937statefulset-csi-scw-5 scw-kosmos-kosmos-scw-0937statefulset-csi-scw-6 scw-kosmos-kosmos-scw-0937statefulset-csi-scw-7 scw-kosmos-kosmos-scw-0937statefulset-csi-scw-8 scw-kosmos-kosmos-scw-0937statefulset-csi-scw-9 scw-kosmos-kosmos-scw-0937Unfortunately, we can see that all pods are running on the same node, which is the node managed by Scaleway.
The reason for that is that Scaleway CSI only runs on managed Instances such as the one we created in Amsterdam, using a node selector on a specific label set by the Scaleway Kubernetes Control-Plane.
Since our instance in Warsaw is not managed (i.e. it has been added manually), no pod could be scheduled on it because it did not have access to Scaleway CSI.
In fact, if we look at Scaleway Console and the list of Block Storages that have been created, we can see that they are all attached to the same Instance in the same Availability Zone.
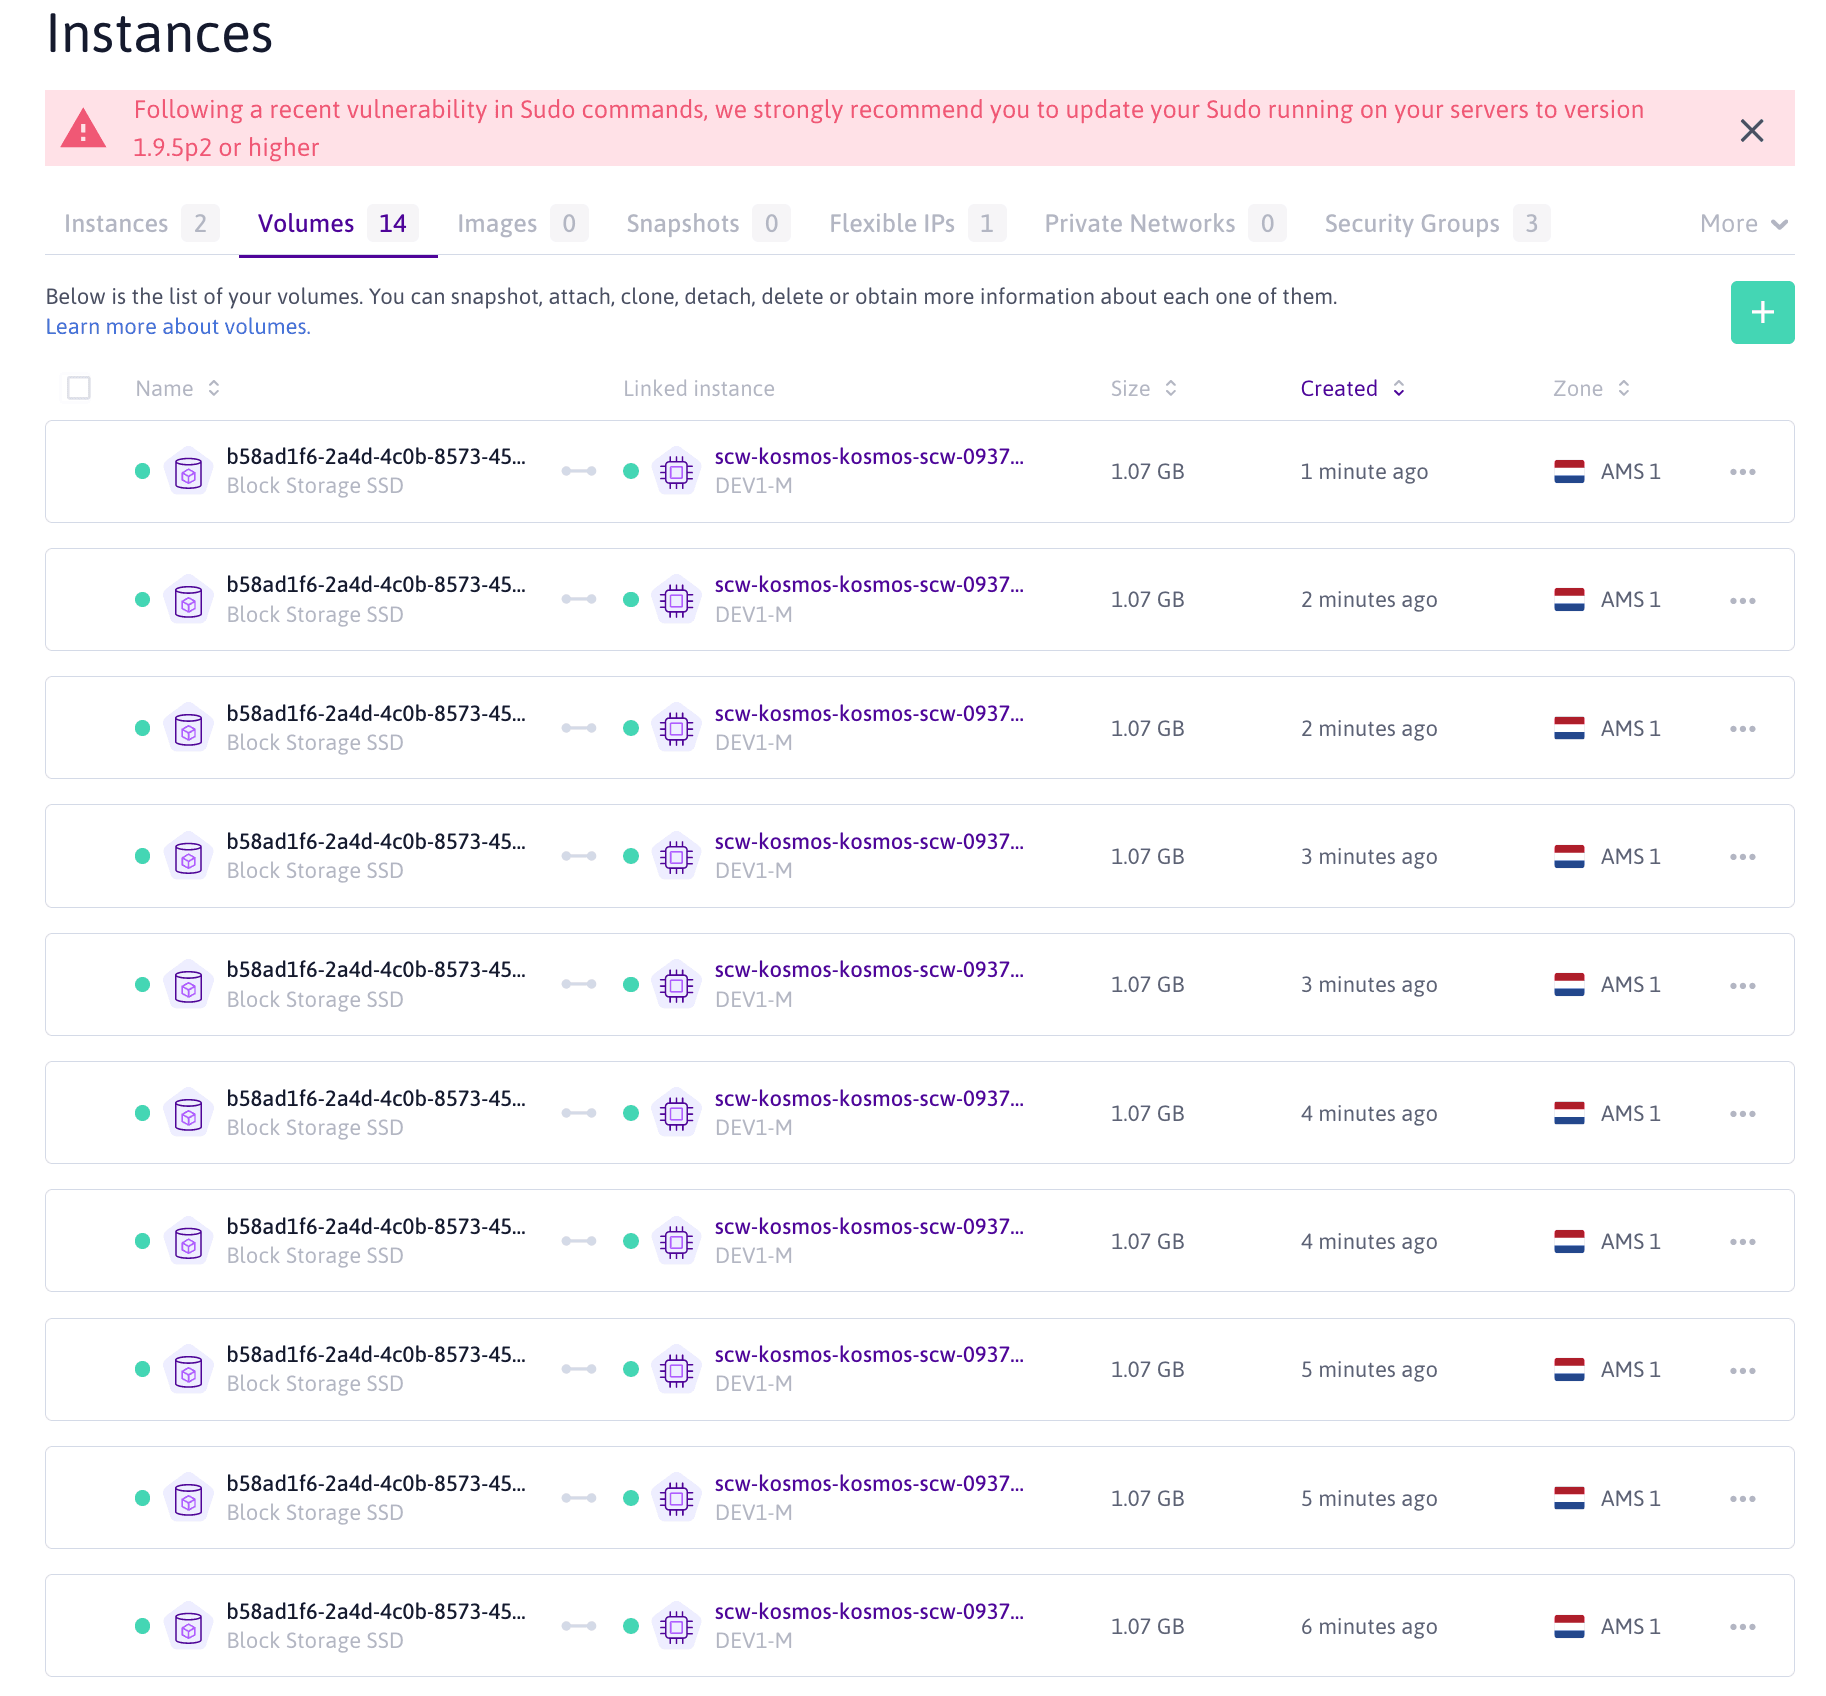
Block Storage listing view in Scaleway Console
In order to fix this behevior, we will start by deleting our statefulset and persistent volumes .
🔥 Delete our StatefulSet and our Persistent volumes:
🔥 kubectl delete statefulset statefulset-csi-scw
Output
statefulset.apps "statefulset-csi-scw" deleted
Delete all resources that should still be running on our cluster (pods and persistent volume claims)
🔥 kubectl delete pod $(kubectl get pod | awk '{print $1}')
🔥 kubectl delete pvc $(kubectl get pvc | awk '{print $1}')
Deleting Persistent Volume Claims (PVC) will also delete Persistent Volumes (PV) objects
To understand what is happening with our Scaleway CSI, let's have a look at the components running in the kube-system namespace of our cluster, and specifically have a look a the line concerning the csi-node deamonset.
🔥 kubectl -n kube-system get all
Output (the part we are going to modify)
NAME DESIRED CURRENT READY UP-TO-DATE AVAILABLE NODE SELECTOR AGEdaemonset.apps/csi-node 1 1 1 1 1 k8s.scaleway.com/managed=true 150mScaleway's CSI have a node selector on the label k8s.scaleway.com/managed=true, which is set to false on our unmanaged Scaleway server. Instead of changing our label to true and risking unwanted behavior (maybe this label is used for another Kubernetes component), we are going to change the node selector so it uses the provider label instead.
🔥 To do so, we can edit the deamonset directly using kubectl. It will open your default unix text editor.
🔥 kubectl -n kube-system edit daemonset.apps/csi-node
We need here to replace the occurence of the nodeSelector k8s.scaleway.com/managed=true by provider=scaleway.
There is only one occurrence to replace.
🔥 Save the file and exit the edition mode.
nodeSelector: provider: scalewayOutput
daemonset.apps/csi-node edited
🔥 Once edited, we can list the components of kube-system namespace again to check that the change was applied.
🔥 kubectl -n kube-system get all
Output (the part we are going to modify)
NAME DESIRED CURRENT READY UP-TO-DATE AVAILABLE NODE SELECTOR AGE> daemonset.apps/csi-node 2 2 2 1 2 provider=scaleway 158mWe can see that the node selector has been changed, and that instead of having only one occurence of it, we now have two deamonset available in our cluster, one for each of our Scaleway node.
🔥 Now that our Scaleway CSI is applied correctly, let's reapply the exact statefulset and see what happens.
🔥 kubectl apply -f statefulset_on_scaleway.yaml
Output
statefulset.apps/statefulset-csi-scw created
🔥 kubectl get pods -o wide | awk '{print $1"\t"$7}' | grep statefulset-csi-scw
Output
statefulset-csi-scw-0 scw-kosmos-kosmos-scw-0937statefulset-csi-scw-1 scw-kosmos-worldwide-5ecdstatefulset-csi-scw-2 scw-kosmos-kosmos-scw-0937statefulset-csi-scw-3 scw-kosmos-worldwide-5ecdstatefulset-csi-scw-4 scw-kosmos-kosmos-scw-0937statefulset-csi-scw-5 scw-kosmos-worldwide-5ecdstatefulset-csi-scw-6 scw-kosmos-kosmos-scw-0937statefulset-csi-scw-7 scw-kosmos-worldwide-5ecdstatefulset-csi-scw-8 scw-kosmos-kosmos-scw-0937statefulset-csi-scw-9 scw-kosmos-worldwide-5ecdOur two Scaleway nodes are now able to attach to Scaleway Block Storage, and we can see that our statefulset is now spread across our two Scaleway Instances, the managed one in Amsterdam and the unmanaged one in Warsaw.
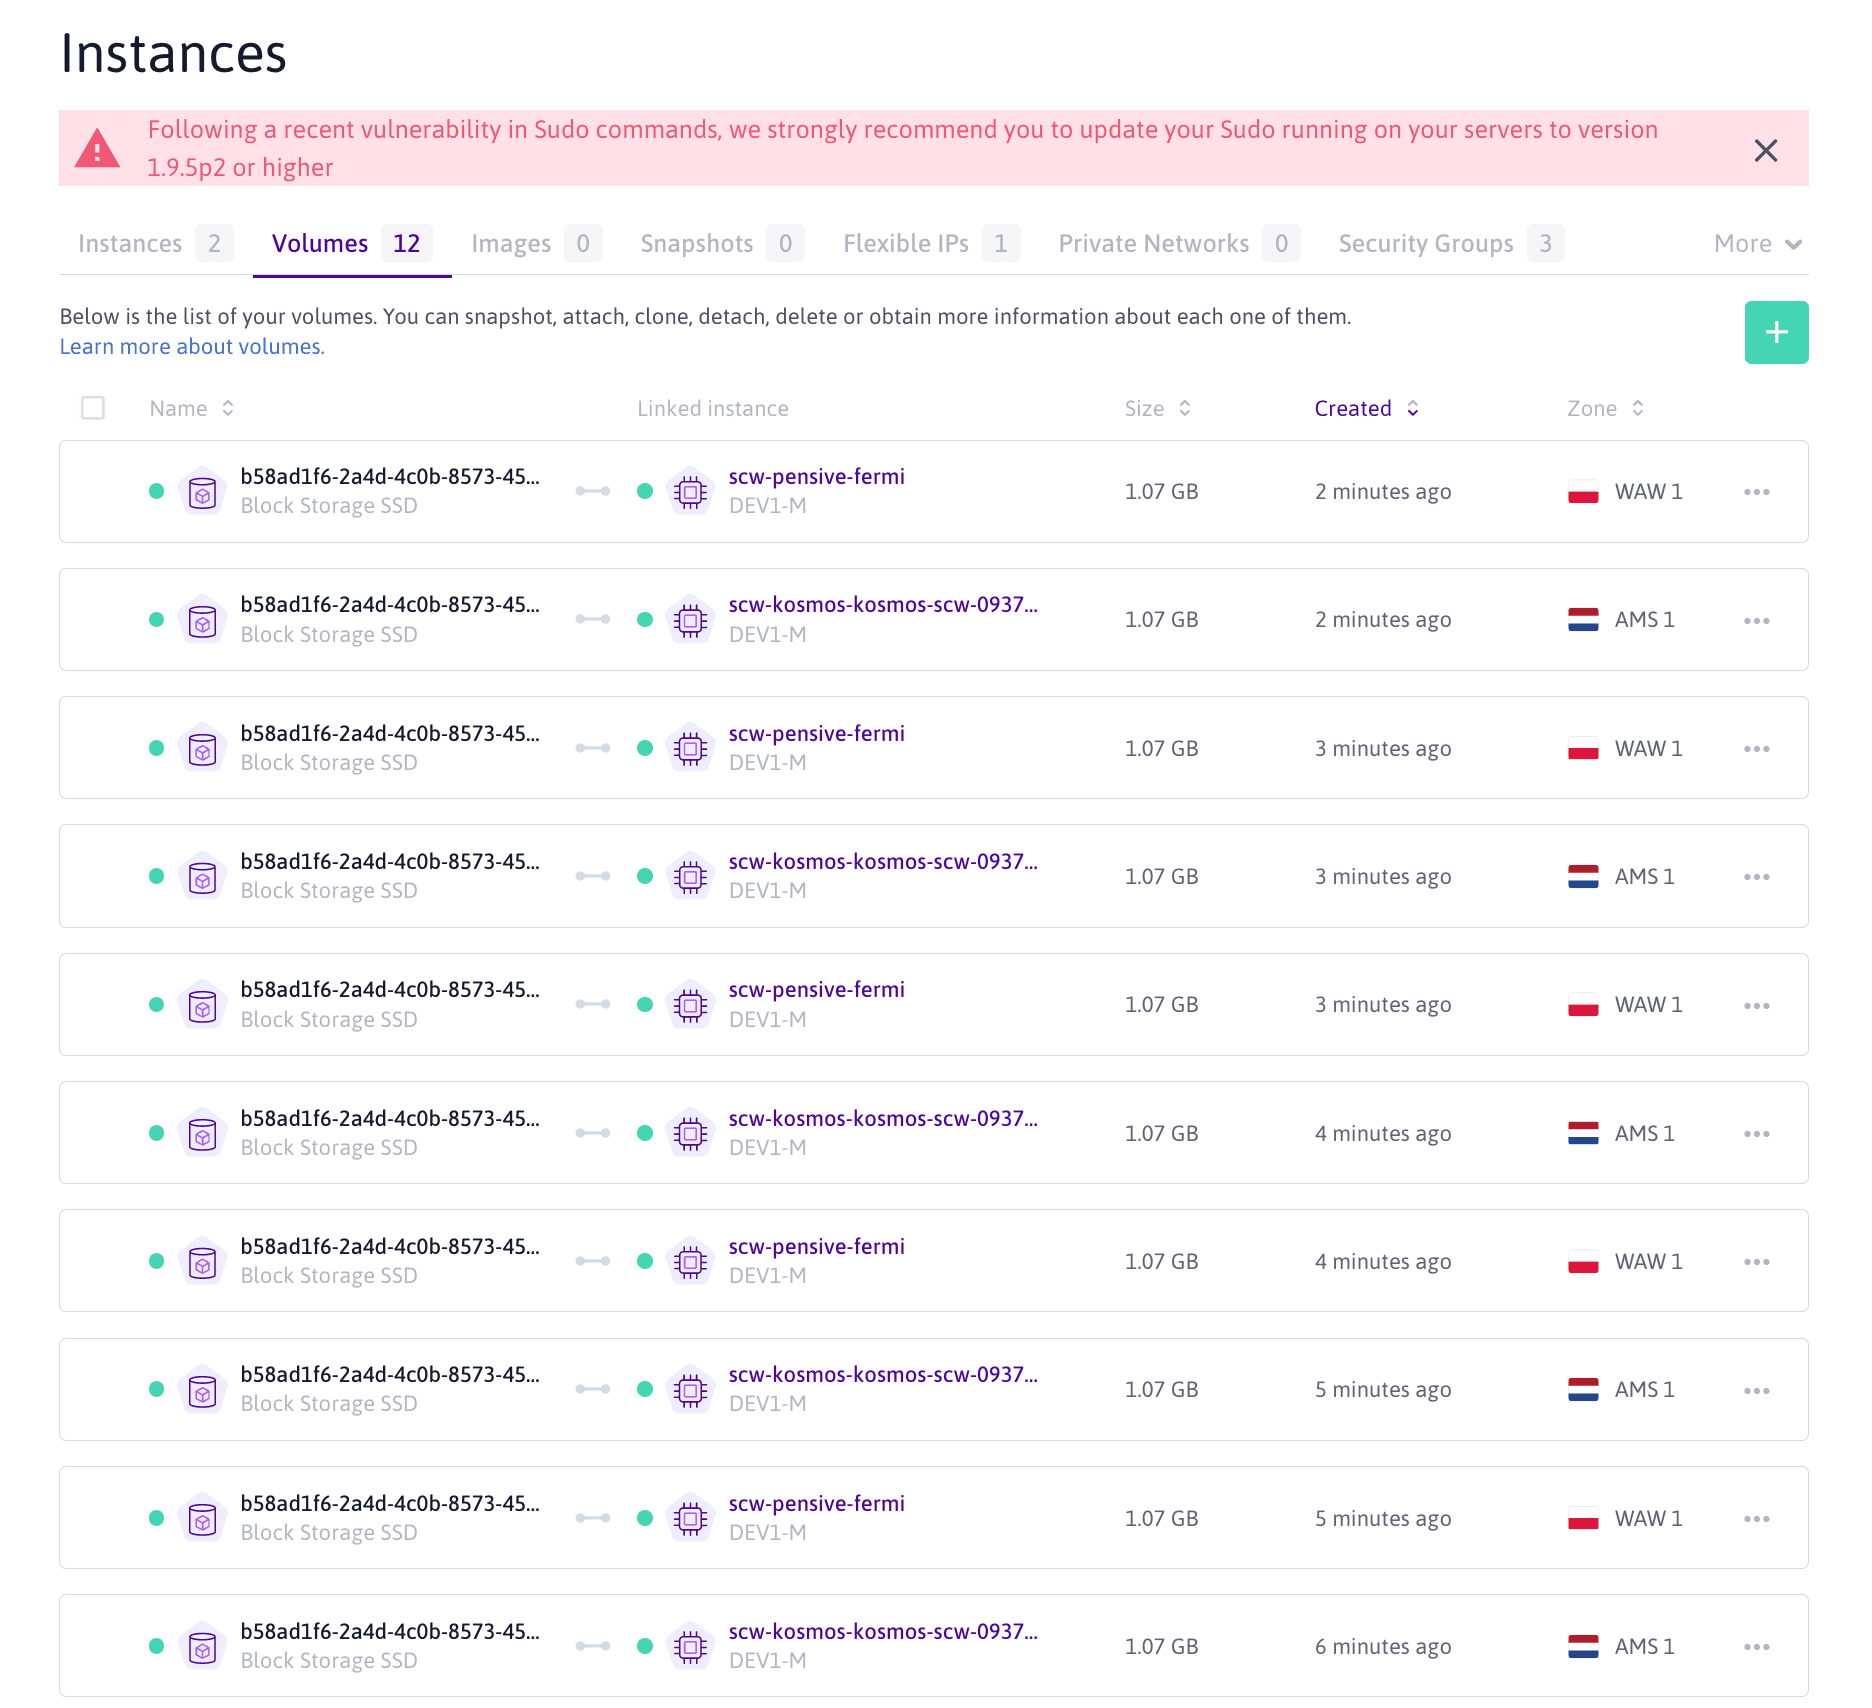
If we look at Scaleway Console where the volumes are listed, we can see our Block Storages in Warsaw 1 and Amsterdam 1 Availability Zone.
Now that we managed to reconfigure Scaleway CSI, let's come back to Hetzner use case.
First, as described in the requirements of the first part of our Hands-On, we need a security token to be able to create resources such as Block Storages on our Hetzner account.
Once this token is generated, we need to store it in our Kubernetes cluster using a secret Kubernetes object.
🔥 Let's create the secret and apply it to our cluster.
🔥
#secret-hetzner.yaml---apiVersion:v1kind: Secretmetadata: name: hcloud-csi namespace: kube-systemstringData: token: <MY-HETZNER-TOKEN>🔥 kubectl apply -f secret-hetzner.yaml
Output
secret/hcloud-csi created
🔥 Since CSI plugin are open-source (Hetzner CSI included), we can download the CSI plugin we need with the following command. Though, we will need to adapt it for our specific situation:
🔥 wget https://raw.githubusercontent.com/hetznercloud/csi-driver/master/deploy/kubernetes/hcloud-csi.yml .
Output
Downloaded: 1 files, 9,4K in 0,002s (4,65 MB/s)
We now have locally the hcloud-csi.yml file, containing Hetzner CSI plugin, and we need to add the right node selector on the label provider=hetzner so that Hetzner CSI is only installed on Hetzner Instances.
🔥 Edit the hcloud-csi.yml downloaded previously to add a nodeSelector contraint. It needs to be applied on two places in the hcloud-csi.yml.
🔥 First we need to find the StatefulSet called hcloud-csi-controller and add the nodeSelector as follows:
---kind: StatefulSet apiVersion: apps/v1metadata: name: hcloud-csi-controller [...] spec: serviceAccount: hcloud-csi nodeSelector: provider: hetzner containers:[...]🔥 Then in the DeamonSet hcloud-csi-node, we need to perform the same addition of the nodeSelector, as follows:
[...]-—-kind: DeamonSet apiVersion: apps/v1metadata: name: hcloud-csi-node namespace: kube-systemspec: selector: matchLabels: app: hcloud-csi template: metadata: labels: app: hcloud-csi spec: tolerations: [...] serviceAccount: hcloud-csi nodeSelector: provider: hetzner containers:[...]---🔥 We can now save the file and apply the configuration. This will deploy Hetzner CSI with the nodeSelector on provider=hetzner.
🔥 kubectl apply -f hcloud-csi.yml
Output
csidriver.storage.k8s.io/csi.hetzner.cloud createdstorageclass.storage.k8s.io/hcloud-volumes createdserviceaccount/hcloud-csi createdclusterrole.rbac.authorization.k8s.io/hcloud-csi createdclusterrolebinding.rbac.authorization.k8s.io/hcloud-csi createdstatefulset.apps/hcloud-csi-controller createddaemonset.apps/hcloud-csi-node createdservice/hcloud-csi-controller-metrics createdservice/hcloud-csi-node-metrics created🔥 Let's see what happened once we applied Hetzner CSI on our kube-system namespace.
🔥 kubectl get all -n kube-system
Output
NAME READY STATUS RESTARTS AGE[...]pod/csi-node-jnr2h 2/2 Running 0 166mpod/csi-node-sxct2 2/2 Running 0 14mpod/hcloud-csi-controller-0 5/5 Running 0 42spod/hcloud-csi-node-ls6ls 3/3 Running 0 42s[...] NAME DESIRED CURRENT READY UP-TO-DATE AVAILABLE NODE SELECTOR AGEdaemonset.apps/csi-node 2 2 2 1 2 provider=scaleway 168mdaemonset.apps/hcloud-csi-node 1 1 1 1 1 provider=hetzner 42s[...]NAME READY AGEstatefulset.apps/hcloud-csi-controller 1/1 42sWe can now see our two different CSI and their associated node selectors.
🔥 Now, we should be able to create a pod on an Hetzner node and attach a persistent volume to it, while specifying the storage class name(hcloud-volumes).
🔥
#hpvc.yamlapiVersion: v1kind: PersistentVolumeClaimmetadata: name: hcsi-pvcspec: accessModes: - ReadWriteOnce resources: requests: storage: 10Gi storageClassName: hcloud-volumes---apiVersion: v1kind: Podmetadata: name: hcsi-appspec: nodeSelector: provider: hetzner containers: - name: busy-hetzner image: busybox volumeMounts: - mountPath: "data" name: hcsi-volume command: ["sleep","3600"] volumes: - name: hcsi-volume persistentVolumeClaim: claimName: hcsi-pvc🔥 Let's apply the configuration and check if our pod is running and our persistent volume created with the corresponding storage class.
🔥 kubectl apply -f hpvc.yaml
Output
persistentvolumeclaim/hcsi-pvc created
pod/hcsi-app created
🔥 kubectl get pods | grep hcsi
Output
hcsi-app 1/1 Running 0 55s
Our pod is running, which means it managed to create and attach a persistent volume.
We can check by listing the persistent volume and the storage class they are based on.
🔥 kubectl get pv -o custom-columns=NAME:.metadata.name,CAPACITY:.spec.capacity.storage,CLAIM:.spec.claimRef.name,STORAGECLASS:.spe c.storageClassName
Output
NAME CAPACITY CLAIM STORAGECLASSpvc-262442c4-6275-4a38-9be8-99c8dc5b5ff6 1Gi csi-vol-scw-statefulset-csi-scw-9 scw-bssdpvc-2ea1d637-9b81-4e07-a342-9574082975d0 1Gi csi-vol-scw-statefulset-csi-scw-2 scw-bssdpvc-381ddf6b-2baa-42a6-a474-2024fb891b91 1Gi csi-vol-scw-statefulset-csi-scw-1 scw-bssdpvc-485b33d7-4740-46f9-b479-71db5eaf48dc 1Gi csi-vol-scw-statefulset-csi-scw-0 scw-bssdpvc-4aa708c4-162e-40cc-9b28-bd97dfbf2f3a 1Gi csi-vol-scw-statefulset-csi-scw-4 scw-bssdpvc-50868e23-0dd4-48e1-86b8-3d9402393371 10Gi hcsi-pvc hcloud-volumespvc-81d8b6ef-a83e-4ca1-95b6-65c3a350a126 1Gi csi-vol-scw-statefulset-csi-scw-7 scw-bssdpvc-e06affe0-d5e1-4ed2-b1ca-1f34a072772f 1Gi csi-vol-scw-statefulset-csi-scw-5 scw-bssdpvc-e6a7791c-71c0-4b73-ac7c-e83c28efd259 1Gi csi-vol-scw-statefulset-csi-scw-3 scw-bssdpvc-f4169ea9-9c22-46c9-b248-870d1859f813 1Gi csi-vol-scw-statefulset-csi-scw-6 scw-bssdpvc-ffb10c3b-beba-4528-9d1a-6f09bb5926c9 1Gi csi-vol-scw-statefulset-csi-scw-8 scw-bssdOur persistent volume with hcsi-pvc claim is created, and if we check on our Hetzner Console, our block storage exists in Helsinki, linked to our Helsinki Hetzner Instance.
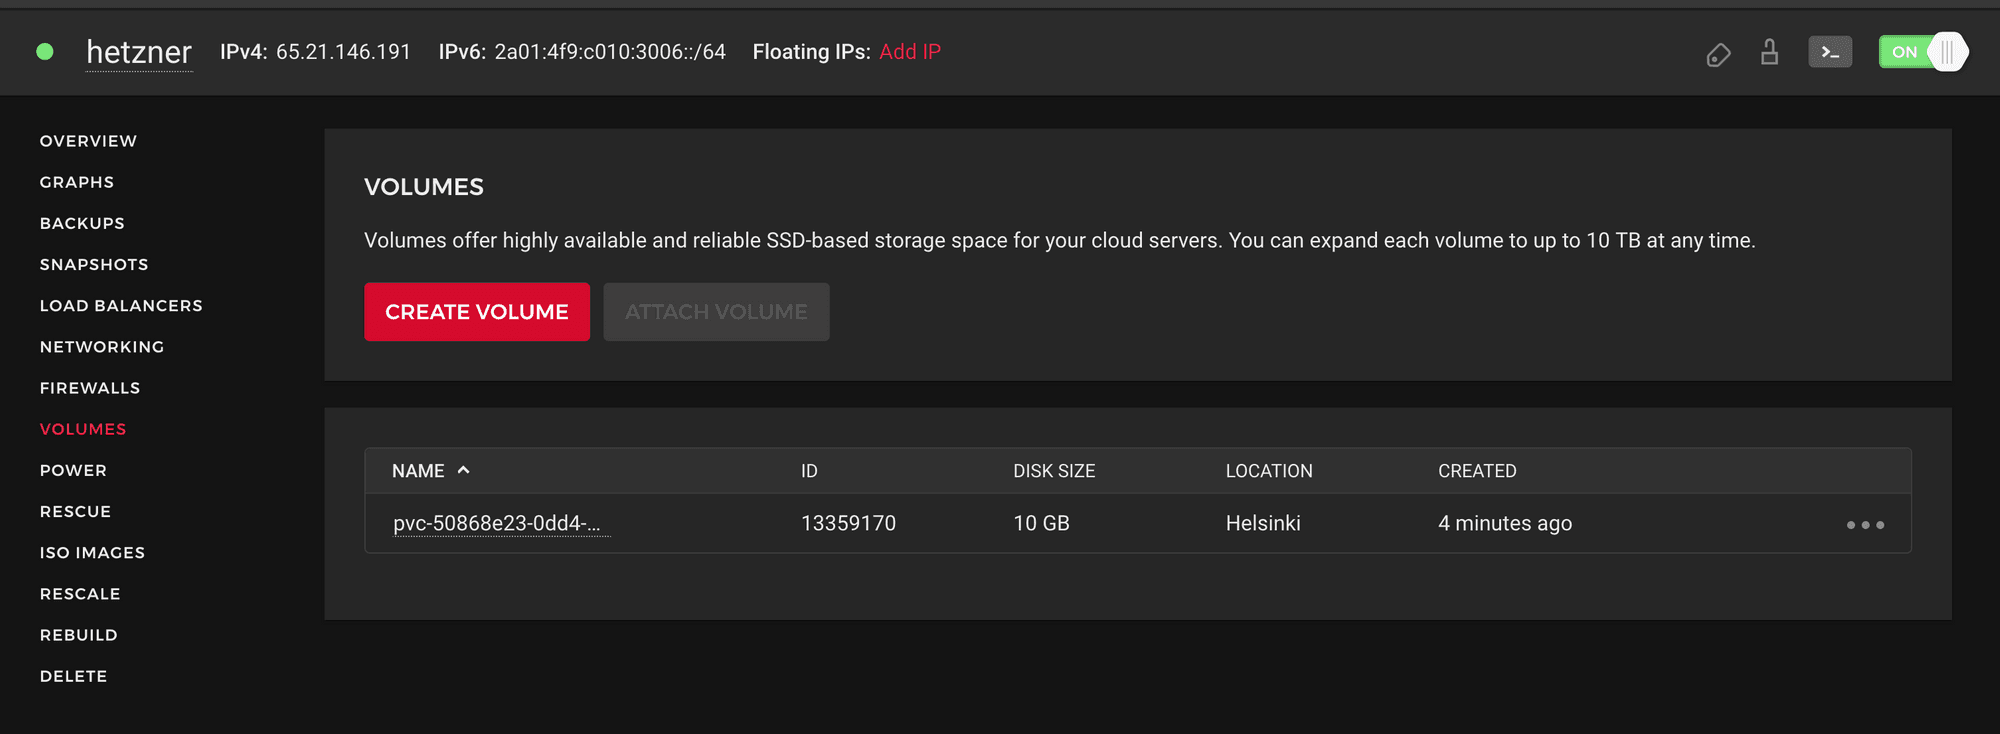
Volumes listing view in Hetzner Cloud Console
As we saw, a pod in need of a remote storage solution needs a resource in the same Availability Zone as it is scheduled, using the right Container Storage Interface.
As it is true for Scaleway or Hetzner as we demonstrated it, it is also true for all Cloud providers.
Nonetheless, the next step would be to manage shared remote storage across providers. We voluntarily excluded the usage of remote DataBases as a Service that is not managed within Kubernetes and is Cloud agnostic.
This solution is possible using a provider-independent Container Storage Interface allowing pods to schedule with associated volumes independently from the Cloud Provider they run on.
The future of data resilience in the Multi-Cloud environment will be led by Cloud-agnostic-based technologies and custom CSI implementation from the Kubernetes community.

Using Kubernetes in a Multi-Cloud environment can be challenging and requires the implementation of best practices. Learn a few good practices to implement a concrete multi-cloud strategy.

Multi-cloud environment presents multiple perks: redundancy, reliability, customer coverage, etc. It also raises questions we will address here about the management and implementation of Multi-Cloud.

Learn more to implement a multi-cloud strategy on Kubernetes. All Cloud market players agree on the global definition of Multi-Cloud: using multiple public Cloud providers.