Administering a Kubernetes cluster safely and efficiently is hard, and it’s even harder if there’s only one of you. However, if you want to share the load, you’ll need to make sure you’re doing it securely. If your cluster is going to accept configuration changes from multiple people, it needs to know who those people are, and to make them prove their identity. In other words, it needs to be able to authenticate them.
Authn vs. authz
There are two concepts you’ll often hear mentioned in the same breath: authentication (often abbreviated to ‘authn’ or a12n) and authorization (similarly, ‘authz’ or a11n). They’re closely related, but subtly different, and mixing them up can get you into hot water. So, what does each one actually mean?
Authentication relates to who you are, and it can get pretty philosophical - it’s essentially an abstraction over identity. How does a piece of software know who you are? Most mechanisms rely on you, as a user, providing some kind of trusted proxy for your identity. Depending on your authn method, this proxy could be anything from a password that only you know, a cryptographically signed bearer token that only you should have, or physical ownership of a piece of hardware like a YubiKey.
Authorization relates to what you can do, and almost always comes after authentication when you’re talking about software. Once you’ve authenticated with your K8s cluster, that’s where K8s’ Role-Based Access Control (RBAC) mechanism comes into play. This is your cluster’s built-in method for determining whether a given user is allowed to perform certain actions, such as modifying configuration or accessing data. Even if a user is able to authenticate, they may not have any permissions granted to them by your cluster’s RBAC system.
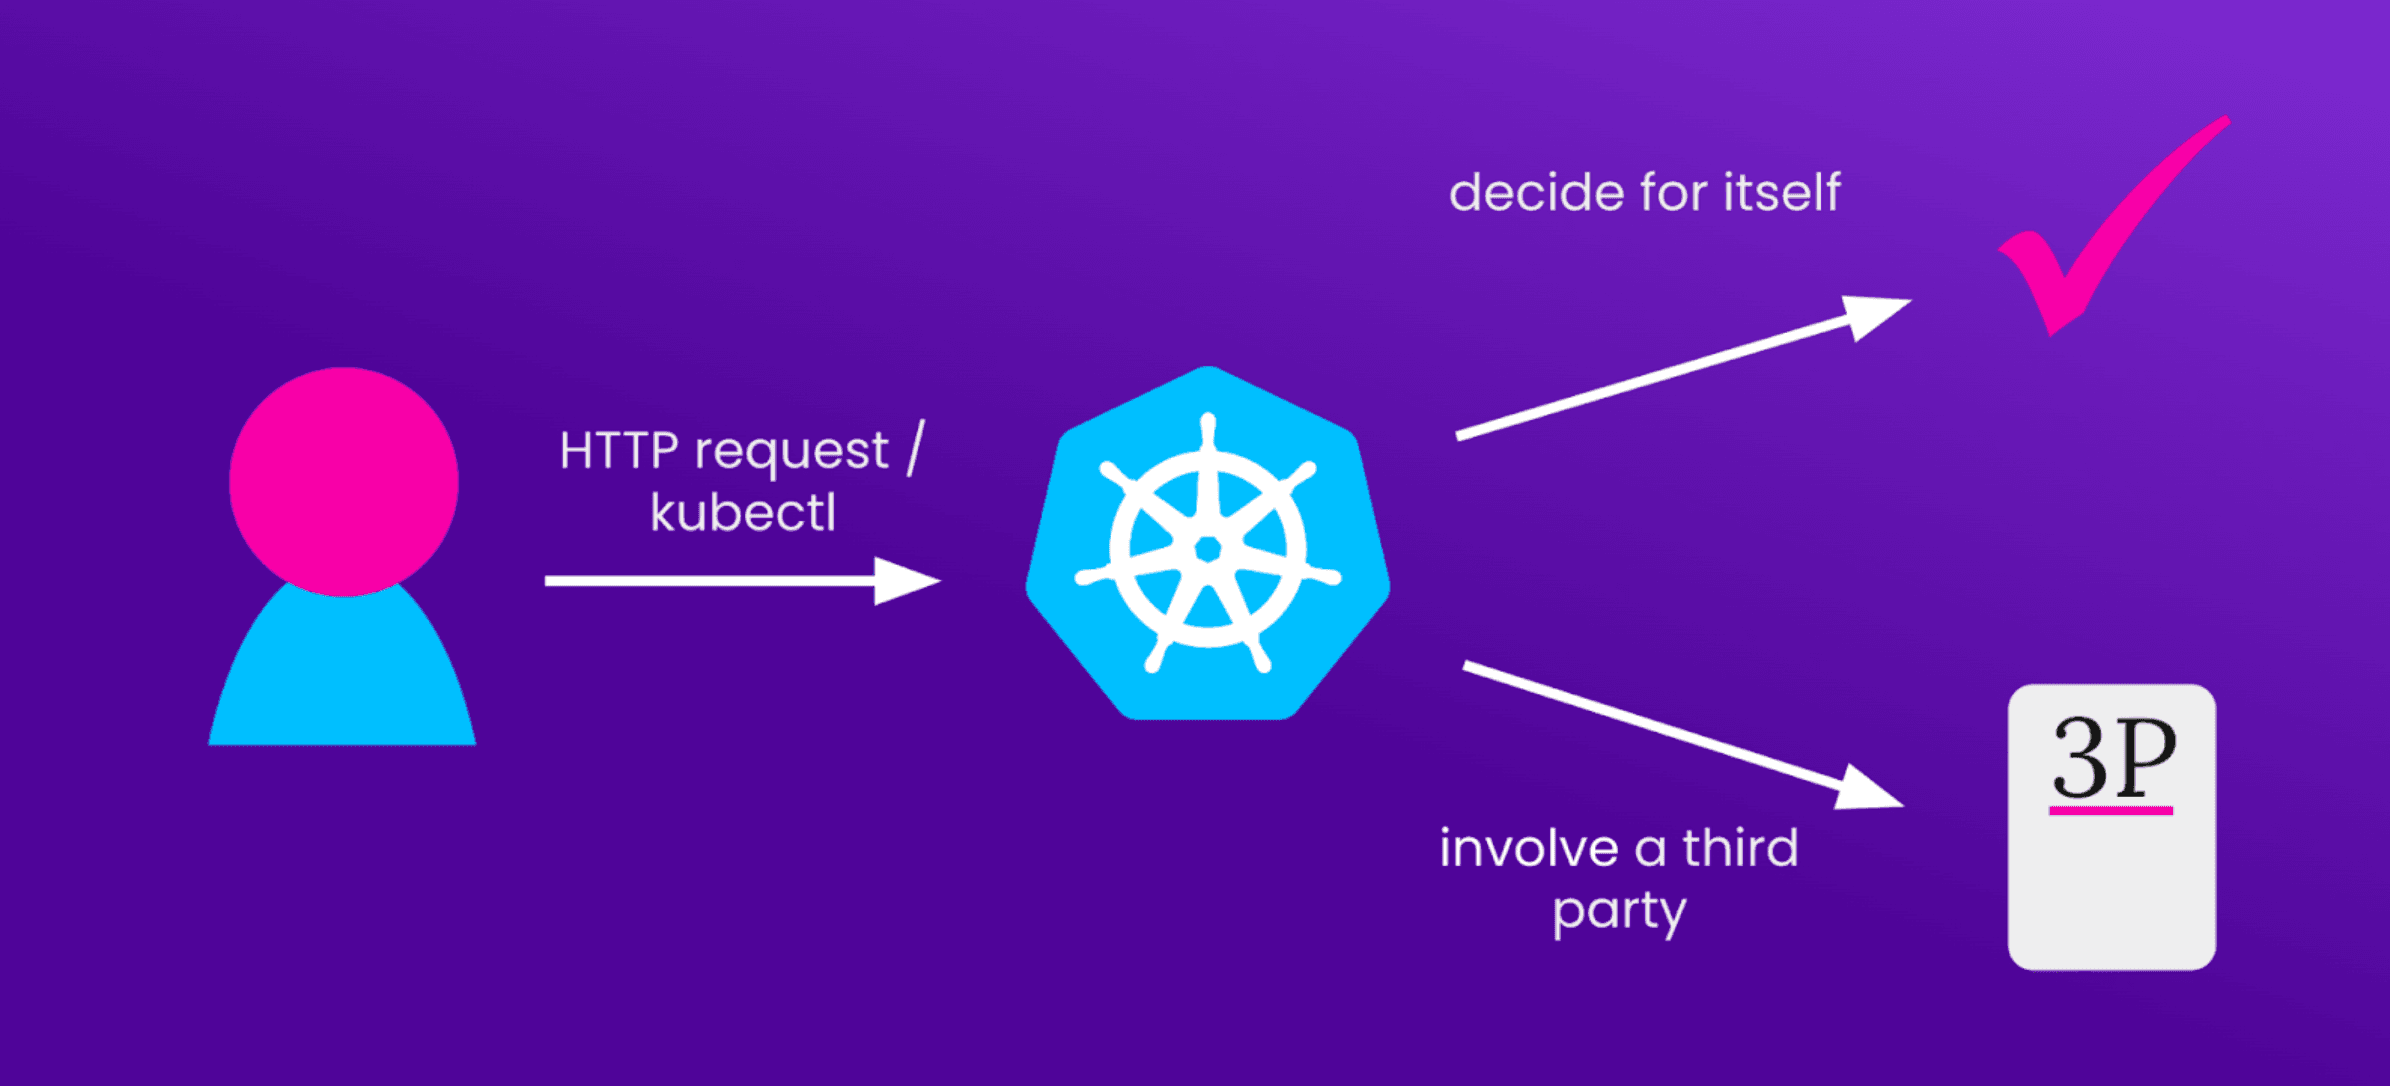
Authentication flows in K8s
Let’s say a user wants to configure something about a K8s cluster. What does that look like? Well, first, they’ll make a request. That could be over HTTP, through a web UI, or on the command-line, using kubectl. For the purposes of this article, these can all be considered equivalently.
Then, once the request is received by your deployment, your cluster has to figure out who the request has come from. Kubernetes provides a few built-in mechanisms for doing this, and you also have the option to integrate third-party authentication systems. In other words, your cluster can either decide for itself, or delegate the decision to a trusted third party.
This description is (of course) an oversimplification — in fact, later in this article we’ll discuss an authentication flow in which the incoming request does not go directly to the cluster — but broadly speaking it’s a useful way to think about how authentication happens.
Kubernetes-native authentication methods
Kubernetes comes with three built-in methods of user authentication, which allow a cluster to identify the originator of a request all by itself (NB: this article doesn’t cover service account authentication, since service accounts aren’t users!)
Static bearer tokens
When you start your cluster’s API server, you have the option to give it a CSV file of static tokens corresponding to known users. That way, when a known user wants to make a configuration change, they include the token along with their request, and the API server can check that token against its file of known and trusted users. ‘Including the token’ could mean putting it into an HTTP header, or passing it in explicitly on the command line.
Since the list of known good tokens is a file that forms part of the API server, tokens cannot be revoked or updated without restarting it; tokens also cannot expire. This makes it hard to revoke access to a given user on the fly.
This method of authentication is extremely simple, but it comes with the standard risks associated with bearer tokens: if they’re leaked, you have to revoke them entirely, and that could mean downtime while you restart the API server.
For more info, see the K8s docs on static bearer files.
X509 Client certificates
Kubernetes also provides native support for X509 certificates, a well-established method of authentication used to provide HTTPS. To set this up in your cluster, you need to provide a certificate authority (or CA) file to your API server upon start. This certificate authority doesn’t have to be an existing one, like that provided by LetsEncrypt; you can generate a self-signed one yourself.
Then, you can use that certificate authority to generate new client certificates. These are files which are cryptographically signed by the CA, and your cluster can use the CA to determine whether or not a given client certificate is valid.
In practice, this authentication flow is pretty similar to using static bearer tokens; when you make a request to your cluster, you include the client certificate, and the cluster can use its certificate authority to determine the validity of your request. Similarly to static bearer tokens, in order to revoke a certificate, you’ll have to restart your API server to remove the certificate authority that issued it.
However, certificates can have expiry dates, meaning that if one gets leaked there’s an automatic time limit on it. There’s also tooling like cert-manager, allowing you to use existing X509 entities like LetsEncrypt for your clusters and streamline the process of managing your client certificates.
For more info, see the K8s docs on X509 client certificates.
Bootstrap tokens
Including bootstrap tokens in a primer about authentication is a bit cheeky, because I would argue that they’re actually about authorization. Bootstrap tokens can be created when you initialize a cluster with kubeadm init; they’re tokens that give the bearer access to a lot of permissions. They’re intended for use during the initial configuration of a cluster, before you’ve set up any other authentication methods.
Bootstrap tokens work exactly like static bearer tokens in practice; you attach them to any request you make, and you will be granted access. However, static bearer tokens configured in a file within the API server also contain information about who you are, whereas all the information a bootstrap token conveys about your identity is ‘bootstrapper’ — hence my argument that they’re actually about what you can do, not who you are, and are therefore authorization tokens rather than authentication tokens.
In theory, after the initial cluster setup is completed and you have no need for bootstrap tokens, you should amend your cluster’s configuration so that it doesn’t accept them any more. However, you don’t have to do this, and since bootstrap tokens have no default expiry date, you can continue to use them as bearer tokens.
For more info, see the K8s docs on bootstrap tokens.
Third-party integrations for authentication
We’ve covered the ways that a cluster can determine the identity of users making requests on its own. However, there are also ways that a cluster can delegate the responsibility of authentication to a third party, providing a lot of flexibility when it comes to your security posture.
Webhooks
In this scenario, each user has a token issued to them by an external third party identity provider (often abbreviated to IdP). Similarly to other authentication flows, the user includes this when making an API request to the cluster. However, rather than trying to parse this token itself, the cluster will instead trigger a webhook when the request is received, and pass the token on to the third party for validation. It’s essentially like the static bearer token flow, except that instead of comparing the token against a file within the API server, the cluster reaches out to the identity provider for a “yes” or a “no”.
The advantages of this approach include being able to revoke tokens dynamically, without restarting your cluster’s API server; since any revocation would be done with the third-party IdP, your cluster’s uptime is unaffected. You have complete flexibility when it comes to choosing the identity provider; all you need is the ability to check tokens for validity via HTTP request. You could use a known OpenID Connect provider, or a self-managed IAM solution like Keycloak.
However, this does mean that every time an authentication request comes in, your cluster has to be able to connect to the identity provider in order to validate it. If you’re running your cluster within a closed network, this would mean hosting your identity provider within the same network. Webhooks are also API objects, and as such need to be versioned appropriately.
For more info, see the K8s docs on using webhooks to authenticate users.
Kubernetes’ OIDC Plugin
Having just mentioned OpenID Connect (often abbreviated to OIDC), it’s time to talk about the Kubernetes plugin that lets you use OIDC to directly authenticate your users. Well-known OIDC identity providers include Google, Facebook, and GitHub; it’s also possible to run your own OIDC IdP. Covering OpenID Connect would require several blog posts all on its own, but for the purposes of this article all you need to know is that it can provide users with identity tokens which can be cryptographically verified by an X509 certificate.
This plugin was developed so that identities provided by an OpenID Connect identity provider can be used to authenticate your users, without your cluster having to connect to the external server each time.
When you install the OIDC plugin for your cluster, you’ll configure all the many moving parts of OIDC, and this includes a certificate that will be stored locally with your cluster’s API server.
Then, when a user makes a request, they must first connect to the OIDC IdP and request an ID token. When they’ve got this, they’ll include it in their API request to the cluster, and the cluster will be able to use the certificate from the OIDC IdP (provided at configuration time) to verify the ID token and validate the request.
The K8s OIDC plugin is a particularly useful option for many teams, because it’s highly likely that developers already have a workplace identity provided by an OIDC IdP — your work-provided Google or Microsoft account, for example. These identities can be re-used to authenticate developers with the cluster they’re administering.
However, most OIDC IdPs don’t make it easy to simply obtain an ID token; they’re sort of an implementation detail of the protocol, and in the normal usage of OpenID Connect they wouldn’t be exposed to users directly. There’s tooling to make this process easier, which also means that tokens can be configured with a short expiration date for extra security.
For more info, see the docs on the K8s OIDC plugin.
Authenticating proxies
The last third-party authentication method we’ll cover in this post is using an Authenticating Proxy (often abbreviated to AP). This flow differs from all the others in this post in that it doesn’t require the use of bearer tokens; you can actually require a user to authenticate separately for each request they make to your cluster, and avoid the problem of token revocation entirely.
The way this method works is that instead of requests being routed directly to your cluster’s API server, they instead go to a third-party service: your Authenticating Proxy. This functions as the Identity Provider for this authentication flow, meaning that it’s the place where your users have to prove their identity. This can be via any means you like — username and password, a hardware token like a Yubikey, or SSH keys configured in a terminal profile.
Once your user has authenticated with the Authenticating Proxy, the proxy then forwards the request along to the cluster, along with any necessary information about the user in question. Communication between the AP and your cluster is done via HTTP, secured by client certificates. The AP must present a valid client certificate, signed by a certificate authority recognized by the cluster, before any other information in its HTTP requests to the cluster will be read.
This auth flow is very flexible, allowing you to use whatever method of user authentication you like, and decoupling the authentication layer from your cluster entirely. If you need to revoke access to a specific user, you can do so at the AP level, without reconfiguring your cluster and risking downtime.
For more info, see the K8s docs on using an Authenticating Proxy.
Choosing the right method for you
So, if you’re deploying a new cluster, and you haven’t yet settled on the method you want to use for user authentication, what should you consider?
Obviously, security has to get top billing. Authentication systems based on bearer tokens require careful thought in order to mitigate the risks associated with leaked tokens, and the difficulties of token revocation. Allowing an untrusted user to authenticate, even if they have no access permissions once authenticated, is still a security gap and should be avoided, and for that you need to be able to revoke any bearer tokens they hold.
Ease of use is also a concern. If you make it difficult for your users to legitimately access your cluster — for example, using an Authenticating Proxy which requires a hardware token verification each time — you’ll end up with frustrated developers who find it hard to do their jobs.
Finally, as the person implementing this system, you’ll want to make it easy to maintain. You don’t want your auth system to break every time a new minor version of K8s is released, nor do you want to have to be constantly restarting your cluster’s API server in order to keep your user list up to date.
How each of these three concerns balance out against each other will depend on your specific circumstances. Perhaps your developers all already have Google accounts, and so the OIDC plugin makes sense; perhaps you have an existing Keycloak deployment within your organization and you can use it as an authenticating proxy. There are also lots of good reasons to have different auth systems for development, staging and production deployments.
In conclusion: it depends (the classic senior developer’s answer). To decide what’ll work best for your needs, you need to consider the factors discussed above in your specific context.