
Smart data annotation for your computer vision projects: CVAT on Scaleway
In this article we are going to look at how to set up a data annotation platform for image and video files stored in Scaleway object storage, using the open source [CVAT]

As an AI engineer or a data scientist, you are probably familiar with the following scenario: you have just spent weeks developing your new machine learning model, you are finally happy enough with its performance, and you want to show it off to the rest of the world.
“The rest of the world” could be your customer waiting for a proof-of-concept prototype, your team at a weekly meeting, your classmates on the project presentation day, maybe the audience of a meetup you are speaking at, or even the co-founder of the startup that the two of you are trying to get off the ground. Point is, you don’t have, nor do you need, a production-ready setup, and your trusted Jupyter notebook will do just fine at this point.
So, what do you do?
The first thing you’ll need is, of course, the model itself. There are different ways to save a trained model, depending on its nature, as well as the machine learning framework that you use. This part of the job is relatively straightforward to figure out (here are the instructions in PyTorch and TensorFlow. Let’s say you have your trained model file(s), and the command that you need to load that model into memory, such as
import torchsaved_model = torch.load(path_to_model_file,map_location=torch.device('cpu'))The second argument may be needed in case the model was on the GPU when you initially saved it, whereas you plan on running inference on the CPU.
Let’s say your model accepts input data of some human-friendly form: images, videos, text, or audio files. Whatever the format, there always are a few pre-preprocessing steps to complete before the inputs are passed through the innards of a neural network: images are often resized, cropped, and normalized, text split and tokenized, etc. Here is what the pre-processing might look like for color images that are to be resized to 128x128 pixels and transformed to PyTorch tensors:
# Here we assume the preprocess function will be called on a numpy array;# otherwise, you could start directly with the resize transform:preprocess = transforms.Compose((transforms.ToPILImage(), transforms.Resize(size = (128, 128)), transforms.ToTensor()))# Since most models are trained on batches of multiple images at a time,# you may need to convert the input image into a “batch of one”:input_tensor = torch.unsqueeze(preprocess(image_array), 0)Once your input data is in proper format, it is time to pass it through the network to get the output that you are after. Depending on the machine learning task at hand, the output may take the form of an image-level class label (the image classification task), or a list of bounding boxes’ coordinates paired with labels (object detection), or perhaps an image mask with a label assigned to every pixel (semantic segmentation).
There are as many possibilities for what models’ outputs might look like as there are machine learning use cases, and some of these outputs may require a certain amount of post-processing. For example, consider a generative computer vision model that outputs tensors whose values go between -1 and 1. In order to display the final generated image, the output tensor needs to be renormalized and possibly reshaped, e.g.
output_tensor = saved_model(Variable(input_tensor.type('torch.FloatTensor')))# Reshape and rescale the tensor to produce the final output:generated_image = output_tensor.detach().squeeze().permute(1, 2, 0).numpy()generated_image = (generated_image + 1.0) / 2.0Now that you have all the code needed to run your trained model on new inputs, how do you go about it?
The most obvious way would be to enter the path to the input file into the Jupyter notebook, open the file and go through the steps that we just outlined above:
image = Image.open("some_directory/demo_image.webp")image_array = np.array(image)# Load the trained model# …# Pre-process the inputs# …# Run the model on the pre-processed input# …However, there are far better ways to create a demo. For example, the Gradio library allows for interactive widgets with which the user can perform tasks like type text in, upload image and video files, but also draw figures inside a sketchpad and record audio using their microphone.
In order to use Gradio, you first need to install it:
pip install gradioThe main building block of a Gradio application is an object belonging to the Interface class. An Interface object wraps around a function fn, and requires specifying the appropriate inputs and outputs. The format of the inputs and the outputs will dictate what the Interface looks like, once launched.

Creating a Gradio interface for a machine learning model is just as easy! All we need to do is combine the preprocessing and inference steps from above into a single function:
import torchfrom torchvision import transformsfrom torch.autograd import Variablesaved_model = torch.load(path_to_model_file, map_location=torch.device('cpu'))def run_inference(image): preprocess = transforms.Compose((transforms.ToPILImage(), transforms.Resize(size = (128, 128)), transforms.ToTensor())) input_tensor = torch.unsqueeze(preprocess(image), 0) output_tensor = saved_model(Variable(input_tensor.type('torch.FloatTensor> generated_image = output_tensor.detach().squeeze().permute(1, 2, 0).numpy> generated_image = (generated_image + 1.0) / 2.0 return generated_image
and wrap a Gradio interface around it:
import gradio as griface = gr.Interface(run_inference, gr.inputs.Image(type="numpy"), "image")If you are running a Jupyter notebook, you will see the interactive widget appear as the output of the launch() cell:

What if instead of showing the demo on your machine you want to provide your audience with a way to test the model out for themselves? This is something that can be done with Scaleway elements. Here are all the steps you need:
scp model.pt root@XXX.XXX.XXX.XX:/root/demo/apt install python3-pippip install gradiopip install torchpip install torchvisionimport gradio as grimport torchfrom torchvision import transformsfrom torch.autograd import Variablesaved_model = torch.load('./model.pt', map_location=torch.device('cpu'))def run_inference(image): preprocess = transforms.Compose((transforms.ToPILImage(), transforms.Resize(size = (128, 128)), transforms.ToTensor())) input_tensor = torch.unsqueeze(preprocess(image), 0) # Use the saved model to generate an output (whose values go between -1 and> # and this will need to get fixed before the output is displayed) generated_image = saved_model(Variable(input_tensor.type('torch.FloatTensor> generated_image = generated_image.detach().squeeze().permute(1, 2, 0).numpy> generated_image = (generated_image + 1.0) / 2.0 return generated_imageiface = gr.Interface(frontalize, gr.inputs.Image(type="numpy"), "image", title='Face Frontalization', description='PyTorch implementation of a super> )iface.launch(share=True)Now run that file (python3 demo.py) and you should see something like:
Running on local URL: http://localhost:7860/
Running on public URL: https://13104.gradio.app
This share link expires in 72 hours. For free permanent hosting, check out Spaces (https://huggingface.co/spaces)
at which point your model can be accessed publicly via either the gradio.app link, or at http://XXX.XXX.XXX.XX:7860/ where XXX.XXX.XXX.XX stands for your Scaleway instance’s Public IP address:
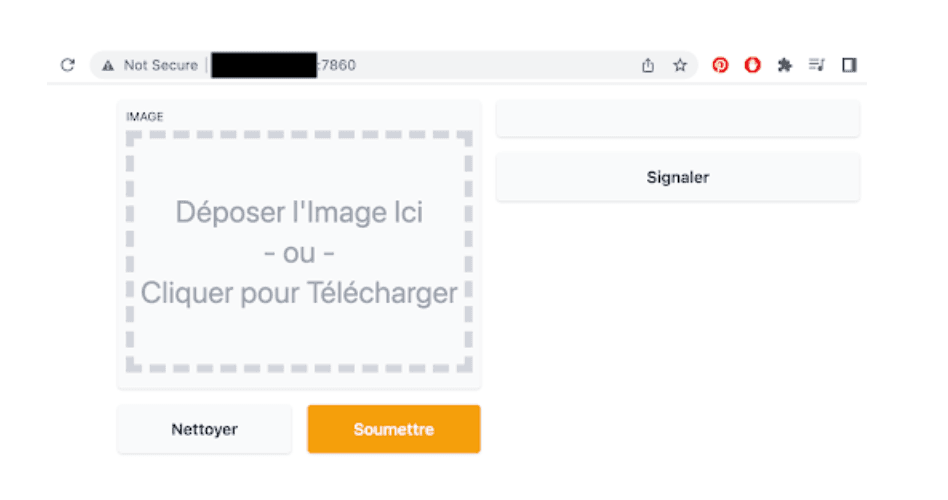
Now anyone who has your demo link can try your model with their own inputs straight on your running Scaleway instance!
In this article we are going to look at how to set up a data annotation platform for image and video files stored in Scaleway object storage, using the open source [CVAT]

We will take a detailed look at the Variational Autoencoder: a generative model based on its more commonplace sibling, the Autoencoder (which we will devote some time to below as well).

In this article, we will talk about active learning and how to apply the concepts to an image classification task with PyTorch.