Currently a Solutions Architect here at Scaleway, I have been working with containers and Kubernetes for a few years now. And for most people, including me, the container journey started the same way: with Docker.
In this blog post, I’ll show you what the next few steps in your container journey could be as you graduate from Docker to Kubernetes.
The container journey begins with Docker
When using containers, you probably started with a docker run and were amazed that you could just start “an ubuntu” inside whatever OS you were running the command on.
After playing around with your container in interactive mode, the next step was to build a container image, starting it in the background and pointing your web browser to it. It took a bit of trial and error, but in the end, your image was there, and everything ran neatly in its own little subsystem.
Going from there, you probably linked a few containers together using Docker Compose, appreciated how you could conveniently reach neighboring containers via network just by using their names, hosted everything on a virtual machine (VM), and your first containerized app was up and running.
But, likely, your next pressing question was: how could you make your app highly available for production? Monitoring everything, making sure it stays up, and scaling up the number of replicas if needed. How could all of this be done on the VM you just set up?
The answer to that question used to be Docker Swarm, but now the de-facto standard is Kubernetes. It will do all the things you want — and much, much more. But installing and using Kubernetes is not quite as straightforward as setting everything up with Docker. The first few steps are going to be painful: there are a lot of ways to do all of this, and a lot of tutorials assume that you already know what Kubernetes is all about.
That’s why, in this blog post, I will try and limit things to the first few steps needed to do the same things with Kubernetes that you used to do with Docker.
Setting up your containerized app with Docker
Let’s start with what you already know. With Docker, to start a container in the background, you used to run the following:
docker run -d **my-image**
And if you wanted the container to have a volume, you could create one and then mount it when you ran the container:
docker create volume myvolumedocker run -d -v myvolume:/data --name back ghcr.io/n-arno/back:latest
When you wanted a container to expose a network port (like a web server), you used to do:
docker run -d -p 8080:80 --name front ghcr.io/n-arno/front:latest
And the step to linking those two was done through a network in order for them to be able to speak with each other:
docker network create -d bridge mynetdocker run -d -v myvolume:/data --net mynet --name back ghcr.io/n-arno/back:latestdocker run -d -p 8080:80 --net mynet --name front ghcr.io/n-arno/front:latest
This way, the “front” container could speak through the network with the “back” container using simply its name:
docker exec -it front /bin/sh wget -qO- http://backexit
As we just saw, we could jump into a container using docker exec, which can be useful for troubleshooting various problems.
The last easy step was listing running containers and getting logs:
docker container list # which is equivalent to "docker ps"docker logs front
Since we wanted to have everything altogether, we installed Docker Compose and wrapped everything in a YAML file.
To begin testing Kubernetes, the very first step is to have a Kubernetes cluster available.
Deploying and maintaining Kubernetes can be complicated, but Scaleway has you covered! You can deploy our managed Kubernetes cluster named Kapsule quickly and easily. To do so, just follow this tutorial. This will create one or several “nodes”, which are servers your containers will run on.
Then, to send commands to Kubernetes, we will need the kubectl command line tool. This can be installed following this tutorial.
The kubectl command line tool will need to know how to connect to your cluster. To do so, it will need a file named kubeconfig which can be downloaded from our console using this tutorial.
Setting up a containerized app with Kubernetes
Let’s take a look at how to set up a container with Kubernetes. Along the way, we’ll learn about resources, metadata, labels and service types.
Starting a container using Kubernetes will feel very similar to what you used to do:
kubectl run --image=ghcr.io/n-arno/front:latest --port 80 front
This will start a single “pod” which is similar to a “container”. The main difference between pods and containers is that a pod can be multiple containers linked together, for example, to have a helper container (like a log gatherer) linked to your application container.
But for the sake of simplicity (for now), let’s assume that a “pod” equals a “container”.
You may have noticed that I did not specify which port the container can be reached at, only the port inside the container. More on this very soon.
But first, list your running pods:
kubectl get pods
Then jump into your container like you used to:
kubectl exec -it front -- /bin/sh
Get the logs of your container:
kubectl logs front
All of this should still feel familiar to you. 😀
Resources in Kubernetes
In Kubernetes, like in Docker, there are several types of resources. With the docker command, you used to do:
docker container listdocker volume listdocker network list
With Kubectl, it’s just slightly different:
kubectl get podskubectl get serviceskubectl get persistentvolumeclaims
There are even short-hand versions for the resource names:
You’ll notice names and shortnames for several resources and other information, such as which part of the Kubernetes API provides the resource and its “kind”.
In fact, like with Docker Compose, all Kubernetes resources can be described using a YAML file. To display the YAML file associated with an existing resource, type:
kubectl get po front -oyaml
Part of the output is:
apiVersion: v1kind: Podmetadata: labels: run: front name: front namespace: defaultspec: containers: - image: ghcr.io/n-arno/front:latest imagePullPolicy: Always name: front ports: - containerPort: 80 protocol: TCP status: phase: Running
You will notice four important fields in the resulting output :
apiVersion
kind
metadata
spec
Since it’s an existing resource, there’s also the status field, but we are not going to look at it for now. Let’s take a closer look at apiVersion and kind.
apiVersion: v1kind: Pod
Those are the values you get when listing the type of resources, since the couple apiVersion and kind is how any type of object is identified in Kubernetes.
Metadata in Kubernetes
The next important part is metadata:
metadata: labels: run: front name: front namespace: default
The object’s name is defined here, along with its namespace, which is used to group and isolate resources using namespaces. But that’s a more advanced subject than replicating what we did with Docker Compose in Kubernetes, so we’ll keep this for the next steps 😀
Labels in Kubernetes
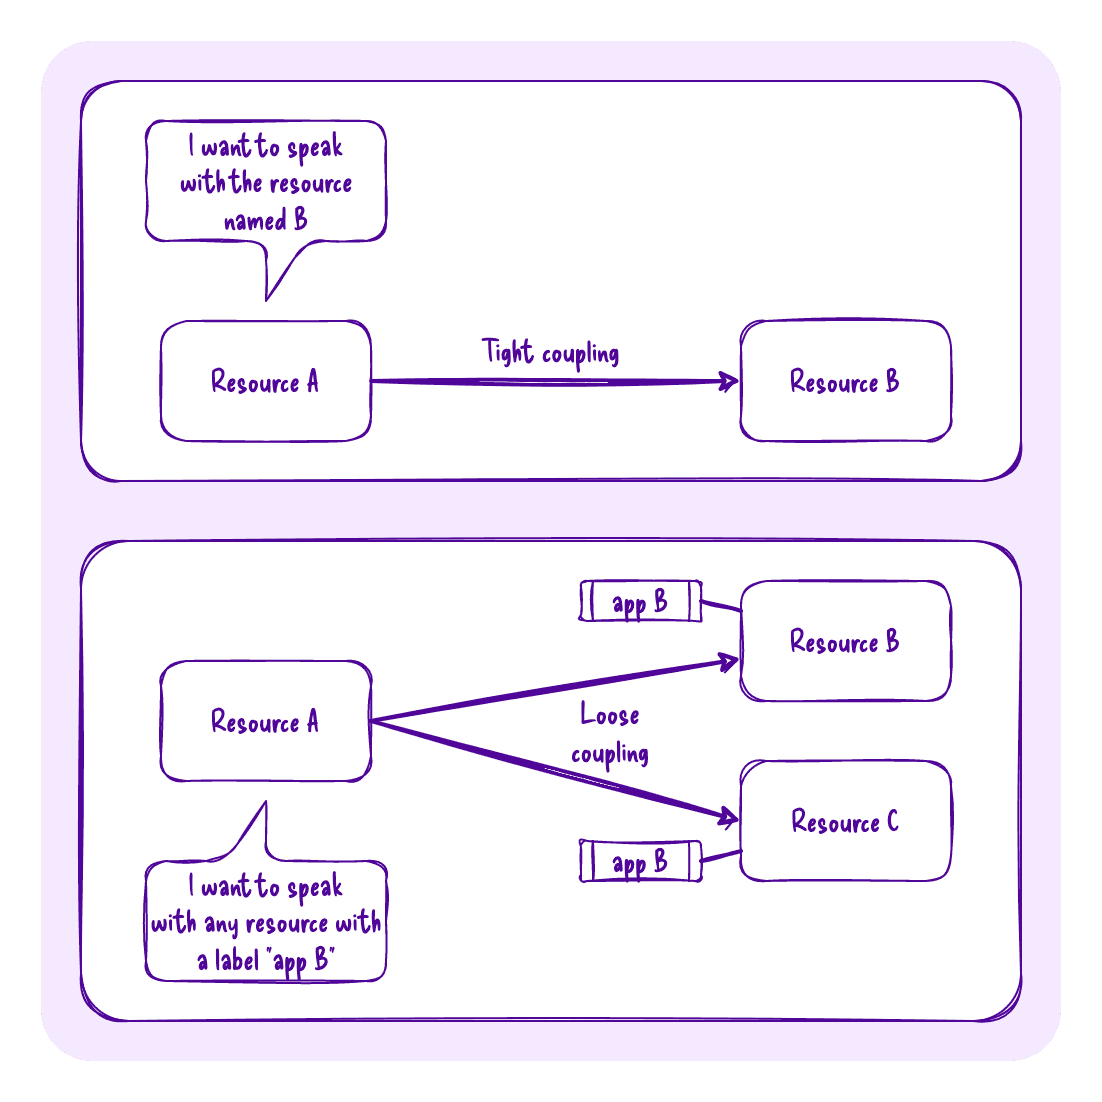
The last part of metadata is the most complicated: the labels. Most of the time, Kubernetes uses “loose coupling” to associate resources with each other. This means that a resource doesn’t directly reference another resource but rather some labels the target resource has.
Hand-drawn diagram showing the difference between a tight coupling and a loose coupling regarding the way one resource references another resource.
Let’s see this in action with another Kubernetes object: services.
Unlike with Docker, when exposing a container with Kubernetes, the information defining how to do it (the internal and external port values) is not described on the container itself but in an object on top. This way, you can alter the way to expose the container without redeploying the container.
This will create a service object with the same name as the pod:
kubectl get svc front -oyamlapiVersion: v1kind: Servicemetadata: labels: run: front name: front namespace: defaultspec: ports: - port: 8080 protocol: TCP targetPort: 80 selector: run: front type: ClusterIP
You will find the now familiar apiVersion, kind, and metadata, but let’s check the spec.
spec is the field that defines what the object is. In the case of a service, you’ll find the information about the ports and the selector, which must identify the same labels as the pod you want to expose.
A label can be pretty much anything and freely defined by you. It should reflect what the usage of the pod is, for example:
app: frontenv: prod
Here, the kubectl run command creates a single label on the pod (run + the name of the pod), and kubectl expose creates copies of the label from the pod in the selector (and the metadata of the service).
Service types in Kubernetes
The type of service defines how Kubernetes will expose the pod.
To expose containers internally, the type ClusterIP is used. To expose containers externally, there are various ways, but the simplest one is via a Load Balancer (type LoadBalancer).
To edit a resource in place, you can type:
kubectl edit svc front
Change the type of service to LoadBalancer (beware, this is case-sensitive!):
type: LoadBalancer
Once done, Kapsule will automatically create a Scaleway Load Balancer and point it to the externally exposed service port (which is called a NodePort). The NodePort (TCP port randomly chosen between 32000 and 32767) is present on all nodes of the cluster and always routes to the service’s internal IP (the ClusterIP), which in turn routes to all pods with the correct labels.
To get the external IP of the service, use:
kubectl get svc frontNAME TYPE CLUSTER-IP EXTERNAL-IP PORT(S) front LoadBalancer internal-ip external-ip 8080:node-port/TCP
You should now be able to navigate to http://external-ip:8080 and access your front!
Upgrading the front end to multiple pods using Kubernetes
But before we go any further, let’s upgrade what we have done by allowing pods to be replicated (more than one pod handling the traffic). To clean all of this up, we will start by deleting the resource we have created:
kubectl delete pod/front svc/front
You’ll notice that in this command, we grouped the resource type and its name to identify a single object, and we deleted multiple objects at the same time.
To handle the replication and the update of pods without needing to delete and recreate them, we are going to use a new type of resource, a deployment (deploy for short).
kubectl create deployment --image=ghcr.io/n-arno/front:latest --replicas=3 --port=80 front
Deployments are the most common way to create and handle containers in Kubernetes. Let’s check the object:
kubectl get deploy/front -oyamlapiVersion: apps/v1kind: Deploymentmetadata: labels: app: front name: front namespace: defaultspec: replicas: 3 selector: matchLabels: app: front template: metadata: labels: app: front spec: containers: - image: ghcr.io/n-arno/front:latest name: front ports: - containerPort: 80
In the spec part, you’ll find the number of replicas (copies) of the container and the template of the pod (this matches the spec you would have found in the pod object). You’ll also notice the same loose coupling between the deployment and the pod it creates using labels and selector.
Now that we have a deployment, we can easily scale the number of pods up and down:
Now that we have a working front end, we need to tackle the back end. The first step is to create a volume, but there is no short one-liner to create a volume as we did with a pod, a deployment, or a service. We will have to create the YAML file.
Create a file named pvc.yaml containing this definition:
A “Persistent Volume Claim” is the Kubernetes way of saying, “Okay, you want a volume, but I’m not sure I’ll be able to deliver; I’ll do my best”.
It can contain a specific field called storageClass which is roughly the equivalent of the volume driver in Docker, the way to actually create/access the volume. In Kapsule, Scaleway provides a default storage class using Block Storage volumes.
One interesting point is the accessMode. It can be ReadOnly, ReadWriteOnce, or ReadWriteMany, depending on whether you can write on the volume or not and whether you can access it from a single pod or multiple. For now, the Scaleway default storageClass supports ReadOnly and ReadWriteOnce.
To create the resource from the file, the way to go is:
kubectl apply -f pvc.yaml
If you edit the file later, you will need to re-apply it with the same command. This is actually the best way to create and keep track of all resources (instead of kubectl run, kubectl create, kubectl edit, kubectl scale, and kubectl expose).
Next up, let’s create the backend pod by editing a brand new file named back.yaml:
In the spec, we define all the volumes needed, and then, in containers, we use these volumes to mount them, similarly to the Docker Compose file with volumes and services.
The field imagePullPolicy set at Always is a best practice to avoid running outdated container images.
Once applied, you should find your volume created and bound to the running pod (or, to be more precise, bound to the cluster node on which the pod is running).
kubectl apply -f back.yamlkubectl get pods backNAME READY STATUS back 1/1 Running kubectl get pvc myvolumeNAME STATUS VOLUME CAPACITY ACCESS MODES myvolume Bound pvc-7e51da4e-50c4-484e-8066-ef7c3c12c2ee 1Gi RWO
Let’s expose this pod to the front by creating the internal service back-service.yaml:
If you had difficulties making it work, here’s a complete YAML file concatenating all needed Kubernetes resources. In YAML, multiple blocks can be added one after the other by separating them with “---”. This way, your Kubernetes YAML file will be closer to a classical Docker Compose single file.
It can be applied directly without downloading it:
Next steps: with Kubernetes, the world is your cluster!
Now that we have achieved the most basic tasks we can do with Kubernetes, you can explore these next steps to continue your journey:
Translating a Docker Compose file to Kubernetes resources can be long and fastidious. Why not use kompose.io to do so?
Using a load balancer for each service may be expensive and will consume multiple IPs. To centralize everything, install and use an Ingress Controller.
In the metadata, together with the labels, annotations are a way to add information to the resources. The difference between both is explained here.
As you may have noticed, scaling a deployment is fairly straightforward in Kubernetes. But it’s possible to go even further by linking the deployment to a Horizontal Pod Autoscaler, a resource that will monitor CPU/RAM utilization and scale the deployment accordingly. This will allow you to take advantage of Scaleway’s Kapsule Cluster Autoscaling to add nodes automatically.
In Kubernetes, it’s possible to separate resources using namespaces. The next step is to create accounts and roles to handle restricting access to resources: Limiting access to Kubernetes resources with RBAC.
Storing connection passwords and/or the URLs or IPs of remote resources should not be done in the container images because it will make those specific to an environment and may expose secrets such as certificates and tokens. To avoid this, a specific type of resources can be used and mounted as volumes and/or environment variables, configMap and secrets. For more info check out An Introduction to Kubernetes Secrets and ConfigMaps
Monitoring and securing connections between containers can be done with a Service Mesh. Tools like linkerd.io and istio.io are the weapons of choice in this case.
Generating and renewing certificates can be complicated, but fear not, cert-manager.io can help with that!
Backing up persistent volume data when they’re moving from node to node can be a puzzle that an installation of velero.io can solve.
Kubernetes is a must-have when it comes to maintaining a container environment and build, test and run applications. On this article, we'll learn how to build and grow on Kubernetes.
To understand why Kubernetes and containerized deployment is so useful for nowadays workloads, let us go back in time and have a view on how deployment has evolved
Some features may be hard to find and used only by most advanced users. We thought you might be interested in going further and optimizing your use of Kubernetes Kapsule