How to create a GitHub / GitLab runner on Apple silicon
You can install your Mac mini with a pre-installed runner for GitHub or GitLab thanks to Scaleway's Dev OS.
Before you start
To complete the actions presented below, you must have:
- A Scaleway account logged into the console
- Owner status or IAM permissions allowing you to perform actions in the intended Organization
- An SSH key
Creating a runner
- Click Apple silicon in the Bare Metal section of the side menu. The Apple silicon splash page displays.
- Click Create Mac mini. The Mac mini creation wizard displays.
- Complete the following steps in the wizard:
- Choose the Pre-installed runner setup type for your Mac mini.
- Choose an Availability Zone, which is the geographical region where your Mac mini will be deployed. The available Mac mini configurations depend on the Availability Zone:
- Mac mini M4, M2 pro, and M2 are available in PARIS 1
- Choose a Dev OS version.
- Tick the checkbox to accept the Dev OS license agreement.
- Choose and configure your runner.
- GitHub: Enter your repository URL, registration token, and a runner name.
- GitLab: Enter your Instance URL, runner token, and a runner name.
- Enter a Name for your Mac mini, or leave the randomly-generated name in place.
- Verify the Estimated cost for your Mac mini based on your chosen specifications.
- Select the commitment plan for your Mac mini. Two options are available:
- No commitment: You can terminate the subscription of your Mac mini at any time after the initial 24 hours, a mandatory period required by Apple's software license. Learn more about Apple's software license requirements (Section 3.A) (PDF).
- Commitment: You subscribe to a commitment plan for Apple silicon and benefit from a discounted monthly price based on your choice.
- Tick the checkbox to agree to the Bare Metal specific conditions and the macOS License Agreement.
- Click Create Mac mini to finish. The installation of your Apple silicon is launched, and you are informed when it is ready.
Retrieving your GitHub token
You can retrieve the required registration token to configure your self-hosted runner from your GitHub repository.
-
Open your GitHub repository in a web browser.
-
Click Settings to view the settings tab.
-
In the Actions section of the sidebar, click Runners to display all runners configured for this project.
-
Click New self-hosted runner to view the setup instructions.
-
Retrieve the token from the command in the Configure section of the instructions. For example, if the command appears as:
$ ./config.sh --url https://github.com/my-user/my-github-repository/ --token 123456789abcdef123456789abcdef123456789aThe token is the value after
--token, like:123456789abcdef123456789abcdef123456789a.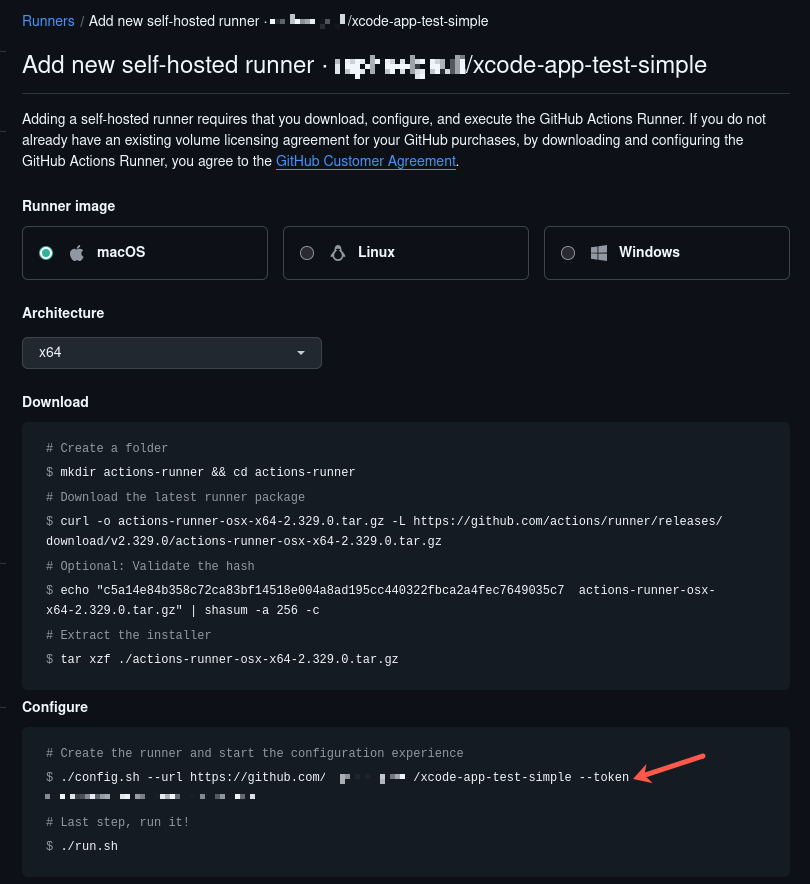
Updating a runner
- Click Apple silicon in the Bare Metal section of the side menu. The Apple silicon splash page displays.
- Select the machine you want to update. The runner information overview displays.
- Open the Settings tab.
- Click Edit in the Runner information section of the page. A pop-up displays.
- Update your runner credentials and click Save and reboot. Your runner configuration will be updated and the runner performs a reboot to take the new configuration into effect.
Reinstalling a runner
Reinstalling a server delivered in Dev OS mode is not possible due to the lengthy installation process required for the full Dev OS stack. You have to delete the runner and create a new one.
Deleting a runner
You can delete a runner like any Mac mini. Refer to How to delete a Mac mini for more information.