InterLink - Quickstart
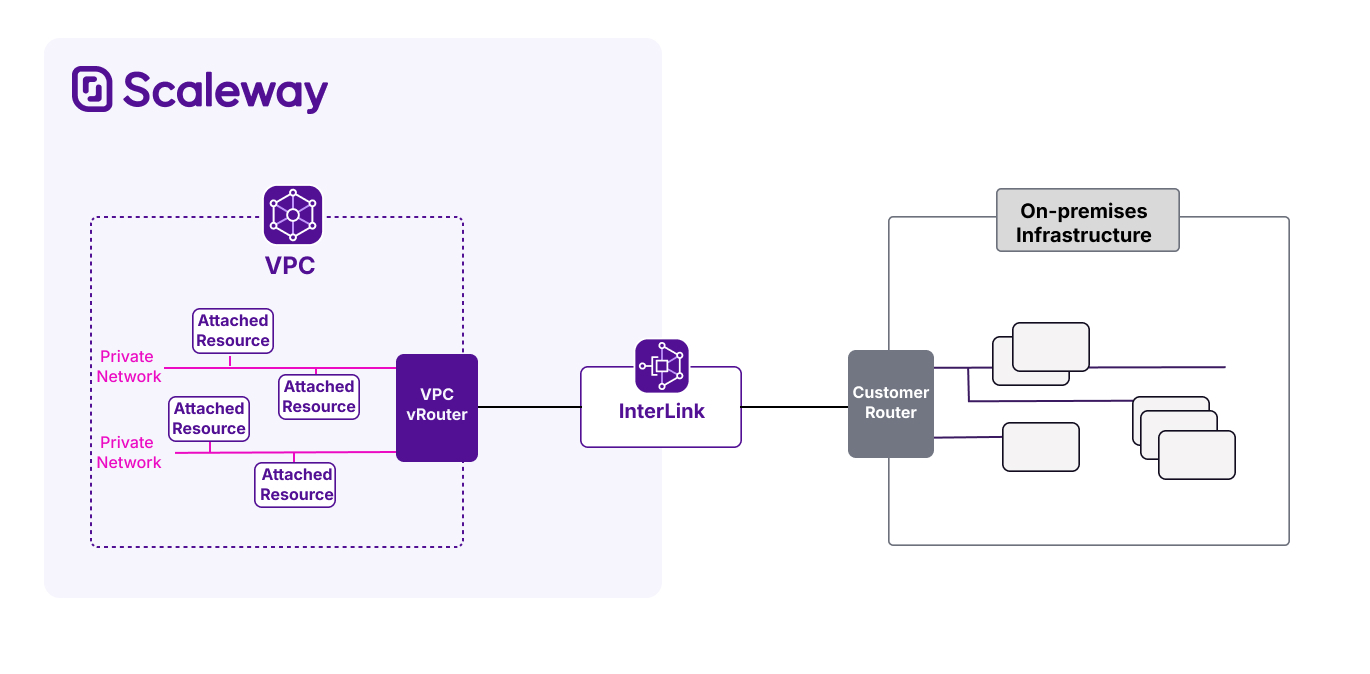
InterLink is Scaleway's product to let you create a secure, private connection between your external infrastructure, and your Scaleway VPC. This allows you to direct your traffic safely from your Scaleway infrastructure to your on-premises infrastructure, away from the public internet.
Before you start
To complete the actions presented below, you must have:
- A Scaleway account logged into the console
- Owner status or IAM permissions allowing you to perform actions in the intended Organization
How to create an InterLink
-
Click InterLink in the Network section of the Scaleway console side menu. If you have not already created an InterLink, the product ordering page is displayed.
-
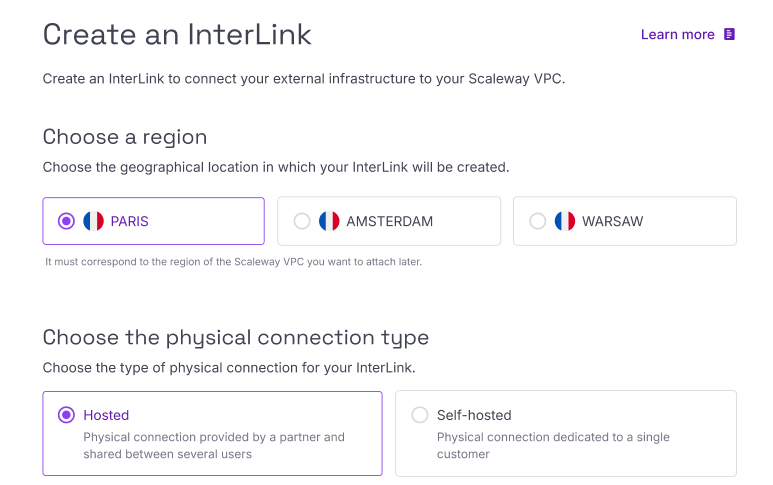
Click Create InterLink. The creation wizard displays.
-
Choose a region for your InterLink. This must correspond to the Scaleway VPC you want to attach later.
-
Select a physical connection type for your InterLink, either hosted or self-hosted.
-
Select the following options, depending on your physical connection type:
-
Choose a bandwidth amount. This represents the maximum bandwidth that will be available over the InterLink.
-
Attach up to two routing policies. InterLink needs a policy for each IP traffic type it should route: all routes are blocked except those allowed in the policy(ies). Alternatively, skip this step and attach routing policies later.
-
Enter a name and optional tags for your InterLink.
-
Click Create InterLink.
-
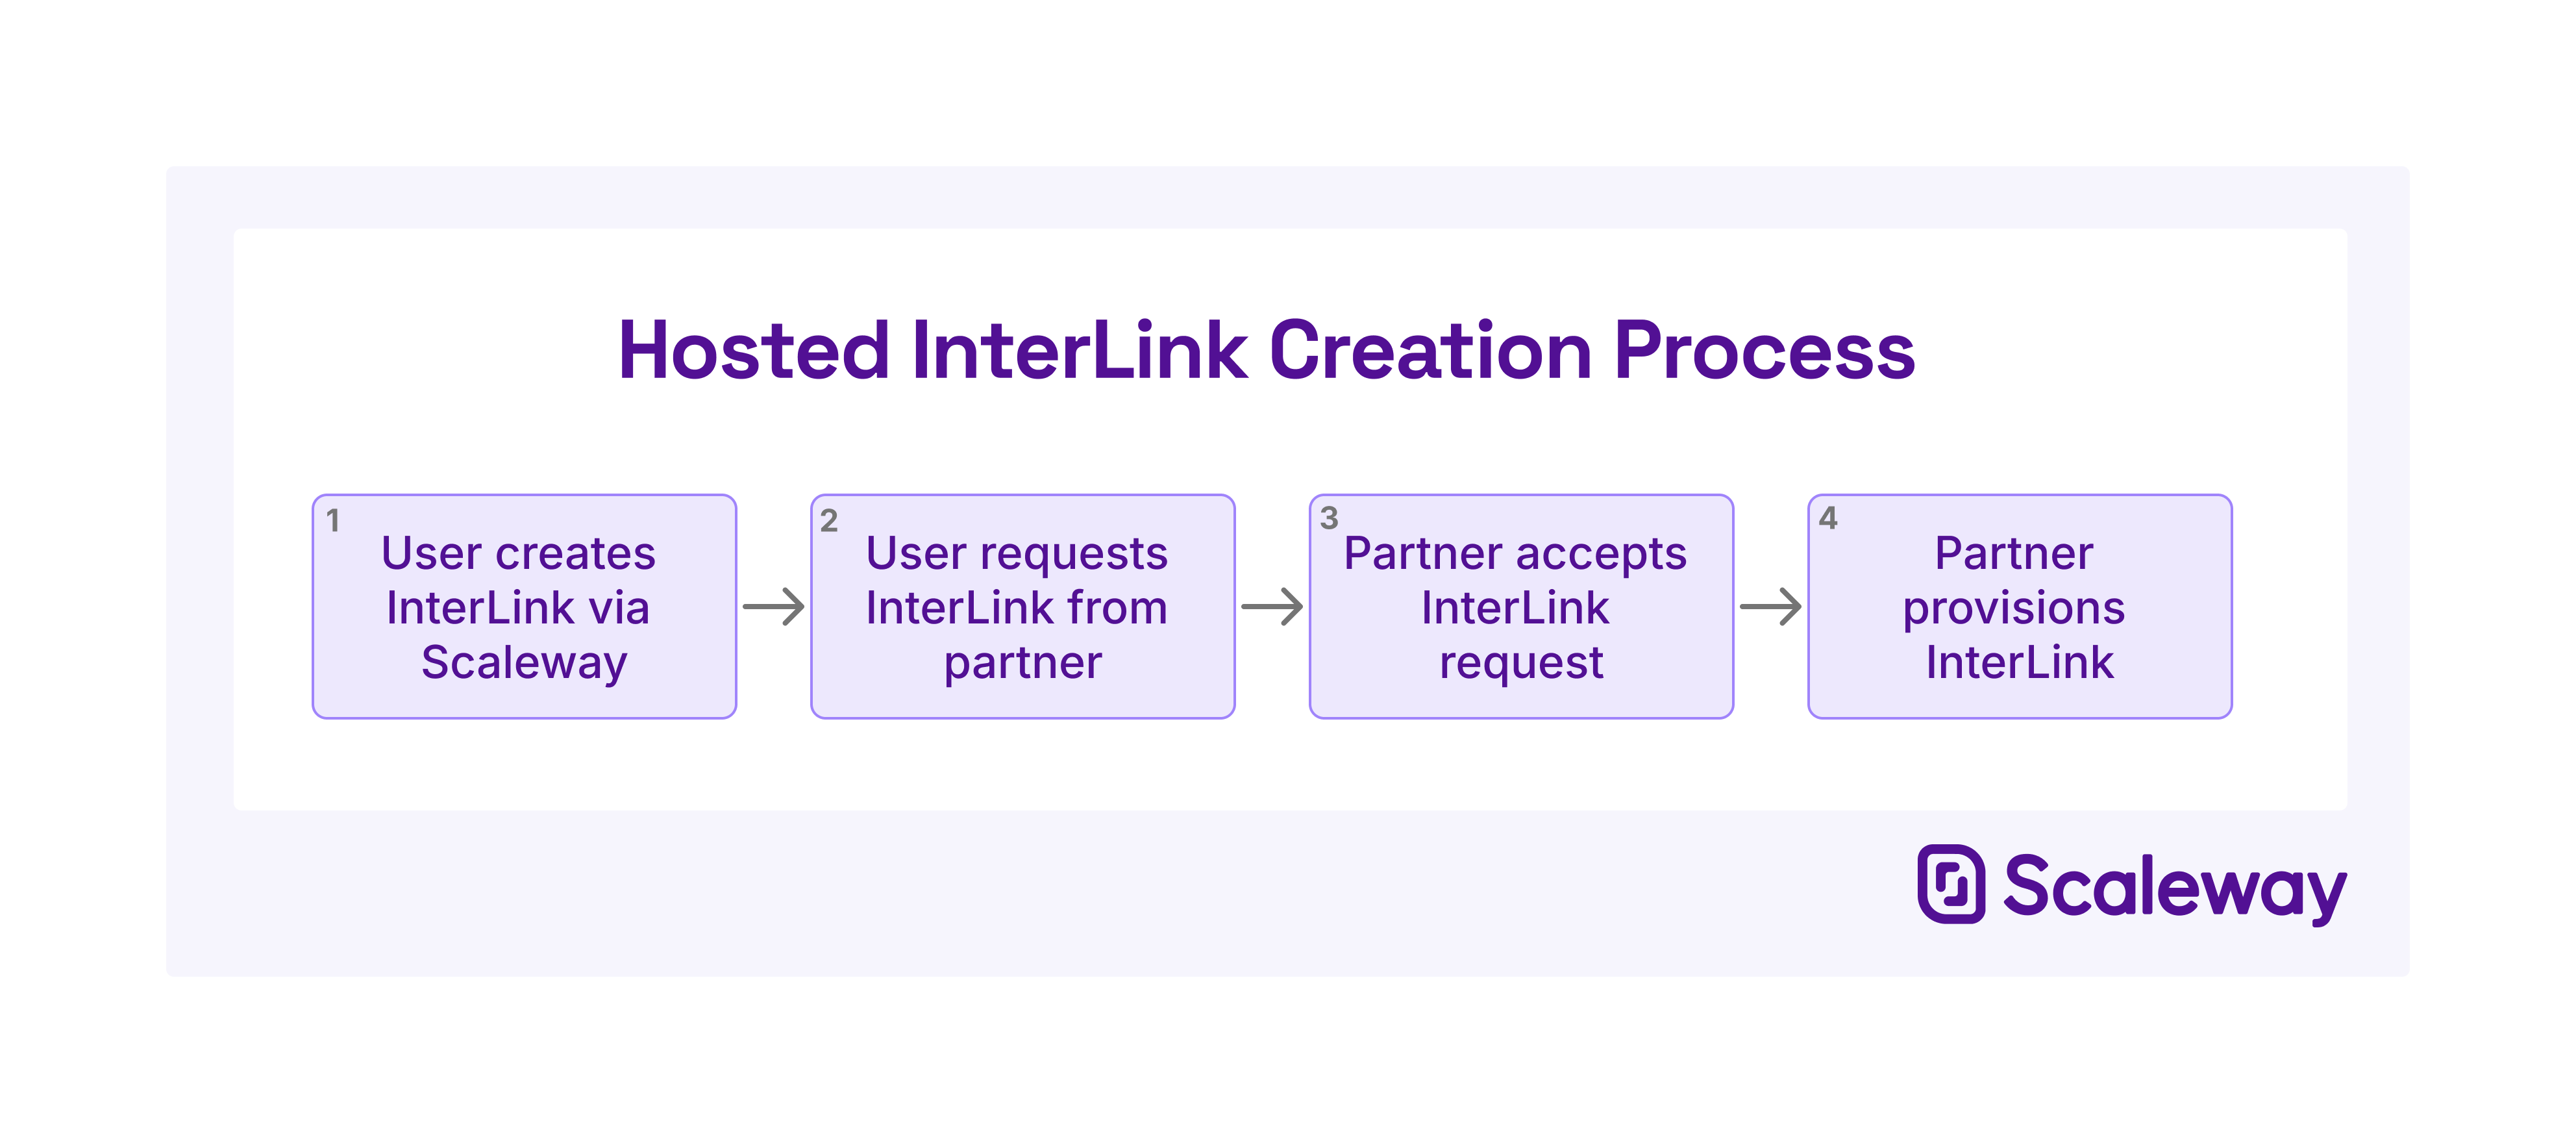
Hosted InterLink: You must now contact your chosen partner to request they provision your InterLink from their end. Note that Scaleway starts billing you for the InterLink as soon as you create it, and your partner may charge you additional fees once provisioned on their end. For full details of the provisioning process, including how to contact your partner and what other steps you need to take, see the page How to complete hosted InterLink provisioning.
-
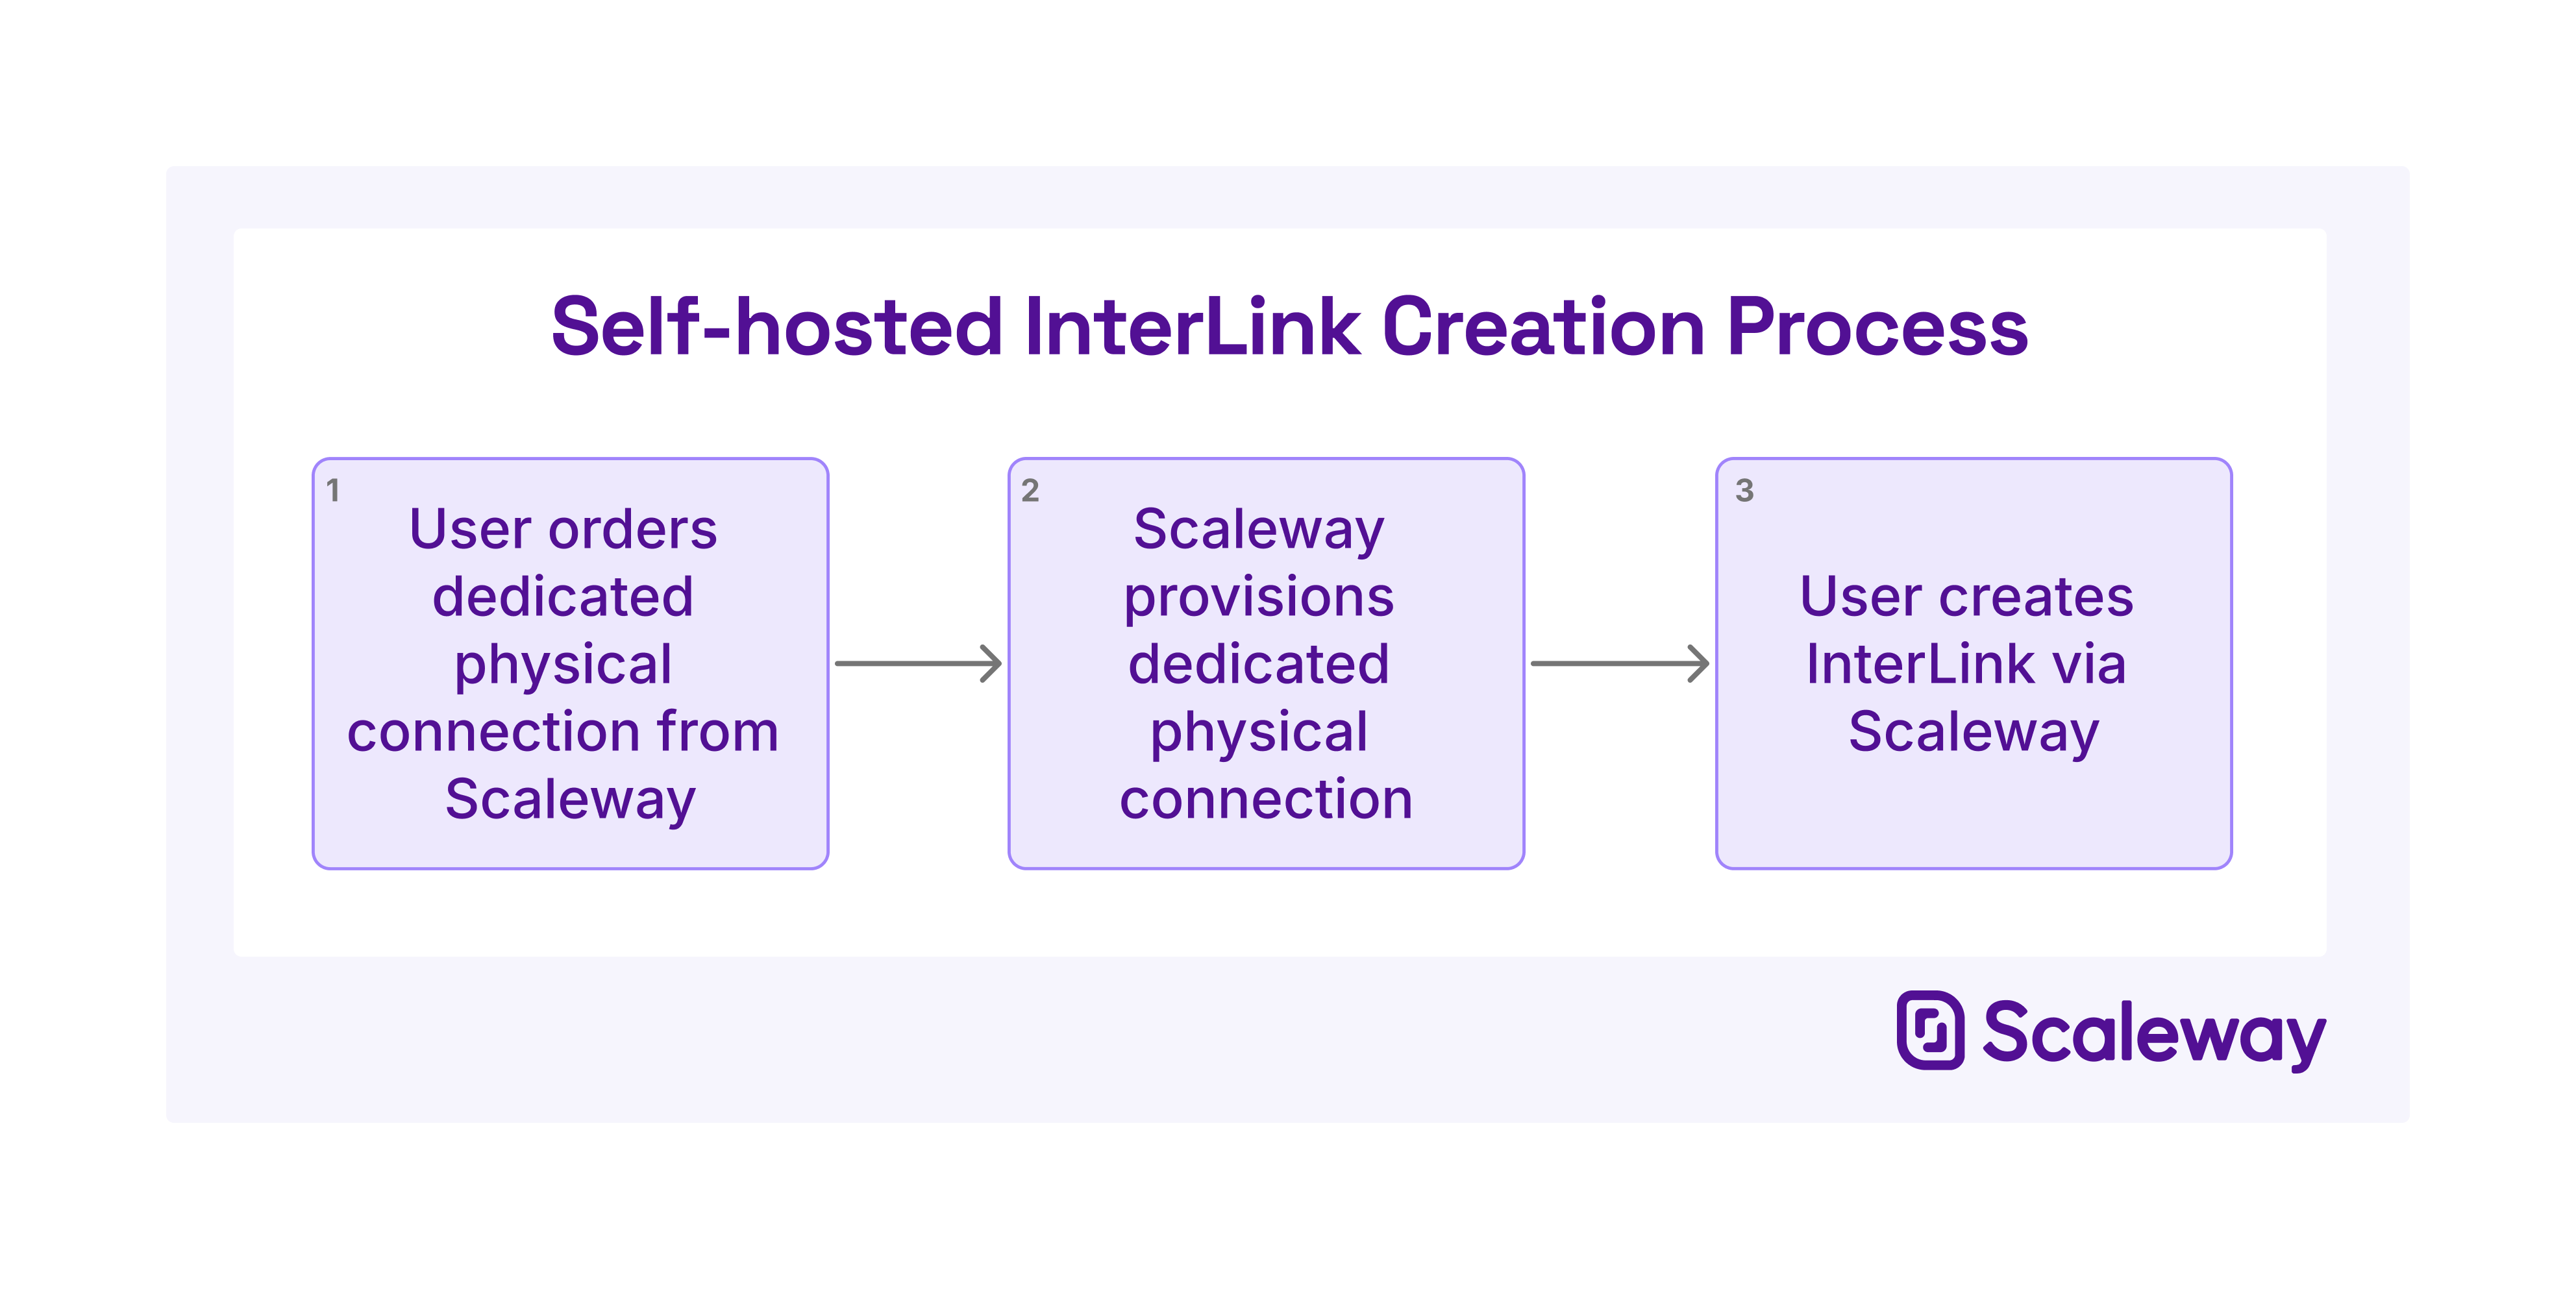
Self-hosted InterLinks: Your InterLink is now fully created. However, you must complete InterLink setup on the customer side by configuring your network device. For full details, see How to complete self-hosted InterLink setup
How to complete hosted InterLink provisioning.
-
Click InterLink in the Network section of the Scaleway console side menu. A listing of your InterLinks displays.
-
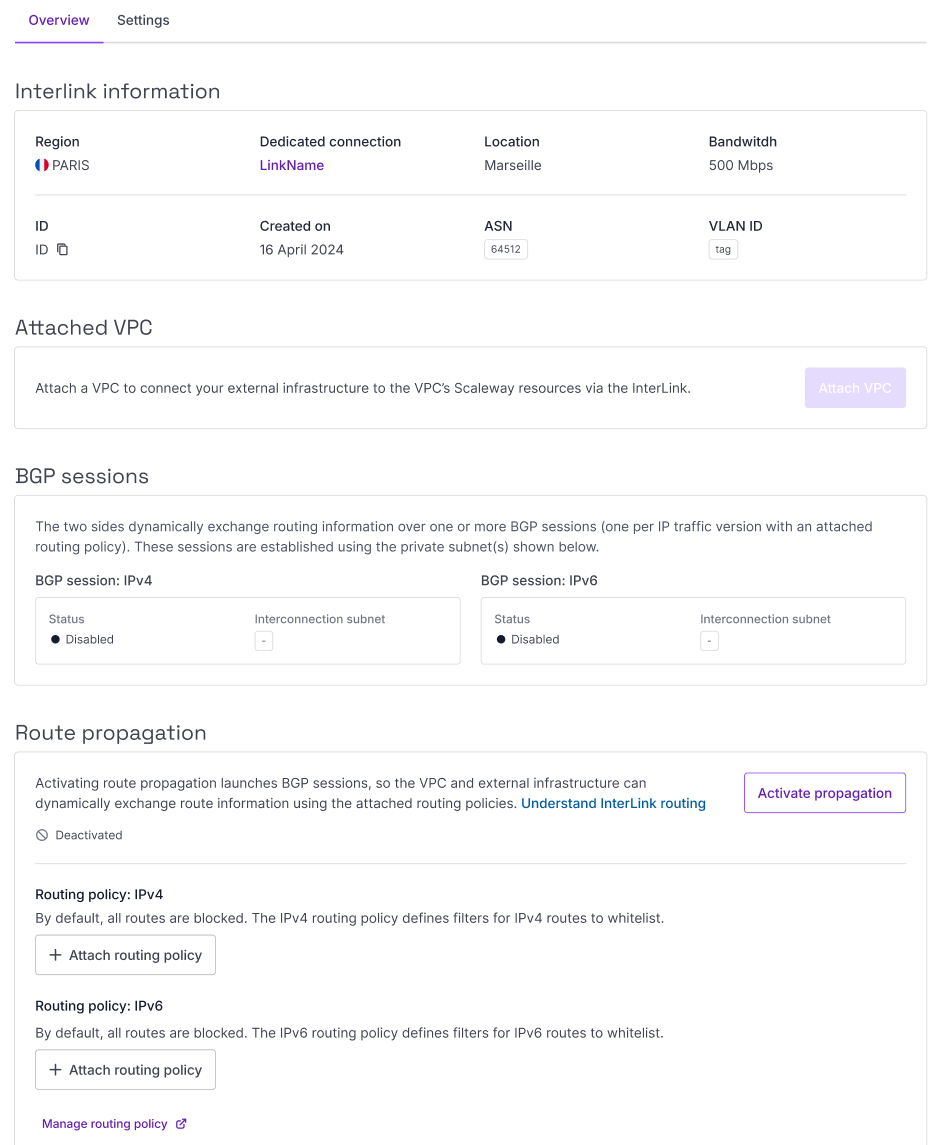
Use the region selector at the top of the page to filter for the region of the InterLink you want to finish provisioning, then click the InterLink. The InterLink's Overview page displays.
-
Note down the pairing key for your InterLink. This is a unique identification number which the partner will need in order to provision your InterLink.
-
Contact your partner. After creating your InterLink order, either their online portal URL, or their email address was displayed to you for this purpose. Use the relevant method to contact your partner, provide the pairing key, and request that they provision your InterLink from their side.
Your InterLink will remain in Requested status until the partner responds to your request. You can keep track of your InterLink's status via the InterLink listing in the Scaleway console.
When the partner approves your request, the InterLink moves to Provisioning status. This means that the partner has agreed to facilitate your InterLink, and is now preparing the resources and configuration necessary to do so.
When the partner has finished provisioning your InterLink, it moves to Active status. This indicates that the physical link and necessary accompanying configuration has been completed on the partner's side, and your InterLink is ready for use.
How to configure your InterLink
After your InterLink has been provisioned, a number of configuration steps are necessary to enable traffic to flow over the InterLink.
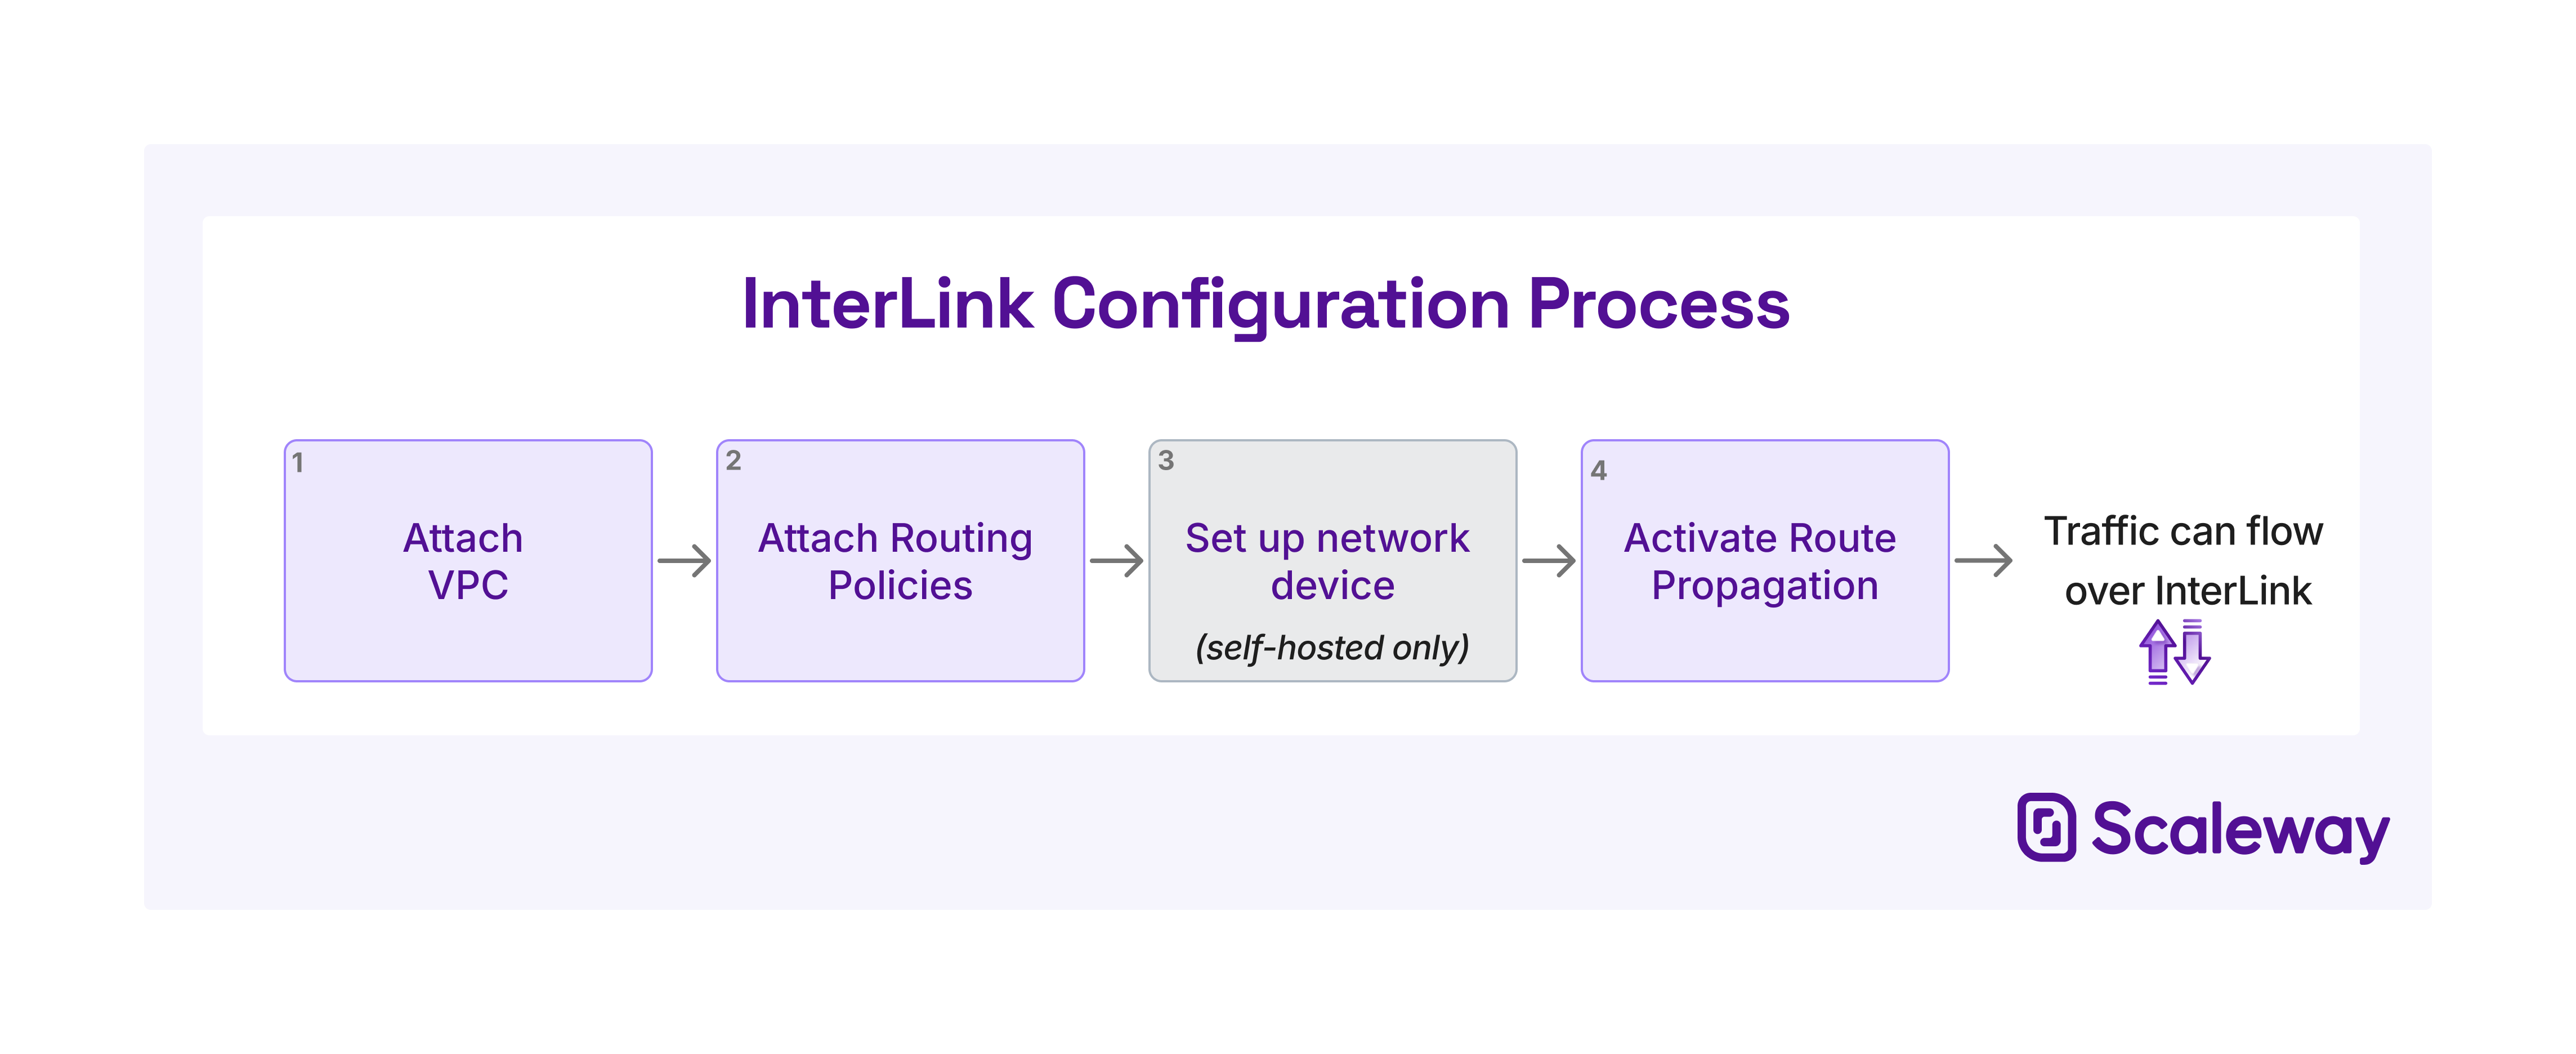
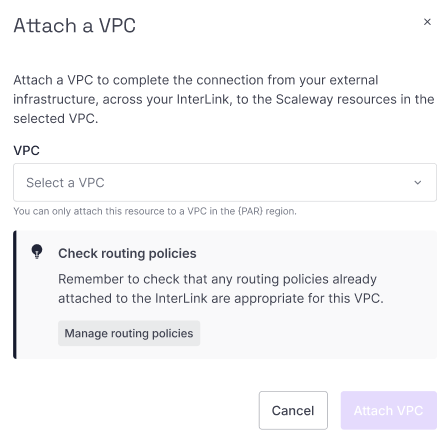
How to attach a VPC
Attaching an InterLink to a VPC allows you to complete the connection from your external infrastructure, across the InterLink, to the Scaleway resources in the selected VPC.
-
Click InterLink in the Network section of the Scaleway console side menu. A listing of your InterLinks displays.
-
Use the region selector at the top of the page to filter for the region of the InterLink you want to configure, then click the InterLink. The InterLink's Overview page displays.
-
In the Attached VPC section, click Attach VPC. A pop-up displays:
-
Select one of your existing VPCs from the dropdown list. It must be in the same region as the InterLink. Alternatively, click + Create VPC to create and attach a new VPC.
-
Click Attach VPC
The VPC is attached and you are returned to the InterLink's Overview page.
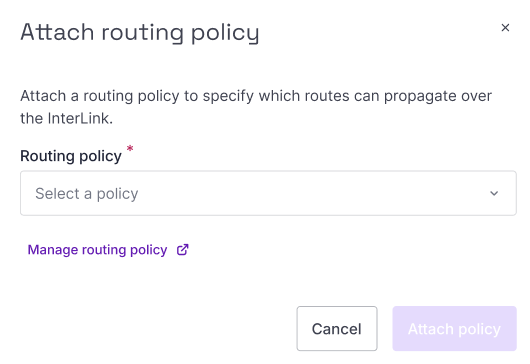
How to attach a routing policy
After attaching a VPC, the next step in configuring your InterLink is to create and attach a routing policy.
The VPC and the external infrastructure's routers both announce their routes to each other via BGP when route propagation is activated. Still, all of these routes are blocked by default. Routing policies let you allow ranges of route announcements so that traffic can flow along these routes across the InterLink.
An InterLink must have a minimum of one and a maximum of two attached routing policies, one for each IP traffic type to be routed (IPv4 and/or IPv6).
See the dedicated documentation on creating a routing policy, then follow these instructions to attach it:
-
Click InterLink in the Network section of the Scaleway console side menu. A listing of your InterLinks displays.
-
Use the region selector at the top of the page to filter for the region of the InterLink you want to configure, then click the InterLink. The InterLink's Overview page displays.
-
In the Route propagation section, click Attach routing policy. A pop-up displays.
-
Select a routing policy from the drop-down list, and click Attach list.
Repeat the process to attach up to two routing policies in total (one for IPv4 and one for IPv6).
How to set up your network device (self-hosted only)
You must configure the real physical or software-based networking device, located on the remote network you are connecting to your Scaleway VPC via the InterLink. You will need the following information, which is available from your InterLink's Overview screen in the Scaleway console:
- Scaleway ASN (12876)
- VLAN ID for the InterLink
You also need to set up route announcements and filters on the customer side. For this, you will need the following information, also available from the InterLink's Overview screen.
-
BGP interconnection subnet(s): The private subnet used for the VPC and external infrastructure to establish a BGP session and exchange routing information. For InterLinks that have both IPv4 and IPv6 routing policies, one IPv4 and one IPv6 subnet will be provided.
-
Routing policy: Take into account the routing policy(ies) you attached to the connection, when configuring routing policy on the customer gateway device.
How to activate route propagation
Once you have attached a VPC, attached routing policies and (for self-hosted InterLinks) set up your network device, you can activate route propagation. This is the final step in configuring your InterLink so that traffic can flow between the VPC and your external infrastructure: it triggers the dynamic exchange of route information between the VPC and external infrastructure.
-
Click InterLink in the Network section of the Scaleway console side menu. A listing of your InterLinks displays.
-
Use the region selector at the top of the page to filter for the region of the InterLink you want to configure, then click the InterLink. The InterLink's Overview page displays.
-
In the Route propagation section, use the toggle toggle icon to turn route propagation ON.
A pop-up displays, confirming that the action will launch the BGP session(s) and allow traffic to flow over the InterLink, via the routes allowed in the attached routing policy(ies).
-
Click Activate route propagation.
Route propagation is activated, and you are returned to your InterLink's overview page.
While route propagation remains active, traffic can flow across the routes allowed by the routing policy(ies). The VPC and external infrastructure will dynamically exchange and update route information. You can deactivate route propagation at any time: if you do so, all routes are blocked and no traffic can flow.
How to delete an InterLink
-
Click InterLink in the Network section of the Scaleway console side menu. A listing of your InterLinks displays.
-
Use the region selector at the top of the page to filter for the region of the InterLink you want to delete, then click the InterLink. The InterLink's Overview page displays.
-
In the Delete InterLink panel, click Delete InterLink, and confirm when prompted.
Scaleway stops billing you for your InterLink at this point, and it can no longer be configured, un-deleted, or used to route traffic.
-
Hosted InterLinks only: Contact your partner to request that they delete the InterLink resource on their side. They may continue to bill you until you do so, and they deprovision the resource on their side. To get in touch with the partner, you can use the same contact information that you used when requesting the InterLink from the partner.
When the InterLink is fully deprovisioned on both sides, it will be deleted from the list of your InterLinks, and its Overview page will no longer be accessible.
Self-hosted InterLinks only: Contact sales if you want to deprovision your dedicated physical connection.