InterLink - Technical overview
InterLink is Scaleway's product to let you create a secure, private connection between your external infrastructure, and your Scaleway VPC. This allows you to direct your traffic safely from your Scaleway infrastructure to your on-premises infrastructure, away from the public internet. Compared to a typical internet-based VPN, an InterLink is more reliable, more secure and offers lower latency.
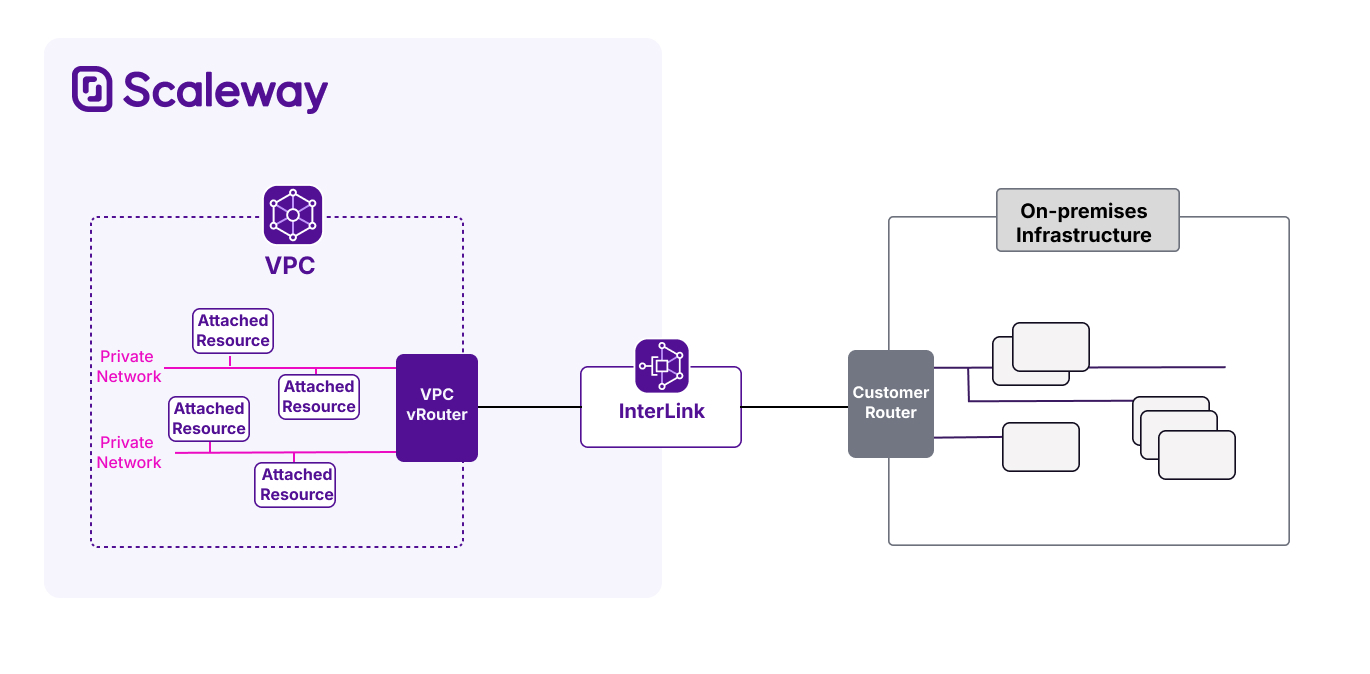
At its simplest level, InterLink can be understood as a configurable connection between your own infrastructure, and your Scaleway VPC. You can configure details such as available bandwidth, and the routing policy between the two peers:
Types of InterLink
Two types of InterLink are available, depending on how you want to provision the physical connection between the external infrastructure and the Scaleway VPC: hosted or self-hosted.
Hosted InterLinks
A hosted InterLink is provisioned via a partner. Partners are telecom operators or network providers that have been pre-selected by Scaleway. They provide a shareable port on their router, with a certain amount of bandwidth, at a PoP (location) where both Scaleway and the partner's networks are present. The available bandwidth is shared between multiple customers: each gets a specified amount when creating their InterLink.
By choosing a hosted InterLink, you can re-use existing connectivity between a PoP where both you and the partner are present, and the Scaleway network. Layer 2 isolation to your Scaleway VPC is preserved, with guaranteed bandwidth (100 Mbps - 25 Gbps) across the InterLink.
How to choose a partner
To establish an InterLink connection via a partner, generally you must be a client of that partner, e.g. with your infrastructure in their data center, or on your own premises using the partner as a network provider.
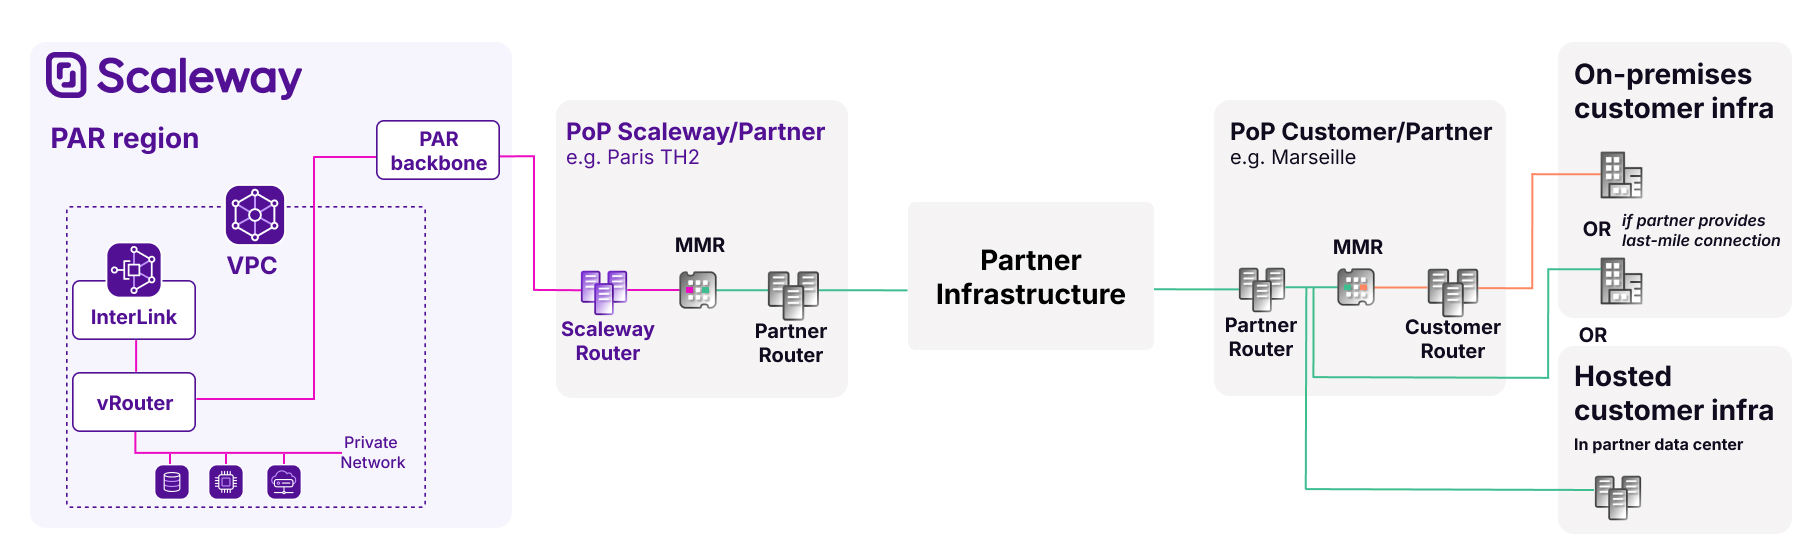
The diagram below shows the architecture of a hosted InterLink. Note that three possibilities are available on the customer side:
- The partner's router connects to the customer's router (itself connected to the customer's on-premises infrastructure) via a Meet Me Room at a PoP where both networks are present.
- The partner's router connects directly to the customer's on-premises infrastructure via a last-mile connection facilitated by the partner.
- The customer's infrastructure is hosted in the partner's datacenter, and connects to the partner's router directly.
Self-hosted InterLink
The customer creates an InterLink using their own dedicated physical connection, where they get sole use of a single InterLink port on Scaleway's router. This connection and its bandwidth can then be used to provision several InterLinks for themselves.
Self-hosted InterLinks enable you to bypass third-party partners for financial, privacy or compliance reasons, or to take advantage if your router is already colocated with one of Scaleway's locations.
To provision your own dedicated physical connection, contact a sales representative. Connections cannot be provisioned via the Scaleway console.
Once the dedicated physical connection is provisioned, you can create your InterLink via the Scaleway console or developer tools, specifying the dedicated connection to be used.
You must be able to configure your network device for InterLink. Otherwise, the configuration process is the same as for hosted InterLinks.
Creating an InterLink
InterLinks can be created via the Scaleway console or our developer tools.
For hosted InterLinks, after creation on the Scaleway side, specific action is required from the customer and the selected partner in order to successfully complete the provisioning process.
For self-hosted InterLinks, you must have already provisioned a dedicated physical connection before starting the InterLink creation process. Once the InterLink is created, you will need to configure your network device.
See our dedicated page on provisioning an InterLink for full details.
Attaching a VPC
When you initially create the InterLink, it is not associated with a specific VPC, only with a given Scaleway region. Attaching it to a VPC within the specified region is essential to complete the connection on the Scaleway side. See the configuration page for more information.
While each InterLink can only be attached to a single Scaleway VPC, it is possible to attach two InterLinks to the same VPC to ensure redundancy and high availability. In this case, each InterLink must be provisioned and configured separately, and will be billed separately. Note that you can reuse the same routing policies across multiple InterLinks.
Routing across an InterLink
InterLink uses Border Gateway Protocol to exchange routing information between the customer’s network and the Scaleway VPC.
Each side advertises IP prefixes for its own internal subnets and resources, to allow the other side to dynamically learn and update its internal routes. This facilitates efficient traffic flow across the link towards these destinations, providing that routing policies and route propagation have been correctly set up.
In fact, each InterLink has two BGP sessions: one for IPv4 and one for IPv6. Each session handles the exchange of IP prefixes for its respective IP version. The separation of these sessions ensures that IPv4 and IPv6 traffic can be managed independently, and provides compatibility with networks that may only support one of the IP versions.
When both BGP sessions are up, the InterLink has Active status. If one BGP session is up, and the other down, the status moves to Limited Connectivity. If both BGP sessions are down, the status is marked as Down. See the page on InterLink statuses for full information.
Routing policies
By default, all route announcements from both sides are blocked by InterLink. This is part of a safety-net mechanism to allow customers to efficiently and safely control traffic flow across the link. You must create and attach a routing policy for each traffic type (IPv4 and/or IPv6), to specify the IP prefix announcements to allow from each side. This is step one of two in allowing traffic to flow across the InterLink. See the configuration page for more information on routing policies.
Route propagation
Even after attaching a routing policy, traffic cannot flow across your InterLink until you activate route propagation. This is the second part of the safety-net mechanism, enabling you to fine-tune the traffic that flows across your InterLink. Route propagation can be activated or deactivated whenever you want. See the configuration page for more information on route propagation.