How to configure Scaleway Dedibox RPNv2
RPNv2 can be configured on any operating system supporting VLANs. The feature is available for selected Dedibox servers.
How to configure RPNv2 on Debian
- Install the vlan package by running the following command:
sudo apt-get install vlan - Edit your
/etc/network/interfacesfile as follows (assuming your RPN NIC iseth1and your VLAN ID is3900):auto eth1.3900 iface eth1.3900 inet static address my.pri.vate.address netmask my.custom.net.mask
How to configure RPNv2 on Ubuntu
network:
    version: 2
    renderer: networkd
    ethernets:
        mainif:
            match:
                macaddress: "de:ad:be:ef:ca:fe"
            set-name: mainif
            addresses: [ "10.3.0.5/23" ]
            gateway4: 10.3.0.1
            nameservers:
                addresses: [ "8.8.8.8", "8.8.4.4" ]
                search: [ example.com ]
    vlans:
        vlan15:
            id: 15
            link: mainif
            addresses: [ "10.3.99.5/24" ]
How to configure RPNv2 on CentOS
In the following 'how to' we assume your RPN NIC is eth1.
- Create a configuration file for the parent interface, called
/etc/sysconfig/network-scripts/ifcfg-eth1:DEVICE=eth1 TYPE=Ethernet BOOTPROTO=none ONBOOT=yes - Create another file for the vlan interface (assuming the VLAN ID is
3900). The file is called/etc/sysconfig/network-scripts/ifcfg-eth1.3900:DEVICE=eth1.3900 BOOTPROTO=none ONBOOT=yes IPADDR=my.pri.vate.address PREFIX=CIDR.Netmask NETWORK=my.private.address.0 VLAN=YES
How to configure RPNv2 on Rocky Linux 9
For this how-to, we assume that your RPN NIC is eth1, the VLAN ID is 2001 and the new connection name is VLAN2001.
To add a new VLAN connection using the nmcli command, follow the steps below:
[root@srv1 ~]# nmcli connection add type vlan ifname VLAN2001 dev eth1 id 2001
Connection 'vlan-VLAN2001' (116121e0-4dca-4fb7-82ac-6e38b0f7d277) successfully added.d
Show the updated VLAN connection:
[root@srv1 ~]# nmcli connection show
NAME           UUID                                  TYPE      DEVICE
vlan-VLAN2001  116121e0-4dca-4fb7-82ac-6e3888f7d277  vlan      VLAN2001
Configure the second server to enable reachability from the group members.
Assign an IP address to VLAN 2001 (your VLAN ID) on serv1 and change ipv4.method to use the manual method
nmcli connection modify vlan-VLAN2001 ipv4.addresses 192.168.10.101/24 ipv4.method manual ipv4.addresses
nmcli connection up vlan-VLAN2001
Assign an IP address to VLAN 2001 (your VLAN) on serv2 and change ipv4.method to use the manual method
nmcli connection modify vlan-VLAN2001 ipv4.addresses 192.168.10.100/24 ipv4.method manual ipv4.addresses
nmcli connection up vlan-VLAN2001
Test your configuration via ping:
From 192.168.0.100 to 192.168.0.101
[root@srv1 ~]# ping 192.168.0.101
PING 192.168.0.101 (192.168.0.101) 56(84) bytes of data.
64 bytes from 192.168.0.101: icmp_seq=1 ttl=64 time=12.9 ms
64 bytes from 192.168.0.101: icmp_seq=2 ttl=64 time=12.9 ms
64 bytes from 192.168.0.101: icmp_seq=3 ttl=64 time=13.1 ms
From 192.168.0.100 to 192.168.0.100
[root@frontend-srv ~]# ping 192.168.0.100
PING 192.168.0.100 (192.168.0.100) 56(84) bytes of data.
64 bytes from 192.168.0.100: icmp_seq=1 ttl=64 time=13.2 ms
64 bytes from 192.168.0.100: icmp_seq=2 ttl=64 time=13.1 ms
64 bytes from 192.168.0.100: icmp_seq=3 ttl=64 time=13.1 ms
How to configure RPNv2 on FreeBSD
Edit your /etc/rc.conf file, assuming ix0 is your RPN NIC, and 3900 your VLAN ID:
ifconfig_ix0="up"
cloned_interfaces="vlan3900"
ifconfig_vlan3900="inet my.pri.vate.IP/CIDR.NETMASK vlan 3900 vlandev ix0"
Do not forget to adapt the VLAN ID, Interface Name, and Network configuration to your needs.
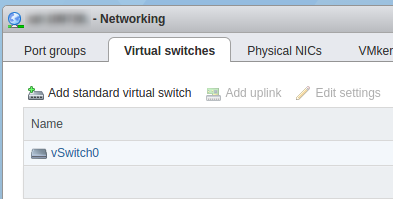
How to configure RPNv2 on ESXi
On ESXi, you can create virtual switches that talk directly on the corresponding VLAN ID.
- Check your network interfaces, to discover which one corresponds to the RPN interface. In the following example, the RPN interface is
vmnic2. - Enter the Virtual switch section and add a new one by clicking Add standard virtual switch:
- Enter a name for the virtual switch, set the MTU to
9000, and select the RPN interface as uplink: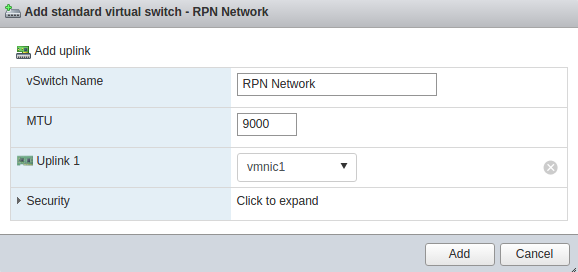
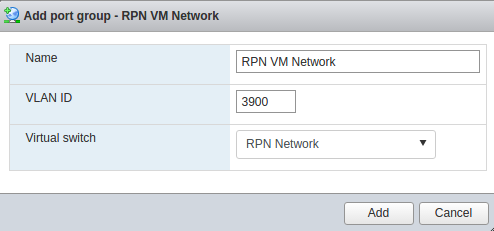
- Click the Port groups tab and click Add port group to create a new one:

- Enter a name for the new port group and set the VLAN IP, then select the virtual switch and click Add.
The virtual switch is configured now.
Create a NIC directly linked to your new Group (VM Network in the example above) and configure it in your virtual machine using your address-plan.
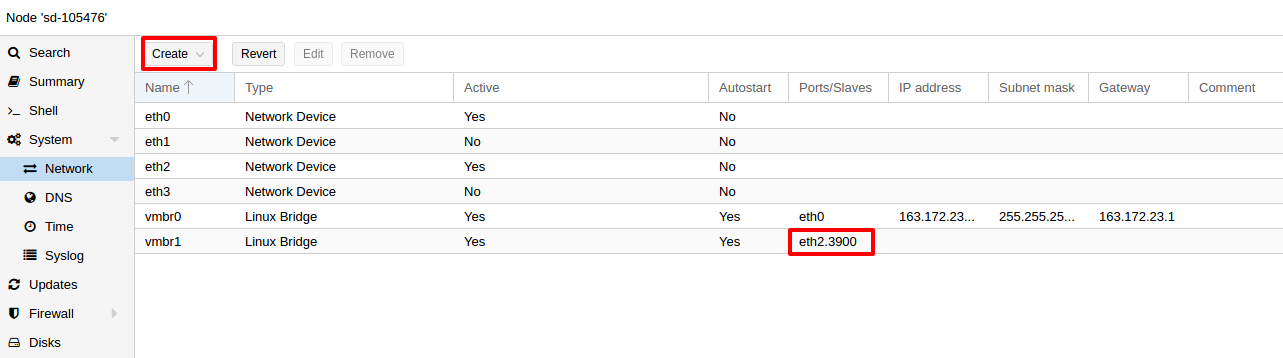
How to configure RPNv2 on Proxmox
-
Login to the Proxmox web interface and click System > Network.
-
Click Create on the network page.
-
Configure your bridge with a
bridge_portwhich will be named after your RPN NIC, and your VLAN ID.