Migrating virtual machines from VMware to Scaleway Instances
Migrating virtual machines from one platform to another can be a complex process, especially when moving from a proprietary environment like VMware to a cloud-based infrastructure like Scaleway. However, with the right tools and a step-by-step approach, you can successfully migrate your VMware virtual machines to Scaleway Instances, taking advantage of the scalability, flexibility, and cost-effectiveness of the cloud.
This guide provides instructions for migrating virtual machines (VMs) from VMware to Scaleway Instances.
It covers the migration process for Microsoft Windows (2019 and 2022) and Red Hat Enterprise Linux (RHEL) 9 VMs, each containing a single volume, to Scaleway’s managed Instances.
The migration uses an intermediate Scaleway Instance as a converter, using tools such as virt-v2v to transform VMware disk formats (VMDK) to Scaleway-compatible formats (QCOW2).
Before you start
To complete the actions presented below, you must have:
- A Scaleway account logged into the console with access to Instances, Block Storage, Object Storage, and optionally Private Networks.
- VMware environment details (e.g., ESXi or vCenter credentials, VM configurations).
- VMs configured to boot with UEFI (not Legacy BIOS).
- SSH key configured for accessing Scaleway Instances.
- Familiarity with command-line tools, including Scaleway CLI, AWS CLI (for Object Storage), and
virt-v2v. - Sufficient Block Storage (at least twice the size of the VM to be migrated) on the converter Instance.
Refer to Scaleway’s Instance documentation for details on setting up Instances and related services.
Glossary
| Term | Definition |
|---|---|
| Block Storage | Scaleway’s persistent storage for Instance disks, used for snapshots and volumes. |
| Hypervisor | Software that manages virtual machines, such as VMware ESXi or Scaleway’s KVM-based system. |
| OVA/OVF | Virtual machine image formats used by VMware for exporting VMs. |
| QCOW2 | Disk image format used by Scaleway’s KVM-based hypervisor, optimized for cloud environments. |
| QEMU Guest Agent | A service enabling communication between the guest OS and Scaleway’s hypervisor for tasks like shutdown or status reporting. |
| VMDK | VMware’s virtual disk image format, which must be converted to QCOW2 for Scaleway. |
| VMX | VMware configuration file specifying VM characteristics (e.g., CPU, RAM, disks, network interfaces). |
| VirtIO Drivers | Drivers allowing the guest OS to interact with Scaleway’s block storage and network devices. |
| virt-v2v | A tool from the Libguestfs project for converting VMs between hypervisors, including VMDK to QCOW2 conversion. |
Validating VMs to migrate
Review your VMware VMs to ensure compatibility with Scaleway Instances.
- Identify VMs:
- List VMs in your VMware environment via vCenter or ESXi console.
- Note the operating system (Windows 2019/2022 or RHEL 9).
- Check the disk configuration:
- Record the number, size, and type of disks (e.g., 1x 100 GB VMDK).
- Verify the network configuration:
- Note the number and type of network interfaces (NICs).
- Confirm the boot type of the VM:
- Ensure VMs use UEFI boot (check VMware settings under "Boot Options").
- Match resources to the new Scaleway Instance:
- Map VM resources (CPU, RAM, storage) to Scaleway Instance types:
- Windows: Use POP2-WIN (e.g., POP2-8C-32G-WIN for 8 cores, 32 GB RAM).
- RHEL: Use General-Purpose (e.g., POP2-8C-32G).
- Refer to Choosing the best Scaleway Instance type for your workload for additional information.
- Map VM resources (CPU, RAM, storage) to Scaleway Instance types:
Migration process
Windows VM migration (single volume)
This section outlines the migration of a Windows 2019 or 2022 VM with a single volume to a Scaleway POP2-WIN Instance.
Preparing the converter instance
-
Create a Scaleway Instance:
- Image: Ubuntu 24.04 Noble Numbat.
- Block Storage: At least twice the storage size of the VM to be migrated.
- SSH Key: Configure an SSH key for access.
-
Install the required migration tools:
# Update package lists apt update apt -y install python3-pip virt-v2v libguestfs-tools unzip # Download VirtIO drivers for Windows wget https://fedorapeople.org/groups/virt/virtio-win/direct-downloads/stable-virtio/virtio-win.iso mkdir -p /usr/share/virtio-win mount virtio-win.iso /usr/share/virtio-win # You will see the following message: mount: /usr/share/virtio-win: WARNING: source write-protected, mounted read-only. curl -L -o - "https://github.com/vmware/govmomi/releases/latest/download/govc_$(uname -s)_$(uname -m).tar.gz" | tar -C /usr/local/bin -xvzf - govc # Tool used to convert rpm packages: apt install -y rpm2cpio # Tool to run applications as Windows service wget -nd -O srvany.rpm https://kojipkgs.fedoraproject.org//packages/mingw-srvany/1.1/4.fc38/noarch/mingw32-srvany-1.1-4.fc38.noarch.rpm rpm2cpio srvany.rpm | cpio -idmv \ && mkdir /usr/share/virt-tools \ && mv ./usr/i686-w64-mingw32/sys-root/mingw/bin/*exe /usr/share/virt-tools/ # Scaleway CLI : curl -s https://raw.githubusercontent.com/scaleway/scaleway-cli/master/scripts/get.sh | sh # AWS CLI for uploading to S3 : curl "https://awscli.amazonaws.com/awscli-exe-linux-x86_64.zip" -o "awscliv2.zip" unzip awscliv2.zip sudo ./aws/install rm -rf aws awscliv2.zip -
Configure credentials:
- Scaleway CLI: Run
scw initand follow the prompts. - AWS CLI for Object Storage: Refer to Using Object Storage with the AWS-CLI.
- Adjust the
multipart_chunksizein~/.aws/configfor large file uploads (e.g., VM images).
- Scaleway CLI: Run
-
Optional: Configure
govcfor VMware (if downloading images directly):export GOVC_PASSWORD=<VMware_password> export GOVC_USERNAME=root export GOVC_INSECURE=1 export GOVC_URL=<VMware_host>Example:
export GOVC_PASSWORD=<my_secret_password> export GOVC_USERNAME=root export GOVC_INSECURE=1 export GOVC_URL=195.154.xxx.yyy #A public IP of a VMWare ESXI server -
Create an Object Storage bucket to store the converted images.
Preparing the Windows VM in VMware
-
Optional: Configure serial console output (for viewing boot sequences in Scaleway’s console):
In PowerShell (on the Windows VM):
bcdedit /ems '{current}' on
bcdedit /emssettings EMSPORT:1 EMSBAUDRATE:115200
In the Administrator command prompt:
bcdedit /set {bootmgr} displaybootmenu yes
bcdedit /set {bootmgr} timeout 10
bcdedit /set {bootmgr} bootems yes
shutdown -r -t 0
Refer to Microsoft’s serial console documentation.
-
Apply the required modifications (if possible in VMware):
In PowerShell (on the Windows VM):
Install-PackageProvider -Force -Name NuGet
Install-Module -Force powershell-yaml
Set-ItemProperty -Path "HKLM:\System\CurrentControlSet\Control\Terminal Server" -Name "fDenyTSConnections" -Value 0
Enable-NetFirewallRule -DisplayGroup "Remote Desktop"
Register-PSRepository -Name NuGet -SourceLocation https://api.nuget.org/v3/index.json -PublishLocation https://api.nuget.org/v3/index.json -InstallationPolicy Trusted
Register-PSRepository -Name NuGetv2 -SourceLocation https://www.nuget.org/api/v2 -PublishLocation https://www.nuget.org/api/v2 -InstallationPolicy Trusted
Install-Module -Force ScalewayEcosystem
Converting the VM on the converter Instance
-
Export or upload the VM image:
-
Export from VMware:
govc export.ovf -vm <VM_NAME> . -
Or manually upload the
.ovaor.vmdkfile to the converter Instance (e.g., usingscp).
-
-
Extract and convert the image:
-
If using an
.ovafile:mkdir vmware-to-migrate cd vmware-to-migrate tar xf <VM_NAME>.ova mv <VM_NAME>-disk1.vmdk vmware-to-migrate-1.vmdk cd .. -
Convert the
.vmdkto.qcow2:# Convert VMDK to QCOW2 format for Scaleway compatibility qemu-img convert -p -Oqcow2 vmware-to-migrate/vmware-to-migrate-1.vmdk vmware-to-migrate/vmware-to-migrate.qcow2 # Create output directory mkdir out # Run virt-v2v to install VirtIO drivers and prepare the image virt-v2v -i disk vmware-to-migrate/vmware-to-migrate.qcow2 -block-driver virtio-scsi -o qemu -os ./out
-
-
Apply additional configurations:
-
Create a
script-init.ps1file on the converter Instance:Install-PackageProvider -Force -Name NuGet Install-Module -Force powershell-yaml Set-ItemProperty -Path "HKLM:\System\CurrentControlSet\Control\Terminal Server" -Name "fDenyTSConnections" -Value 0 Enable-NetFirewallRule -DisplayGroup "Remote Desktop" Register-PSRepository -Name NuGet -SourceLocation https://api.nuget.org/v3/index.json -PublishLocation https://api.nuget.org/v3/index.json -InstallationPolicy Trusted Register-PSRepository -Name NuGetv2 -SourceLocation https://www.nuget.org/api/v2 -PublishLocation https://www.nuget.org/api/v2 -InstallationPolicy Trusted Install-Module -Force ScalewayEcosystem -
Upload it to the VM image:
guestfish -a out/vmware-to-migrate-sda -i << EOF
mkdir /Scaleway
upload script-init.ps1 /Scaleway/script-init.ps1
EOF
-
-
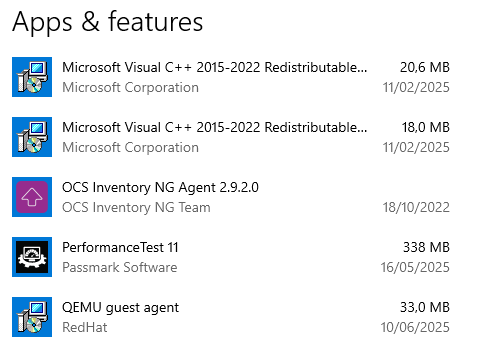
Optional: Verify the QEMU Guest Agent and remove VMware Tools:
-
Launch the VM locally on the converter Instance using noVNC:
git clone https://github.com/novnc/noVNC.git && cd noVNC pip3 install websockify --break-system-packages utils/novnc_proxy --vnc localhost:5901 --listen 6080 & -
Edit
out/vmware-to-migrate.sh, replacing-display gtkwith:-vnc :1,websocket=5700,password=off \ -
Add CPU and RAM:
-m 16384 -smp 8 -
Start the VM:
./out/vmware-to-migrate.sh -
With the internet browser of your computer, access the VM at
http://<converter_instance_public_ip>:6080/vnc.html. -
Verify the QEMU Guest Agent is installed (check
C:\for the package). If missing, install it manually. -
Remove VMware Tools if not already done.
-
Creating snapshot, Block Volume, and Instance
-
Convert and upload the image:
# Convert final image to QCOW2 qemu-img convert -p -Oqcow2 out/vmware-to-migrate-sda out/vmware-to-migrate.qcow2 # Upload to Object Storage aws s3 cp out/vmware-to-migrate.qcow2 s3://<bucket_name>/vmware-to-migrate.qcow2 -
Import as a snapshot:
scw block snapshot import-from-object-storage bucket=<bucket_name> key=vmware-to-migrate.qcow2 name=vmware-to-migrate -
Create a POP2-WIN Instance:
scw instance server create name=windows-vm image=none root-volume=sbs:<snapshot_uuid> type=POP2-8C-32G-WIN admin-password-encryption-ssh-key-id=<ssh_key_uuid> -
Generate RDP credentials:
scw instance server get-rdp-password <server_uuid> key=~/.ssh/<private_key_path>
Troubleshooting
- If the RDP connection fails, configure a Private Network with a Public Gateway (NAT on port 3389).
- Enable DHCP in Windows for Private Network connectivity.
- Reconfigure Windows users if necessary.
Optional: Private Network configuration
To connect the Instance to a Private Network:
scw instance private-nic create server-id=<server_uuid> private-network-id=<private_network_uuid> ipam-ip-ids.0=<ipam_ip_uuid>Refer to Scaleway Private Networks quickstart.
RHEL 9 VM Migration (single volume)
This section outlines the migration of an RHEL 9 VM with a single volume to a Scaleway Instance.
Preparing the converter Instance
-
Create a Scaleway Instance:
- Image: CentOS 9.
- Block Storage: At least twice the storage size of the VM to be migrated.
- SSH Key: Configure an SSH key for access.
-
Connect to the Instance via SSH.
-
Install migration tools:
# Install unzip, Scaleway CLI and AWS CLI yum install unzip curl -s https://raw.githubusercontent.com/scaleway/scaleway-cli/master/scripts/get.sh | sh curl "https://awscli.amazonaws.com/awscli-exe-linux-x86_64.zip" -o "awscliv2.zip" unzip awscliv2.zip sudo ./aws/install rm -rf aws awscliv2.zip # Install conversion tools yum install python3-libguestfs virt-v2v -
Configure credentials:
- Scaleway CLI: Run
scw init. - AWS CLI for Object Storage: Refer to Using Object Storage with the AWS-CLI.
- Adjust
multipart_chunksizein~/.aws/configfor large file uploads.
- Scaleway CLI: Run
-
Download migration scripts from Scaleway's public GitHub repository:
git clone https://github.com/scaleway/migration-tools -
Create an Object Storage bucket.
Converting the VM on the converter Instance
-
Upload or export the VM image:
- Use
govc(as shown in the Windows section) or manually upload the.ova/.vmdkfile.
- Use
-
Extract the
.ovafile (if applicable):tar xf <VM_NAME>.ova -
Run migration scripts:
cd migration-tools/vmware-to-instances/red-hat
chmod +x create_bases.sh migrate_centos.sh
./create_bases.sh
./migrate_centos.sh <source_vmdk_or_qcow2> <output_qcow2>
Example:
./migrate_centos.sh ../povrhel9_scaleway-disk1.vmdk povrhel9_scaleway.qcow2
Creating a snapshot, a Block Volume, and an Instance
-
Upload the image:
aws s3 cp povrhel9_scaleway.qcow2 s3://<bucket_name>/povrhel9_scaleway.qcow2 -
Import as a snapshot:
scw block snapshot import-from-object-storage bucket=<bucket_name> key=povrhel9_scaleway.qcow2 name=rhel9-vm -
Create an Instance:
scw instance server create name=rhel9-vm image=none root-volume=sbs:<snapshot_uuid> type=POP2-8C-32G admin-password-encryption-ssh-key-id=<ssh_key_uuid>
Handling multiple snapshots
If the VM has multiple snapshots:
-
Check the VMware
.vmxfile for thescsi0:0.fileNameline to identify the root volume and boot order. -
Create an image with multiple volumes:
scw instance image create snapshot-id=<root_snapshot_uuid> additional-volumes.0.id=<additional_snapshot_uuid> arch=x86_64 -
Create the Instance:
scw instance server create image=<image_uuid> type=<commercial_type>
Refer to Scaleway CLI Documentation.
Additional tips
-
Uploading an OVA to ESXi:
govc import.ova <image_name>.ova -
ESXi Console: If you can not enable copy-paste on the ESXI console, use RDP or SSH for easier interaction.
-
Verifying migration: After migration, verify that the QEMU Guest Agent is installed and VMware Tools are removed. Re-run migration scripts or manual steps if necessary.
-
Private Network configuration: For enhanced security, configure Private Networks and use a Public Gateway for external access.