Deploying Cloud Instances with Packer and Terraform/OpenTofu
Packer is a tool for creating identical machine images for multiple platforms from a single source configuration file. It can build images for multiple cloud hosting platforms, including Scaleway.
Terraform is a tool for building, changing, and versioning infrastructure safely and efficiently. OpenTofu is an open-source fork of Terraform, delivering similar functionalities.
Both applications are available for Linux, macOS, Windows, FreeBSD, and NetBSD.
Before you start
To complete the actions presented below, you must have:
- Owner status or IAM permissions allowing you to perform actions in the intended Organization
Downloading and installing Packer
- Download Packer for your operating system. If you want to define a specific configuration, you can also build the application from the source.
- Install the application on your computer following the instructions in the Packer downloads page.
- Verify that the application is working properly, by opening a terminal and typing
packer --help. You see the following output:packer --help Usage: packer [--version] [--help] <command> [<args>] Available commands are: build build image(s) from template fix fixes templates from old versions of packer inspect see components of a template push push a template and supporting files to a Packer build service validate check that a template is valid version Prints the Packer version - Make sure you are running at least version 1.6.3 of Packer.
Packer configuration files
Packer builds images by taking a base image and installing additional software on it.
To use Packer with Scaleway, you must generate an API key from the management console.
Packer uses JSON files for the configuration.
The following are the required configuration parameters for a minimal configuration file:
-
project_id(string) - The project ID to use to identify your Project. It can also be specified via the environment variableSCW_DEFAULT_PROJECT_ID. -
access_key(string) - The Scaleway API access key. It can also be specified via the environment variableSCW_ACCESS_KEY. -
secret_key(string) - The Scaleway API secret key. It can also be specified via the environment variableSCW_SECRET_KEY. -
image(string) - The UUID or marketplace image label of the base image to use. This will be used to boot the server on, before launching the additional tasks. Read more about available images on our website, and use the Marketplace API to get UUIDs and image labels. -
zone(string) - The name of the zone to launch the server and where the snapshot will be available. -
commercial_type(string) - The name of the commercial type used to boot for example: RENDER-S, GP1-L, GP1-M, GP1-S, GP1-XS.
A basic configuration should look like the following example:
{
  "type": "scaleway",
  "project_id": "<YOUR_PROJECT_ID>",
  "access_key": "<YOUR_ACCESS_KEY>",
  "secret_key": "<YOUR_SECRET_KEY>",
  "image": "UUID OR IMAGE LABEL OF THE BASE IMAGE",
  "zone": "fr-par-1",
  "commercial_type": "DEV1-S",
  "ssh_username": "root",
  "ssh_private_key_file": "/home/user/.ssh/id_rsa"
}
When you do not specify the
ssh_private_key_file, a temporarily SSH key pair will be generated to connect to the server. This key will only allow the root user to connect the server.
There are also some optional parameters that you can use:
-
server_name(string) - The name assigned to the server. Default packer-UUID. -
image_name(string) - The name of the resulting image that will appear in your account. Default packer-TIMESTAMP. -
snapshot_name(string) - The name of the resulting snapshot that will appear in your account. Default packer-TIMESTAMP. -
remove_volume(bool) - Force Packer to delete the volume associated with the resulting snapshot after the build. Default to false.
See the rest of the parameters on the Packer documentation.
Building an image with Packer
As exemplified below, we will build an Ubuntu image with Apache preinstalled:
-
Set your credentials as an environment variable on your computer. For example in bash, you have to edit the file
~/.bashrc, for zsh the procedure is the same, but the file to edit is~/.zshrc:export SCW_DEFAULT_PROJECT_ID=<YOUR_PROJECT_ID> export SCW_ACCESS_KEY=<YOUR_ACCESS_KEY> export SCW_SECRET_KEY=<YOUR_SECRET_KEY> -
Create and edit the file
packer.jsonby putting the following content in it:{ "variables": { "project_id": "", "access_key": "", "secret_key": "" }, "builders": [ { "project_id": "{{ user `project_id` }}", "access_key": "{{ user `access_key` }}", "secret_key": "{{ user `secret_key` }}", "server_name": "apache", "image_name": "ubuntu-apache", "snapshot_name": "ubuntu-apache-snapshot", "type": "scaleway", "image": "<BASE_IMAGE_ID>", "zone": "fr-par-1", "commercial_type": "DEV1-S", "ssh_private_key_file": "/Users/myaccount/.ssh/id_rsa", "ssh_username": "root" } ], "provisioners": [ { "type": "shell", "inline": [ "sleep 30", "apt-get update", "apt-get -y upgrade", "apt-get install -y apache2" ] } ] } -
Save the file and launch packer:
packer build -var "project_id=${SCW_DEFAULT_PROJECT_ID}" -var="access_key=${SCW_ACCESS_KEY}" -var="secret_key=${SCW_SECRET_KEY}" packer.jsonYou can also use the following file:
{
  "builders": [
    {
      "server_name": "apache",
      "image_name": "ubuntu-apache",
      "snapshot_name": "ubuntu-apache-snapshot",
      "type": "scaleway",
      "image": "<BASE_IMAGE_ID>",
      "zone": "fr-par-1",
      "commercial_type": "DEV1-S",
      "ssh_private_key_file": "/Users/myaccount/.ssh/id_rsa",
      "ssh_username": "root"
    }
  ],
  "provisioners": [
    {
      "type": "shell",
      "inline": [
        "sleep 30",
        "apt-get update",
        "apt-get -y upgrade",
        "apt-get install -y apache2"
      ]
    }
  ]
}
And build with this (the environment variables will be used):
packer build packer.jsonYou will see an output like the following:
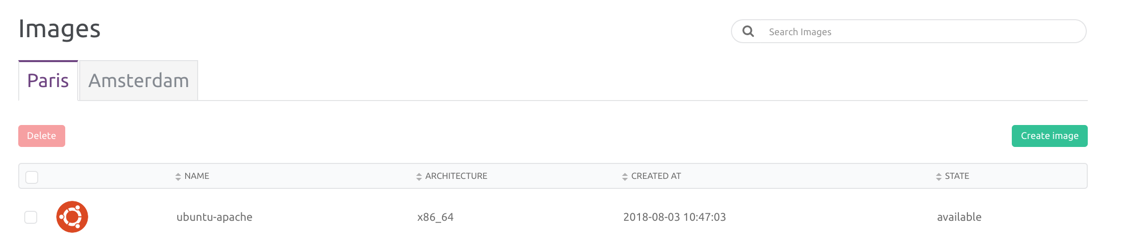
packer build scaleway.json
scaleway output will be in this color.

==> scaleway: Prevalidating image name: ubuntu-apache
==> scaleway: Prevalidating snapshot name: ubuntu-apache-snapshot
==> scaleway: Using existing SSH private key
==> scaleway: Creating server...
==> scaleway: Waiting for server to become active...
==> scaleway: Using ssh communicator to connect: 51.15.234.151
==> scaleway: Waiting for SSH to become available...
==> scaleway: Connected to SSH!
==> scaleway: Provisioning with shell script: /tmp/packer-shell591856108
==> scaleway: Shutting down server...
==> scaleway: Creating snapshot: ubuntu-apache-snapshot
==> scaleway: Creating image: ubuntu-apache
==> scaleway: Destroying server...
Build 'scaleway' finished.

==> Builds finished. The artifacts of successful builds are:
--> scaleway: An image was created: 'ubuntu-apache' (ID: e6e764cf-7f46-4c13-b251-a9e47367e284) in zone 'fr-par-1' based on snapshot 'ubuntu-apache-snapshot' (ID: 7abb7315-fae6-4317-9389-8ecf3c5e8a7b)
The newly created image will appear in the image list in your account:
-
You can now start one or a series of servers with your new image.
Deploying machine images with Terraform/OpenTofu
-
Set your credentials as an environment variable on your computer. For example in bash, you have to edit the file
~/.bashrc, for zsh the procedure is the same, but the file to edit is~/.zshrc:export SCW_DEFAULT_PROJECT_ID=<YOUR_PROJECT_ID> export SCW_ACCESS_KEY=<YOUR_ACCESS_KEY> export SCW_SECRET_KEY=<YOUR_SECRET_KEY> -
Create a configuration file
scaleway.tfwith the following contents:terraform { required_providers { scaleway = { source = "scaleway/scaleway" } } required_version = ">= 0.13" } provider "scaleway" { zone = "fr-par-1" } resource "scaleway_instance_ip" "ip" { } data "scaleway_instance_image" "ubuntu-apache" { architecture = "x86_64" name = "ubuntu-apache" } resource "scaleway_instance_server" "ubuntu-apache-server" { name = "ubuntu-apache-server" ip_id = scaleway_instance_ip.ip.id image = data.scaleway_instance_image.ubuntu-apache.id type = "DEV1-S" security_group_id = scaleway_instance_security_group.web.id } resource "scaleway_instance_security_group" "web" { name = "http" description = "allow HTTP and HTTPS traffic" inbound_rule { action = "accept" port = 80 ip_range = "0.0.0.0/0" protocol = "TCP" } inbound_rule { action = "accept" port = 443 ip_range = "0.0.0.0/0" protocol = "TCP" } } -
Initialize Terraform/OpenTofu:
terraform initYou will see an output like the following:
Initializing provider plugins... - Finding latest version of scaleway/scaleway... - Installing scaleway/scaleway v1.17.0... - Installed scaleway/scaleway v1.17.0 (signed by a HashiCorp partner, key ID F5BF26CADF6F9614) Partner and community providers are signed by their developers. If you'd like to know more about provider signing, you can read about it here: https://www.terraform.io/docs/plugins/signing.html The following providers do not have any version constraints in configuration, so the latest version was installed. To prevent automatic upgrades to new major versions that may contain breaking changes, we recommend adding version constraints in a required_providers block in your configuration, with the constraint strings suggested below. * scaleway/scaleway: version = "~> 1.17.0" Terraform has been successfully initialized! -
Run a dry run of the configuration to check it:
terraform plan -
Start your server from Terraform/OpenTofu:
terraform applyAn output like the following will appear on the screen:
Do you want to perform these actions?
  Terraform will perform the actions described above.
  Only 'yes' will be accepted to approve.

  Enter a value: yes

scaleway_instance_ip.ip: Creating...
scaleway_instance_volume.data: Creating...
scaleway_instance_security_group.http: Creating...
scaleway_instance_ip.ip: Creation complete after 1s [id=fr-par-1/278d1009-bd9f-4175-ab56-3ce6811ace72]
scaleway_instance_server.ubuntu-apache-server: Creating...
scaleway_instance_security_group.http: Creation complete after 4s [id=fr-par-1/065adee2-a74a-450f-a28c-bce3578c34a3]
scaleway_instance_server.ubuntu-apache-server: Still creating... [10s elapsed]
scaleway_instance_server.ubuntu-apache-server: Still creating... [20s elapsed]
scaleway_instance_server.ubuntu-apache-server: Still creating... [30s elapsed]
scaleway_instance_server.ubuntu-apache-server: Still creating... [40s elapsed]
scaleway_instance_server.ubuntu-apache-server: Still creating... [50s elapsed]
scaleway_instance_server.ubuntu-apache-server: Creation complete after 51s [id=fr-par-1/b3d9f0d3-a150-4d08-a505-9e5a4058958a]

Apply complete! Resources: 4 added, 0 changed, 0 destroyed.
To find out more about all the resources that you can manage with Terraform/OpenTofu, check out the official documentation. For more information about Packer, refer to the official Packer documentation.
Visit our Help Center and find the answers to your most frequent questions.
Visit Help Center