Deploying Your First Infrastructure on Scaleway using Terraform/OpenTofu
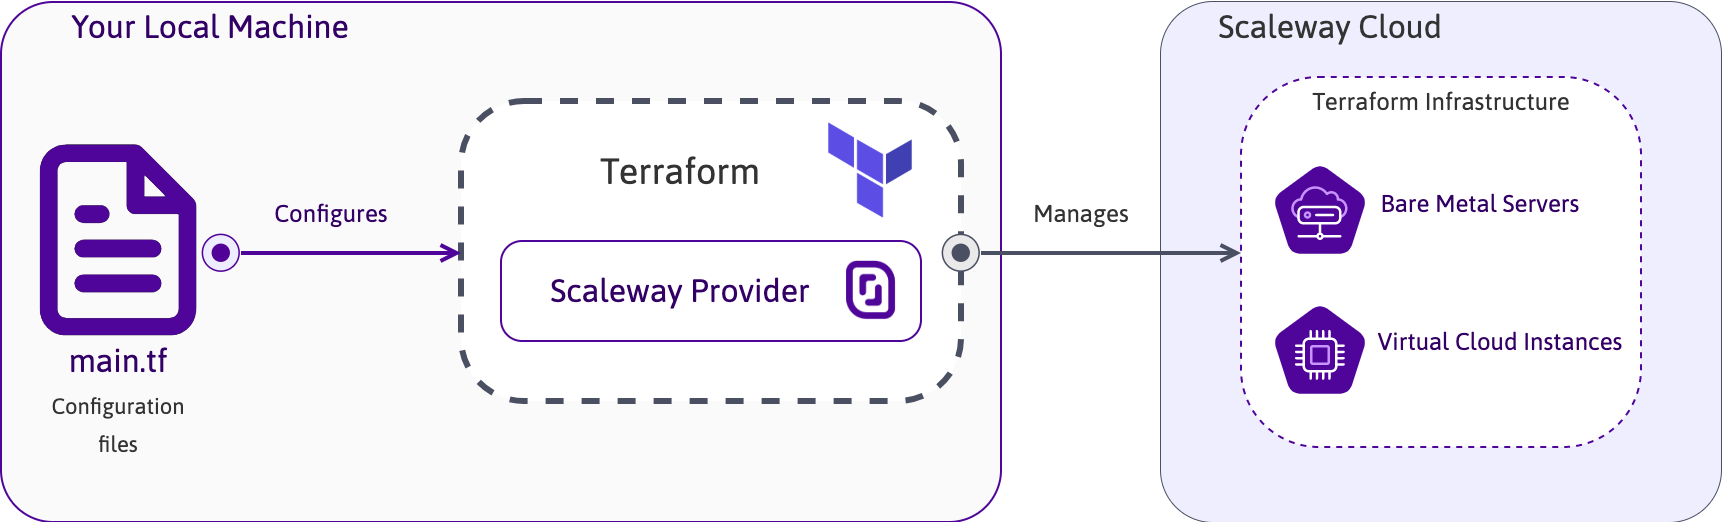
HashiCorp Terraform or OpenTofu (open source fork of Terraform) are open-source software tools to deploy IaC: Infrastructure as Code. It means that you can automate infrastructure resources such as Network, Instances, Elastic Metal servers, and more. It allows you to use declarative configuration files to manage the full lifecycle — create new resources, manage existing ones, and delete those no longer needed. The configuration language used by Terraform/OpenTofu is called Hashicorp Configuration Language (HCL).
Before you start
To complete the actions presented below, you must have:
- A Scaleway account logged into the Scaleway console
- Owner status or IAM permissions allowing you to perform actions in the intended Organization
- An SSH key
- A valid API key
Installing Terraform/OpenTofu
The first step is to install Terraform/OpenTofu on a server or on your computer to deploy and manage your resources. Terraform/OpenTofu is installed on a user environment (which can either be your local computer or a remote server used to manage your infrastructures) to push configuration files to your cloud environment. We suggest adding your configuration files to a versioning system like GitHub or Bitbucket to manage the versioning of your configurations.
Installation on macOS
Terraform/OpenTofu can be easily installed on computers running macOS X using the Homebrew package manager. Run the following command in a terminal window to install the application:
brew tap hashicorp/tap && brew install hashicorp/tap/terraformInstallation on Windows
The installation of Terraform/OpenTofu on Windows can be done in a single command line using the Chocolatey package manager. Run the following command in a terminal window to install Terraform/OpenTofu on computers running Microsoft Windows:
choco install terraformInstallation on Linux
The installation of Terraform/OpenTofu on Linux can be done in a few simple steps.
- Ensure your system is up to date and you have installed the
gnupg,software-properties-common, andcurlpackages.apt update && apt install -y gnupg software-properties-common - Download the HashiCorp GPG key on your machine.
wget -O- https://apt.releases.hashicorp.com/gpg | \ gpg --dearmor | \ sudo tee /usr/share/keyrings/hashicorp-archive-keyring.gpg > /dev/null - Verify the key's fingerprint.
The
gpg --no-default-keyring \ --keyring /usr/share/keyrings/hashicorp-archive-keyring.gpg \ --fingerprintgpgcommand reports the key's fingerprint:/usr/share/keyrings/hashicorp-archive-keyring.gpg ------------------------------------------------- pub rsa4096 XXXX-XX-XX [SC] AAAA AAAA AAAA AAAA uid [ unknown] HashiCorp Security (HashiCorp Package Signing) <security+packaging@hashicorp.com> sub rsa4096 XXXX-XX-XX [E] - Add the Terraform/OpenTofu repositories to the apt sources.
echo "deb [arch=$(dpkg --print-architecture) signed-by=/usr/share/keyrings/hashicorp-archive-keyring.gpg] https://apt.releases.hashicorp.com $(grep -oP '(?<=UBUNTU_CODENAME=).*' /etc/os-release || lsb_release -cs) main" | sudo tee /etc/apt/sources.list.d/hashicorp.list - Update the apt packet cache and install Terraform/OpenTofu using
apt.apt update && apt-get install terraform - Test the installation by running the
terraform versioncommand.
Creating a first Instance using Terraform/OpenTofu
To create a first Instance using Terraform/OpenTofu, you need a declarative configuration file. This file contains all the information on machine characteristics required to deploy. It has to be written in the Hashicorp Configuration Language (HCL). The deployment of Scaleway resources is done using the Scaleway Provider for Terraform/OpenTofu. For more information about HCL, refer to the official documentation.
-
Create a project folder (for example
scaleway-terraform) and navigate into the newly created directory:mkdir scaleway-terraform && cd scaleway-terraform -
Create a new text file called
scaleway.tfin a text editor of your choice. In the example below, we usenano.nano scaleway.tf -
Add the following content to the file to deploy a Development DEV1-L Instance running the Ubuntu Jammy Jellyfish (22.04 LTS) base image in the
fr-par-1zone. Replace<SCW_ACCESS_KEY>and<SCW_SECRET_KEY>with your own API key information and<SCW_DEFAULT_PROJECT_ID>with your own Project ID:terraform { required_providers { scaleway = { source = "scaleway/scaleway" } } required_version = ">= 0.13" } provider "scaleway" { access_key = "<SCW_ACCESS_KEY>" secret_key = "<SCW_SECRET_KEY>" project_id = "<SCW_DEFAULT_PROJECT_ID>" zone = "fr-par-1" region = "fr-par" } resource "scaleway_instance_ip" "public_ip" {} resource "scaleway_block_volume" "data" { size_in_gb = 30 iops = 5000 } resource "scaleway_instance_server" "my-instance" { type = "DEV1-L" image = "ubuntu_jammy" tags = ["terraform instance", "my-instance"] ip_id = scaleway_instance_ip.public_ip.id additional_volume_ids = [scaleway_block_volume.data.id] root_volume { # The local storage of a DEV1-L Instance is 80 GB, subtract 30 GB from the additional block volume, then the root volume needs to be 50 GB. size_in_gb = 50 } }Save the file and exit the text editor.
-
Run
terraform initto load the newly created configuration file into Terraform/OpenTofu:terraform init -
Plan the execution of the tasks to be done by terraform using the command
terraform plan:terraform plan Terraform used the selected providers to generate the following execution plan. Resource actions are indicated with the following symbols: + create Terraform will perform the following actions: # scaleway_block_volume.data will be created + resource "scaleway_block_volume" "data" { + id = (known after apply) + instance_volume_id = (known after apply) + iops = 5000 + name = (known after apply) + project_id = (known after apply) + size_in_gb = 30 + zone = (known after apply) } # scaleway_instance_ip.public_ip will be created + resource "scaleway_instance_ip" "public_ip" { + address = (known after apply) + id = (known after apply) + organization_id = (known after apply) + prefix = (known after apply) + project_id = (known after apply) + reverse = (known after apply) + server_id = (known after apply) + type = (known after apply) + zone = (known after apply) } # scaleway_instance_server.my-instance will be created + resource "scaleway_instance_server" "my-instance" { + additional_volume_ids = (known after apply) + boot_type = "local" + cloud_init = (known after apply) + enable_dynamic_ip = false + enable_ipv6 = false + id = (known after apply) + image = "ubuntu_jammy" + ip_id = (known after apply) + ipv6_address = (known after apply) + ipv6_gateway = (known after apply) + ipv6_prefix_length = (known after apply) + name = (known after apply) + organization_id = (known after apply) + placement_group_policy_respected = (known after apply) + private_ip = (known after apply) + private_ips = (known after apply) + project_id = (known after apply) + protected = false + public_ip = (known after apply) + replace_on_type_change = false + security_group_id = (known after apply) + state = "started" + tags = [ + "terraform instance", + "my-instance", ] + type = "DEV1-L" + user_data = (known after apply) + zone = (known after apply) + public_ips (known after apply) + root_volume { + boot = false + delete_on_termination = true + name = (known after apply) + sbs_iops = (known after apply) + size_in_gb = 50 + volume_id = (known after apply) + volume_type = (known after apply) } } Plan: 3 to add, 0 to change, 0 to destroy. ─────────────────────────────────────────────────────────────────────────────── Note: You didn't use the -out option to save this plan, so Terraform can't guarantee to take exactly these actions if you run "terraform apply" now. -
Apply the new configuration and create the Instance using Terraform/OpenTofu by running
terraform apply, if the output obtained is the same as the one above. Confirm the execution of the plan by typingyeswhen prompted:terraform apply Terraform used the selected providers to generate the following execution plan. Resource actions are indicated with the following symbols: + create Terraform will perform the following actions: # scaleway_block_volume.data will be created + resource "scaleway_block_volume" "data" { + id = (known after apply) + instance_volume_id = (known after apply) + iops = 5000 + name = (known after apply) + project_id = (known after apply) + size_in_gb = 30 + zone = (known after apply) } # scaleway_instance_ip.public_ip will be created + resource "scaleway_instance_ip" "public_ip" { + address = (known after apply) + id = (known after apply) + organization_id = (known after apply) + prefix = (known after apply) + project_id = (known after apply) + reverse = (known after apply) + server_id = (known after apply) + type = (known after apply) + zone = (known after apply) } # scaleway_instance_server.my-instance will be created + resource "scaleway_instance_server" "my-instance" { + additional_volume_ids = (known after apply) + boot_type = "local" + cloud_init = (known after apply) + enable_dynamic_ip = false + enable_ipv6 = false + id = (known after apply) + image = "ubuntu_jammy" + ip_id = (known after apply) + ipv6_address = (known after apply) + ipv6_gateway = (known after apply) + ipv6_prefix_length = (known after apply) + name = (known after apply) + organization_id = (known after apply) + placement_group_policy_respected = (known after apply) + private_ip = (known after apply) + private_ips = (known after apply) + project_id = (known after apply) + protected = false + public_ip = (known after apply) + replace_on_type_change = false + security_group_id = (known after apply) + state = "started" + tags = [ + "terraform instance", + "my-instance", ] + type = "DEV1-L" + user_data = (known after apply) + zone = (known after apply) + public_ips (known after apply) + root_volume { + boot = false + delete_on_termination = true + name = (known after apply) + sbs_iops = (known after apply) + size_in_gb = 50 + volume_id = (known after apply) + volume_type = (known after apply) } } Plan: 3 to add, 0 to change, 0 to destroy. Do you want to perform these actions? Terraform will perform the actions described above. Only 'yes' will be accepted to approve. Enter a value: -
Enter
yesto confirm.scaleway_block_volume.data: Creating... scaleway_instance_ip.public_ip: Creating... scaleway_instance_ip.public_ip: Creation complete after 2s [id=fr-par-1/fc850359-f13a-44af-9ae0-2fa15289cc5d] scaleway_block_volume.data: Creation complete after 7s [id=fr-par-1/119a0c58-8714-4511-8f30-e5cbbdaefc12] scaleway_instance_server.my-instance: Creating... scaleway_instance_server.my-instance: Creation complete after 8s [id=fr-par-1/97f50ae5-0221-4373-8bd8-4c20ad0dc44d] Apply complete! Resources: 3 added, 0 changed, 0 destroyed. -
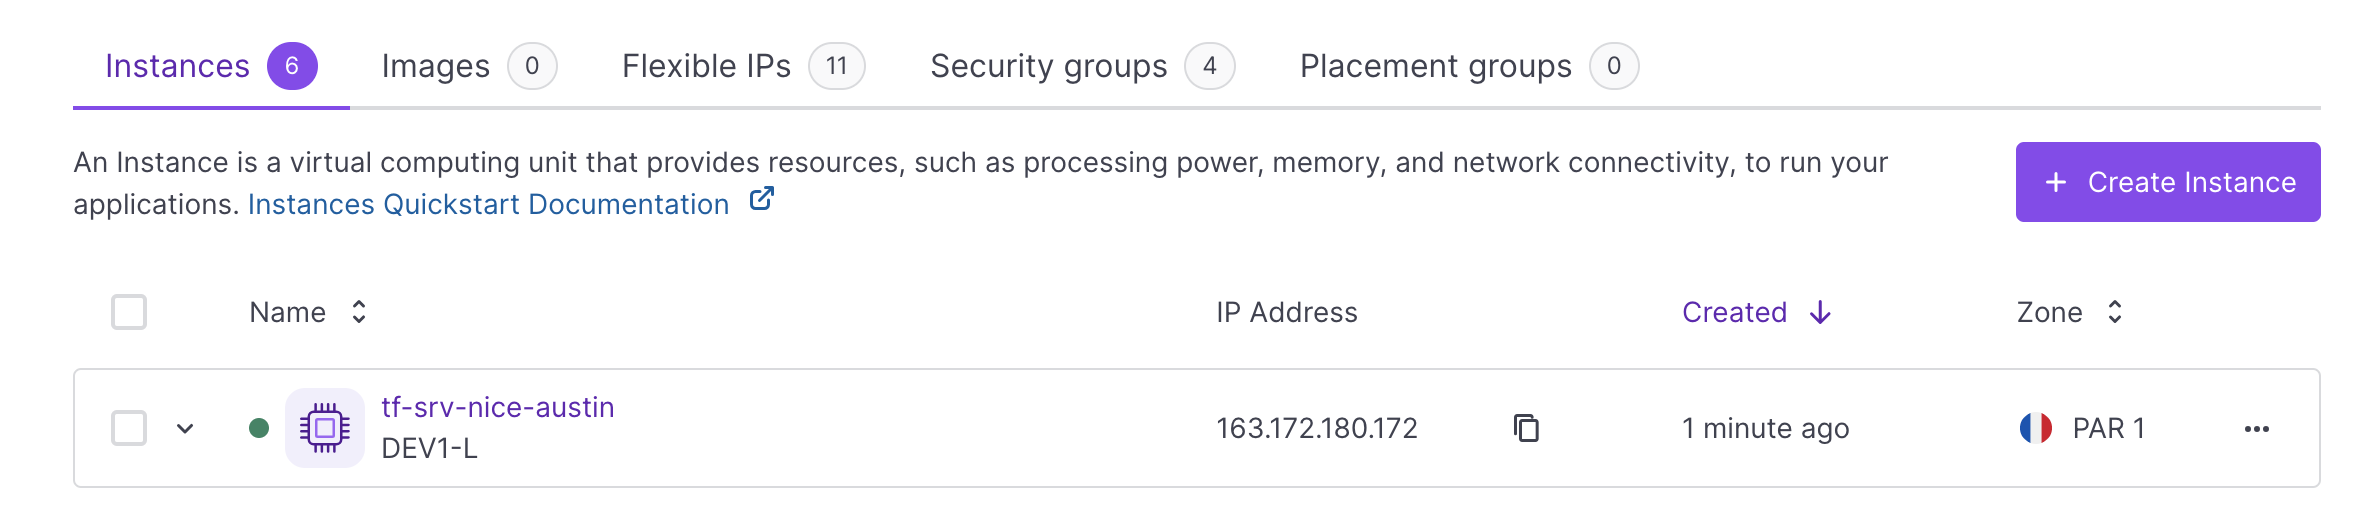
Go to the Instances section in your Scaleway console. You can see that the Instance has been created:
Modifying an Instance using Terraform/OpenTofu
We now have a first Instance up and running. Next, we will modify it by restricting access using security groups. We are going to DROP all traffic to the Instance by default: only traffic to ports 80 (HTTP), 443 (HTTPS) and 22 (SSH) will be allowed. To do this, we have to add some more lines to our existing configuration file scaleway.tf.
- Open the configuration file
scaleway.tfin a text editor and edit it as follows. To modify our Instance, we add ascaleway_instance_security_groupresource, and thesecurity_group_ididentifier to our existingscaleway_instance_serverresource.terraform { required_providers { scaleway = { source = "scaleway/scaleway" } } required_version = ">= 0.13" } provider "scaleway" { access_key = "<SCW_ACCESS_KEY>" secret_key = "<SCW_SECRET_KEY>" project_id = "<SCW_DEFAULT_PROJECT_ID>" zone = "fr-par-1" region = "fr-par" } resource "scaleway_instance_ip" "public_ip" {} resource "scaleway_block_volume" "data" { size_in_gb = 30 iops = 5000 } resource "scaleway_instance_security_group" "my-security-group" { inbound_default_policy = "drop" outbound_default_policy = "accept" inbound_rule { action = "accept" port = "22" } inbound_rule { action = "accept" port = "80" } inbound_rule { action = "accept" port = "443" } } resource "scaleway_instance_server" "my-instance" { type = "DEV1-L" image = "ubuntu_jammy" tags = ["terraform instance", "my-instance"] ip_id = scaleway_instance_ip.public_ip.id additional_volume_ids = [scaleway_block_volume.data.id] root_volume { # The local storage of a DEV1-L Instance is 80 GB, subtract 30 GB from the additional block volume, then the root volume needs to be 50 GB. size_in_gb = 50 } security_group_id = scaleway_instance_security_group.my-security-group.id } - Save the file, exit the text editor, and run
terraform applyagain to see how Terraform/OpenTofu applies the new configuration to the existing instance:The following output should display:terraform applyscaleway_instance_ip.public_ip: Refreshing state... [id=fr-par-1/fc850359-f13a-44af-9ae0-2fa15289cc5d] scaleway_block_volume.data: Refreshing state... [id=fr-par-1/119a0c58-8714-4511-8f30-e5cbbdaefc12] scaleway_instance_server.my-instance: Refreshing state... [id=fr-par-1/97f50ae5-0221-4373-8bd8-4c20ad0dc44d] Terraform used the selected providers to generate the following execution plan. Resource actions are indicated with the following symbols: + create ~ update in-place Terraform will perform the following actions: # scaleway_instance_security_group.my-security-group will be created + resource "scaleway_instance_security_group" "my-security-group" { + enable_default_security = true + external_rules = false + id = (known after apply) + inbound_default_policy = "drop" + name = (known after apply) + organization_id = (known after apply) + outbound_default_policy = "accept" + project_id = (known after apply) + stateful = true + zone = (known after apply) + inbound_rule { + action = "accept" + port = 22 + protocol = "TCP" } + inbound_rule { + action = "accept" + port = 80 + protocol = "TCP" } + inbound_rule { + action = "accept" + port = 443 + protocol = "TCP" } } # scaleway_instance_server.my-instance will be updated in-place ~ resource "scaleway_instance_server" "my-instance" { id = "fr-par-1/97f50ae5-0221-4373-8bd8-4c20ad0dc44d" name = "tf-srv-nice-austin" ~ security_group_id = "fr-par-1/2bc88e59-1b3a-4c54-bb10-53771abd621d" -> (known after apply) tags = [ "terraform instance", "my-instance", ] # (20 unchanged attributes hidden) # (2 unchanged blocks hidden) } Plan: 1 to add, 1 to change, 0 to destroy. Do you want to perform these actions? Terraform will perform the actions described above. Only 'yes' will be accepted to approve. - Enter
yesto confirm. Terraform/OpenTofu has created the security group and modified the configuration of the existing Instance by adding it to the newly created group. You can see the group from the Scaleway console and check the rules that have been created: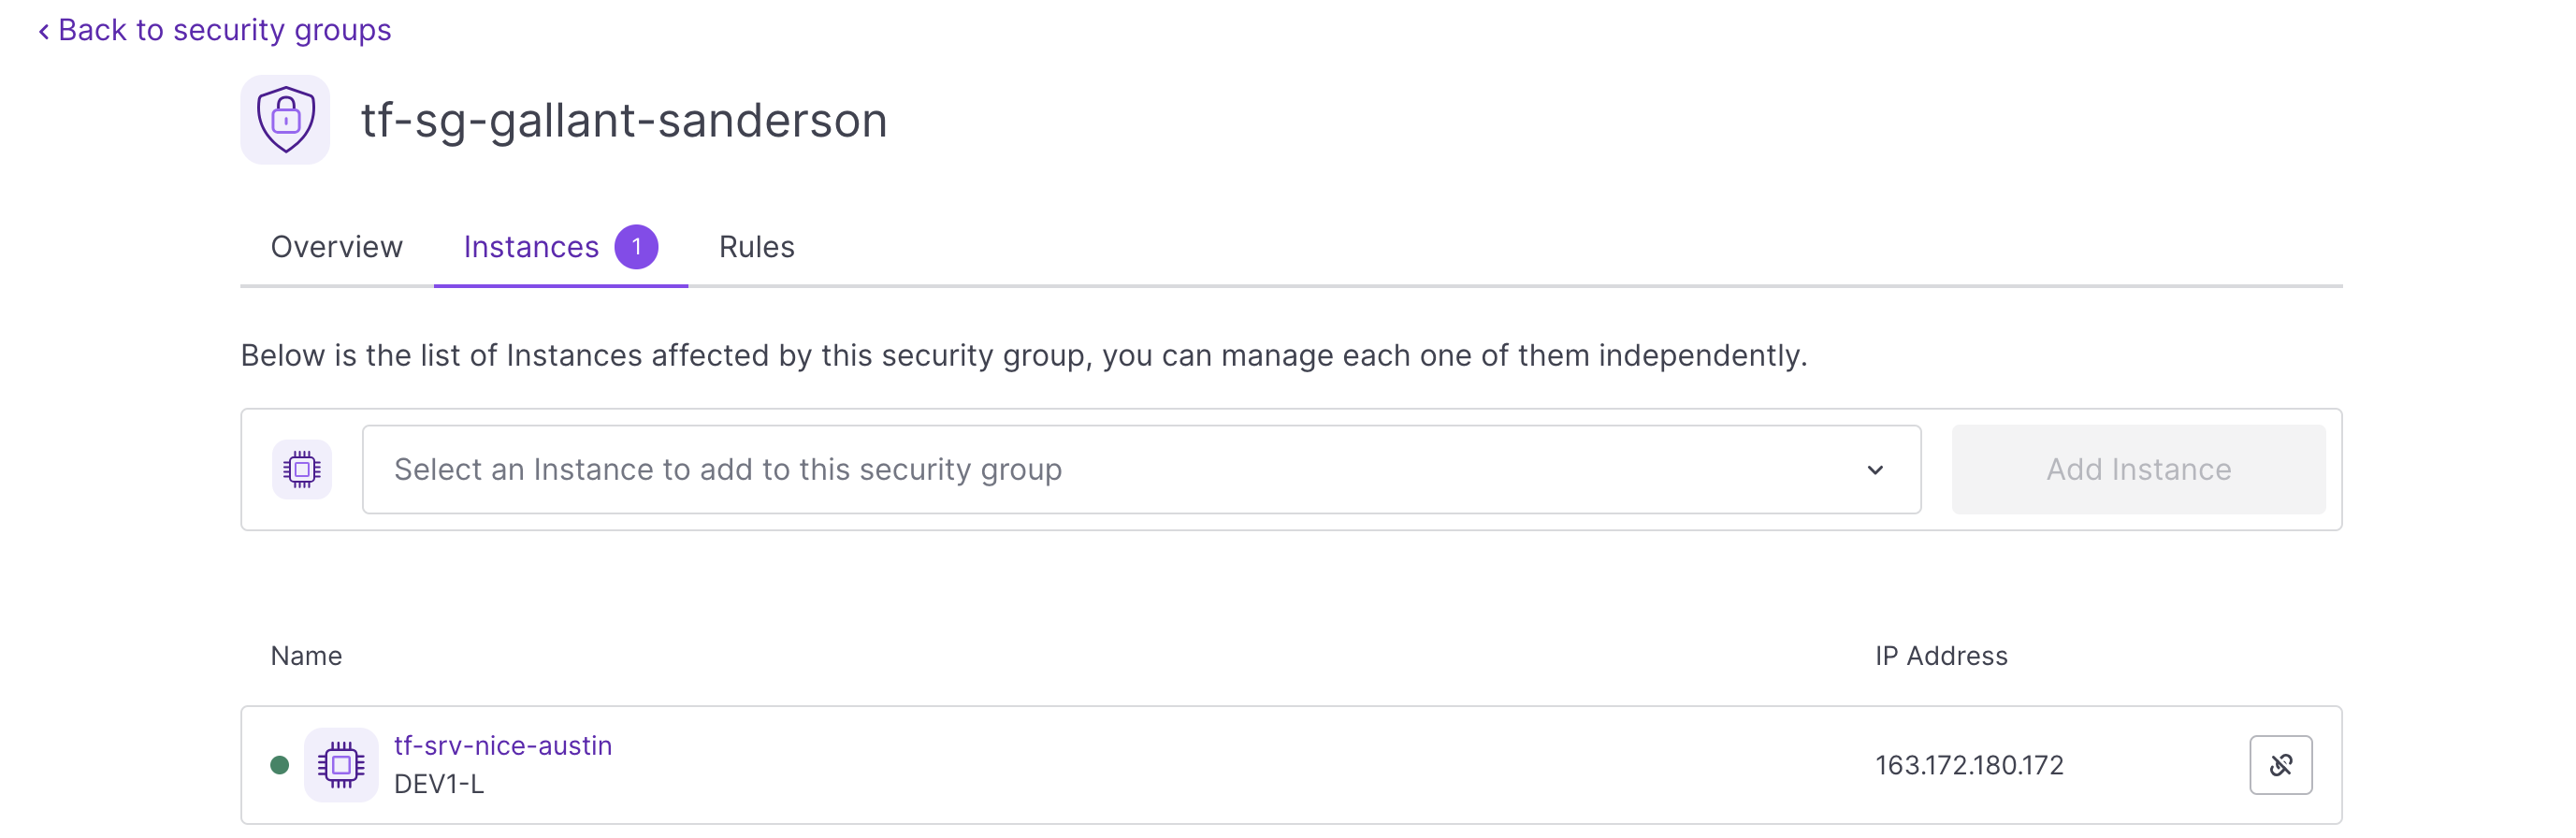
Adding resources to an infrastructure
Terraform/OpenTofu allows us to add additional resources to infrastructures and is capable of managing both Instances and Elastic Metal servers. Let us add an Elastic Metal server to our Terraform/OpenTofu project using the Elastic Metal module of the Scaleway provider.
-
Open the file
scaleway.tfin a text editor and add thescaleway_account_ssh_keydata source and thescaleway_baremetal_serverresource as follows:terraform { required_providers { scaleway = { source = "scaleway/scaleway" } } required_version = ">= 0.13" } provider "scaleway" { access_key = "<SCW_ACCESS_KEY>" secret_key = "<SCW_SECRET_KEY>" project_id = "<SCW_DEFAULT_PROJECT_ID>" zone = "fr-par-1" region = "fr-par" } resource "scaleway_instance_ip" "public_ip" {} resource "scaleway_block_volume" "data" { size_in_gb = 30 iops = 5000 } resource "scaleway_instance_security_group" "my-security-group" { inbound_default_policy = "drop" outbound_default_policy = "accept" inbound_rule { action = "accept" port = "22" } inbound_rule { action = "accept" port = "80" } inbound_rule { action = "accept" port = "443" } } resource "scaleway_instance_server" "my-instance" { type = "DEV1-L" image = "ubuntu_jammy" tags = ["terraform instance", "my-instance"] ip_id = scaleway_instance_ip.public_ip.id additional_volume_ids = [scaleway_block_volume.data.id] root_volume { # The local storage of a DEV1-L Instance is 80 GB, subtract 30 GB from the additional block volume, then the root volume needs to be 50 GB. size_in_gb = 50 } security_group_id = scaleway_instance_security_group.my-security-group.id } data "scaleway_account_ssh_key" "my_ssh_key" { ssh_key_id = "<SSH-KEY-ID>" } data "scaleway_baremetal_offer" "my_offer" { zone = "fr-par-2" name = "EM-B112X-SSD" } data "scaleway_baremetal_os" "my_os" { zone = "fr-par-2" name = "Ubuntu" version = "22.04 LTS (Jammy Jellyfish)" } resource "scaleway_baremetal_server" "my_server" { zone = "fr-par-2" offer = data.scaleway_baremetal_offer.my_offer.offer_id os = data.scaleway_baremetal_os.my_os.os_id ssh_key_ids = [data.scaleway_account_ssh_key.my_ssh_key.id] } -
Apply the new configuration using
terraform apply. Terraform/OpenTofu will add an Elastic Metal server to the existing infrastructure
Storing the Terraform/OpenTofu state in the cloud
Optionally, you can store your Terraform/OpenTofu state with Scaleway Object Storage. Configure your backend as follows:
terraform {
  backend "s3" {
    bucket                      = "terraform_state"
    key                         = "my_state.tfstate"
    region                      = "fr-par"
    access_key                  = "<SCW_ACCESS_KEY>"
    secret_key                  = "<SCW_SECRET_KEY>"
    skip_credentials_validation = true
    skip_region_validation      = true
    skip_requesting_account_id  = true
    endpoints = {
      s3  = "https://s3.fr-par.scw.cloud"
    }
  }
}
Deleting infrastructures using Terraform/OpenTofu
Now you have deployed a Terraform/OpenTofu infrastructure, modified its settings, and added additional resources. If you want to destroy the resources you have created, you can use the terraform destroy command.
- Run
terraform destroyin your terminal. The output shows you what will be destroyed. - Enter
yeswhen prompted to enter a value. - Hit
Enterto confirm. The output shows you the resources being deleted.
Going further
Terraform/OpenTofu commands
You have now managed the complete lifecycle of an infrastructure using Terraform/OpenTofu. To discover more Terraform/OpenTofu commands, use the terraform -h command. Common Terraform/OpenTofu commands include for example:
apply: Builds or changes infrastructureconsole: Interactive console for Terraform/OpenTofu interpolationsdestroy: Destroy Terraform/OpenTofu-managed infrastructure env Workspace managementfmt: Rewrites configuration files to canonical formatget: Download and install modules for the configurationgraph: Create a visual graph of Terraform/OpenTofu resourcesimport: Import existing infrastructure into Terraform/OpenTofuinit: Initialize a Terraform/OpenTofu working directoryoutput: Read an output from a state fileplan: Generate and show an execution planproviders: Prints a tree of the providers used in the configurationrefresh: Update local state file against real resourcesshow: Inspect Terraform/OpenTofu state or plantaint: Manually mark a resource for recreationuntaint: Manually unmark a resource as taintedvalidateValidates the Terraform/OpenTofu filesversion: Prints the Terraform/OpenTofu versionworkspace: Workspace management
Modules and variables
To create configurations that are shareable and version-controlled, it is recommended that you organize your code with modules. Modules are used to encapsulate logic and design a layer of abstraction for Terraform/OpenTofu code.
Most modules manage a few closely related resources from a single provider and allow you to parameterize the configurations. You can define variables to simplify the management of your infrastructure and duplicate it in no time.
For example, create a configuration file variables.tf in your Terraform/OpenTofu Project directory and edit it as follows:
variable "zone" {
  default = "fr-par-1"
}
You have 3 options to use these variables:
- As an environment variable:
TF_VAR_zone=${var.zone} terraform apply - As a command-line parameter variable:
terraform apply -var zone=${var.zone} - As a variables file:
terraform apply -var-file=variables.tf
Deployment
-
Discover how to deploy your cloud resources using Packer and Terraform/OpenTofu and check out the full Scaleway Provider documentation for Terraform/OpenTofu.
-
Use cloud-init to automatically install and provision software on a Scaleway Instance.
-
Use Ansible to automate client machines configuration from a Scaleway Instance using a simple YAML syntax.
Visit our Help Center and find the answers to your most frequent questions.
Visit Help Center