Configuring Plex Media Server with Scaleway Object Storage
Plex is a client/server media player system comprising two main components:
- The Plex Server application, which is available for Windows, macOS, Linux, and even some NAS devices.
- Plex clients that can be either a web-based interface, an application on smart TVs, streaming boxes, or other third-party applications.
Before you start
To complete the actions presented below, you must have:
- A Scaleway account logged into the console
- Owner status or IAM permissions allowing you to perform actions in the intended Organization
- An SSH key
- An Instance running Ubuntu 22.04 LTS (or later)
- An Object Storage bucket
sudoprivileges or access to the root user
Installing the required software
-
Connect to your Instance using SSH:
ssh root@<your-instance-IP> -
Update the APT package manager and the software already installed on the system:
apt update && apt upgrade -y -
Add the Plex repository:
Add Plex's GPG key and create a new repository file:
sudo mkdir -p /etc/apt/keyrings curl -fsSL https://downloads.plex.tv/plex-keys/PlexSign.key | sudo gpg --dearmor -o /etc/apt/keyrings/plex.gpg echo "deb [signed-by=/etc/apt/keyrings/plex.gpg] https://downloads.plex.tv/repo/deb public main" | sudo tee /etc/apt/sources.list.d/plexmediaserver.list -
Install Plex and s3fs:
Update the APT package list and install the latest version of Plex and s3fs:
apt update
apt install -y plexmediaserver s3fs
Configuring s3fs
-
Create the folder on which you will mount the bucket:
mkdir -p /mnt/media -
Obtain and configure API keys for Scaleway Object Storage:
- Log in to your Scaleway console and navigate to Object Storage.
- Select or create a bucket.
- Create an API key with
ObjectStorageFullAccesspermission.
-
Enter your API keys in the password file and set proper permissions:
echo ACCESS_KEY_ID:SECRET_ACCESS_KEY | sudo tee /etc/passwd-s3fs sudo chmod 600 /etc/passwd-s3fs -
Uncomment
user_allow_otherin the/etc/fuse.conffile:sudo nano /etc/fuse.conf [...] user_allow_other -
Mount the bucket in the local file system:
sudo s3fs BUCKET_NAME /mnt/media -o allow_other -o umask=0002 -o passwd_file=/etc/passwd-s3fs -o url=https://s3.REGION.scw.cloud -
(Optional) Enable automatic mounting at boot by adding an entry to
/etc/fstab:echo "s3fs#BUCKET_NAME /mnt/media fuse _netdev,allow_other,umask=0002,passwd_file=/etc/passwd-s3fs,url=https://s3.REGION.scw.cloud 0 0" | sudo tee -a /etc/fstab
Configuring Plex
-
Check that Plex is running:
systemctl status plexmediaserver.serviceIf the status is
active (running), everything is fine. -
Access the Plex interface through an SSH tunnel:
- On Linux/macOS:
ssh root@plex.server.ip -L 8888:localhost:32400 - On Windows (using PuTTY):
- Open PuTTY, enter your Instance IP, and navigate to Connection > SSH > Auth > Credentials.
- Make sure the correct private key file is selected.
- Navigate to Connection > SSH > Tunnels.
- Set Source port to
8888and Destination tolocalhost:32400. - Click Add, then Save, then Open to connect.
Open a browser and go to
http://localhost:8888/webto access Plex. - On Linux/macOS:
-
Configure the Plex server:
- Open
http://<plex.server.ip>:32400in a browser. - Complete the setup wizard.
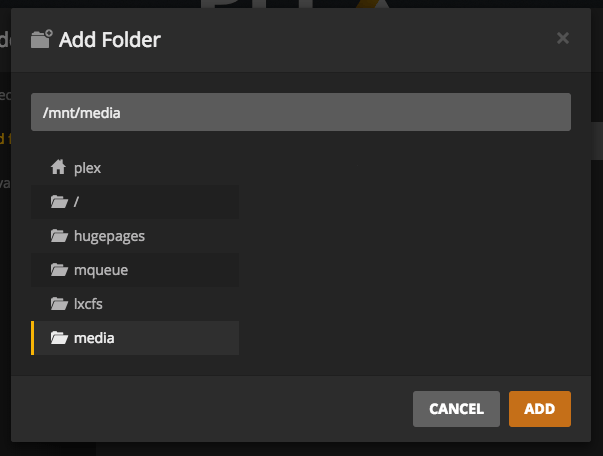
- Add a library and specify
/mnt/media/<Folder Name>as the media folder.
- Open
-
To upload media, use an S3-compatible tool like Cyberduck.
-
Trigger a media scan in Plex to display new files.
For more information, refer to Plex's official documentation.
Visit our Help Center and find the answers to your most frequent questions.
Visit Help Center