How to manage a domain's DNS zones
The DNS zone is the roadmap of the domain name and contains all the required information to operate it on the internet.
For example, A records indicate where to find the website and MX records indicate where emails should be sent.
This document shows you how to manage your domain's DNS zones.
Before you start
To complete the actions presented below, you must have:
- A Dedibox account logged into the console
- A domain name
How to understand DNS records/entries
The most common types of DNS entries are as follows:
| Type | Description |
|---|---|
| A | Allows you to link a domain name with an IP address (IPv4) (www.online.net. IN A 212.27.35.195). |
| AAAA | Allows you to link a domain name with an IP address (IPv6) (irc.online.net. IN AAAA 2a01:e0b:1:f:2d0:b7ff:fea9:4da8). |
| CNAME | Allows the mapping between a DNS name and another DNS name (sql.domain.ext. IN CNAME mysql1.online.net.). |
| MX | Allows to set the responsible mail server for a domain (online.net. IN mx.online.net.). The DNS name MUST be an IPv4 and can not be an IP address or a CNAME. Priority defines the time in which the servers are contacted if there are more than one. |
| TXT | This record can store a string of 1024 characters. |
| SRV | This registration enables automatic discovery services. This type of record is reserved for expert users only. |
How to manage your DNS zones
You can manage multiple versions of your DNS zones at Scaleway.
Each modification on an existing DNS zone will launch the creation of a new temporary zone. Once you have finished your modifications, you will be able to create a permanent zone from the temporary zone and to set it as active to allow its usage on the internet.
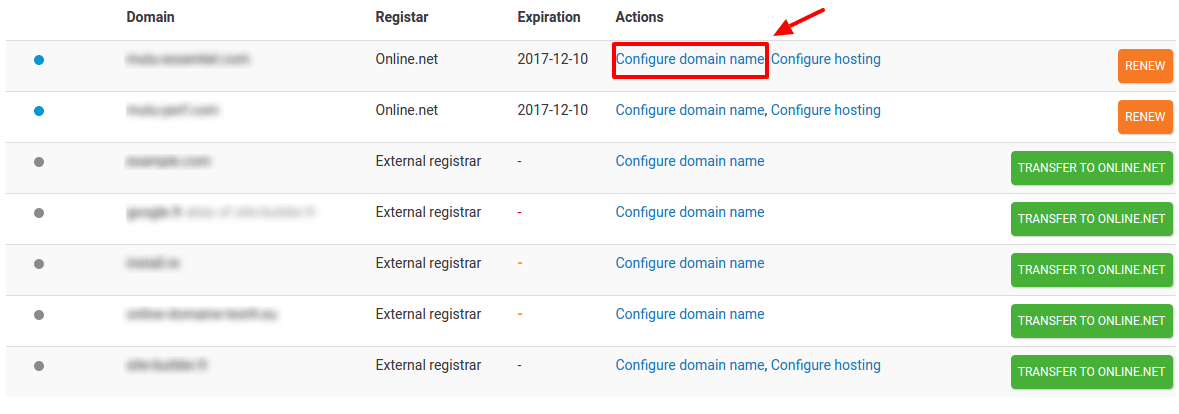
- From the Dedibox console, click Domain. A list of your domains displays.
- Click Configure domain name next to the relevant domain.
- Click the Edit DNS zone tab.
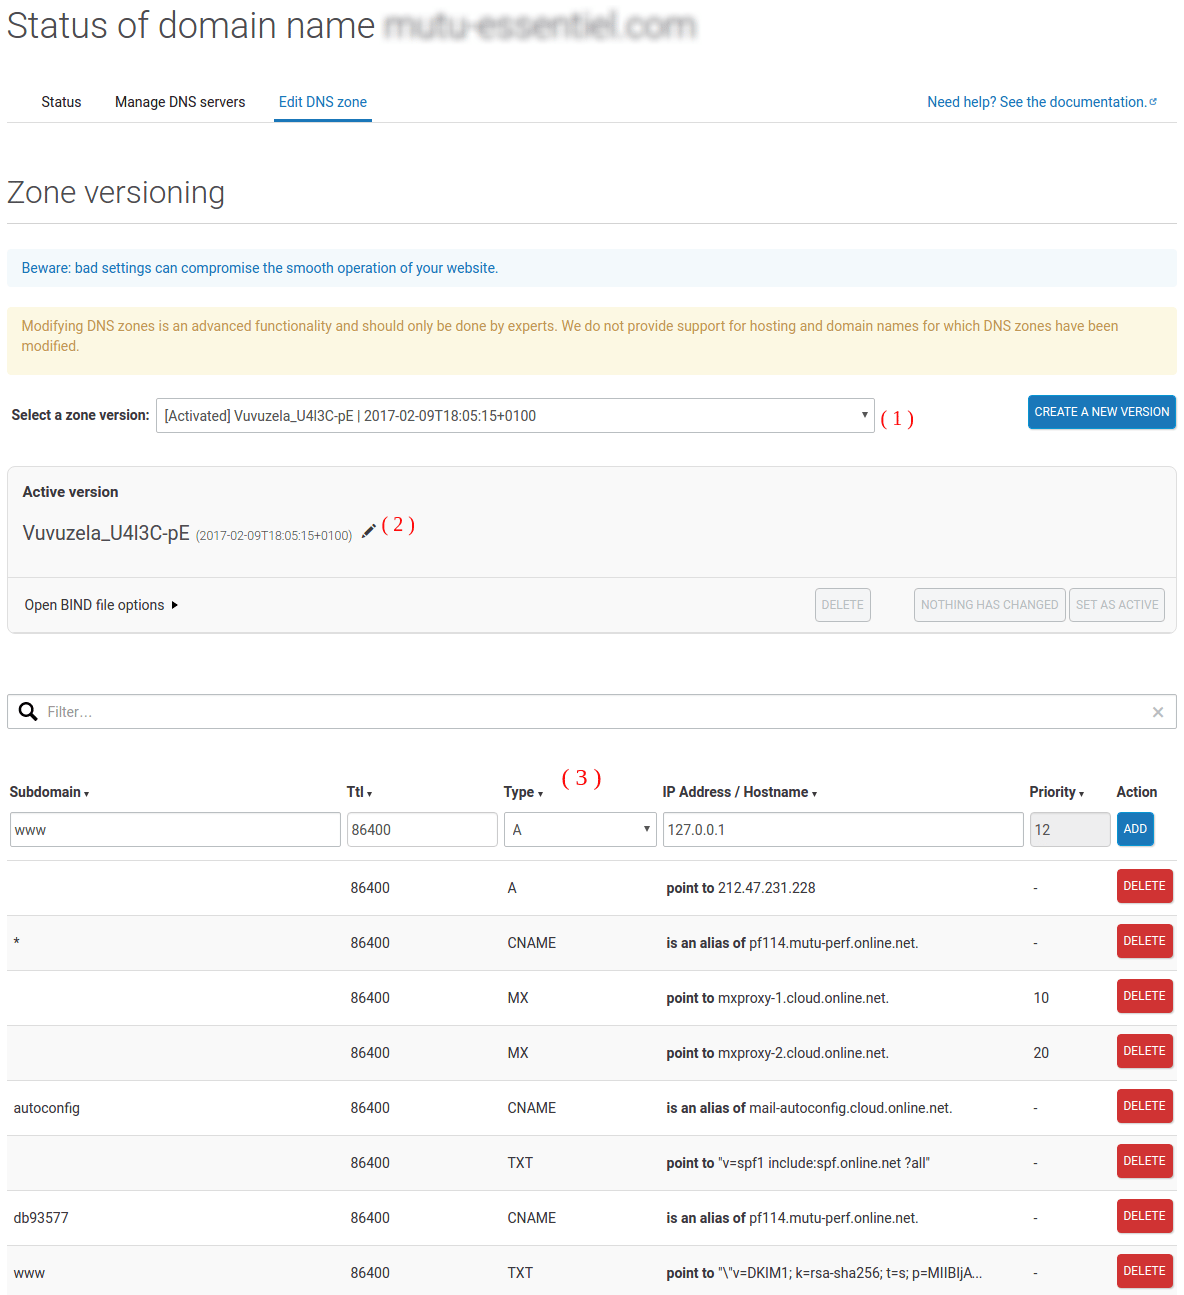
- Note the following parts of the interface:
- At the top of the screen, the Select a zone version drop-down menu lets you navigate between your different zone versions to modify them and set them as active.
- The pen icon next to the zone name in the Active Version panel lets you manage the zone's options. Click the pen to edit the zone name or set it as active.
- The list of zone entries in the lower part of the screen lets you add, modify or delete DNS entries in your zone.
How to modify a DNS zone
- From the Edit DNS zone tab, make your changes (eg adding or deleting an entry) in the current zone shown to you.
- Click Create a new version.
- Click Set as active and wait for propagation of the zone.
How to use BIND configuration mode (Advanced)
To facilitate the management of your zones, reserved for experts, we provide you with the option of sending and downloading your DNS zone in the BIND format. This is the format mostly used for the configuration of a BIND DNS Server, and allows you to re-import your zones if they were previously in this format, or if you are used to it.
-
From the Edit DNS zone tab, click the arrow in the middle panel next to Open BIND file options.
-
Enter the desired content in the text box that displays. Alternatively, if you want to recover your current zone, click the Download button.
Here is an example of a DNS zone in the BIND format:
;; Zone dump from zone version "Zone 1" $ORIGIN mutu-essentiel.com. @ 3600 IN SOA ns0.online.net. hostmaster.online.net. 20170209060437 10800 3600 604800 3600 @ 86400 IN A 212.47.231.228 * 86400 IN CNAME pf114.mutu-perf.online.net. @ 86400 IN MX 10 mxproxy-1.cloud.online.net. @ 86400 IN MX 20 mxproxy-2.cloud.online.net. autoconfig 86400 IN CNAME mail-autoconfig.cloud.online.net. @ 86400 IN TXT "v=spf1 include:spf.online.net ?all" db93577 86400 IN CNAME pf114.mutu-perf.online.net. phpmyadmin 14400 IN CNAME pf114.mutu-perf.online.net. -
Click Submit your zone.