How to install Docker on a Scaleway Instance running Ubuntu Linux
Docker is a tool designed to create, deploy, and run applications using containers.
Containers allow packing an application with all requirements necessary, such as libraries and other dependencies, and ship it out as one package.
This ensures that an application can run on any Linux machine, regardless of the specific settings of the host machine, which might be different from the development environment.
Before you start
To complete the actions presented below, you must have:
- A Scaleway account logged into the console
- Owner status or IAM permissions allowing you to perform actions in the intended Organization
- An SSH key
- An Instance running on Ubuntu Bionic
sudoprivileges or access to the root user
Installing Docker Community Edition
Docker Community Edition (CE) is the classic open-source Docker environment.
-
Before installing the latest version of Docker on your server, make sure to remove any old version that might have already been installed.
sudo apt-get remove docker docker-engine docker.io -
Update the apt package cache to make sure all required software is referenced.
sudo apt-get update -
As Docker uses HTTPS for their repository, install the required packages so apt can download them via a secure connection.
sudo apt-get install apt-transport-https ca-certificates curl software-properties-common -
Add Docker's official SSH key to apt.
curl -fsSL https://download.docker.com/linux/ubuntu/gpg | sudo apt-key add - -
Verify the fingerprint of the key (
9DC8 5822 9FC7 DD38 854A E2D8 8D81 803C 0EBF CD88), by looking at the last 8 characters.sudo apt-key fingerprint 0EBFCD88 -
Add the repository for the stable version of Docker. For an
x86_64based server, use the following command.sudo add-apt-repository "deb [arch=amd64] https://download.docker.com/linux/ubuntu $(lsb_release -cs) stable" -
Update the APT package cache.
sudo apt-get update -
Install the latest version of Docker.
sudo apt-get install docker-ce -
Verify that Docker has been installed by running the
Hello Worldcontainer:sudo docker run hello-world
Managing Docker as a non-root user
The docker daemon always runs as root user and binds to a Unix socket instead of a TCP port.
This Unix socket is owned by the root user by default, and other users can only access it by using sudo.
If you do not want to use sudo with the docker command, create a Unix group called docker and add users to it. The daemon makes the ownership of the Unix socket read/writable by the docker group when it starts.
- Create the docker group.
sudo groupadd docker - Add your user to the docker group.
sudo usermod -aG docker $USER - Log out and log back in to re-evaluate your group membership.
- Verify that you can run
dockercommands without sudo by downloading a test image and running it in a container.docker run hello-world
If you were using docker CLI using sudo before adding your user to the docker group, you might encounter an error message, telling you that your ~/.docker/ directory was created with incorrect permissions:
WARNING: Error loading config file: /home/user/.docker/config.json -
stat /home/user/.docker/config.json: permission denied
This problem can either be fixed by removing the ~/.docker/ directory or by changing the ownership and permissions using the following commands
sudo chown "$USER":"$USER" /home/"$USER"/.docker -R
sudo chmod g+rwx "/home/$USER/.docker" -RConfiguring Docker to start on boot
Ubuntu uses systemd to manage services. Docker comes with a pre-built systemd configuration, and you can enable the service to start automatically on boot.
sudo systemctl enable docker.serviceIf you do not want Docker to start automatically, disable it in the same way.
sudo systemctl disable docker.serviceBuilding your first container
In the past, all software dependencies required to run your application had to be installed on either the physical machine or a VM.
Managing all these machines can become quite hard and if you ship your application to one of your customers and they have a different system configuration, your application might not work as expected.
Let's say you want to develop a Python web application. Docker allows you to grab a portable Python runtime as an image with no installation necessary.
You develop your application, and your build can include the base Python image right alongside your app code, ensuring that your app, its dependencies, and the runtime, perfectly designed for each other are shipped together.
Creating the Dockerfile
Portable images are defined in a file called Dockerfile and define what goes on in the environment inside your container.
Resources of the server (like network interfaces or disk drives) are virtualized inside this environment, and it is isolated from the rest of your system.
This means you have to map ports to the outside world and define precisely which files you want to copy into that environment.
Thanks to this, you can expect that the build of your application defined in the Dockerfile behaves precisely the same, no matter where it runs.
- Create a new directory to develop your environment:
mkdir my-application - Enter into the directory:
cd my-application - Create a new file, called
Dockerfile, copy & paste the following content into it, and save the file:# Use an official Python runtime as a parent image FROM python:2.7-slim # Set the working directory to /app WORKDIR /app # Copy the current directory contents into the container at /app ADD . /app # Install the Flask framework RUN pip install --trusted-host pypi.python.org Flask # Make port 80 available to the world outside this container EXPOSE 80 # Define environment variable ENV NAME World # Run app.py when the container launches CMD ["python", "app.py"]
Creating the Application
Now that you have created your Dockerfile, it is time to create your application. Open a text editor, copy and paste the following content and save the file as app.py.
from flask import Flask
import os
import socket


app = Flask(__name__)

@app.route("/")
def hello():

    html = "<h1>Hello {name}!</h1>" \
          "<b>Hostname:</b> {hostname}<br/>"
    return html.format(name=os.getenv("NAME", "world"), hostname=socket.gethostname(),)

if __name__ == "__main__":
    app.run(host='0.0.0.0', port=80)
Building the Container
Now that you have created a Dockerfile and the application, it is time to build the container.
- Make sure you are in the correct directory and that both files are present:
ls Dockerfile app.py - Build the image. The
-ttag allows you to set a friendly name for the image. The application will recover the environment variable we have set in the dockerfile and display the container's host name.Docker will now download the Python base image and process the tasks defined in the Dockerfile.docker build -t helloworld .Your image is now available in your local docker registry:Sending build context to Docker daemon 3.584 kB Step 1/7 : FROM python:2.7-slim 2.7-slim: Pulling from library/python 683abbb4ea60: Pull complete 8af590abc616: Pull complete f6cf6c5b7946: Pull complete e61a0272532e: Pull complete Digest: sha256:8ccd3a1e1836e2d1d1abda0c7f56b726fe70e2f4148190ce38456021c5ffc744 Status: Downloaded newer image for python:2.7-slim ---> 02ca219cf841 Step 2/7 : WORKDIR /app Removing intermediate container b4186d6dccd7 ---> ddc94a21efbb Step 3/7 : ADD . /app ---> 84df6bca17f6 Step 4/7 : RUN pip install --trusted-host pypi.python.org Flask ---> Running in e992f7fcc7d8 Collecting Flask Downloading https://files.pythonhosted.org/packages/7f/e7/08578774ed4536d3242b14dacb4696386634607af824ea997202cd0edb4b/Flask-1.0.2-py2.py3-none-any.whl (91 kB) [...] Removing intermediate container e992f7fcc7d8 ---> 5da35ac6d845 Step 5/7 : EXPOSE 80 ---> Running in 445b607f5795 Removing intermediate container 445b607f5795 ---> 1b5471afba0c Step 6/7 : ENV NAME World ---> Running in 2bb6c11c5a22 Removing intermediate container 2bb6c11c5a22 ---> 9c0b3c60260c Step 7/7 : CMD ["python", "app.py"] ---> Running in d01c685cfda3 Removing intermediate container d01c685cfda3 ---> b584aacca9d8 Successfully built b584aacca9d8 Successfully tagged helloworld:latestdocker image ls REPOSITORY TAG IMAGE ID helloworld latest b584aacca9d8
Running the Application
Now it is time to run your application for the first time.
Use the -p option to map the port 4000 of your computer to port 80 of the container:
docker run -p 4000:80 helloworldYou will see a message similar to the following:
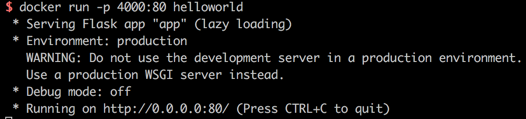
You can notice that the application is running on port 80.
Remember, this is the internal port of your container and can reach the application by typing http://localhost:4000 in the address bar of your browser:
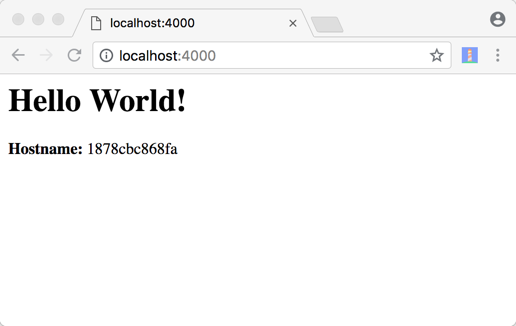
The application displays the internal hostname of the container and retrieves the word "World" from the environment variable that you have set in the Dockerfile.
Sharing the Application
Docker lets you easily ship your image to a registry to share it with others.
We use the public docker registry in this example, but you can also set up a private registry to distribute the image on your infrastructure.
-
Log in to the Docker registry:
docker loginTo associate a local image with a repository on a registry, you have to use the notation
username/repository:tag.The tag is not mandatory but recommended, as it is the mechanism that registries use to give Docker images a version.
To push your image you have to run
docker tagwith your username, repository, and tag, so your image uploads to the desired destination. -
Tag the image.
docker tag imagename username/repository:tag -
Publish your image.
docker push username/repository:tag
Once the image has been pushed to Docker Hub it will be publicly available, and you can see the image with its pull command in your account.
Pulling and running an Image from a Remote Repository
As your image is available on the Docker Hub now, you can run it from anywhere.
docker run -p 4000:80 username/repository:tagIf the image is not available yet on the local machine, Docker will download it from the registry.
No matter which machine you run it on, it will always run in the same environment you configured when you built the image.
Visit our Help Center and find the answers to your most frequent questions.
Visit Help Center