How to reserve an IP address
IP Address Manager (IPAM) is Scaleway's tool for planning, tracking and managing the IP address space of Scaleway products. It acts as a single source of truth for the IP addresses of Scaleway resources.
You can use IPAM to reserve a private IP address from a given Private Network's CIDR block. When you reserve an IP in this way, it stops it from being potentially auto-allocated to new resources being attached to the Private Network. You can then use the reserved address to attach the specific resource of your choice to the Private Network. If you later detach the resource from the network, the reserved IP will stay reserved, until you either release it back into the general pool, or use it to attach a different resource.
This page sets out the steps necessary to reserve an IP address with IPAM.
Before you start
To complete the actions presented below, you must have:
- A Scaleway account logged into the console
- Owner status or IAM permissions allowing you to perform actions in the intended Organization
- At least one Private Network
How to reserve a private IP address
The procedure is the same, whether you want to use the IP to attach a Scaleway-managed resource (Instance, Elastic Metal server etc.), or a custom resource (such as a VM hosted on an Elastic Metal server).
-
Click IPAM in the Network section of the Scaleway console side menu.
-
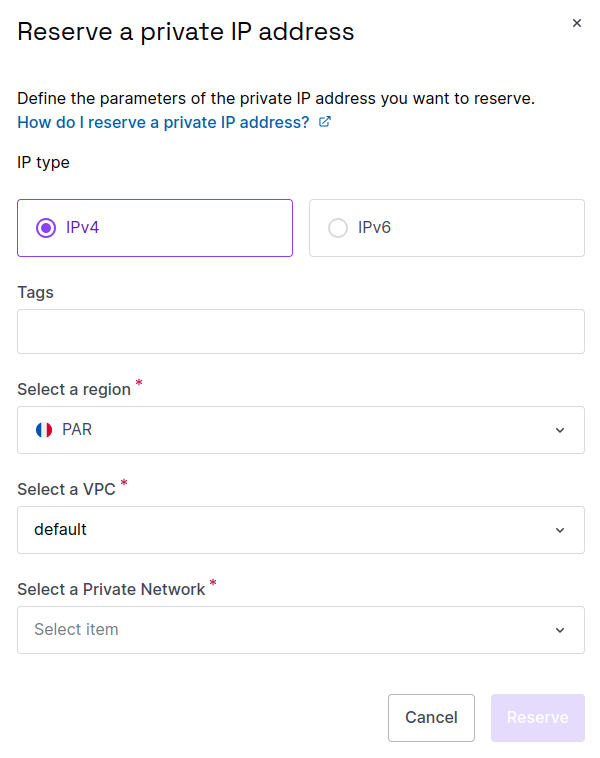
Click Reserve private IP. The following screen displays:

-
Define the parameters for the private IP address you want to reserve:
- IP type: IPv4 or IPv6
- Tags: Tags to help you filter and manage your reserved IPs later
- Region: The region in which you want to reserve a private IP address
- VPC: The VPC in which you want to reserve a private IP address
- Private Network: The Private Network in which you want to reserve a private IP address. The reserved IP will be from this network's CIDR block, and available to attach resources to this network.
-
Define whether you want to specify the IP address to reserve, or reserve any available IP on the Private Network (the IP selected will be displayed after reservation). If specifying the IP address yourself, do not include the network prefix (e.g.
/22). -
Click Reserve to reserve the IP.
The IP address is reserved, and you are returned to the list of your private IP addresses, where the reserved address now displays. You can use this address to attach a resource to the Private Network you reserved it from. If and when you no longer need the reserved IP, you can release it.
How to attach a managed resource to a Private Network using a reserved IP address
You can currently attach Instances, Elastic Metal servers, Load Balancers, and Public Gateways to Private Networks using a reserved IP address. Support for Managed Databases will be coming soon.
The option to use a reserved IP displays when you attach the resource to a Private Network in the console. Follow the instructions below:
- Attach a resource to a Private Network from the Private Networks product dashboard
- Attach an Instance to a Private Network from the Instances product dashboard
- Attach an Elastic Metal server to a Private Network from the Elastic Metal product dashboard
- Attach a Load Balancer to a Private Network from the Load Balancer product dashboard
- Attach a Public Gateway to a Private Network from the Public Gateways product dashboard
How to attach a custom resource to a Private Network using a reserved IP address
You can use reserved IP addresses to attach custom resources, such as VMs hosted on Elastic Metal servers, to Scaleway Private Networks. In doing so, you are prompted to specify the MAC address of the custom resource.
Attach the custom resource from the Private Network's dashboard in the Scaleway console, by following the procedure detailed in the Private Networks documentation.
How to release a reserved private IP address
You can release a reserved IP address, as long as it is not attached to a resource. Releasing the IP means it goes back into the general pool of available IP addresses for that Private Network, and could potentially be auto-allocated to a new resource joining the network.
-
Click IPAM in the Network section of the Scaleway console side menu.
-
Click the three dot menu more icon next to the IP you want to release, and then click Release IP.
A message displays asking you to confirm you want to release the IP address.
-
Click Confirm.
The IP address is released.