How to configure a Public Gateway
This page shows you how to attach a Public Gateway to a Private Network, how to configure NAT and how to enable SMTP.
Before you start
To complete the actions presented below, you must have:
- A Scaleway account logged into the console
- Owner status or IAM permissions allowing you to perform actions in the intended Organization
- Created a Public Gateway
How to attach a Public Gateway to a Private Network
-
Click Public Gateways in the Network section of the side menu.
-
Click the Public Gateway that you want to attach to a Private Network. You are taken to the Overview page for that Public Gateway.
-
Click the Private Networks tab. A list of Private Networks attached to the Public Gateway displays. If no Private Networks are attached, the list will be empty.
-
Click Attach to a Private Network to attach a new Private Network to the Public Gateway.
-
Choose to attach an existing or a new Private Network.
- If you want to attach an existing Private Network, select the desired network from the drop-down list.
- If you want to create and attach a new Private Network, select Create a new Private Network. You are prompted to enter a name and tags for the Private Network, and to select the VPC it should be created in. The Private Network will be created with default configuration, meaning its CIDR block will be automatically defined. Dynamic NAT will be automatically activated on the Public Gateway for the Private Network.
-
Choose whether to auto-allocate an available IP from the pool (the CIDR block defined at the time of creating the Private Network), or use a reserved IP address for the attachment.
-
Use the toggle to select whether to tell the gateway whether or not it should advertise the default route to the internet for attached resources. When activated, other resources on this Private Network will learn the default route through the Public Gateway via DHCP. The route will also be installed in the VPC’s route table, and other Private Networks can opt in to receive it.
-
Click Attach to Private Network to finish. You are taken back to the Private Networks tab, where the network you attached now appears, along with the services configured and the IP address of the Public Gateway.
Your Private Network is now attached to your Public Gateway. You can repeat the steps above to attach more Private Networks to the same Public Gateway if you wish.
How to review and configure NAT
Dynamic NAT is automatically activated. However, you can review and (if you wish) modify the NAT configuration of an existing Public Gateway as follows:
-
Click Public Gateways in the Network section of the side menu.
-
Click the Public Gateway whose configuration you wish to modify. You are taken to the Overview page for that Public Gateway.
-
Click the NAT tab.
-
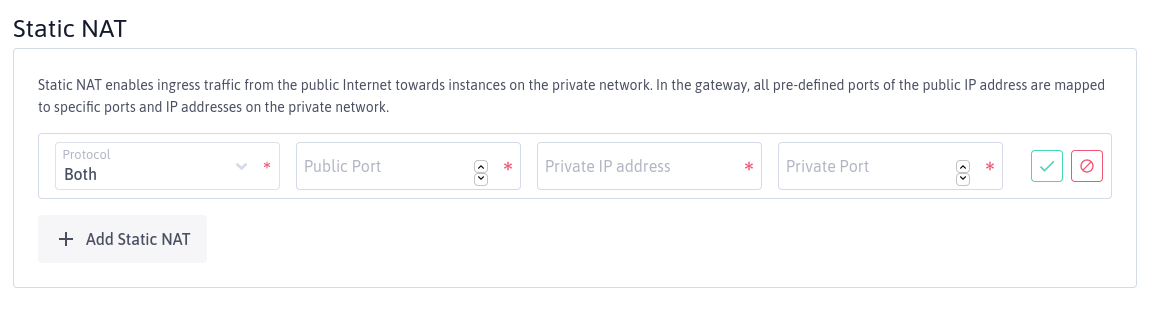
Use the toggle to deactivate dynamic NAT if desired. To add a new static NAT configuration for any Private Network attached to this gateway, click Add Static NAT. The following screen displays:
-
Add the following information for your new static NAT configuration:
- Protocol: Choose TCP, UDP or Both from the drop-down menu
- Public Port: Choose the Public Gateway port you want to use for this mapping
- Private IP address: Enter the Private IP address of the Instance you want to map to. This should be included within one of the configured subnets of an attached Private Network. Usually, a static DHCP association is used too, to make sure this address does not change.
- Private Port: Choose which of the Instance's ports you want to map to.
-
Click validate icon to save your configuration changes, or cancel icon to cancel.
Your new NAT configuration is now saved, and displays on the NAT panel. You can repeat steps 4-6 to add new static NAT configurations as you wish.
How to enable SMTP
By default, the SMTP ports (25, 465, 587 and 2525) on your Public Gateway are blocked to avoid spam. If you wish to send emails from resources located behind your Public Gateway, make sure those resources have also enabled SMTP and then enable SMTP on your Public Gateway as follows:
- Click Public Gateways in the Network section of the side menu.
- Click the Public Gateway whose configuration you wish to modify. You are taken to the Overview page for that Public Gateway.
- Scroll down to the SMTP panel, and use the toggle toggle icon to enable SMTP.
How to enable or disable default route advertisement
You can enable or disable default route advertisement at any time.
- Click Public Gateways in the Network section of the side menu.
- Click the Public Gateway whose default route advertisement you wish to modify, then click the Network tab.
- Use the toggle toggle icon to enable or disable default route advertisement on this network.