How to create a Private Network
VPC allows you to build your own Virtual Private Cloud on top of Scaleway's shared public cloud. Within each VPC, you can create multiple Private Networks and attach Scaleway resources to them, as long as the resources are in an AZ within the network's region. Attached resources can then communicate between themselves in an isolated and secure layer 2 network, away from the public internet.
Private Networks also have built-in Dynamic Host Configuration Protocol (DHCP), making it easy to manage the private IP addresses of your resources on the network. IPs are statically allocated when resources are attached to a Private Network, and are managed by our internal IPAM. You can find out how to get the most from your Private Networks in our dedicated guide.
Before you start
To complete the actions presented below, you must have:
- A Scaleway account logged into the console
- Owner status or IAM permissions allowing you to perform actions in the intended Organization
How to create a Private Network
-
Click VPC in the Network section of the side menu. The list of your VPCs displays. Each Private Network must be created within a VPC.
-
Click the VPC you wish to create your Private Network in.
If you already have existing Private Networks in this VPC, a list of these displays. Otherwise, you see a welcome screen.
-
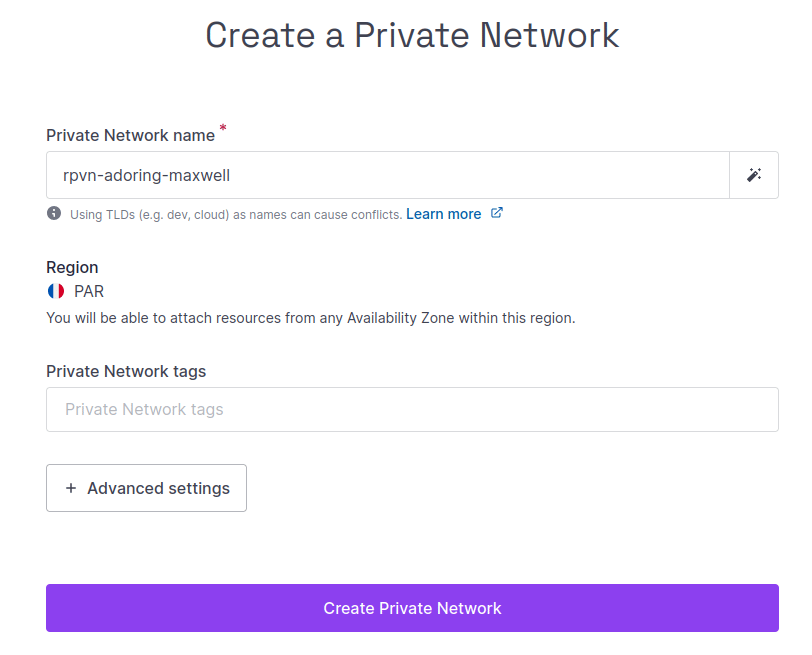
Click + Create Private Network. The creation screen displays.
-
Enter a name for the network, or leave the randomly generated name in place. Optionally, you can also add tags to help organize your Private Networks. Each tag should be separated by a space.
-
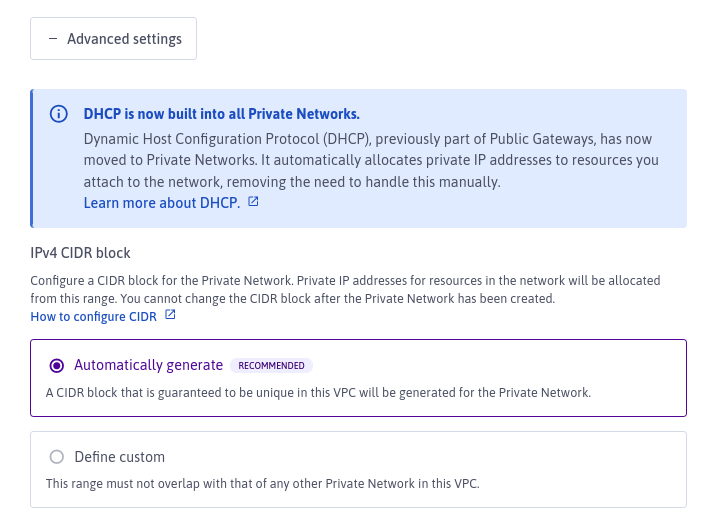
Optional: Click Advanced Settings to edit these settings, otherwise they will be left at default recommended values. The only advanced setting available concerns the creation of an IPv4 CIDR block for the Private Network, from which private IP addresses will be allocated. You cannot change the CIDR block after the Private Network has been created. See the section below on configuring CIDR for more help with choosing these settings.
-
Click Create Private Network to finish. Your Private Network is created.
How to configure CIDR
Private Networks have built-in Dynamic Host Configuration Protocol (DHCP). DHCP manages the allocation of private IP addresses to resources attached to the network. For this purpose, a Classless Inter-Domain Routing (CIDR) block is defined for each Private Network, from which IP addresses will be assigned. In fact, both an IPv4 and an IPv6 CIDR block are defined.
IPv6 CIDR block
The IPv6 CIDR block is defined automatically and "invisibly" by default at the time of creating the Private Network. It cannot be modified either at the time of creation, or afterward.
It is a /64 block, guaranteed to be unique within the VPC and not overlapping with any of your other Private Networks.
IPv4 CIDR block
The IPv4 CIDR block is defined at the time of creating the Private Network. You can choose to automatically generate a default IPv4 CIDR block, or define a custom block. However, in either case, the IPv4 CIDR block cannot be modified after creation.
Automatically generating a CIDR block
Automatically generating a CIDR block is the default (and recommended) setting when creating a Private Network. Simply follow the steps above to create a Private Network, leave Advanced Settings at default values, and a /22 CIDR block will be automatically generated for the Private Network.
This block is guaranteed to be unique within the VPC, and will not overlap with any of your other Private Networks. It gives 1024 private IPv4 addresses, of which 1020 are available to be allocated to resources attached to the Private Network. The first two and last two addresses in the block are not available.
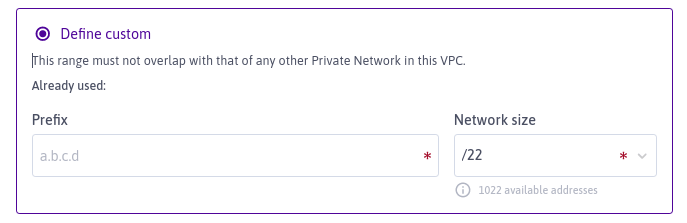
Defining a custom CIDR block
If you prefer, you can define your own custom IPv4 CIDR block when creating your Private Network. This is only recommended for advanced users.
-
Follow the steps above to create a Private Network, and at step 5, click Advanced Settings.
-
Click Define custom. The following screen displays:
-
Enter a network prefix. This should typically be in the following ranges normally used for private networks:
192.168.0.0-192.168.255.255172.16.0.0-172.31.255.25510.0.0.0-10.255.255.255
-
Choose your network size from the options available. The range of options begins at
/20, with 4094 addresses available for resources on the Private Network, and ends at/28, with 14 addresses available for resources on the Private Network. -
Click Create Private Network to finish.
Viewing IP addresses of attached resources
When you attach resources to the Private Network, they will be assigned IP addresses from the CIDR block you defined. See how to attach a resource to a Private Network and how to view the resource's IP address for more information.