How to manage routing
Routing is used to manage and control the flow of traffic within a VPC. It tells the VPC where to send traffic trying to get to a specific destination IP address. Notably, it allows traffic to be automatically routed between resources attached to different Private Networks within the VPC, as well as along user-created custom routes.
Read more about the VPC routing feature, including detailed explanations, usage considerations, limitations and best practices in our dedicated reference content.
Before you start
To complete the actions presented below, you must have:
- A Scaleway account logged into the console
How to activate routing
To activate routing on a pre-existing VPC, follow these steps:
-
Click VPC in the Network section of the Scaleway console side menu. A listing of your VPCs displays.
-
Use the region selector at the top of the page to filter for the region of the VPC on which you want to configure routing.
The Routing column allows you to see whether routing is already activated and up-to-date for a given VPC.
-
Click Activate next to the VPC on which you want to activate routing.
A message displays warning you that this enables the automatic routing of traffic between the Private Networks of your VPC, and that this action is irreversible.
-
Type ACTIVATE in the box, and click Activate Routing to confirm.
Routing is activated on the VPC.
How to update routing behavior
If you created your VPC before July 1st 2025, you must manually update its routing behavior in order to get the following capabilities:
- Advertisement of custom routes across the entire VPC as standard.
- Option to enable each Private Network in the VPC to receive default route advertisements not only from their locally attached Public Gateways, but from other Public Gateways (or default custom routes) attached to different Private Networks throughout the whole VPC.
For more information on these new routing behaviors, see our detailed documentation.
Updating routing behavior is irreversible: once updated, you cannot revert. However, Network ACLs are configurable via the API to let you finely control and restrict routes within your VPC as necessary.
Follow the steps below to update the routing behavior for a given VPC:
-
Click VPC in the Network section of the Scaleway console side menu. A listing of your VPCs displays.
-
Use the region selector at the top of the page to filter for the region of the VPC on which you want to configure routing.
-
Click Update in the Routing column of the VPC you want to update.
A three-step wizard displays, reiterating and reminding you of the changes to routing behavior.
-
On page 1 of the wizard, read the recap of the changes to routing behavior, and click Next.
-
On page 2 of the wizard, read the reminder of how these changes may impact your existing setup, and click Next.
-
On page 3 of the wizard, read the explanation that updating will entail no downtime, though changes to routes may take up to 30 minutes to fully propagate. Then type UPDATE in the box and click Confirm.
Your VPC's routing behavior is updated, and you are directed to its routing table. Custom routes will now be scoped to the entire VPC, and you can use the Manage default routes button if you want to select Private Networks to receive default routes from throughout the VPC.
How to access and read the route table
Your VPC's route table can be found in its Routing tab. The route table shows all the existing routes for the VPC.
-
Click VPC in the Network section of the Scaleway console side menu. A listing of your VPCs displays.
-
Use the region selector at the top of the page to filter for the region of the VPC whose route table you want to read, then click the VPC.
-
Click the Routing tab.
Routes are automatically generated and added to the route table when you:
- Create a Private Network in the VPC (this generates a local subnet route, which allows the VPC to automatically route traffic between Private Networks), or
- Attach a Public Gateway to a Private Network and set it to advertise a default route. This generates a default route to the internet.
- Create a custom route
When your route table starts to populate, it will look something like this:
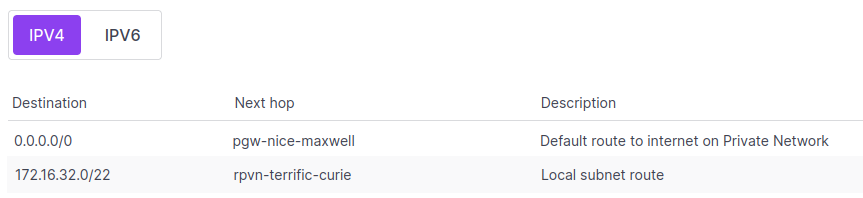
For help with understanding the route table and how to read it, refer to our documentation about route tables.
How to generate a managed route
Two types of auto-generated routes exist for VPCs:
- Local subnet route: Generated when you create a Private Network in a VPC. Allows traffic to be routed between different Private Networks in the VPC.
- Default route to internet: Generated when you attach a Public Gateway to a Private Network in the VPC, and set it to advertise a default route. Allows traffic to be routed to addresses outside the VPC (i.e. the public internet) via the gateway.
You cannot delete managed routes, as their lifecycle is fully managed by Scaleway. The route will be automatically deleted for you when you delete the Private Network or Public Gateway that it concerns.
How to manage default route scope
If your VPC is using up-to-date routing behavior, you can enable each Private Network to receive default route advertisements not only from their locally attached Public Gateways, but also from throughout the VPC.
This means that the Private Network will receive route advertisements from:
- All locally attached Public Gateway advertising a default route
- All Public Gateways attached to other Private Networks in the VPC advertising default routes
- All custom routes with a destination of
0.0.0.0/0.
Each Private Network must individually opt in to receive all these default routes. This can be done when creating a Private Network, or later, from each Private Network's Settings tab, or from the VPC's Routing tab.
How to view VPC routes in IPv6
Scaleway VPC routing supports both IPv4 and IPv6 protocols. Managed routes to Private Networks are simultaneously generated for both IPV4 and IPV6, and both are added to the route table. Use the toggle above the route table to switch from the default view of IPV4 routes to a view of IPV6 routes.
Note that auto-generated managed routes to Public Gateways are only created in IPv4, since Public Gateways are not yet IPv6-compatible. Custom routes are only created for the IP type specified during the creation process.
How to create a custom route
Each VPC has auto-generated, managed routes to local subnets and Public Gateways, but you can also create your own custom routes.
For example, you may wish to route all traffic for a certain private IP range to an Instance hosting a manually configured VPN tunnel, allowing secure connection to a corresponding subnet at the other end of the tunnel.
Follow the steps below to define a custom route:
-
Click VPC in the Network section of the Scaleway console side menu. A list of your VPCs displays.
-
Use the region selector at the top of the page to filter for the region of the VPC where you want to define a custom route, then click the VPC. A list of Private Networks in this VPC displays.
-
Click the Routing tab.
-
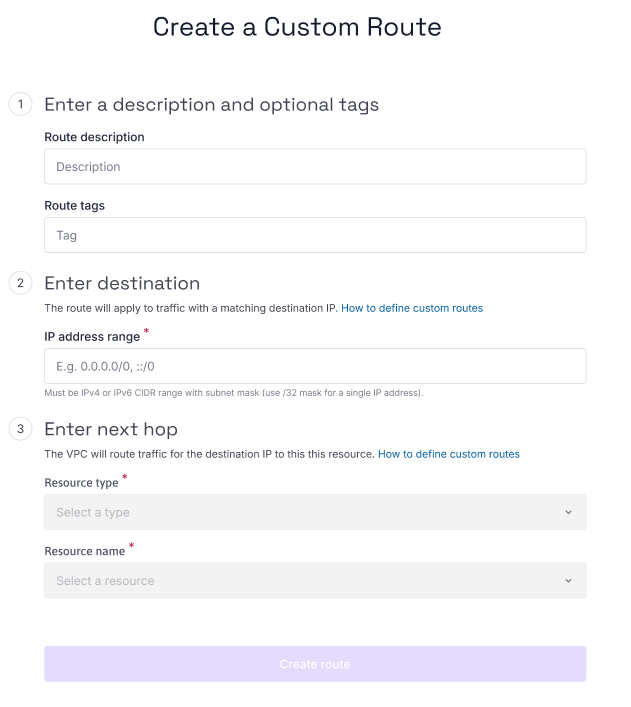
Click Create route. The custom route creation wizard displays.
-
Enter a description for your route, e.g. "Route to hosted VPN".
-
Optionally, enter one or more tags for your route. Tags help you filter and organize your list of routes.
-
Enter a destination for the route. The VPC will apply the route to all traffic with a matching destination IP. You must enter an IPv4 or IPv6 CIDR range with a subnet mask, e.g.
192.168.1.0/24. For a single IP address, use the/32mask for IPv4. -
Enter a next hop for the route. The VPC will route traffic for the destination IP to the resource designated as the next hop.
- Select a peering connector if you are setting up VPC peering.
- Select the Private Network which the next hop resource is attached to.
- Select a resource type, e.g. Instance, Public Gateway, or Elastic Metal.
- Select the name of the specific resource you want to route traffic to. The resource must be attached to a Private Network in this VPC.
-
Click Create route to finish.
The custom route is created and you are returned to the list of your VPC's routes, where the newly-created route now displays.
How to fix a broken custom route
If you delete a resource used as a next hop in a custom route, or detach it from the Private Network, the custom route will cease to function. A Not found! warning will display in the Next hop column for this route in the route table.
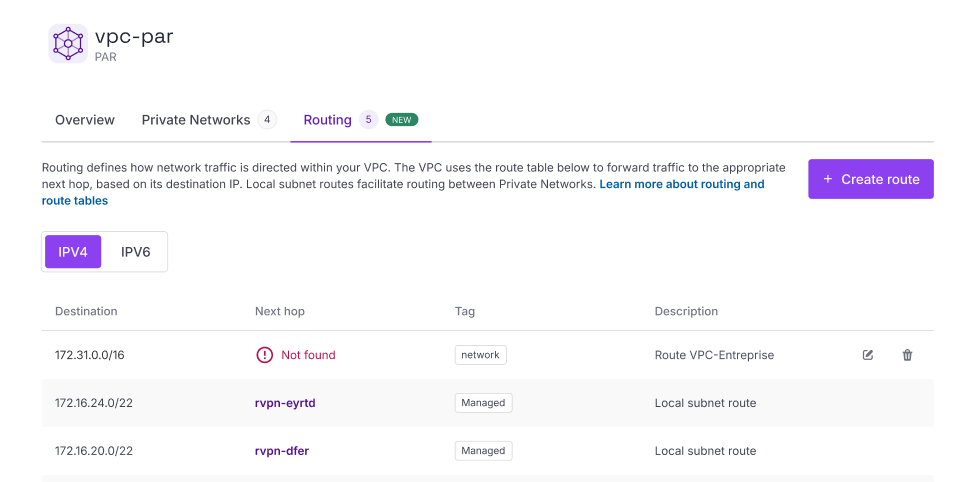
To resolve this, you must either:
- Reattach the next hop resource to the Private Network and then edit the route to reselect the next hop resource, or
- Edit the route to select a new next hop, or
- Delete the route
How to edit a custom route
Only custom routes that you created yourself can be edited. It is not possible to edit auto-generated managed routes to Private Networks or Public Gateways.
-
Click VPC in the Network section of the Scaleway console side menu. A list of your VPCs displays.
-
Use the region selector at the top of the page to filter for the region of the VPC where you want to edit a custom route, then click the VPC. A list of Private Networks in this VPC displays.
-
Click the Routing tab.
-
Click the edit edit icon icon next to the custom route you want to edit.
-
Modify the details of the custom route as necessary. You can edit the name, tags, destination IP address range, and next hop.
-
Click Edit custom route to finish.
The custom route is updated, and you are returned to the list of your VPC's routes.
How to delete a custom route
Auto-generated managed routes to Private Networks or Public Gateways will be automatically deleted when you delete the Private Network or Public Gateway. However, custom routes that you create yourself are never automatically deleted, even when you delete a resource used as next hop. You must manually delete custom routes yourself when you no longer want them.
It is not possible to manually delete an auto-generated, managed route. Only custom routes can be deleted following the steps below.
-
Click VPC in the Network section of the Scaleway console side menu. A list of your VPCs displays.
-
Use the region selector at the top of the page to filter for the region of the VPC where you want to delete a custom route, then click the VPC. A list of Private Networks in this VPC displays.
-
Click the Routing tab.
-
Click the delete delete icon icon next to the custom route you want to delete. A pop-up displays asking you to confirm.
-
Click Delete route to confirm.
The custom route is deleted, and you are returned to the list of your VPC's routes.
Routing limitations and best practices
Read more about the VPC routing feature, including detailed explanations, usage considerations, limitations and best practices in our dedicated reference content.