How to use SSH bastion
SSH bastion is a server dedicated to managing connections to the infrastructure behind your Public Gateway. When you activate SSH bastion on your Public Gateway, all SSH keys held in your Project are imported to the SSH bastion, providing a single point of entry. You can then connect to resources connected to the same Private Network as the Public Gateway, via the bastion. This makes management of your infrastructure easier and more secure, as you do not need to expose your other resources to the internet in order to connect to them, neither do you need to upload SSH keys to individual resources.
The Allowed IPs feature lets you control which public IPs can access resources behind the bastion.
Before you start
To complete the actions presented below, you must have:
- A Scaleway account logged into the console
- Owner status or IAM permissions allowing you to perform actions in the intended Organization
- Created a Public Gateway
- Attached your Public Gateway to a Private Network
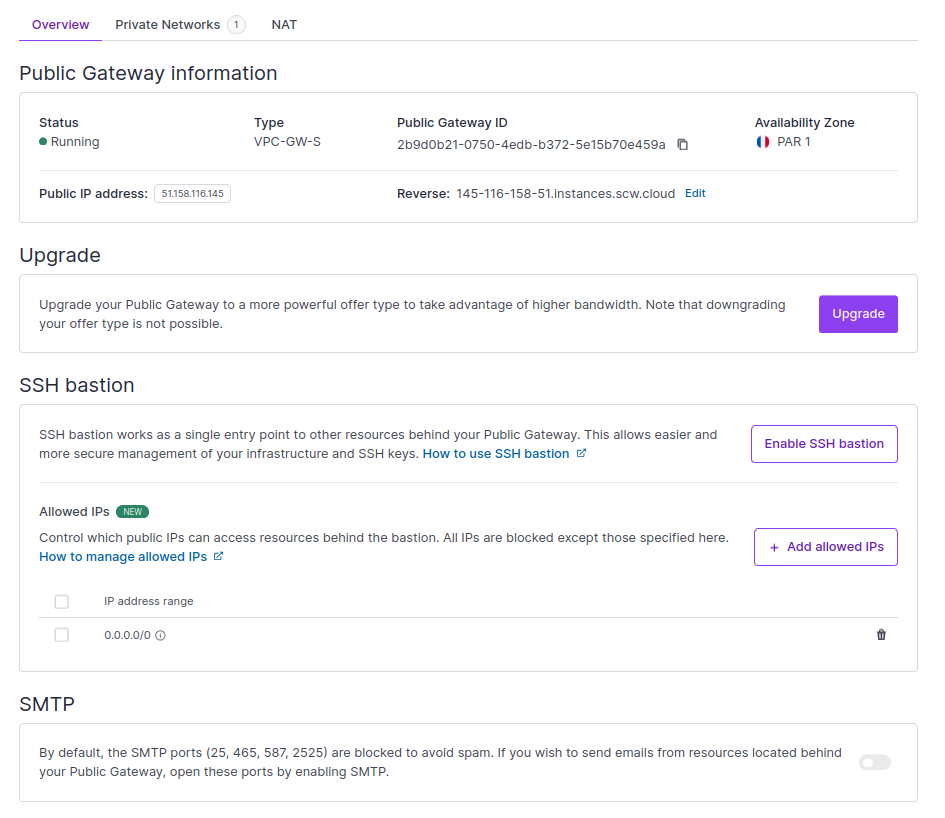
How to activate SSH bastion
-
Click Public Gateways in the Network section of the Scaleway console side menu. A listing of your Public Gateways displays.
-
Use the region selector at the top of the page to filter for the region of the Public Gateway you want to configure, then click the Public Gateway in the listing. The Public Gateway's Overview page displays.
-
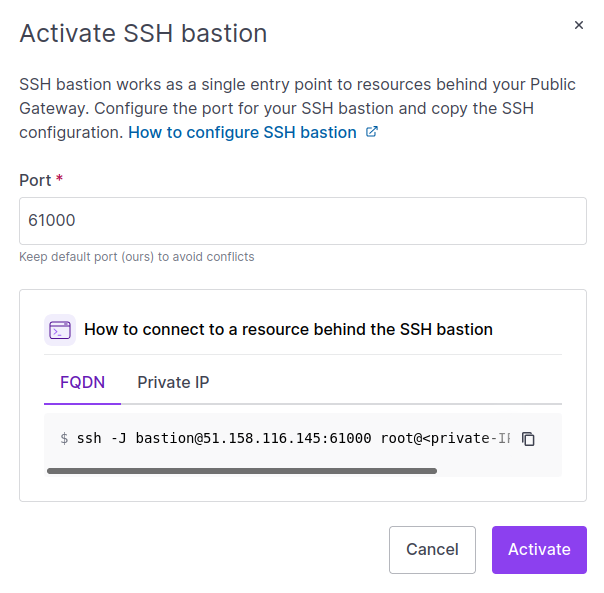
Under SSH Bastion, click Enable SSH bastion to activate the feature. A pop-up displays:
-
Enter the port that you want your SSH bastion to listen on (or leave the default port in place).
-
Copy the command to connect to a resource, and click Save SSH bastion settings.
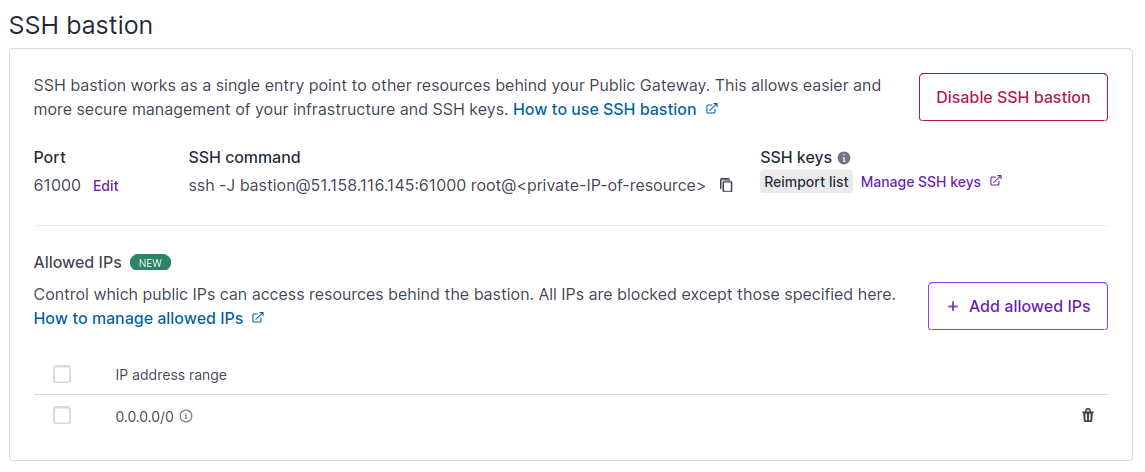
You are redirected to your Public Gateway's Overview page, where SSH bastion is now activated. All the SSH keys in your Project at the time of activation are copied to the SSH bastion.
How to configure allowed IPs
The Allowed IPs feature lets you control which public IPs can connect to resources behind the bastion. All IPs are blocked except those specified in your Allowed IPs list.
When you first activate SSH bastion, the Allowed IPs list has one entry: a default IP range of 0.0.0.0/0 which gives access to all public IPs.
How to allow all IPs
If you do not want to restrict connections to the resources behind the bastion to specific public IPs only, leave the default entry of 0.0.0.0/0 in place. This IP range encompasses all possible public IPs, so will allow any public IP address to connect to the bastion (as long as they have a valid SSH key). No further configuration is required.
If you have deleted the default entry, you can re-add an entry for 0.0.0.0/0 at any time. Click the Add allowed IPs button, and add a single entry for 0.0.0.0/0 to restore access to all public IPs.
How to restrict access to certain IPs
To restrict connections to resources behind the bastion to specific public IPs only, you must delete the default 0.0.0.0/0 entry, and add entries for the specific IP ranges that you want to allow. Follow the steps below:
- Ensure you have activated SSH bastion.
- In the Allowed IPs list, delete the default IP range entry
0.0.0.0/0by clicking the delete icon button next to it. A pop-up displays, asking you to confirm that you want to delete this IP range. - Type DELETE in the box, then click Delete allowed IP range. The IP range is deleted and you are returned to the Allowed IPs list.
- Click the + Add allowed IPs button.
A pop-up displays, asking you to enter the IPv4 address ranges to allow.
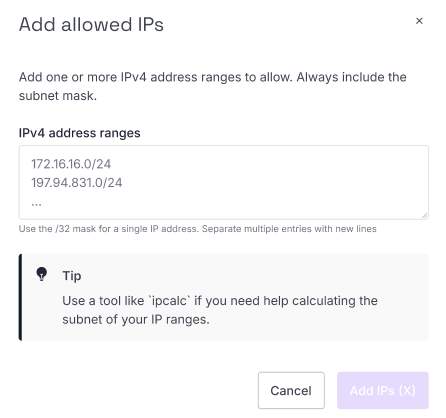
- Enter the IPv4 address ranges you to want to allow to connect to your SSH bastion. In each case, include the subnet mask (use
/32for single addresses). You can add multiple IP ranges in one go by separating them with new lines. - Click the Add IPs button. The IPs are added, and you are returned to the Allowed IPs list.
Repeat steps 4 - 6 to add more IP range entries, if you wish.
You can delete an entry from the list at any time by clicking the delete icon button next to it.
How to reimport SSH keys
If you add new SSH keys to your Project after activating SSH bastion, you will need to perform a reimport to update the bastion with the new keys.
-
Click Public Gateways in the Network section of the Scaleway console side menu. A listing of your Public Gateways displays.
-
Use the region selector at the top of the page to filter for the region of the Public Gateway you want to configure, then click the Public Gateway in the listing. The Public Gateway's Overview page displays.
-
Under SSH Bastion click the Reimport list button.

Your SSH bastion is updated with the new SSH keys.
How to connect to a resource behind your SSH bastion
In this section, we use the example of a Public Gateway attached to a Private Network, with different resources (Instances, Elastic Metal servers etc) attached to the Private Network. SSH bastion has been activated on the Public Gateway, listening on port 61000.
How to connect using the resource's private IP address
You can connect to a resource behind the bastion using its private IP address on the Private Network. The command to use is shown in the Scaleway console at the time of activating the bastion, e.g.
ssh -J bastion@<public-IP-of-gateway>:61000 root@<private-IP-of-resource>
How to connect using the resource's fully-qualified domain name (FQDN)
The command to use is:
ssh -J bastion@PUBLIC_IP_OF_PUBLIC_GATEWAY:61000 user@FQDNq
The FQDN is <resource-name>.<private-network-name>.internal.
When connecting as the user alex on an Instance named scw-frosty-cannon on a Private Network named pvn-silly-goodall, where the Public Gateway has an IP 51.158.125.88 and SSH bastion is configured on port 6100, the full connection command would therefore be:
ssh -J bastion@51.158.125:61000 alex@scw-frosty-cannon.pvn-silly-goodall.internalHow to edit your SSH configuration files for connection
Carry out the following steps to avoid the need to repeat -J bastion@<public-IP-of-gateway>:61000 in your SSH connection commands. The following steps must be repeated on all local machines that want to connect to a resource behind the SSH bastion in this way.
-
To configure at user/local level, open your user SSH configuration file on your local machine with a text-editor such as
nano:nano ~/.ssh/configPaste the following code into the file, then save and exit. Ensure that you make the following replacements:
.<private-network-name>: The name of your Private NetworkPUBLIC_IP_OF_PUBLIC_GATEWAY: The public IP address of your gatewaySSH_BASTION_PORT: The port you set when activating SSH bastion on your gateway
Host *.<private-network-name> ProxyJump bastion@PUBLIC_IP_OF_PUBLIC_GATEWAY:SSH_BASTION_PORT -
Alternatively, to configure at system-wide level, open your system-wide configuration file on your local machine with a text-editor such as
nano:nano /etc/ssh/ssh_configPaste the code into the file, then save and exit.
-
Carry out the following command on your terminal to connect to a resource inside your Private Network using its FQDN. Check the information above to identify the FQDN of your resource.
ssh FQDN
How to edit the SSH bastion port
-
Click Public Gateways in the Network section of the Scaleway console side menu. A listing of your Public Gateways displays.
-
Use the region selector at the top of the page to filter for the region of the Public Gateway you want to configure, then click the Public Gateway in the listing. The Public Gateway's Overview page displays.
-
Under SSH Bastion click Edit, next to the port number. A pop-up displays.
-
Edit your SSH bastion port as required.
-
Click Save.
Your edits are saved, and you are redirected to your Public Gateway's Overview page.
How to monitor SSH bastion
Scaleway Cockpit allows you to monitor the logs of SSH Bastion. Refer to the dedicated documentation for more information on how to monitor your Public Gateways.
How to deactivate SSH bastion
-
Click Public Gateways in the Network section of the Scaleway console side menu. A listing of your Public Gateways displays.
-
Use the region selector at the top of the page to filter for the region of the Public Gateway you want to configure, then click the Public Gateway in the listing. The Public Gateway's Overview page displays.
-
Under SSH Bastion use the toggle toggle icon to deactivate the bastion.
SSH bastion is deactivated on this gateway. You can reactivate it at any time.
SSH bastion limitations and troubleshooting
If you are having trouble matching SSH key fingerprints logged for Public Gateway in Cockpit, to SSH key fingerprints as shown in the Project settings section of the Scaleway console, see our dedicated troubleshooting guide.