VPC - Quickstart
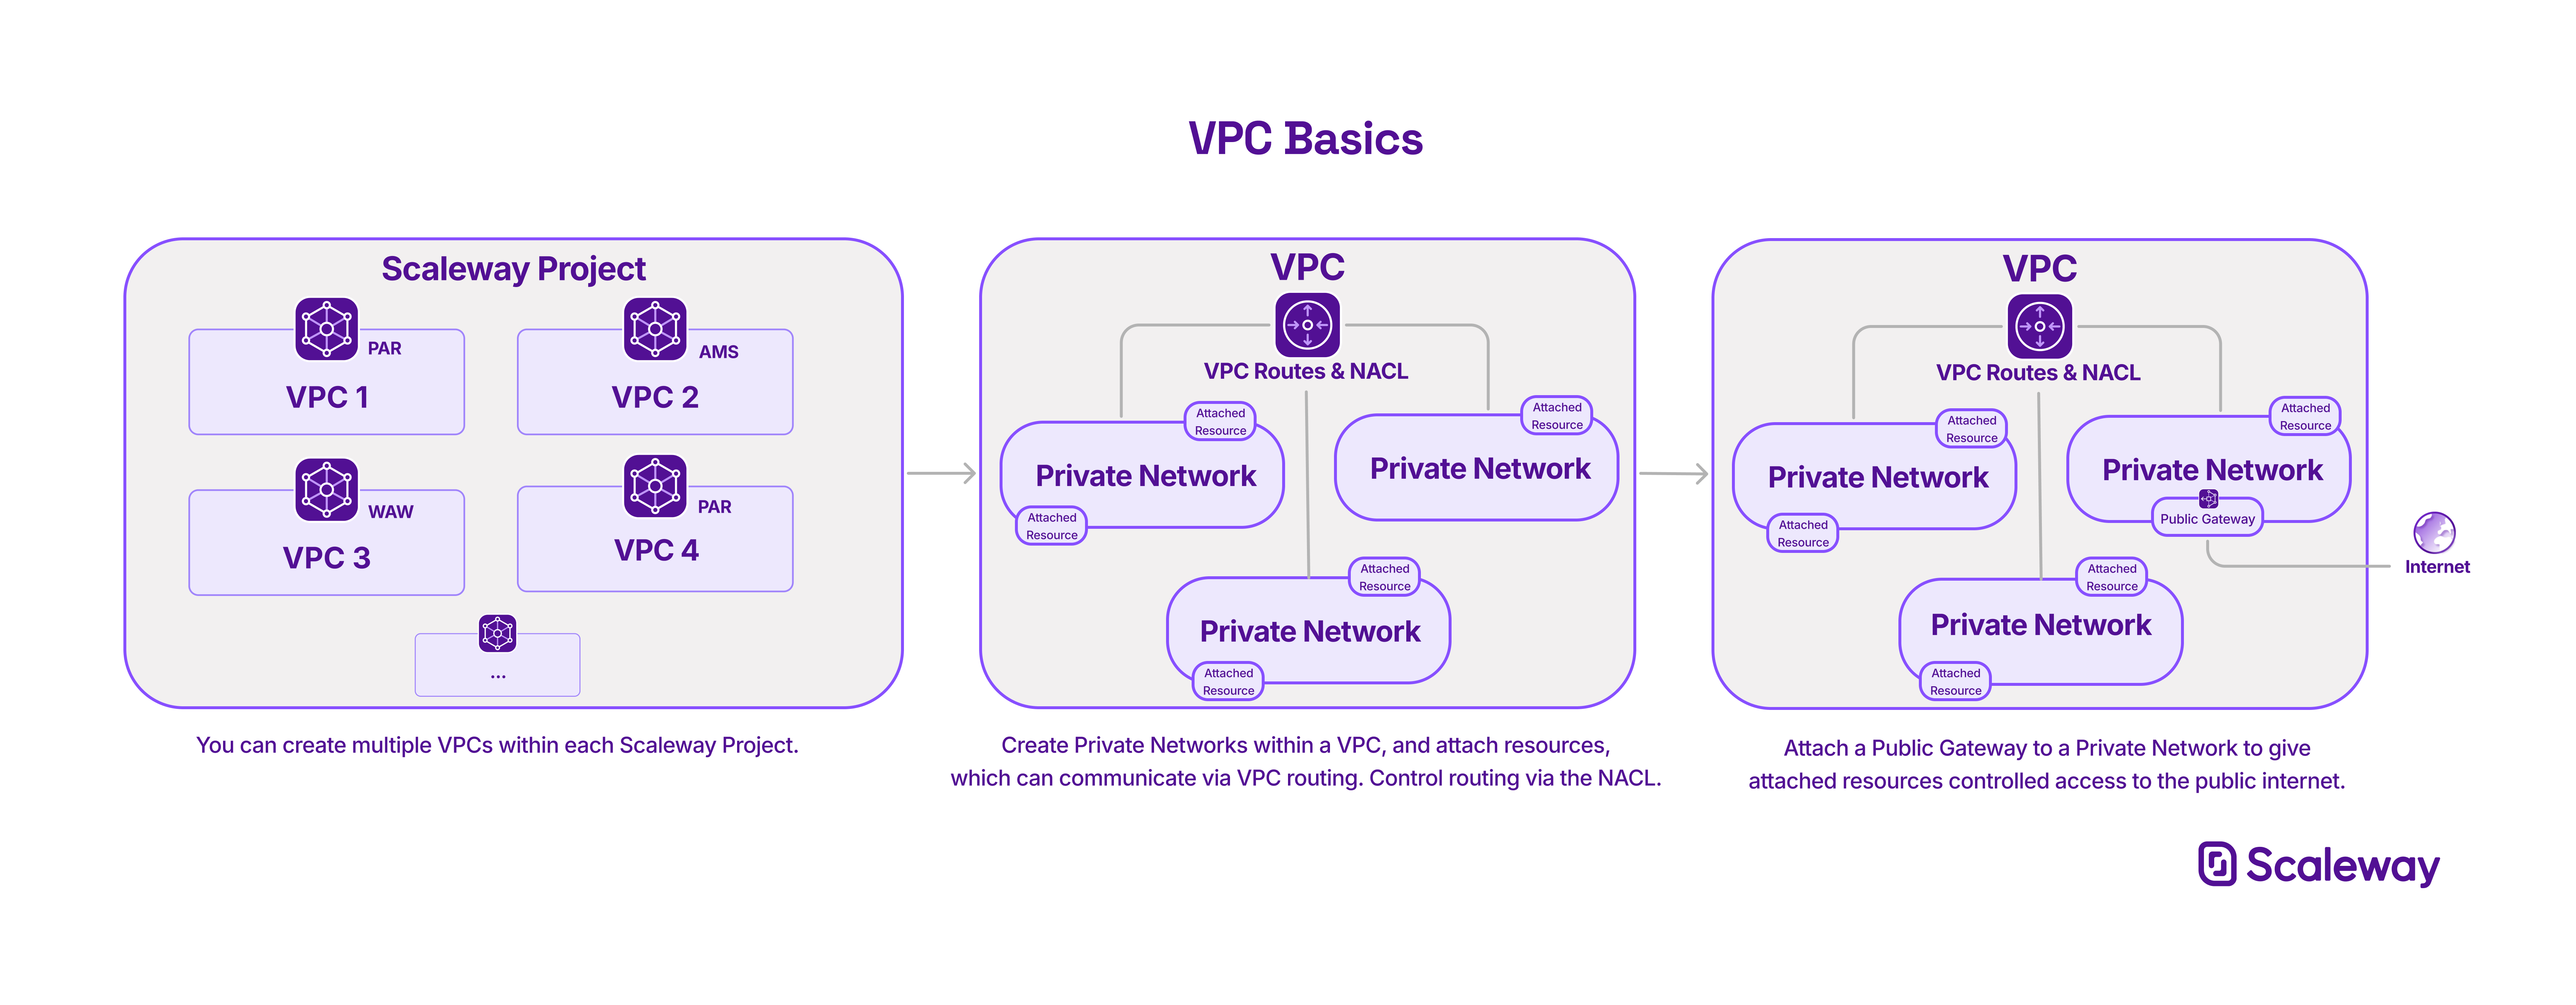
VPC allows you to build your own Virtual Private Cloud on top of Scaleway's shared public cloud. You can create one or more VPCs in each Scaleway region.
Within each VPC, you can create Private Networks and attach Scaleway resources (Instances, Elastic Metal servers, Load Balancers etc.) to them, as long as the resources are within the network's region. Resources attached to a Private Network can communicate between themselves in an isolated and secure virtual layer 2 network, away from the public internet.
VPC routing facilitates the automatic routing of traffic between the Private Networks of a VPC, as well as the ability to define custom routes between resources. Finely control and limit routing between resources in a VPC via the Network Access Control List (currently available only via the VPC API).
Attach a Public Gateway to your VPC to give your resources controlled access to the public internet via the Private Network.
This quickstart walks you through the process of getting started with Scaleway VPC.
Console overview
Discover the VPC interface on the Scaleway console.
Before you start
To complete the actions presented below, you must have:
- A Scaleway account logged into the console
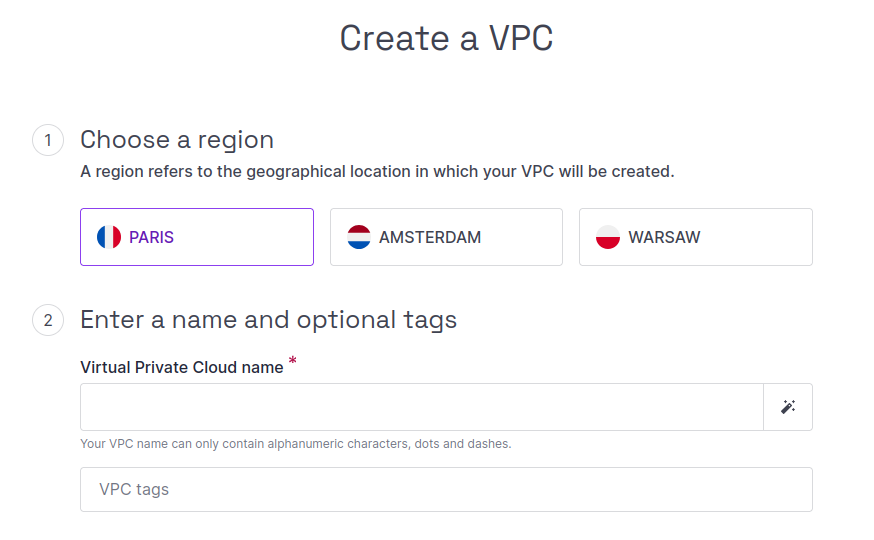
How to create a VPC
-
Click VPC in the Network section of the Scaleway console side menu.
-
Click plus icon Create a VPC. The VPC creation wizard displays.
-
Choose a region in which to create your VPC.
-
Enter a name for your VPC (or use the wand icon to generate a random name). Optionally, you can also add tags to help organize your VPCs. Each tag should be separated by a space.
You can create Private Networks in this VPC after you have created the VPC itself. However, you can not move an existing Private Network from one VPC to another.
-
Click Create VPC to finish.
Your VPC is created, and you are redirected to its Overview page.
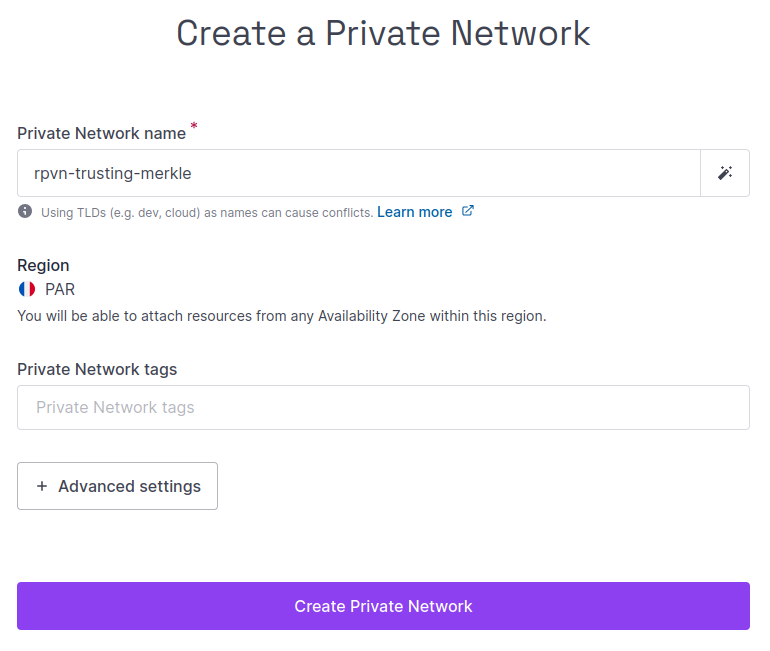
How to create a Private Network
You can create multiple Private Networks within each VPC. Resources attached to each Private Network will be able to communicate between themselves via their private IP addresses or private hostnames, away from the public internet.
-
Click VPC in the Network section of the Scaleway console side menu. A listing of your VPCs displays. Each Private Network must be created within a VPC.
-
Use the region selector at the top of the page to filter for the region of the VPC in which you want to create the Private Network, then click the VPC in the listing.
If you already have existing Private Networks in this VPC, a list of these displays. Otherwise, you see a welcome screen.
-
Click + Create Private Network. The creation screen displays.
-
Enter a name for the network, or leave the randomly-generated name in place. Optionally, you can also add tags to help organize your Private Networks. Each tag should be separated by a space.
Leave the Advanced Settings at default values, to create a network with an auto-generated CIDR block. IP addresses for attached resources will come from this block.
-
Click Create Private Network to finish. Your Private Network is created.
How to attach resources to a Private Network
-
Click VPC in the Network section of the Scaleway console side menu. A listing of your VPCs displays.
-
Use the region selector at the top of the page to filter for the region of the VPC containing the Private Network you want to configure, then click the VPC in the listing. A listing of Private Networks in the VPC displays.
-
Click the Private Network to which you want to attach a resource.
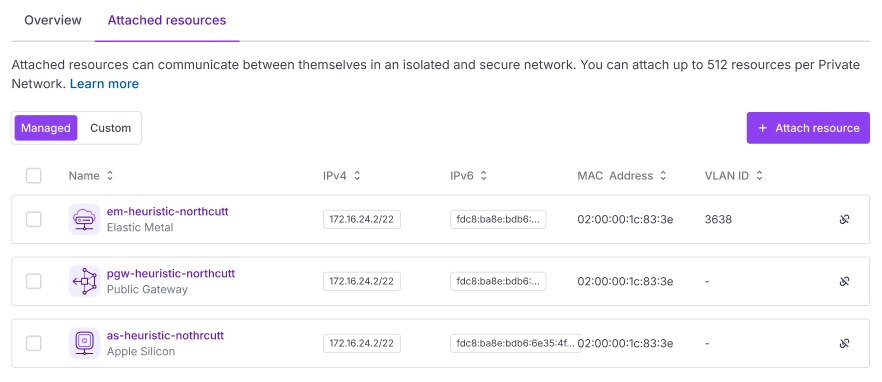
The Private Network's Attached resources tab displays.
-
Use the toggle to select the type of resource you want to attach:
- Managed resources are created and managed via Scaleway, e.g. Instances, Elastic Metal servers, Load Balancers, Managed Databases, Kubernetes Kapsules, Public Gateways, Apple silicon etc.
- Custom resources are created and managed by yourself, e.g. virtual machines you are hosting on a Proxmox cluster on an Elastic Metal server.
-
Click + Attach resource. A pop-up displays.
-
Complete the required information about the resource to attach. This depends on whether you are attaching a managed or custom resource.
-
Click Attach to Private Network to finish.
You are returned to the list of attached resources, where the newly-attached resource now displays.
How to address resources on a Private Network
Resources on a Private Network can be addressed via their private IP address or their hostname.
Private IP address
When you attach a resource to a Private Network, it gets a private IPv4 address on that network (and also an IPv6 address, if supported by the resource).
Private IPs are assigned from the CIDR block defined at the time of the Private Network's creation, either via auto-assignment or specification of a particular reserved IP.
You can view a resource's IPv4 or v6 address in the Attached Resources tab of the Private Network itself (follow steps 1 - 5 above). It can also be viewed via the Private Networks tab of the resource's own dashboard.
Hostname
In addition to using its private IP address, you can also access a resource on a Private Network via its hostname, thanks to VPC’s inbuilt private DNS.
A resource’s hostname is equivalent to the name you gave the resource when creating it. For example, if you have an Instance with the name instance123 attached to a Private Network named prodpn, its address on that network is instance123.prodpn.internal. The .internal is important to allow Scaleway DNS to distinguish public and private hostnames.
For full information on Scaleway internal DNS and hostname formats, including troubleshooting advice, see our dedicated DNS documentation.
How to manage routing
Routing is used to manage and control the flow of traffic within a VPC. It tells the VPC where to send traffic trying to get to a specific destination IP address. Notably, it allows traffic to be automatically routed between resources attached to different Private Networks within the VPC, using their private IP addresses. You can also create your own custom routes.
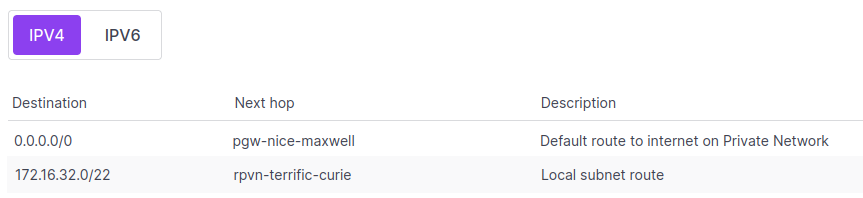
Your VPC’s route table can be found in its Routing tab. The route table shows all the existing routes for the VPC.
-
Click VPC in the Network section of the Scaleway console side menu. A listing of your VPCs displays.
-
Use the region selector at the top of the page to filter for the region of the VPC where you want to manage routing, then click the VPC.
-
Click the Routing tab.
Routes are automatically generated and added to the route table when you:
- Create a Private Network in the VPC (this generates a local subnet route, which allows the VPC to automatically route traffic between Private Networks), or
- Attach a Public Gateway to a Private Network and set it to advertise a default route. This generates a default route to the internet.
- Create a custom route.
When your route table starts to populate, it will look something like this:
You can use the VPC's Network Access Ccontrol List to limit and restrict certain routes within a VPC, but this feature is currently available via the VPC API only only.
How to delete a Private Network
You must detach all resources and release all reserved IPs from the Private Network before you can delete it.
-
Click VPC in the Network section of the Scaleway console side menu. A listing of your VPCs displays.
-
Use the region selector at the top of the page to filter for the region of the VPC containing the Private Network you want to delete, then click the VPC in the listing. A listing of Private Networks in the VPC displays.
-
Click the more icon icon next to the Private Network you want to delete, then click Delete on the pop-up menu.
A screen displays asking you to confirm that you want to delete the network.
-
Type DELETE and click Delete Private Network.
Your Private Network is deleted.