How to create and manage queues
This page shows how to create and manage your queues with Scaleway Queues (formerly part of the Messaging and Queuing product).
Before you start
To complete the actions presented below, you must have:
- A Scaleway account logged into the console
- Owner status or IAM permissions allowing you to perform actions in the intended Organization
How to create a queue
-
Click Queues in the Integration Services section of the Scaleway console side menu.
-
Click Create queue. The queue creation wizard displays.
-
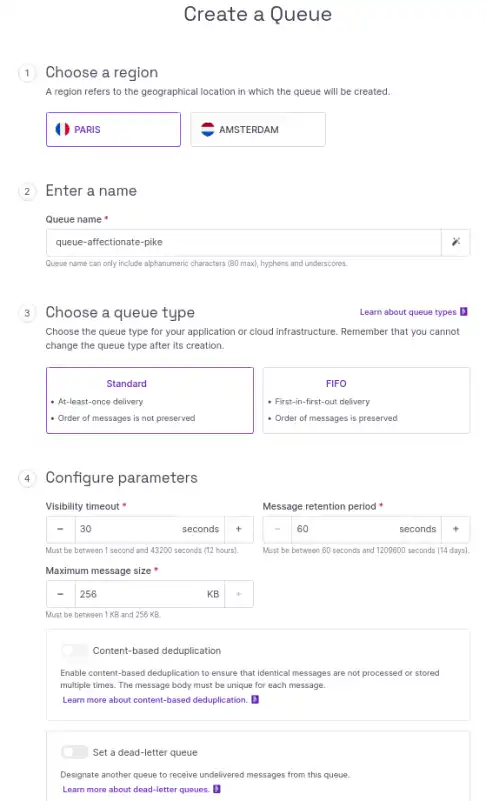
Select the region in which you want to create the queue.
-
Enter a name for your queue. The name must be no more than 80 characters, and consist only of alphanumeric characters, hyphens, and underscores. Alternatively, you can go with the auto-generated name suggested for you.
-
Choose your Queue type, from one of the following:
- Standard: Standard Queues ensure at-least-once delivery. The exact order of messages in the queue is not preserved.
- FIFO: FIFO Queues (First In First Out) preserves the exact ordering of messages.
-
Configure your queue's parameters. The following parameters can be defined:
- Visibility timeout: The length of time (in seconds) during which, after a message is received, it is hidden and cannot be received again by the same or other consumers. This is useful as the queue itself does not automatically delete messages once they are received, and so prevents consumers from receiving the same message many times before they have finished processing it. Therefore, the value set here should be informed by the expected length of time it will take consumers to process messages. The default value is 30 seconds. The value must be between 1 second and 43 200 seconds (12 hours).
- Message retention period: The length of time (in seconds) that messages are kept in the queue before being deleted. Setting a longer message retention period allows for a longer interval between a message being sent and it being received. The default value is 60 seconds. The value must be between 60 seconds and 1 290 600 seconds (14 days).
- Maximum message size: The maximum size (in kilobytes) of a message that can be sent to the queue. Messages greater than the defined size will be rejected. The default value is 256 KB. The value must be between 1 KB and 256 KB.
- Content Based Deduplication: This setting is only available for FIFO queues. Enable content-based deduplication if the message body is guaranteed to be unique for each message. A unique hash value is generated from the body of each message, which is used as its deduplication ID. This avoids the need to set a deduplication ID when sending messages.
- Dead-letter queue: Designate another queue to receive undelivered messages from this queue. If you select this option, you are prompted to select an existing queue as dead-letter queue. This queue must be of the same type, in the same Project and in the same region as the queue you are creating. You must also enter a value for the maximum receive count: how many times a message can be received by consumers from the source queue before being moved to the dead-letter queue.
-
Click Create queue to finish.
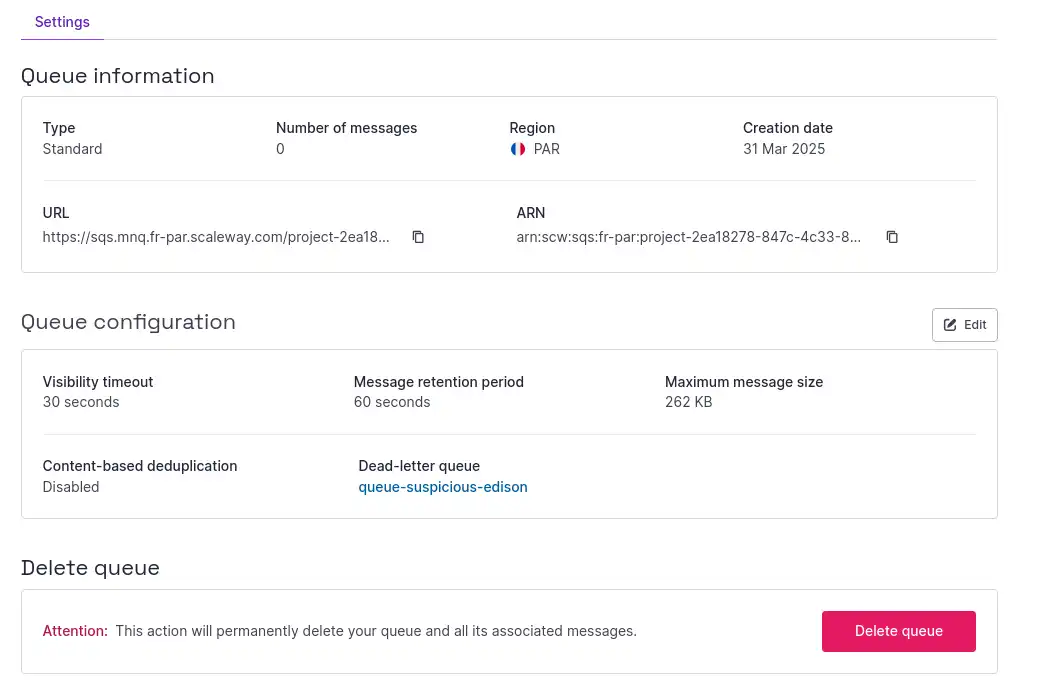
You are returned to the Queues tab, where your newly-created queue now displays. The queue's URL is also displayed here, for use in your API/CLI operations.
Go further by clicking on the queue's name to access its Settings page and see additional information such as its ARN (Amazon Resource Name) and configuration parameters.
How to modify a queue's configuration
You can modify the visibility timeout, message retention period and maximum message size of a queue after creation. You can also modify the content based deduplication settings for FIFO queues. However, you cannot change a queue's name or type after creation.
-
Click Queues in the Integration Services section of the Scaleway console side menu.
-
Use the drop-down menu to select the region of the queue you want to modify.
-
Click the queue you wish to modify. The queue's Settings page displays:
-
Modify the visibility timeout, message retention period, maximum message size, dead-letter queue settings, and (for FIFO queues) content-based deduplication values as you wish.
-
Click Save.
How to purge a queue of messages
You can use the Purge feature to delete all messages from a queue.
-
Click Queues in the Integration Services section of the Scaleway console side menu.
-
Use the drop-down menu to select the region of the queue you want to configure.
-
Either:
- Click the queue you wish to purge. The queue's Settings page displays. Click the Purge button in the top right corner.
- Click the more icon icon next to the queue you wish to purge, then select Purge from the menu that displays.
A pop-up asks you to confirm that you understand this action will delete all your queued messages.
-
Type PURGE and click Purge queue.
How to delete a queue
When you no longer want a queue, you can delete it. This action is irreversible and deletes the queue along with any queued messages.
-
Click Queues in the Integration Services section of the Scaleway console side menu.
-
Use the drop-down menu to select the region of the queue you want to configure.
-
Either:
- Click the queue you wish to delete. The queue's Settings page displays. Click the Delete queue button in the bottom right corner.
- Click the more icon icon next to the queue you wish to delete, then select Delete from the menu that displays.
A pop-up asks you to confirm that you understand this action will delete the queue and all your queued messages.
-
Type DELETE and click Delete queue.