NavigationContentFooter
Jump toSuggest an edit

How to get started with Messaging and Queuing

Reviewed on 01 February 2024Published on 03 October 2023

This page shows how to get started with Scaleway Messaging and Queuing. The process differs depending on the messaging protocol you want to use:

  • For NATS, you need to create a NATS account.
  • For SQS or SNS, you need to activate the protocol.

Both procedures are described in full below.

Before you start

To complete the actions presented below, you must have:

  • A Scaleway account logged into the console
  • Owner status or IAM permissions allowing you to perform actions in the intended Organization

How to create a NATS account

To start using a NATS message broker, you must first create a NATS account. This sets a scope for your NATS credentials, messages, queues and stream.

  1. Click Messaging in the Serverless section of the Scaleway console side menu. The following screen displays:

  2. Select a region from the drop-down menu. The region designates the geographical area where the NATS account will be hosted.

  3. Click NATS. The NATS welcome screen displays.

  4. Click Create a NATS account. The creation wizard displays:

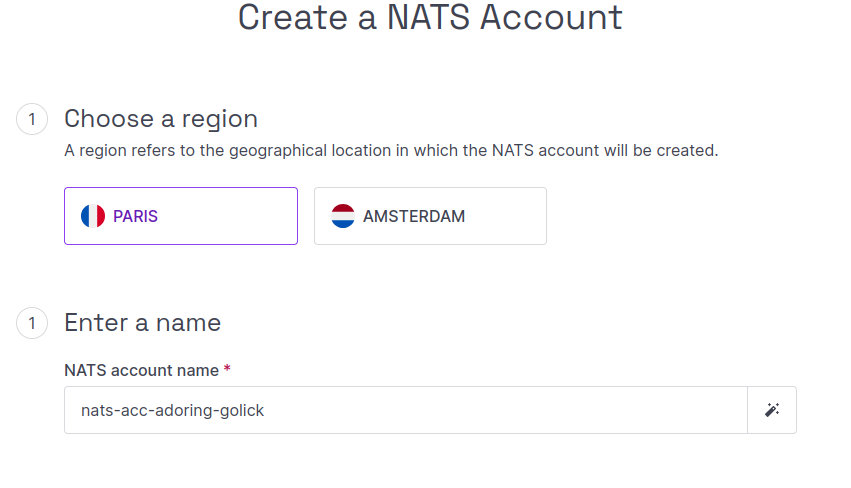
  5. Complete the following steps in the wizard:

    • Check the region, which is the geographical location in which your NATS account will be created. If you want to use a different region to the one shown, go back to step 2 to change it.
    • Enter a name for your NATS account, or use the auto-generated name suggested for you.
    • Optional: Use the Estimated cost* calculator to simulate how messages sent and stored with NATS streams will be billed. Note that simply creating a NATS account does not in itself incur any billing. For more information about NATS billing, see the FAQ.
    • Click Create NATS account to finish.

    You are directed to the listing of your NATS accounts, where your newly-created NATS account now appears.

    Tip

    You can create more NATS accounts in your pre-selected region if you wish, by clicking on the + Create NATS account button. To create NATS accounts in other regions, repeat the steps above starting from step 2 and selecting the required region.

How to activate SQS or SNS

SQS and SNS are handled as two separate protocols. Each one needs to be activated before you can start creating credentials, queues, topics, etc. for this protocol. You can choose to activate one or both protocols as you like. You can deactivate each protocol at any time.

  1. Click Messaging in the Serverless section of the Scaleway console side menu. The following screen displays:

  2. Select a region from the drop-down menu. The region designates the geographical area where the service will be hosted.

  3. Click Activate next to SQS or SNS, depending on the protocol you want to activate.

    A message displays prompting you to click a button to activate the protocol. It also reminds you that activating the protocol does not trigger any billing, and that you can deactivate at any time.

  4. Click Activate SQS (or SNS).

    The protocol is activated for the selected region, and you are invited to generate credentials. You can repeat these steps to activate the protocol for additional regions, if required.

See also
How to create credentials
Docs APIScaleway consoleDedibox consoleScaleway LearningScaleway.comPricingBlogCarreer
© 2023-2024 – Scaleway