Configuring an Apache Kafka Messaging Cluster
Apache Kafka is a versatile distributed messaging system, developed initially by LinkedIn to handle their growing need for message processing. It is a publish/subscribe messaging system that has an interface typical of messaging systems but a storage layer more like a log-aggregation system and can be used for various activities, from monitoring (collection of metrics, or the creation of dashboards), messaging (used for message queues in content feeds), activity tracking (from passive information like page views or clicks to more complex data like user-generated content) or a building block for distributed applications (distributed databases, distributed log systems).
The project started in 2010 at LinkedIn and was released to the open-source community on GitHub where it gained rapid attention. It became part of the Apache Foundation in 2011.
Kafka has been implemented by many companies of any size because of its flexibility, immense scalability (you can grow your Kafka cluster by adding additional brokers without any impact on the system and handle trillions of messages), and redundancy.
Before you start
To complete the actions presented below, you must have:
- A Scaleway account logged into the console
- Owner status or IAM permissions allowing you to perform actions in the intended Organization
- An SSH key
- A Scaleway Instance running on a Linux based distribution
What is a messaging system?
In today's applications, you have to handle enormous volumes of messages. Therefore a messaging system can facilitate your workflow. It is responsible for the transmission of data from one application to the other. Thus, the apps can focus on the data but do not need to worry about sharing it with other applications.
Two types of messaging systems exist:
- Point-to-point
- Publish/subscribe
In a point-to-point messaging system, messages are kept in a queue, and multiple consumers can consume the messages. Once a message is consumed it disappears from the queue.
A typical use case would be an order processing system. Several workers can consume messages one after another and the task assigned in the message can be fulfilled by the worker. The next task can be done by the next worker that consumes a message from the queue.
In a publish/subscribe system, messages are persisted in a topic. Unlike in a point-to-point system, consumers can subscribe to one or more topics and consume all messages on that topic. Different consumers can consume messages and remain on the topic so another consumer can receive the same information again. Kafka is a publish-subscribe messaging system.
Architecture of Apache Kafka
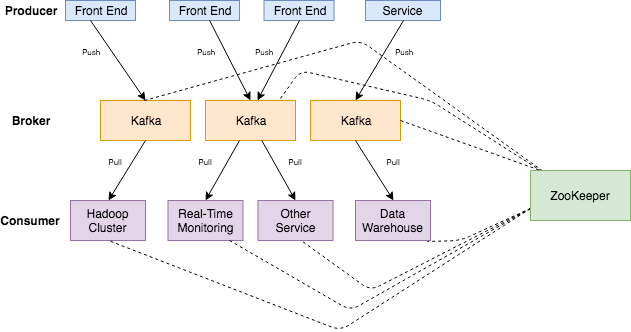
Kafka needs at least one server to run the application on, called broker, a cluster can consist of multiple brokers that can be distributed in different data centers and physical locations for redundancy and stability.
Brokers collect the messages sent by the producers. A message can be any kind of data and can be reported from different types of services, either log files or data collected by a sensor probe.
Kafka stores the data in topics. Topics can be seen as a table in a database or a folder in a file system. They contain the messages sent to Kafka.
Topics are split into partitions. For each topic, Kafka keeps a minimum of one partition. Each such partition contains messages in an unchangeable ordered sequence. A partition consists of a set of segment files of equal sizes.
Consumers can subscribe to one or multiple topics to consume the data in the topic.
Installing Kafka
Kafka is built in Scala and Java and can run on any platform that is capable of executing Java applications (for example Linux, Windows or macOS).
-
Update the system and download a Java environment as Kafka relies on it. Kafka 3.8.1 requires Java 11 or later. Install OpenJDK 17:
apt update && apt upgrade apt install openjdk-17-jdk -
Download Kafka and extract it
wget https://downloads.apache.org/kafka/3.8.1/kafka_2.13-3.8.1.tgz tar -zxf kafka_2.13-3.8.1.tgz mv kafka_2.13-3.8.1 /usr/local/kafka mkdir /tmp/kafka-logs -
Configure Kafka for KRaft Mode (ZooKeeper-less) and initialize the Kafka cluster:
/usr/local/kafka/bin/kafka-storage.sh format -t <cluster-id> -c /usr/local/kafka/config/kraft/server.propertiesEdit the
server.propertiesfile:process.roles=broker,controller node.id=1 controller.quorum.voters=1@localhost:9093,2@localhost:9094,3@localhost:9095 listeners=PLAINTEXT://localhost:9092,CONTROLLER://localhost:9093 listener.security.protocol.map=CONTROLLER:PLAINTEXT,PLAINTEXT:PLAINTEXT inter.broker.listener.name=PLAINTEXT log.dirs=/tmp/kafka-logs -
Start the Kafka Broker:
/usr/local/kafka/bin/kafka-server-start.sh /usr/local/kafka/config/kraft/server.properties
Creating a topic
Create a topic named test using the following command:
/usr/local/kafka/bin/kafka-topics.sh --create --topic test --bootstrap-server localhost:9092 --partitions 1 --replication-factor 1You should see the response: Created topic "test".
Sending messages
Use the Kafka producer tool to send messages:
/usr/local/kafka/bin/kafka-console-producer.sh --topic test --bootstrap-server localhost:9092Type messages and press CTRL+C to exit:
This is a test message
This is another test message
Starting a consumer
Use the Kafka consumer tool to read messages:
/usr/local/kafka/bin/kafka-console-consumer.sh --topic test --bootstrap-server localhost:9092 --from-beginningThe messages you sent will appear. Press CTRL+C to exit.
Starting a multi-broker cluster
We have now everything up and running for a single broker setup of Kafka. Let's configure a multi-broker setup for fault tolerance and redundancy.
If you configure Kafka for testing purposes you can run the different brokers on the same machine, however for redundancy it is recommended to run a production environment on multiple computers.
We will setup a cluster consisting of three Kafka brokers. This will allow us to keep the cluster running even if one broker fails.
-
Clone the configuration files:
cp /usr/local/kafka/config/kraft/server.properties /usr/local/kafka/config/server-1.properties
cp /usr/local/kafka/config/kraft/server.properties /usr/local/kafka/config/server-2.properties
Now we have to edit the configuration files to configure some parameters give a unique identifier to each instance.
-
Modify each configuration file:
server-1.properties:node.id=2 listeners=PLAINTEXT://localhost:9094 log.dirs=/tmp/kafka-logs-1server-2.properties:node.id=3 listeners=PLAINTEXT://localhost:9095 log.dirs=/tmp/kafka-logs-2
-
Start additional brokers:
/usr/local/kafka/bin/kafka-server-start.sh /usr/local/kafka/config/server-1.properties & /usr/local/kafka/bin/kafka-server-start.sh /usr/local/kafka/config/server-2.properties & -
Create a replicated topic:
/usr/local/kafka/bin/kafka-topics.sh --create --topic replicated-topic --bootstrap-server localhost:9092 --partitions 1 --replication-factor 3 -
Check cluster status:
/usr/local/kafka/bin/kafka-topics.sh --describe --bootstrap-server localhost:9092 --topic replicated-topic
Security best practices
-
Enable TLS/SSL to configure secure communication:
listeners=SSL://localhost:9092 ssl.keystore.location=/path/to/keystore.jks ssl.keystore.password=your-keystore-password ssl.key.password=your-key-password ssl.truststore.location=/path/to/truststore.jks ssl.truststore.password=your-truststore-password -
Use SASL or OAuth2 for authentication and define ACLs for resource access.
Importing and exporting data with Kafka Connect
Writing and consuming data on the console is a nice way to start, but you want probably to collect data from other sources or export data to other applications from Kafka. This can be done with Kafka Connect.
Kafka Connect is a tool that is included with Kafka and can be used to import and export data by running connectors, which implement the specific configuration for interacting with an external system.
In this tutorial, we will configure Kafka Connect to write data from a file to a Kafka topic and from a Kafka topic to a file.
-
Create some data to test
echo -e "foo\nbar" > test.txt -
Start two connectors in standalone mode:
/usr/local/kafka/bin/connect-standalone.sh /usr/local/kafka/config/connect-standalone.properties /usr/local/kafka/config/connect-file-source.properties /usr/local/kafka/config/connect-fileink.propertiesThese sample configuration files provided by Kafka use the local cluster configuration that we started earlier and create two connectors:
- a source connector that reads lines from an input file and passes each line of the file to a Kafka topic
- a sink connector that reads the messages from a Kafka topic and writes each as a line in an output file.
During startup, some log messages show up. Once the Kafka Connect process has started the source connector will begin reading lines from the file
test.txtand passing them to the topicconnect-test. The sink connector will start reading lines from the topicconnect-testand write them to the filetest.sink.txt. -
To check if everything has worked well, display the content of the output file:
cat test.sink.txt
foo
bar
As the messages remain in the Kafka topic we can also check them from a console consumer:
/usr/local/kafka/bin/kafka-console-consumer.sh --bootstrap-server localhost:9092 --topic connect-test --from-beginning
{"schema":{"type":"string","optional":false},"payload":"foo"}
{"schema":{"type":"string","optional":false},"payload":"bar"}
As the connectors continue to process data, we can add more content to the file:
echo More content>> test.txtThe line appears in the sink file as well as the console consumer.
Different connectors for various applications exist already and are available for download.
If you need a specific connector for your application you can develop one by yourself.
Kafka provides various APIs to automatize many tasks. If you want to learn more about Kafka, feel free to check their documentation.
Visit our Help Center and find the answers to your most frequent questions.
Visit Help Center