Deploying a WordPress blog backed by Scaleway Managed Database for MySQL 8
Learn how to set up your own WordPress blog on a Scaleway Instance, supported by a robust MySQL 8 database. Scaleway Managed Database for MySQL 8 offers up to 48 cores and 256 GB of RAM, ensuring optimal performance and reliability for your project.
WordPress, a PHP-based content management system, relies on MySQL to store its data. This tutorial will guide you through the technical steps of configuring WordPress on your Scaleway Instance, leveraging the power of MySQL 8.
With its customizable themes and extensive plugin ecosystem, WordPress provides unparalleled flexibility for developers and administrators to tailor the look and functionality of their blogs.
Before you start
To complete the actions presented below, you must have:
- A Scaleway account logged into the console
- Owner status or IAM permissions allowing you to perform actions in the intended Organization
- An SSH key
- An Instance running on Ubuntu Bionic Beaver (18.04 LTS) or Focal Fossa (20.04 LTS)
- A Database for MySQL v8
Preparing the managed database
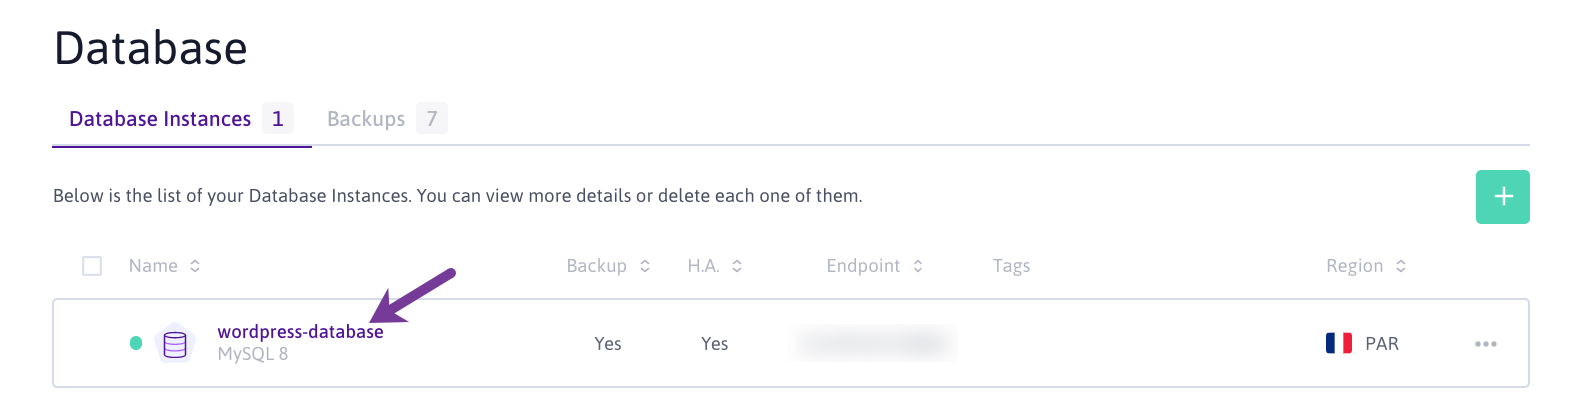
- Go to the Database section of your Scaleway console and choose your Database Instance from the list:
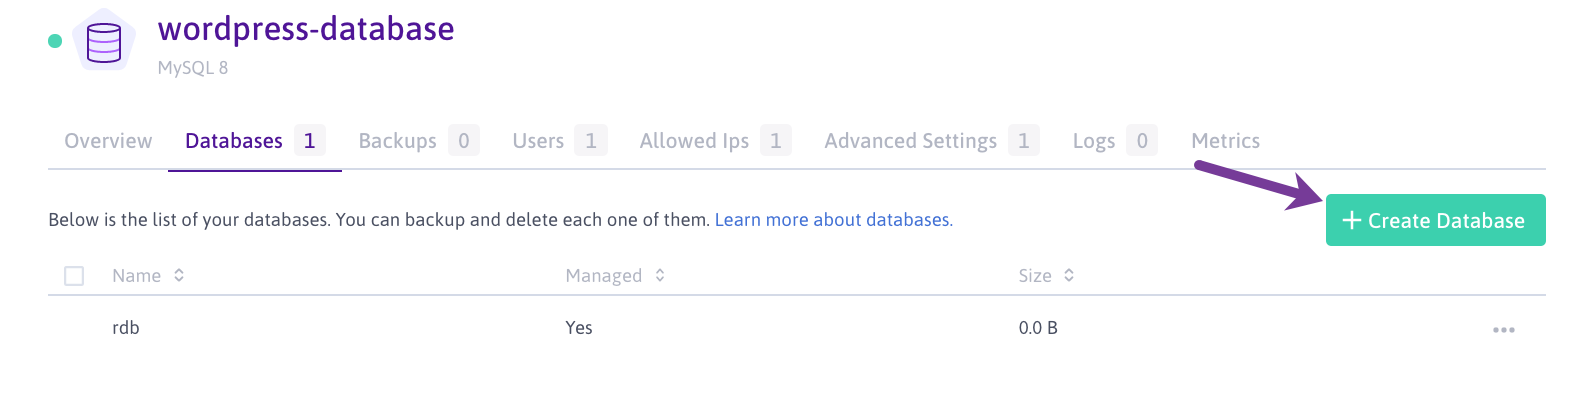
- Click the Managed Databases tab. A list of your existing databases displays. Click + Create Database to create a new database:
- Enter a name for your new database (for example,
wordpress) and confirm by clicking on Create Database: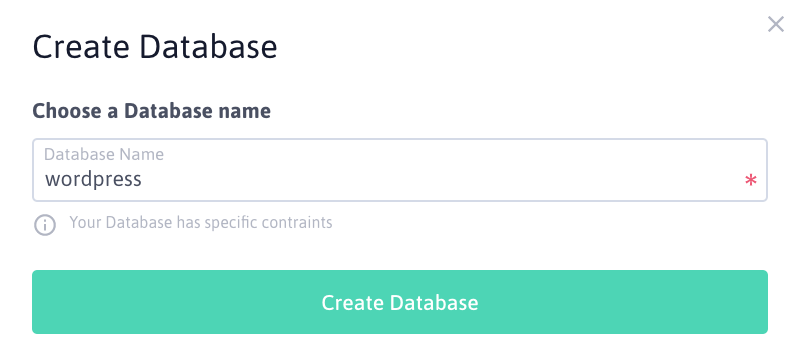
Securing the managed database
- Click the Allowed IPs tab to see the list of allowed IPs:
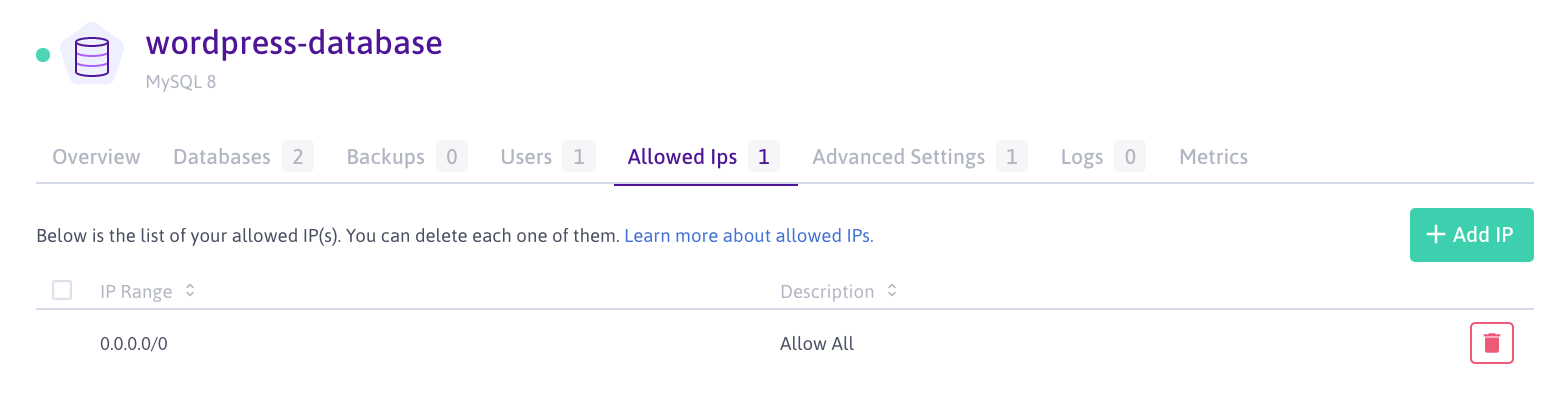
- Click Delete to delete the default rule (
0.0.0.0/0 Allow All). - Click Add IP and enter the IP of your Instance in CIDR notation (for example:
51.15.123.234/32). - Confirm by clicking the Add IP button.
Preparing the Instance
To host WordPress on our Instance, we need to install the required software on it. In this tutorial, we will use the Apache web server with PHP 7.4 to host our blog.
- Connect to your Instance using SSH.
ssh root@your_instance_ip - Update the
aptpackage manager and upgrade the software already installed on the machine to make sure you have installed the latest upgrades and security patches:apt update && apt upgrade -y - Install the Apache web server and PHP:
apt install apache2 libapache2-mod-php php-common php-mysql php-curl php-json php-mbstring php-xml php-zip php-gd php-soap php-ssh2 php-tokenizer
Downloading and installing WordPress
-
Download the latest WordPress release using
wget:wget -c http://wordpress.org/latest.tar.gz -
Unpack the downloaded file using the following
tarcommand:tar -xzvf latest.tar.gz -
Move the content of the
wordpressfolder to a directory under the document root for Apache by creating a new folder for your blog (i.e.blog.example.comif you want to host your blog at https://blog.example.com/).cp -R wordpress /var/www/html/blog.example.com -
Configure the ownership and file permissions on the blog directory. To make sure your blog works as expected, the directory should be owned by the Apache2 user and group called
www-data.chown -R www-data:www-data /var/www/html/blog.example.com chmod -R 775 /var/www/html/blog.example.com -
Enter the blog directory and create a
wp-config.phpfile by copying the example file shipped with the application.cd /var/www/html/blog.example.com cp wp-config-sample.php wp-config.php -
Open the configuration file in a text editor (for example,
nano) and edit the MySQL server configuration as follows: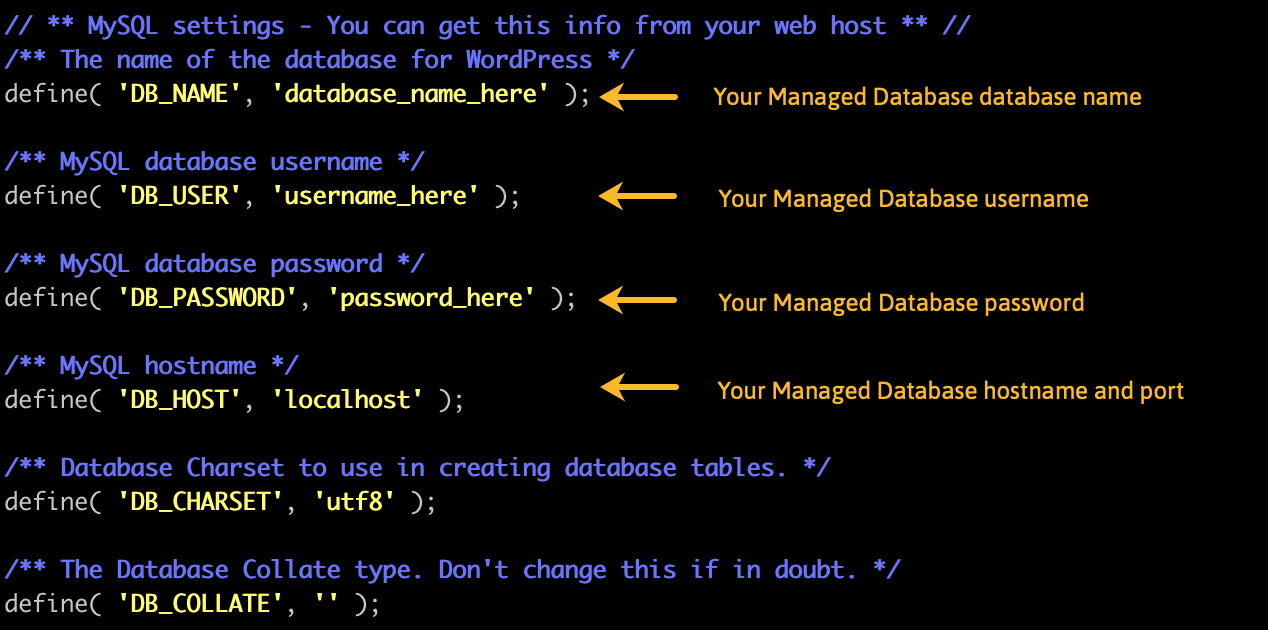
Edit the hostname for your Database in the form
database_ip_address:database_port, for example:51.15.151.53:6241.Save the file and exit
nano. -
Create an Apache configuration file for your new blog by opening it in a text editor, we use
nanoagain:nano /etc/apache2/sites-available/blog.example.com.confCopy and paste the following content into the file, then save it and quit the text editor:
<VirtualHost *:80> ServerName blog.example.com ServerAdmin webmaster@blog.example.com DocumentRoot /var/www/html/blog.example.com ErrorLog ${APACHE_LOG_DIR}/error.log CustomLog ${APACHE_LOG_DIR}/access.log combined </VirtualHost> -
Test the Apache configuration file for syntax errors.
apache2ctl -t -
If no errors appear, enable the new site and reload Apache2 to activate the configuration:
a2ensite blog.example.com
systemctl reload apache2.service
Securing the connection using TLS
By default, HTTP is a plain text protocol and does not use any encryption. To secure the connection between the client and the server, we are going to use the TLS protocol using a certificate issued by the Let's Encrypt certificate authority. We are going to use a tool, called certbot which manages the configuration of the Apache2 web server, the certificate creation, and renewal of it. Certbot is developed and maintained by the Electronic Frontier Foundation EFF.
-
Install the required dependencies to prepare the system.
apt install software-properties-common add-apt-repository universe apt update -
Install
certbotusing theaptpackage manager.apt install certbot python3-certbot-apache -
Run
certbotto configure the Apache2 web server and request the certificate for your domain name.certbot --apacheAnswer the prompts.
Saving debug log to /var/log/letsencrypt/letsencrypt.log
Plugins selected: Authenticator apache, Installer apache
Enter email address (used for urgent renewal and security notices) (Enter 'c' to
cancel): me@myemail.com <-- Enter your e-Mail address here, then press Enter to confirm

- - - - - - - - - - - - - - - - - - - - - - - - - - - - - - - - - - - - - - - -
Please read the Terms of Service at
https://letsencrypt.org/documents/LE-SA-v1.2-November-15-2017.pdf. You must
agree in order to register with the ACME server at
https://acme-v02.api.letsencrypt.org/directory
- - - - - - - - - - - - - - - - - - - - - - - - - - - - - - - - - - - - - - - -
(A)gree/(C)ancel: A <-- Type A to agree, confirm by pressing Enter

- - - - - - - - - - - - - - - - - - - - - - - - - - - - - - - - - - - - - - - -
Would you be willing to share your email address with the Electronic Frontier
Foundation, a founding partner of the Let's Encrypt project and the non-profit
organization that develops Certbot? We'd like to send you email about our work
encrypting the web, EFF news, campaigns, and ways to support digital freedom.
- - - - - - - - - - - - - - - - - - - - - - - - - - - - - - - - - - - - - - - -
(Y)es/(N)o: Y <-- Press Y to share your email address with the Electronic Frontier Foundation or N to refuse sharing your email address. Confirm your choice by pressing Enter.

Which names would you like to activate HTTPS for?
- - - - - - - - - - - - - - - - - - - - - - - - - - - - - - - - - - - - - - - -
1: blog.example.com
- - - - - - - - - - - - - - - - - - - - - - - - - - - - - - - - - - - - - - - -
Select the appropriate numbers separated by commas and/or spaces, or leave input
blank to select all options shown (Enter 'c' to cancel): 1 <-- Enter the appropriate numbers of the domain names you want to activate HTTPS for, leave the form empty to activate HTTPS for all domain names. Then confirm your choice by pressing Enter.
Obtaining a new certificate
Performing the following challenges:
http-01 challenge for blog.example.com
Enabled Apache rewrite module
Waiting for verification...
Cleaning up challenges
Created an SSL vhost at /etc/apache2/sites-available/blog.example.com-le-ssl.conf
Enabled Apache socache_shmcb module
Enabled Apache ssl module
Deploying Certificate to VirtualHost /etc/apache2/sites-available/blog.example.com-le-ssl.conf
Enabling available site: /etc/apache2/sites-available/blog.example.com-le-ssl.conf

Please choose whether to redirect HTTP traffic to HTTPS, removing HTTP access.
- - - - - - - - - - - - - - - - - - - - - - - - - - - - - - - - - - - - - - - -
1: No redirect - Make no further changes to the webserver configuration.
2: Redirect - Make all requests redirect to secure HTTPS access. Choose this for
new sites, or if you're confident your site works on HTTPS. You can undo this
change by editing your web server's configuration.
- - - - - - - - - - - - - - - - - - - - - - - - - - - - - - - - - - - - - - - -
Select the appropriate number [1-2] then [enter] (press 'c' to cancel): 2 <-- Type 2 to redirect all HTTP connections to HTTPS, type 1 to your visitors decide if they want to use HTTP or HTTPS. Confirm your choice by pressing Enter

Enabled Apache rewrite module
Redirecting vhost in /etc/apache2/sites-enabled/blog.example.com.conf to ssl vhost in /etc/apache2/sites-available/blog.example.com-le-ssl.conf

- - - - - - - - - - - - - - - - - - - - - - - - - - - - - - - - - - - - - - - -
Congratulations! You have successfully enabled https://blog.example.com

You should test your configuration at:
https://www.ssllabs.com/ssltest/analyze.html?d=blog.example.com
- - - - - - - - - - - - - - - - - - - - - - - - - - - - - - - - - - - - - - - -

IMPORTANT NOTES:
- Congratulations! Your certificate and chain have been saved at:
  /etc/letsencrypt/live/blog.example.com/fullchain.pem
  Your key file has been saved at:
  /etc/letsencrypt/live/blog.example.com/privkey.pem
  Your cert will expire on 2020-09-21. To obtain a new or tweaked
  version of this certificate in the future, simply run certbot again
  with the "certonly" option. To non-interactively renew *all* of
  your certificates, run "certbot renew"
- Your account credentials have been saved in your Certbot
  configuration directory at /etc/letsencrypt. You should make a
  secure backup of this folder now. This configuration directory will
  also contain certificates and private keys obtained by Certbot so
  making regular backups of this folder is ideal.
- If you like Certbot, please consider supporting our work by:

  Donating to ISRG / Let's Encrypt:   https://letsencrypt.org/donate
  Donating to EFF:                    https://eff.org/donate-le
You have now successfully requested a TLS certificate for your blog. The connection between your visitors and the server is encrypted and secured.
Configuring WordPress
Now, as WordPress is successfully installed and connections between your users and the server are using a secure HTTPS connection, it is time to finally configure your blog.
- Open your web browser and type your blog's URL in the address bar of your web browser (for example:
https://blog.example.com). - The WordPress installation wizard displays. Choose the desired language for your blog from the list and click Continue:

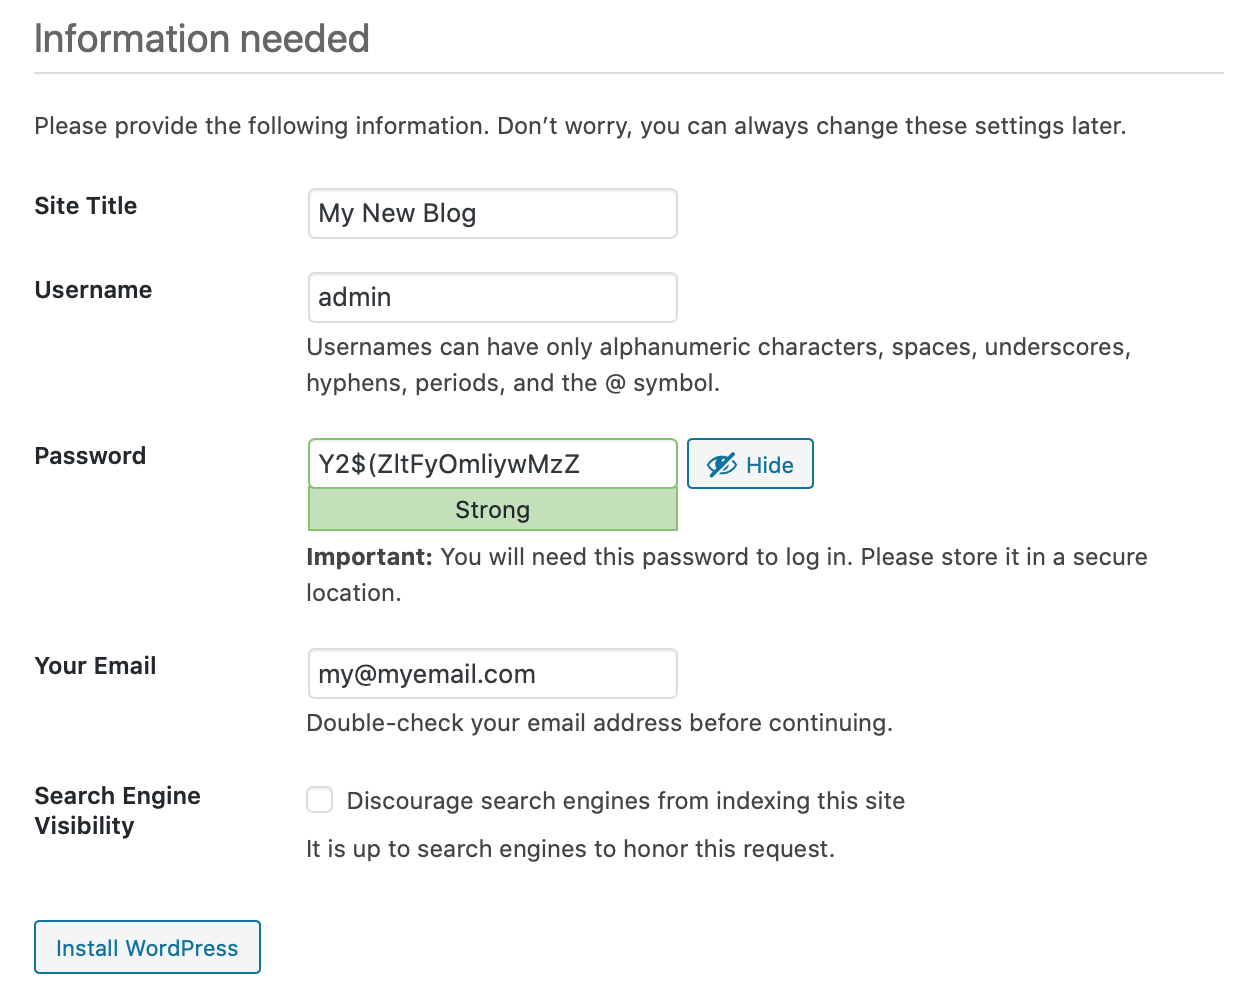
- Enter the details of your new blog, such as the title, choose a name for the admin user, and set a secret password. Then click Install WordPress to complete the installation of your blog:
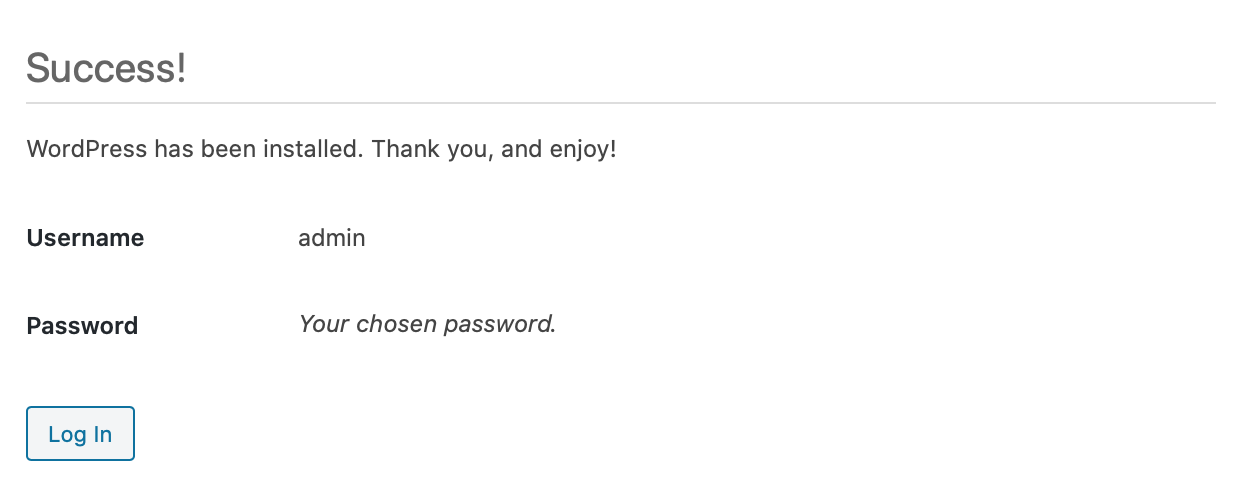
- You can now log in to your blog and write your first articles, or configure the look and feel by installing additional themes and modules.
You have installed and configured your blog using a powerful Scaleway Database for MySQL 8, in which all your blog's content and information is stored. For more information on how to customize your WordPress installation, refer to the official WordPress developer documentation.
Visit our Help Center and find the answers to your most frequent questions.
Visit Help Center