First steps with the Linux command line
This tutorial shows you how to get started with the Linux command line (also known as the terminal).
You may be used to using a Graphical User Interface (GUI) for your machine, such as Windows or MacOS. These GUIs make it easy to do everything visually, with clicks of your mouse to open, and close programs and complete thousands of different tasks.
However, when you provision a virtual or remote machine such as a Scaleway Instance, Dedibox, or Elastic Metal server it is more usual to use the text-based command line, rather than a GUI, to operate the machine. While GUIs are user-friendly, the command line is much more powerful, uses fewer of the machine's resources (leaving more compute power to be used elsewhere), is less laggy, and more efficient.
Even if you are using a GUI on your own local machine, you can also choose to use the command line by opening a terminal application in your GUI, to start carrying actions via the command line instead of the graphical interface.
When you are faced with operating a machine via the command line for the first time, this can be confusing and frustrating. This document aims to show you some of the basic principles of using a command line instead of a graphical interface. We will guide you through a series of hands-on exercises to practice some of the main commands you need to get started.
In this document, we cover commands for a Linux command line. If you are using a Windows command line, we recommend that you refer to the Windows documentation, as the commands differ. In the context of virtual machines and servers, a Linux-based OS is generally the go-to choice. Unlike Windows, Linux OSes do not require paid-for licenses; they are free and open source.
Before you start
To complete the actions presented below, you must have:
- Provisioned a virtual/remote machine running a Linux OS and connected to its command line via SSH or you are using a physical machine running a Linux OS or MacOS, and have opened the terminal.
The command prompt
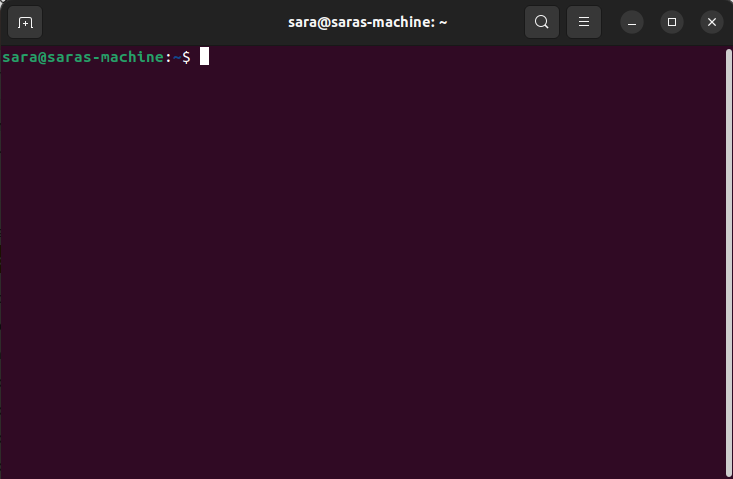
When you are first connected to the command line (aka the shell), you will see a command prompt which should look something like this:
username@machine-name:~$The exact prompt will vary depending on the setup of your individual machine. But generally, it will display your username on the machine, followed by an @ and the name of the machine itself.
The ~ indicates that you are in your home directory.
The $ signals the end of the command prompt (if you are logged in as root you may see a # instead of a $).
Where am I? The working directory - pwd
The working directory is also known as the current directory. It represents the directory you are currently in, in the command line. You can imagine a graphical file system with many different folders, each themselves containing more subfolders and files. Whenever you are in the terminal, you are "in" a particular directory (or folder) somewhere within this file system tree.
To find out where you are (i.e. what your working directory is), use the pwd command. It stands for print working directory. Type it into your terminal and hit enter:
pwdYou see an output that prints your current working directory to the screen, for example:
/home/usernameMoving between directories - cd
You can move between directories with the cd command. It stands for change directory.
-
Go one directory "upwards" in the file system, i.e. a step closer to the root, by using the command
cdfollowed by..:cd .. -
Repeat the
pwdcommand to check your new working directory:pwdThe working directory now displays, for example:
/home -
Go one directory "downwards" in the file system, i.e. into a subdirectory of your current directory, by using the command
cdfollowed by the directory name. Assuming you are now in thehomedirectory, use the command below replacingusernamewith your own username, to move back into the directory where you started:cd username
Listing the contents of a directory - ls
You can use the ls command to list the contents of your working directory. It stands for list.
-
List the subdirectories and files in your current working directory with
ls:lsThe output will depend on the contents of your particular directory, but you may see something like the following:
Documents Music Templates Desktop Pictures config.txt Downloads Public Videos -
Practice the
cdcommand again by changing the directory into one of the subdirectories listed, checking the contents withpwd, and then usingcd ..to change back to the upper directory again:cd Documents- You change into the Documents directory.
pwd- You see an output showing the contents of the Documents directory.
cd ..- You change back into the Documents directory.
Make a new directory - mkdir
You can make a new directory with the mkdir command. It stands for make directory.
-
Make a new directory with
mkdirfollowed by the name of the directory you want to create:mkdir my-directory -
Use
lsto confirm that the directory is created:lsYou see
my-directorythat you just created, listed in the contents of the current working directory. -
Move into the directory you just created:
cd my-directory
Make a new file - touch
You can make a new file, without any content, with the touch command.
-
Make a new file called
my-text-file.txtwith the touch command:touch my-text-file.txt -
Use
lsto confirm that the file is created:lsThe filename should now display among the rest of the output.
Edit a text file - nano
There are many different programs you can use to edit text in the command line of Linux. Some of these include Vim, GNU Emacs and ne. However, for this tutorial, we will use nano. It is pre-installed on most Linux distributions, and relatively easy to use for beginners.
-
Make sure you are in the same working directory as the text file you created in the previous step, and then open the text file with nano:
nano my-text-file.txtNano opens the file and you see a screen like the following:
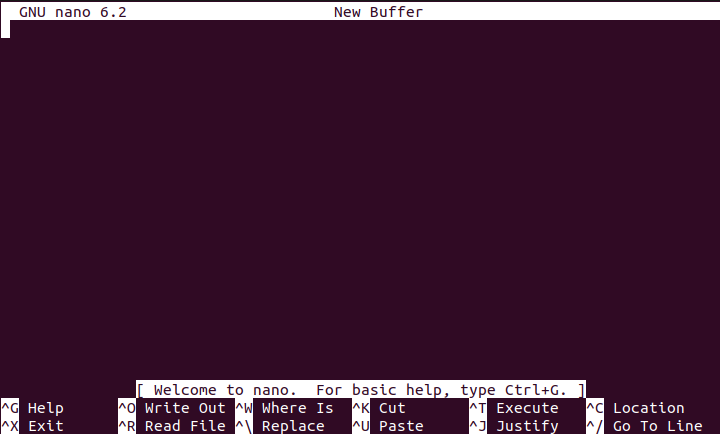
The information at the bottom tells you the keyboard shortcuts for different actions within the file. Depending on your keyboard, a command such as
CTRL + Xwill exit the file and take you back to the command line, whereas you can useCTRL + Kto cut text, etc. -
Enter some text into the file, for example:
Hello world! This is my first text file in Linux. -
Use
CTRL+Oto save ("write out") the file, and hit enter when asked to confirm. -
Use
CTRL+Xto exit the file and go back to the command line.
Display the contents of a file - cat
You can display the contents of a file on the command line, without opening the file itself, using the cat command. It stands for concatenate. This is because it is frequently used to concatenate the contents of multiple files together. However, here we will just look at its most simple, basic usage.
-
Make sure you are in the same working directory as the text file you created in the previous step, and display its contents with
cat:cat my-text-file.txtThe contents of your text file display on the command line:
Hello world!
This is my first text file in Linux
You can also use
catto put the contents of the text file, into a new text file, as we see next. -
Copy the contents of
my-text-file.txtinto a new text file calledanother-text-file.txt, with the following command:cat my-text-file.txt > another-text-file.txt -
Display the contents of the new text file:
cat another-text-file.txtThe contents of the new text file display on the command line. Of course, the contents are identical, as it is simply a copy of the first file:
Hello world!
This is my first text file in Linux
Moving or copying files and directories - mv and cp
You can move files and directories with the mv (move) and cp (copy) commands.
-
Create a new directory called dir-2 with the following command, as we saw earlier:
mkdir dir-2 -
Make sure you are in the same working directory as the file
my-text-file.txtthat you previously created, and then copy into the directory created in step 1 with the following command:cp my-text-file.txt dir-2 -
Use
cdandlistto move into the new directory and check that the text file has been copied:cd dir-2 lsYou should see the name of the file (
my-text-file.txt) when displaying the directory contents withls. -
Use
cdto move back to the previous directory, and check that the original text file still exists there too:cd .. lsYou should see the name of the file (
my-text-file.txt) when displaying the directory contents withls. Thecpsimply made a new copy for the new folder. -
Make a new text file with the following command. Notice that here instead of using
touchto create an empty file, we usenanoto directly create and edit the new file:nano second-text-file.txtNano opens the empty file.
-
Add the following text to the file, then save and exit as shown before:
This is a new text file. I'm a Linux pro now. -
Use
mvto movesecond-text-file.txtinto thedir-2directory you previously created:mv second-text-file.txt dir-2 -
List contents of the current directory, to see that
second-text-file.txtis no longer there:ls -
Use the following commands to change your working directory to
dir-2and see thatsecond-text-file.txthas been moved there:cd dir-2 ls
Deleting files and directories - rm
You can remove files and directories with the rm (remove) command.
-
Navigate to the directory where
my-text-file.txtis located, and delete the file with the following command:rm my-text-file.txt -
With
cd, navigate to the directory where you createddir-2(do not go intodir-2, stay in its parent directory).The command to remove the directory depends on whether or not it is empty.
- If there are no files in the directory use
rm -d dir-2 - If there are files (or other directories) in the directory, use
rm -r dir-2
- If there are no files in the directory use
-
Delete the
dir-2 directory(which we presume still has other files inside):rm -r dir-2
Running commands as the superuser - sudo
When you first install Linux, the only user that exists is root, which has inherent "superuser" administrative powers. It is not generally advisable to stay permanently logged in as the superuser, for reasons of security. Instead, you should create a "normal" user account and use that when carrying out operations on your machine.
But as a "normal" user, you will not have permission for everything, such as updating and upgrading software. To carry out this kind of operation, you will need to prefix your command with sudo (superuser do).
You are usually prompted to enter a password when you enter a sudo command, to ensure that you have the right permissions. After you have entered your password once, you will not be asked to enter it on subsequent sudo commands for a little while.
Carry on to the next section to see how to update and upgrade your system's software, using sudo.
Updating the system and installing new applications - apt
You can use apt, the command for the Advanced Package Tool, to install, update, delete, and manage software packages on Linux systems like Ubuntu and Linux Mint.
In this context, "package" essentially refers to software. On Linux, software is usually built as a package, distributed across remote repositories, and managed by users like you via package managers on their local machines.
You need to use sudo for these commands.
-
Update the software packages on your system with the following command:
sudo apt updateAPT will fetch the latest information (about versions, indexes, etc) for packages on your system.
-
Upgrade the software packages on your system with the following command:
sudo apt upgradeAPT will use the information it gained in the previous step, to now actually fetch the new versions of the machine's packages and bring everything up to date.
You will probably see a message like this:
After this operation, 19,5 kB of additional disk space will be used.
Do you want to continue? [Y/n]
Hit
yon your keyboard and then Enter, to continue.Your system's software is updated and upgraded.
-
Install a new software package on your system. In this example, we install the text editor
ne:sudo apt install neThe
nepackages are installed. -
Open
neby typing its name:neThe text editor opens. You can play around with this text editor, or type
CTRL+Qto exit.
Creating and logging into new user accounts - adduser, usermod, and su
As previously mentioned, when you first install Linux, the only user that exists is root, which has inherent "superuser" administrative powers. It is not generally advisable to stay permanently logged in as the superuser, for reasons of security. Instead, you should create a "normal" user account and use that when carrying out operations on your machine.
When creating user accounts, you need to either be logged in as root, or else to prefix these commands with sudo.
-
Create a new user with the
addusercommand. Replace sarah with the username of your choice.sudo adduser k8sYou will be prompted to add a password for this user. Then you will be prompted to add optional information such as first name, surname, and telephone number. You can hit enter to skip adding each optional piece of information. Hit
ywhen prompted to confirm and create the user.Adding user `sarah' ... Adding new group `sarah' (1003) ... Adding new user `sarah' (1003) with group `sarah' ... Creating home directory `/home/sarah' ... Copying files from `/etc/skel' ... New password: Retype new password: passwd: password updated successfully Changing the user information for sarah Enter the new value, or press ENTER for the default Full Name []: Sarah Room Number []: 3 Work Phone []: Home Phone []: Other []: Is the information correct? [Y/n] yYou can see that a home directory has been automatically created for the new user.
-
Give the new user sudo privileges, so that they can carry out actions like updating software with the
sudoprefix. This is done via the usermod command (user modification):sudo usermod -aG sudo sarah -
Log in as the new user with the
su(switch User) command:su sarah
Linux commands summary and cheatsheet
The table below provides a summary of everything we covered in this tutorial.
| Command | |
|---|---|
| Print your working directory | pwd |
| Move one directory 'upwards' | cd .. |
| Move into a directory that's inside your working directory | cd name-of-directory |
| Move into a directory that's elsewhere | cd /path/name-of-directory |
| Move into the home directory | cd ~ |
| List the contents of a directory | ls |
| Make a new directory | mkdir name-of-directory |
| Make a new empty file | touch name-of-file |
| Open nano to edit a text file | nano name-of-file |
| Display the contents of a file | cat name-of-file |
| Copy the contents of a file into a new file | cat my-file.txt > new-file.txt |
| Create a copy of a file and put it in a specific directory | cp my-file.txt target-directory |
| Move a file into a specific directory | mv my-file.txt target-directory |
| Delete a file | rm name-of-file |
| Delete an empty directory | rm -d name-of-directory |
| Delete a non-empty directory | rm -r name-of-directory |
| Run a command as the superuser | sudo command |
| Update the software packages on your system | sudo apt update |
| Upgrade the software packages on your system | sudo apt upgrade |
| Create a new user | sudo adduser name-of-user |
| Give a user sudo privileges | sudo usermod -aG sudo name-of-user |
| Log in as a different user | su name-of-user |
Visit our Help Center and find the answers to your most frequent questions.
Visit Help Center