Running a messaging platform with RocketChat
Rocket.Chat is a free and open-source team chat software solution. It provides features like audio and video conferencing, guest access, screen sharing, file sharing, LiveChat, LDAP Group Sync, two-factor authentication (2FA), E2E encryption, SSO, and more. The tool uses MongoDB as a database and the JavaScript runtime Node.js.
Before you start
To complete the actions presented below, you must have:
- A Scaleway account logged into the console
- Owner status or IAM permissions allowing you to perform actions in the intended Organization
- An SSH key
- An Instance running on Ubuntu Focal Fossa (20.04 LTS)
- A domain name pointed to your Instance
sudoprivileges or access to the root user
Preparing the Instance
- Update the APT package cache, upgrade the software already installed on the Instance to the latest version available, and install
curl.sudo apt update && sudo apt upgrade -y && sudo apt -y install curl - Add the key used by apt to install the official MongoDB® packages:
curl -fsSL https://www.mongodb.org/static/pgp/server-7.0.asc | \ sudo gpg -o /usr/share/keyrings/mongodb-server-7.0.gpg \ --dearmor - Create an apt sources list by running the following command:
echo "deb [ arch=amd64,arm64 signed-by=/usr/share/keyrings/mongodb-server-7.0.gpg ] https://repo.mongodb.org/apt/ubuntu jammy/mongodb-org/7.0 multiverse" | sudo tee /etc/apt/sources.list.d/mongodb-org-7.0.list - Prepare the installation of Node.js.
sudo apt -y update && curl -fsSL https://deb.nodesource.com/setup_22.x -o nodesource_setup.sh - Run the Node.js setup script with sudo:
sudo -E bash nodesource_setup.sh - Install MongoDB, Node.js, graphicsmagick and build tools.
sudo apt-get install -y build-essential mongodb-org nodejs graphicsmagick
Installing Rocket.Chat
- Download the latest version of Rocket.Chat:
curl -L https://releases.rocket.chat/latest/download -o /tmp/rocket.chat.tgz - Extract the downloaded file:
tar -xzf /tmp/rocket.chat.tgz -C /tmp - Launch the installation of the application:
cd /tmp/bundle/programs/server && npm install --production - Move the application to its final destination:
sudo mv /tmp/bundle /opt/Rocket.Chat
Configuring the Rocket.Chat service
-
Create a user under which the application will run.
useradd -M rocketchat && usermod -L rocketchat -
Set the ownership and permissions of the application.
chown -R rocketchat:rocketchat /opt/Rocket.Chat -
Create the
lib/systemd/system/rocketchat.servicefile and open it in your favorite text editor. Copy the following content to create a service file for Rocket.chat:[Unit] Description=Rocket.Chat Server After=network.target remote-fs.target nss-lookup.target nginx.target mongod.target [Service] ExecStart=/usr/local/bin/node /opt/Rocket.Chat/main.js StandardOutput=syslog StandardError=syslog SyslogIdentifier=rocketchat User=rocketchat Environment=MONGO_URL=mongodb://localhost:27017/rocketchat ROOT_URL=http://rocketchat.example.com/ MONGO_OPLOG_URL=mongodb://localhost:27017/local?replSet=rs01 PORT=3000 [Install] WantedBy=multi-user.target
Configuring a MongoDB® replica set
We recommend you use the MongoDB® replica set to improve Rocket.Chat's performance with Meteor Oplog tailing.
-
Run the following code to add a replica set to your MongoDB® configuration:
echo -e "replication:\n replSetName: \"rs01\"" | tee -a /etc/mongod.conf -
Enable and start the MongoDB® service.
systemctl enable mongod.service && systemctl start mongod.service -
Connect to the MongoDB® shell and initiate the replica set with
rs.initiate().mongo > rs.initiate()An output like the following appears:
{ "info2" : "no configuration specified. Using a default configuration for the set", "me" : "127.0.0.1:27017", "ok" : 1, "operationTime" : Timestamp(1548866987, 1), "$clusterTime" : { "clusterTime" : Timestamp(1548866987, 1), "signature" : { "hash" : BinData(0,"AAAAAAAAAAAAAAAAAAAAAAAAAAA="), "keyId" : NumberLong(0) } } } rs01:SECONDARY> -
Press Enter on your keyboard. The following output indicates that the replica set is being used:
rs01:PRIMARY> -
Leave the MongoDB® shell.
rs01:PRIMARY> exit
bye
Configuring an Nginx reverse proxy
Rocket.Chat functions as a server on its own, but adding an Nginx Reverse Proxy adds a layer of security, advanced load balancing, and acceleration features that the application does not provide by itself.
-
Install Nginx:
apt install nginx -
Create and open the
/etc/nginx/sites-available/rocketchat.example.comfile and paste the following content into it to create a proxy server block for Rocket.Chat:# Upstreams upstream backend { server 127.0.0.1:3000; } # Proxy Server server { listen 80; server_name rocketchat.example.com; # You can increase the limit if you need to. client_max_body_size 200M; error_log /var/log/nginx/rocketchat.access.log; location / { proxy_pass http://backend/; proxy_http_version 1.1; proxy_set_header Upgrade $http_upgrade; proxy_set_header Connection "upgrade"; proxy_set_header Host $http_host; proxy_set_header X-Real-IP $remote_addr; proxy_set_header X-Forward-For $proxy_add_x_forwarded_for; proxy_set_header X-Forward-Proto http; proxy_set_header X-Nginx-Proxy true; proxy_redirect off; } } -
Create a symbolic link to activate the proxy in Nginx:
ln -s /etc/nginx/sites-available/rocketchat.example.com /etc/nginx/sites-enabled/rocketchat.example.com -
Test the configuration for syntax errors.
nginx -tIf the syntax is correct you see an output like the following:
nginx: the configuration file /etc/nginx/nginx.conf syntax is ok nginx: configuration file /etc/nginx/nginx.conf test is successful -
Install Certbot to generate a Let's Encrypt SSL certificate to encrypt the connection to your Rocket.Chat Instance:
apt install software-properties-common add-apt-repository ppa:certbot/certbot apt update apt-get install python3-certbot-nginx -
Run Certbot to request a certificate and to make the required changes to the Nginx configuration:
certbot --nginxCertbot will ask you several questions and you should see an output like the following when you have completed the generation of the certificate:
Plugins selected: Authenticator nginx, Installer nginx
Enter email address (used for urgent renewal and security notices) (Enter 'c' to
cancel): me@example.com

- - - - - - - - - - - - - - - - - - - - - - - - - - - - - - - - - - - - - - - -
Please read the Terms of Service at
https://letsencrypt.org/documents/LE-SA-v1.2-November-15-2017.pdf. You must
agree in order to register with the ACME server at
https://acme-v02.api.letsencrypt.org/directory
- - - - - - - - - - - - - - - - - - - - - - - - - - - - - - - - - - - - - - - -
(A)gree/(C)ancel: a

- - - - - - - - - - - - - - - - - - - - - - - - - - - - - - - - - - - - - - - -
Would you be willing to share your email address with the Electronic Frontier
Foundation, a founding partner of the Let's Encrypt project and the non-profit
organization that develops Certbot? We'd like to send you email about our work
encrypting the web, EFF news, campaigns, and ways to support digital freedom.
- - - - - - - - - - - - - - - - - - - - - - - - - - - - - - - - - - - - - - - -
(Y)es/(N)o: n

Which names would you like to activate HTTPS for?
- - - - - - - - - - - - - - - - - - - - - - - - - - - - - - - - - - - - - - - -
1: rocketchat.example.com
- - - - - - - - - - - - - - - - - - - - - - - - - - - - - - - - - - - - - - - -
Select the appropriate numbers separated by commas and/or spaces, or leave input
blank to select all options shown (Enter 'c' to cancel):
Obtaining a new certificate
Performing the following challenges:
http-01 challenge for rocketchat.example.com
Waiting for verification...
Cleaning up challenges
Deploying Certificate to VirtualHost /etc/nginx/sites-enabled/rocketchat.example.com

Please choose whether or not to redirect HTTP traffic to HTTPS, removing HTTP access.
- - - - - - - - - - - - - - - - - - - - - - - - - - - - - - - - - - - - - - - -
1: No redirect - Make no further changes to the webserver configuration.
2: Redirect - Make all requests redirect to secure HTTPS access. Choose this for
new sites, or if you're confident your site works on HTTPS. You can undo this
change by editing your web server's configuration.
- - - - - - - - - - - - - - - - - - - - - - - - - - - - - - - - - - - - - - - -
Select the appropriate number [1-2] then [enter] (press 'c' to cancel): 2
Redirecting all traffic on port 80 to ssl in /etc/nginx/sites-enabled/rocketchat.example.com

- - - - - - - - - - - - - - - - - - - - - - - - - - - - - - - - - - - - - - - -
Congratulations! You have successfully enabled https://rocketchat.example.com

You should test your configuration at:
https://www.ssllabs.com/ssltest/analyze.html?d=rocketchat.example.com
- - - - - - - - - - - - - - - - - - - - - - - - - - - - - - - - - - - - - - - -
Setting up the Rocket.Chat service
-
Start and enable the Rocket.Chat service.
systemctl enable rocketchat.service && systemctl start rocketchat.service -
Restart the Nginx web proxy.
systemctl restart nginx.service -
Open your web browser and type your domain name, for example:
https://rocketchat.example.com/. The Rocket.Chat setup wizard appears in your browser.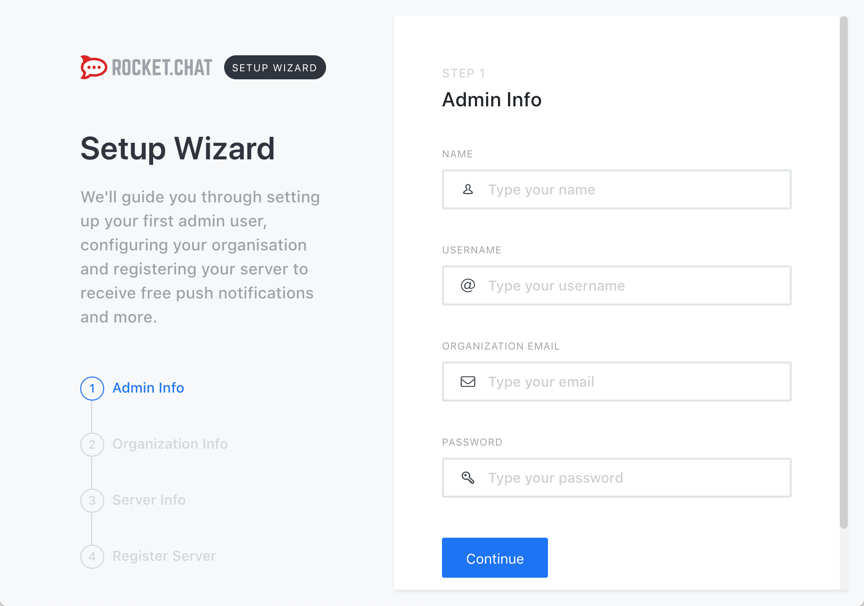
Enter your personal information:
- Your name
- Your admin username
- Your email address
- Your password.
-
Click Continue.
-
Fill in the required information and click Continue.
-
Fill in your site name, language, and if you want to have a private or public community. Click Continue.
In the last step of the setup, you are asked if you want to keep your server as a stand-alone Instance or if you want to register it with Rocket.Chat to have access to additional functions and resources.
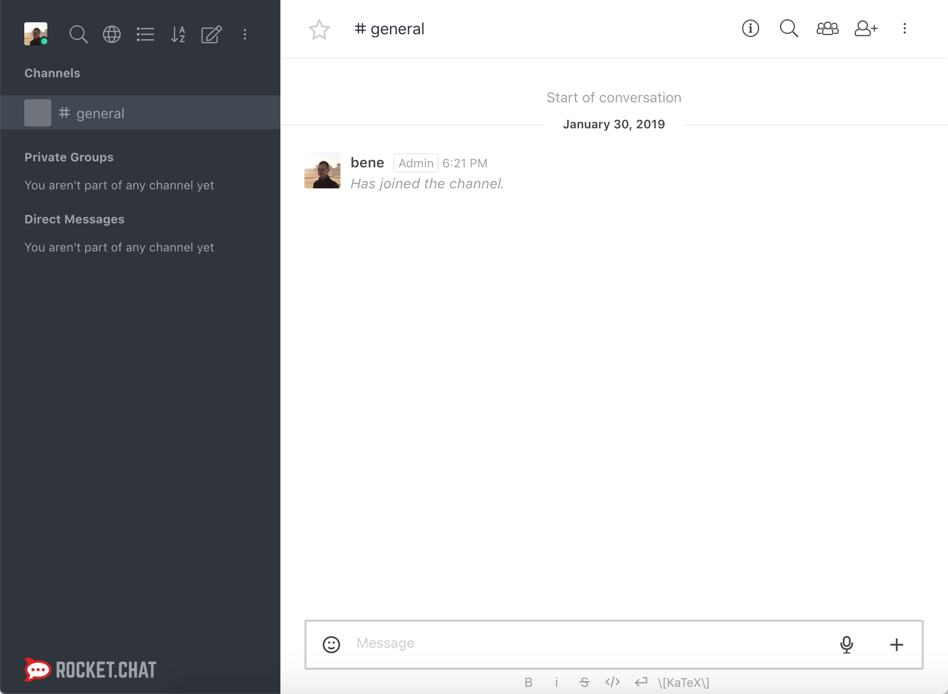
-
Access your Rocket.Chat and be the first user in the #general channel.
-
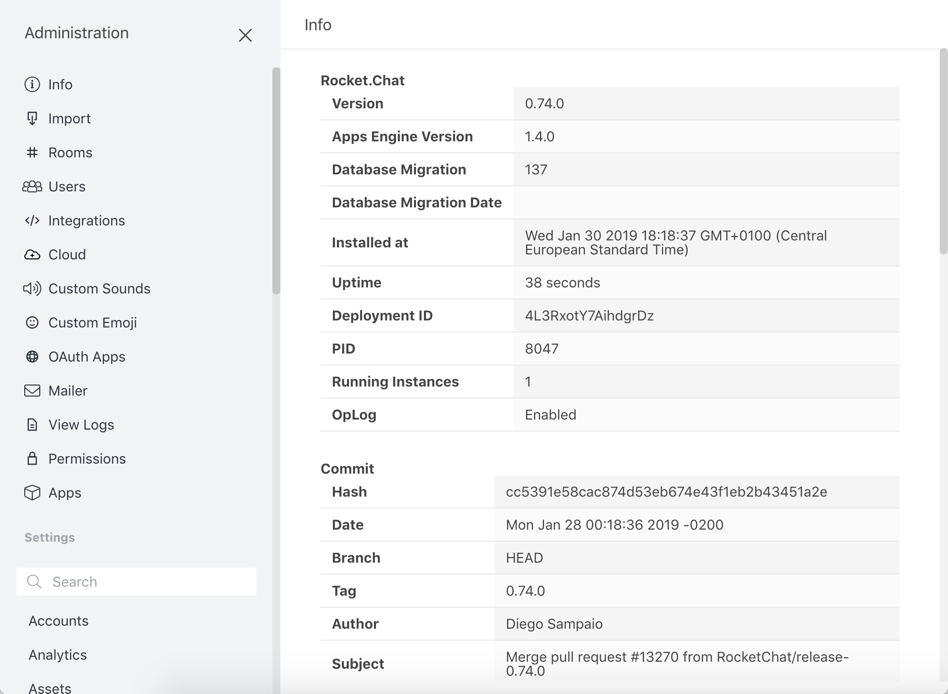
Click the menu button, then Administration to access the admin interface of your Instance. Here you can configure the look and feel of your Instance as well as additional services like an IRC bridge, bots or OAuth services:
To use Rocket.Chat directly on your PC or Mac or from your mobile, download the free application directly from the Rocket.Chat website. For more information and advanced configuration settings of your community, refer to the official documentation.
Visit our Help Center and find the answers to your most frequent questions.
Visit Help Center