Setting up Nginx as a reverse proxy with Scaleway Object Storage
Scaleway Object Storage provides the capability to securely store unlimited data within designated buckets. Accessing your stored data is convenient and direct, facilitated through your storage bucket.
For optimized access, you can use an Instance as a proxy, leveraging the power of Nginx as a reverse proxy. This configuration enables read-only access to the contents of your bucket.
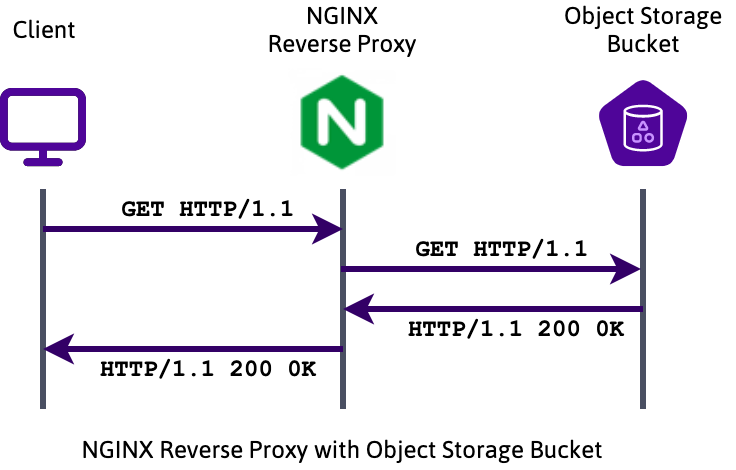
When a client initiates an HTTP request to the Nginx proxy server, the request to retrieve a bucket is directly forwarded to the Object Storage bucket. The Object Storage platform promptly responds by delivering the requested object to Nginx, which efficiently relays it to the client.
To further enhance performance and reduce the load on the bucket, frequently accessed objects can be cached locally within Nginx.
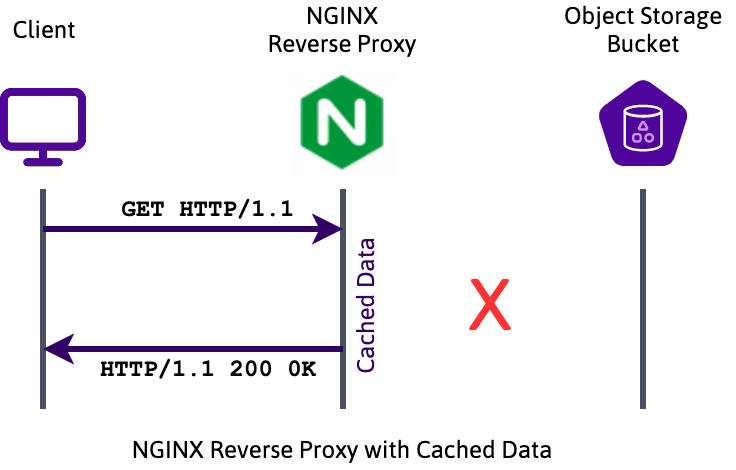
In this setup, requested objects are temporarily stored in Nginx's cache. Consequently, when a client requests an object, it is delivered directly from Nginx without requiring a forward request to the Object Storage platform. This caching mechanism significantly improves delivery speed and resource utilization.
Before you start
To complete the actions presented below, you must have:
- A Scaleway account logged into the console
- Owner status or IAM permissions allowing you to perform actions in the intended Organization
- An SSH key
- An Instance running on Ubuntu or Debian Linux
- An Object Storage bucket with public, readable objects
Installing Nginx on a Scaleway Instance
- Log into your Instance using SSH:
ssh root@<your_instance_ip> - Make sure the
aptrepositories as well as the software already installed on the Instance are up-to-date:apt update && apt upgrade -y - Install the
nginxreverse proxy using theaptpackage manager:apt install nginx -y
Configuring Nginx as a reverse proxy
-
Open the Nginx configuration file in a text editor:
nano /etc/nginx/nginx.conf -
Edit the file as follows:
user www-data;
worker_processes auto;
pid /run/nginx.pid;
include /etc/nginx/modules-enabled/*.conf;

events {
  worker_connections  768;
}

http {
  default_type       text/html;
  sendfile           on;
  keepalive_timeout  65;

  proxy_cache_path   /tmp/ levels=1:2 keys_zone=s3_cache:10m max_size=500m
                    inactive=60m use_temp_path=off;

  server {
    listen 80;

    # Configure your domain name here:
    server_name  s3proxy.mydomain.eu;
    access_log   /var/log/s3proxy.access.log  combined;

    # Configure your Object Storage bucket URL here:
    set $bucket "myobjectstoragebucket.s3.fr-par.scw.cloud";

    # This configuration provides direct access to the Object Storage bucket:
    location /s3/  {
      rewrite ^/s3/(.*) /$1 break;
      resolver 1.1.1.1;
      proxy_http_version     1.1;
      proxy_redirect off;
      proxy_set_header       Connection "";
      proxy_set_header       Authorization '';
      proxy_set_header       Host $bucket;
      proxy_set_header       X-Real-IP $remote_addr;
      proxy_set_header       X-Forwarded-For $proxy_add_x_forwarded_for;
      proxy_hide_header      x-amz-id-2;
      proxy_hide_header      x-amz-request-id;
      proxy_hide_header      x-amz-meta-server-side-encryption;
      proxy_hide_header      x-amz-server-side-encryption;
      proxy_hide_header      Set-Cookie;
      proxy_ignore_headers   Set-Cookie;
      proxy_intercept_errors on;
      add_header             Cache-Control max-age=31536000;
      proxy_pass             http://$bucket;
    }

    # This configuration uses a 60 minute cache for files requested:
    location /s3_cached/ {
      resolver 51.159.47.28;
      proxy_cache            s3_cache;
      proxy_http_version     1.1;
      proxy_redirect off;
      proxy_set_header       Connection "";
      proxy_set_header       Host $bucket;
      proxy_set_header       X-Real-IP $remote_addr;
      proxy_set_header       X-Forwarded-For $proxy_add_x_forwarded_for;
      proxy_hide_header      Authorization;
      proxy_hide_header      x-amz-id-2;
      proxy_hide_header      x-amz-request-id;
      proxy_hide_header      x-amz-meta-server-side-encryption;
      proxy_hide_header      x-amz-server-side-encryption;
      proxy_hide_header      Set-Cookie;
      proxy_ignore_headers   Set-Cookie;
      proxy_cache_revalidate on;
      proxy_intercept_errors on;
      proxy_cache_use_stale  error timeout updating http_500 http_502 http_503 http_504;
      proxy_cache_lock       on;
      proxy_cache_valid      200 304 60m;
      add_header             Cache-Control max-age=31536000;
      add_header             X-Cache-Status $upstream_cache_status;
      proxy_pass             https://$bucket/;
    }

  }
}
Save the file and exit
nanoonce it is edited. -
Make sure that there are no typos in the Nginx configuration file by syntax-checking it using the following command:
nginx -t -
Restart Nginx to apply the new configuration:
service nginx restart
You can now access the files of your bucket by going directly to http://s3proxy.mydomain.eu/s3/myfile.txt, for example. You can also access a cached version after the first retrieval by going to http://s3proxy.mydomain.eu/s3_cached/myfile.txt.
Configuring Nginx as a reverse proxy for HTTPS
Connections to your proxy are currently available in plain, unencrypted HTTP only. It is possible to encrypt the connection between the client and the Nginx proxy by configuring HTTPS. To do so, we will obtain a free SSL certificate issued by Let's Encrypt using Certbot, a tool to obtain, manage and renew Let's Encrypt certificates automatically.
-
Add the Certbot repository to apt to download the latest release of the software. Certbot is in active development and the packages included in Ubuntu may be already outdated.
add-apt-repository ppa:certbot/certbotPress
Enterwhen asked to confirm the action. -
Install Certbot for Nginx proxy reverse:
apt install python3-certbot-nginx -y -
Launch the generation of the certificate.
certbot --nginx -d <yourdomain.name>When running Certbot for the first time, you will be asked to enter your email address. Confirm it by pressing
Enteron your keyboard. Once confirmed Certbot will run a challenge and request the certificate. -
Press
2, thenEnteron your keyboard when asked to redirect all traffic to HTTPS.Please choose whether or not to redirect HTTP traffic to HTTPS, removing HTTP access. - - - - - - - - - - - - - - - - - - - - - - - - - - - - - - - - - - - - - - - - 1: No redirect - Make no further changes to the webserver configuration. 2: Redirect - Make all requests redirect to secure HTTPS access. Choose this for new sites, or if you're confident your site works on HTTPS. You can undo this change by editing your web server's configuration. - - - - - - - - - - - - - - - - - - - - - - - - - - - - - - - - - - - - - - - - Select the appropriate number [1-2] then [enter] (press 'c' to cancel):Certbot will now reconfigure Nginx and once you see the following message your certificate is successfully installed:
IMPORTANT NOTES:
- Congratulations! Your certificate and chain have been saved at:
  /etc/letsencrypt/live/example.com/fullchain.pem
  Your key file has been saved at:
  /etc/letsencrypt/live/example.com/privkey.pem
  Your cert will expire on 2019-04-15. To obtain a new or tweaked
  version of this certificate in the future, simply run certbot again
  with the "certonly" option. To non-interactively renew *all* of
  your certificates, run "certbot renew"
- Your account credentials have been saved in your Certbot
  configuration directory at /etc/letsencrypt. You should make a
  secure backup of this folder now. This configuration directory will
  also contain certificates and private keys obtained by Certbot so
  making regular backups of this folder is ideal.
- If you like Certbot, please consider supporting our work by:

  Donating to ISRG / Let's Encrypt:   https://letsencrypt.org/donate
  Donating to EFF:                    https://eff.org/donate-le
You have now secured the connection between the client and your Nginx proxy using TLS. You can verify it by opening a web browser and going to https://s3proxy.mydomain.eu/s3/myfile.txt, for example. The file will be downloaded using an encrypted connection.
Visit our Help Center and find the answers to your most frequent questions.
Visit Help Center