Getting started with Socket.io
Socket.io enables real-time event-based communication between one or more clients and a server. It works on every platform, browser, or device and is fast and reliable. Socket.io has two parts: a client-side library that runs in the browser, and a server-side library for Node.js. Both components have an identical API.
Learn how to install and use Socket.io with Express using the npm package manager, and create a simple chat server to see the basics of how a client and server work together.
Before you start
To complete the actions presented below, you must have:
- A Scaleway account logged into the console
- Owner status or IAM permissions allowing you to perform actions in the intended Organization
- An SSH key
- An Instance running Ubuntu 20.04 LTS or later
- Root access to the Instances you want to manage
- Installed Node.js (version 18.x or later) and NPM on your Instance
Installing Express.js and Socket.io
Express is a minimal, flexible Node.js web application framework. Install it alongside Socket.io to create a real-time server.
-
Create a project folder and navigate into it:
mkdir myapp cd myapp -
Initialize your project with
npm:npm init -yThis creates a
package.jsonfile with default settings. -
Install Express and Socket.io:
npm install express@4 socket.io@4 --save -
(Optional) Install jQuery if you want to use it in the front-end:
npm install jquery --save
Creating an Express server
-
Create a file called
app.jsfile in themyappfolder.:nano app.jsThis file will contain the application code for the Socket.io application.
-
Paste the following code into the application file
app.js:const express = require('express'); const http = require('http'); const app = express(); const server = http.createServer(app); const { Server } = require('socket.io'); const io = new Server(server); app.use(express.static(__dirname + '/node_modules')); app.get('/', (req, res) => { res.sendFile(__dirname + '/index.html'); }); io.on('connection', (socket) => { console.log('a user connected'); socket.on('disconnect', () => { console.log('user disconnected'); }); }); server.listen(4200, () => { console.log('listening on *:4200'); });Save the file and exit
nano. -
Create another file called
index.htmlin themyappfolder:nano index.htmlThis file contains the frontend for the application.
-
Paste the following content into
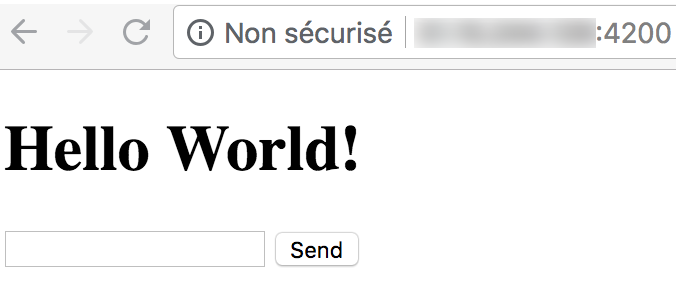
index.html:<!doctype html> <html lang="en"> <head> <meta charset="UTF-8"> <title>Socket.io Demo Chat</title> </head> <body> <h1>Hello World!</h1> <form id="chat-form"> <input id="message" autocomplete="off" /> <button>Send</button> </form> <ul id="messages"></ul> <script src="/socket.io/socket.io.js"></script> <script> const socket = io(); document.getElementById('chat-form').addEventListener('submit', (e) => { e.preventDefault(); socket.emit('chat message', document.getElementById('message').value); document.getElementById('message').value = ''; }); socket.on('chat message', (msg) => { const item = document.createElement('li'); item.textContent = msg; document.getElementById('messages').appendChild(item); }); </script> </body> </html>
Running the server
-
Launch the server using Node.js:
node app.js -
Open a browser and go to
http://<your_instance_ip>:4200. You should see the chat interface.
Enhancing the chat server with client-server interaction
-
Edit
app.jsto handle chat messages:io.on('connection', (socket) => { console.log('a user connected'); socket.on('chat message', (msg) => { io.emit('chat message', msg); }); socket.on('disconnect', () => { console.log('user disconnected'); }); }); -
Reload the server and try sending chat messages. Any message sent will be broadcast to all connected clients.
You have successfully installed and configured Socket.io and Express on Node.js 18.x. The basic chat server demonstrates real-time bidirectional communication between clients and the server. You can now build more advanced applications using Socket.io's robust API.
Visit our Help Center and find the answers to your most frequent questions.
Visit Help Center