NavigationContentFooter
Jump toSuggest an edit

Messaging and Queuing - Quickstart

Reviewed on 07 February 2024Published on 29 August 2022

Scaleway Messaging and Queuing is a message broker tool that allows you to transfer messages between different microservices and platforms. This enables them to “talk” to each other effectively even if they are not otherwise compatible. Messaging and Queuing enables and simplifies microservices application development and allows you to build highly scalable, reliable, distributed applications.

To get started with Scaleway Messaging and Queuing, you need to activate your protocol of choice (SQS or SNS) - or, in the case of the NATS protocol, create a NATS account. You should then generate credentials, and in the case of SQS, use the console to start creating queues. After this, you can then use any supported SDK or CLI of your choice to start creating and managing queues, topics and messages.

This quickstart guide is divided into two sections, depending on the protocol you want to use with Messaging and Queuing (SQS/SNS, or NATS).

Before you start

To complete the actions presented below, you must have:

  • A Scaleway account logged into the console
  • Owner status or IAM permissions allowing you to perform actions in the intended Organization

Quickstart for SQS

How to activate SQS

SQS must be activated for each region you want to use, before you can start creating credentials, queues or other resources for this protocol. You can deactivate at any time.

  1. Click Messaging in the Serverless section of the Scaleway console side menu. The following screen displays:

  2. Select a region from the drop-down menu. The region designates the geographical area where the service will be hosted.

  3. Click SQS. A message displays prompting you to click a button to activate the protocol. It also reminds you that activating the protocol does not trigger any billing, and that you can deactivate at any time.

  4. Click Activate SQS.

    The protocol is activated for the pre-selected region, and you are invited to generate credentials.

How to create SQS credentials

Credentials for SQS are granular: you can define the level of access that they should give.

  1. Click Messaging in the Serverless section of the Scaleway console side menu. The list of Messaging and Queuing protocols displays.

  2. Use the dropdown menu to select the region in which you want to create credentials.

  3. Click SQS, then Generate credentials. A pop-up displays:

  4. Enter a name for these credentials.

  5. Select the required permissions for the credentials. You must choose at least one of Write, Read and Manage. You are free to select any combination of these permissions.

  6. Click Generate credentials.

    The credentials are created. The access key and secret key are displayed, and you are invited to copy them.

    Important

    This is your only chance to view and save the secret key. Make sure that you copy it and save it somewhere securely.

  7. Copy and save the credentials, before closing the window.

    You are returned to your Messaging and Queuing SQS service’s Credentials tab. The name of your newly-generated credentials, along with the access key and access level are displayed.

How to create queues

  1. Click Messaging in the Serverless section of the Scaleway console side menu. The list of Messaging and Queuing protocols displays.

  2. Use the dropdown menu to select the region in which you want to create a queue.

  3. Click SQS, then Create queue. The queue creation wizard displays.

  4. Check the region that your queue will be created in. If you want to change the region, go back to step 2.

  5. Enter a name for your queue. The name must be no more than 80 characters, and consist only of alphanumeric characters, hyphens, and underscores. Alternatively, you can go with the auto-generated name suggested for you.

  6. Choose your queue type, from one of the following:

    • Standard: Standard queues ensure at-least-once delivery. The exact order of messages in the queue is not preserved.
    • FIFO: FIFO queues (First In First Out) preserves the exact ordering of messages.
  7. Configure your queue’s parameters. The following parameters can be defined:

    • Visibility timeout: The length of time (in seconds) during which, after a message is received, it is hidden and cannot be received again by the same or other consumers. This is useful as the queue itself does not automatically delete messages once they are received, and so prevents consumers from receiving the same message many times before they have finished processing it. Therefore, the value set here should be informed by the expected length of time it will take consumers to process messages. The default value is 30 seconds. The value must be between 1 second and 43 200 seconds (12 hours).
    • Message retention period: The length of time (in seconds) that messages are kept in the queue before being deleted. Setting a longer message retention period allows for a longer interval between a message being sent and it being received. The default value is 60 seconds. The value must be between 60 seconds and 1 290 600 seconds (14 days).
    • Maximum message size: The maximum size (in kilobytes) of a message that can be sent to the queue. Messages greater than the defined size will be rejected. The default value is 256 KB. The value must be between 1 KB and 256 KB.
    • Content Based Deduplication: This setting is only available for FIFO queues. Enable content based deduplication if the message body is guaranteed to be unique for each message. A unique hash value is generated from the body of each message, which is used as its deduplication ID. This avoids the need to set a deduplication ID when sending messages.
  8. Click Create queue to finish.

You are returned to the Queues tab, where your newly-created queue now displays. You can view its URL here, for use in your API/CLI operations. Go further by clicking on the queue’s name to access its Settings page and see additional information such as its ARN (Amazon Resource Name) and configuration parameters.

How to send and receive messages

All further actions related to sending messages to queues can be done via a supported CLI or SDK. See our documentation on the SQS CLI and SDKs for more information. You can also check out our tutorial on creating a serverless scraping architecture with Scaleway Messaging and Queuing SQS queues.

How to deactivate SQS

  1. Click Messaging in the Serverless section of the Scaleway console side menu. The list of Messaging and Queuing protocols displays.

  2. Use the drop-down menu to select the region you want to deactivate the relevant protocol in.

  3. Click SQS or SNS depending on which protocol you want to deactivate.

  4. Click the Settings tab.

Tip

If you do not currently have any credentials, topics or queues created for SQS, you will not be able to access the Settings tab. Temporarily create credentials or a queue, in order to access the Settings tab. Then, proceed with the steps below to deactivate the protocol.

  1. In the bottom panel, click the Deactivate SQS button.

    A popup displays, reminding you that any existing SQS resources you have will be permanently deleted, and that you will not be able to create any new queues or credentials unless you reactivate the protocol.

  2. Click Deactivate SQS to confirm.

Note

SQS must be deactivated on a region-by-region basis. If you have activated SQS in other regions, and you also want to deactivate those, repeat the process above to deactivate the protocol in each one.

Quickstart for SNS

How to activate SNS

SNS must be activated for each region you want to use, before you can start creating credentials, topics or other resources for this protocol. You can deactivate SNS at any time.

  1. Click Messaging in the Serverless section of the Scaleway console side menu. The following screen displays:

  2. Select a region from the drop-down menu. The region designates the geographical area where the service will be hosted.

  3. Click SNS. A message displays prompting you to click a button to activate the protocol. It also reminds you that activating the protocol does not trigger any billing, and that you can deactivate at any time.

  4. Click Activate SNS.

    The protocol is activated for the pre-selected region, and you are invited to generate credentials.

How to create SNS credentials

Credentials for SNS are granular: you can define the level of access that they should give.

  1. Click Messaging in the Serverless section of the Scaleway console side menu. The list of Messaging and Queuing protocols displays.

  2. Use the drop-down menu to select the region in which you want to create credentials.

  3. Click SNS, then Generate credentials. A pop-up displays:

  4. Enter a name for these credentials.

  5. Select the required permissions for the credentials. You must choose at least one of Write, Read and Manage. You are free to select any combination of these permissions.

  6. Click Generate credentials.

    The credentials are created. The access key and secret key are displayed, and you are invited to copy them.

    Important

    This is your only chance to view and save the secret key. Make sure that you copy it and save it somewhere securely.

  7. Copy and save the credentials, before closing the window.

    You are returned to your Messaging and Queuing SNS service’s Credentials tab. The name of your newly-generated credentials, along with the access key and access level are displayed.

How to create topics

  1. Click Messaging in the Serverless section of the Scaleway console side menu. The list of Messaging and Queuing protocols displays.

  2. Use the drop-down menu to select the region in which you want to create a topic.

  3. Click SNS, then navigate to the Topics tab and click Create topic. The topic creation wizard displays.

  4. Enter a name for your topic. The name must contain no more than 80 characters, and consist only of alphanumeric characters, hyphens, and underscores. Alternatively, you can go with the auto-generated name suggested for you.

  5. Choose a topic type. Currently, only the Standard topic type is available, ensuring at-least-once delivery. See the topic types documentation for more information.

  6. Click Create topic to finish.

You are returned to the Topics tab, where your newly-created topic now displays. The topic’s URL is also displayed here, for use in your API/CLI operations.

How to create a subscription

  1. Click Messaging in the Serverless section of the Scaleway console side menu. The list of Messaging and Queuing protocols displays.

  2. Use the dropdown menu to select the region of the topic you want to create a subscription for.

  3. Click SNS, then navigate to the Topics tab and click the topic you want to create a subscription for.

  4. Click create subscription. The subscription creation wizard displays:

  5. Verify the parameters of the topic that you are creating a subscription for.

  6. Choose a protocol, based on the type of endpoint or client you want to subscribe. Click the tab below for further details and full instructions on each protocol:


    Select HTTP to create a subscription for a service or web server that can receive HTTP POST requests from SNS, via standard HTTP protocol.

    Note that for security reasons, we recommend using the HTTPS protocol, rather than HTTP.

    You are prompted to enter the URL of the HTTP endpoint to subscribe, e.g. example.com. Note that the scheme (http://) is not required.

    After your HTTP subscription is created, you must confirm it. Find out how in our dedicated documentation.

  7. Click Create subscription to finish.

    The subscription is created. If you created an HTTP or HTTPS subscription, you will now need to confirm it. This step is not required for Serverless Functions or Containers subscriptions.

How to publish messages

All further actions related to publishing messages to topics can be done via a supported CLI or SDK. See our documentation on the SNS CLI and SDKsfor more information.

How to deactivate SNS

  1. Click Messaging in the Serverless section of the Scaleway console side menu. The list of Messaging and Queuing protocols displays.

  2. Use the drop-down menu to select the region you want to deactivate the relevant protocol in.

  3. Click SQS or SNS depending on which protocol you want to deactivate.

  4. Click the Settings tab.

Tip

If you do not currently have any credentials, topics or queues created for this protocol, you will not be able to access the Settings tab. Temporarily create credentials, or a topic or queue, in order to access the Settings tab. Then, proceed with the steps below to deactivate the protocol.

  1. In the bottom panel, click the Deactivate SQS button.

    A popup displays, reminding you that any existing SQS (or SNS) resources you have will be permanently deleted, and that you will not be able to create any new queues/topics or credentials unless you reactivate the protocol.

  2. Click Deactivate SQS (or SNS) to confirm.

Note

SQS and SNS must be deactivated on a region-by-region basis. If you have activated SNS or SQS in other regions, and you also want to deactivate those, repeat the process above to deactivate the protocol in each one.

Quickstart for NATS

How to create a NATS account

To start using a NATS message broker, you must first create a NATS account. This sets a scope for your NATS credentials, messages, queues and stream.

  1. Click Messaging in the Serverless section of the Scaleway console side menu. The following screen displays:

  2. Select a region from the drop-down menu. The region designates the geographical area where the NATS account will be hosted.

  3. Click NATS. The NATS welcome screen displays.

  4. Click Create a NATS account. The creation wizard displays:

  5. Complete the following steps in the wizard:
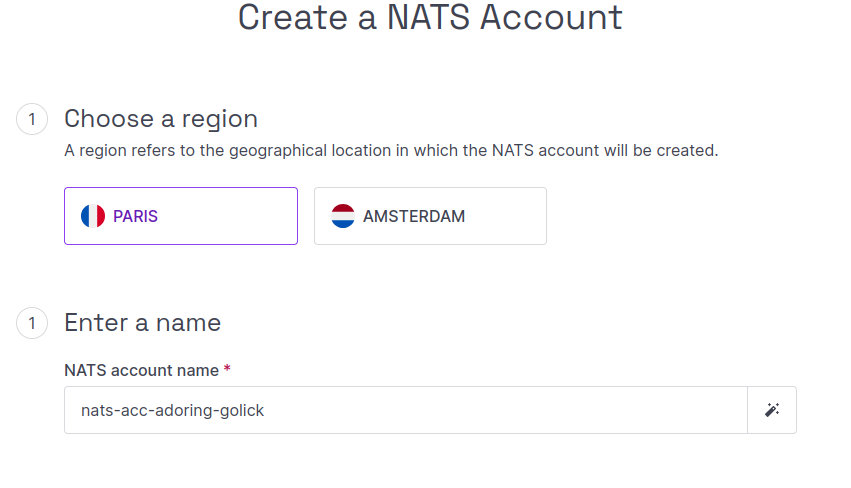
    • Check the region, which is the geographical location in which your NATS account will be created. If you want to use a different region to the one shown, go back to step 2 to change it.
    • Enter a name for your NATS account, or use the auto-generated name suggested for you.
    • Optionally, use the Estimated cost calculator to simulate how messages sent and stored with NATS streams will be billed. Note that simply creating a NATS account does not in itself incur any billing. For more information about NATS billing, see the FAQ.
    • Click Create NATS account to finish

    You are directed to the listing of your NATS accounts, where your newly-created NATS account now appears.

How to create NATS credentials

Credentials for NATS accounts are not granular: they necessarily give full read and write access. The bearer of these credentials can publish and receive messages, as well as manage topics and streams, for this account.

  1. Click Messaging in the Serverless section of the Scaleway console side menu. The list of Messaging and Queuing protocols displays.

  2. Use the drop-down menu to select the region of the NATS account for which you want to create credentials.

  3. Click NATS. The list of your NATS accounts in the pre-selected region displays.

  4. Click the NATS account you want to generate credentials for. The account’s Overview page displays.

  5. In the Credentials panel, click Generate credentials. A pop-up displays.

  1. Enter a name for these credentials, and click Generate credentials.

    The credentials are created and a button displays prompting you to download them in a .creds file.

    Important

    The generated credentials are displayed only once. Make sure to download and safely store them before closing the window.

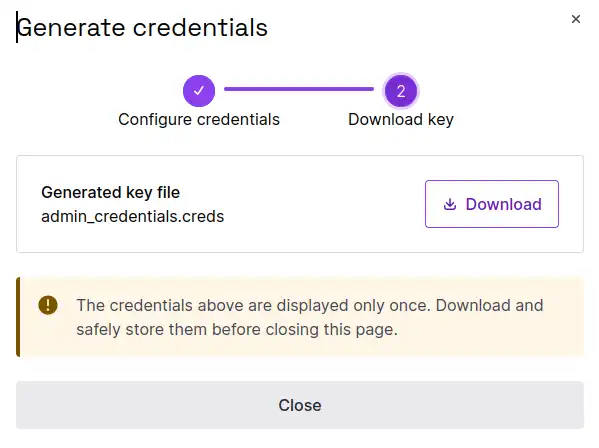
  2. Click Download and save the file, before closing the window.

    You are returned to your namespace’s overview page. The name of your newly-generated credentials and their access level is displayed in the Credentials panel.

How to create and manage queues, messages and streams

All further actions related to publishing, processing and managing messages, subjects, queues and streams can be done via a supported CLI or SDK. See our documentation on NATS CLI and SDKs for more information. You can also check out our tutorial on creating a serverless architecture for handling large messages with Scaleway Messaging and Queuing NATS.

How to delete a NATS account

  1. Click Messaging in the Serverless section of the Scaleway console side menu. The list of Messaging and Queuing protocols displays.

  2. Use the drop-down menu to select the region containing the NATS account you want to delete.

  3. Click NATS, then click the NATS account you want to delete.

  4. In the bottom panel, click the Delete NATS account button.

    A popup displays, reminding you that the action is irreversible, and any associated queued messages and credentials will be deleted.

  5. Type DELETE and click Delete NATS account to confirm.

Docs APIScaleway consoleDedibox consoleScaleway LearningScaleway.comPricingBlogCarreer
© 2023-2024 – Scaleway