How to create and manage a VPN connection
A connection is the central component of a Site-to-Site VPN. It links the VPN gateway to the customer gateway, sets the routing policy(ies), and defines the encryption, initiation and security parameters for the VPN tunnel.
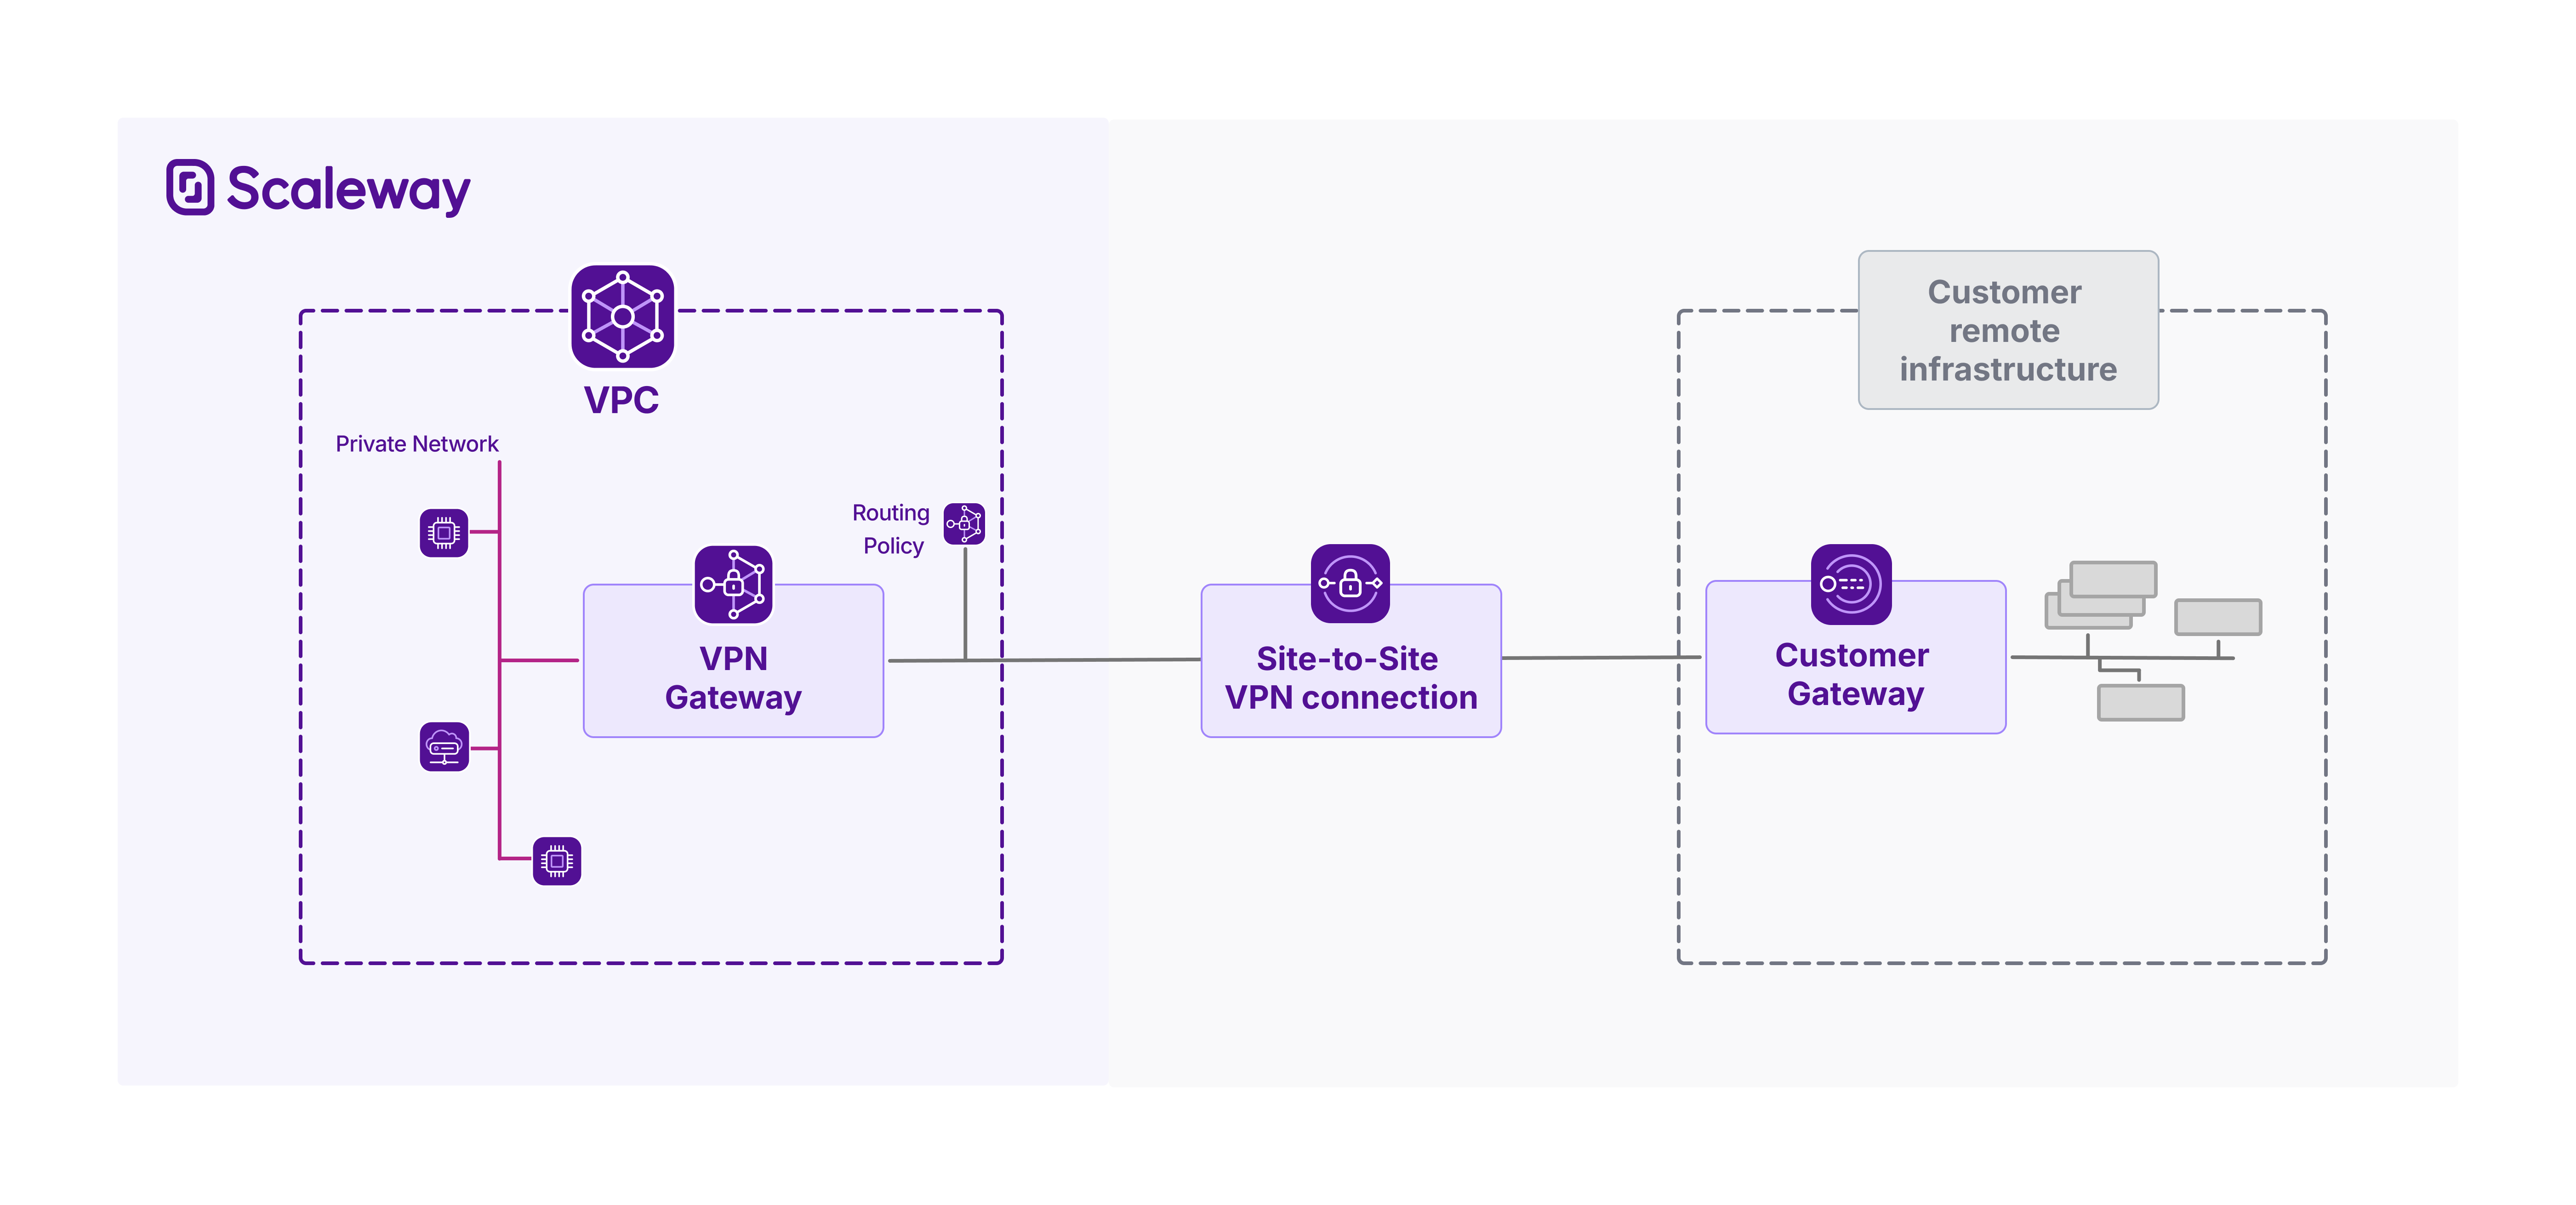
This document explains how to create and manage a Site-to-Site VPN connection with the Scaleway console.
Before you start
To complete the actions presented below, you must have:
- A Scaleway account logged into the console
- Owner status or IAM permissions allowing you to perform actions in the intended Organization
- Created a VPN gateway and a customer gateway in the same Scaleway region
How to create a VPN connection
-
Click Site-to-Site VPN in the Network section of the Scaleway console side menu. A listing of your existing VPN connections displays, if you have any.
-
Click Create connection. The creation wizard displays.
-
Choose a region in which to create your VPN connection. The resource will be created in this geographical location. You must create the connection in the same region as the VPN gateway and customer gateway that you want to connect.
-
Choose the gateways to connect. The connection will link the VPN gateway and customer gateways that you select here. Only gateways you have already created in the region you chose at step 3 will be displayed.
Based on the selected gateways, the VPN tunnel details selection panel displays.
-
Select how the VPN tunnel for this connection should be established: via the gateways' public IPv4 addresses or their public IPv6 addresses.
-
Specify a routing policy for the connection (optional). The VPN connection needs a policy for each IP traffic type (IPv4, IPv6) you want it to route. These policies define the traffic that is allowed to flow through the tunnel. Without an attached routing policy, no traffic can flow, but you can choose to attach a routing policy after creating the connection, if you prefer.
-
Set the connection initiation policy by selecting which gateway should initiate the VPN tunnel.
-
Select a security proposal for this connection. The security proposal defines the encryption and authentication methods used to secure the IPSec VPN tunnel. For help choosing a security proposal, refer to our dedicated documentation.
A pre-shared key (PSK) will be generated automatically when you create the VPN connection object. It will be securely stored in Scaleway Secret Manager, and can be retrieved for the purposes of configuring your customer gateway device. It is not currently possible to upload your own custom PSK.
-
Enter a name and (optionally) tags for the VPN connection.
-
Click Create connection to finish.
Your connection is created, and you are directed to its Overview page.
If the tunnel does not come up as expected, ensure you have completed all the essential configuration steps.
How to view a VPN connection's details
-
Click Site-to-Site VPN in the Network section of the Scaleway console side menu. A listing of your VPN connections displays.
-
Use the region selector at the top of the page to filter for the region of the connection you want to view, then click the connection in the listing. The connection's Overview page displays.
Here you can view the following information:
| Category | Description | Attributes |
|---|---|---|
| Connection information | Basic parameters of the connection | Status, Region, ID, VPN gateway and customer gateways linked by the connection, IP type used to establish the tunnel (IPv4 or IPv6), Initiation policy, Link to PSK, ESP proposal, IKE proposal |
| VPN tunnel endpoint addresses | An encrypted VPN tunnel links the VPN gateway and customer gateway via their public IPs, as shown here | VPN gateway public IP, Customer gateway public IP |
| BGP sessions | The private subnet used to provide private IP addresses for the VPN gateway and customer gateway over the tunnel. The gateways connect over this subnet to establish a BGP session and exchange routing information. For connections configured to route both IPv4 and IPv6 traffic, one subnet for each is provided. 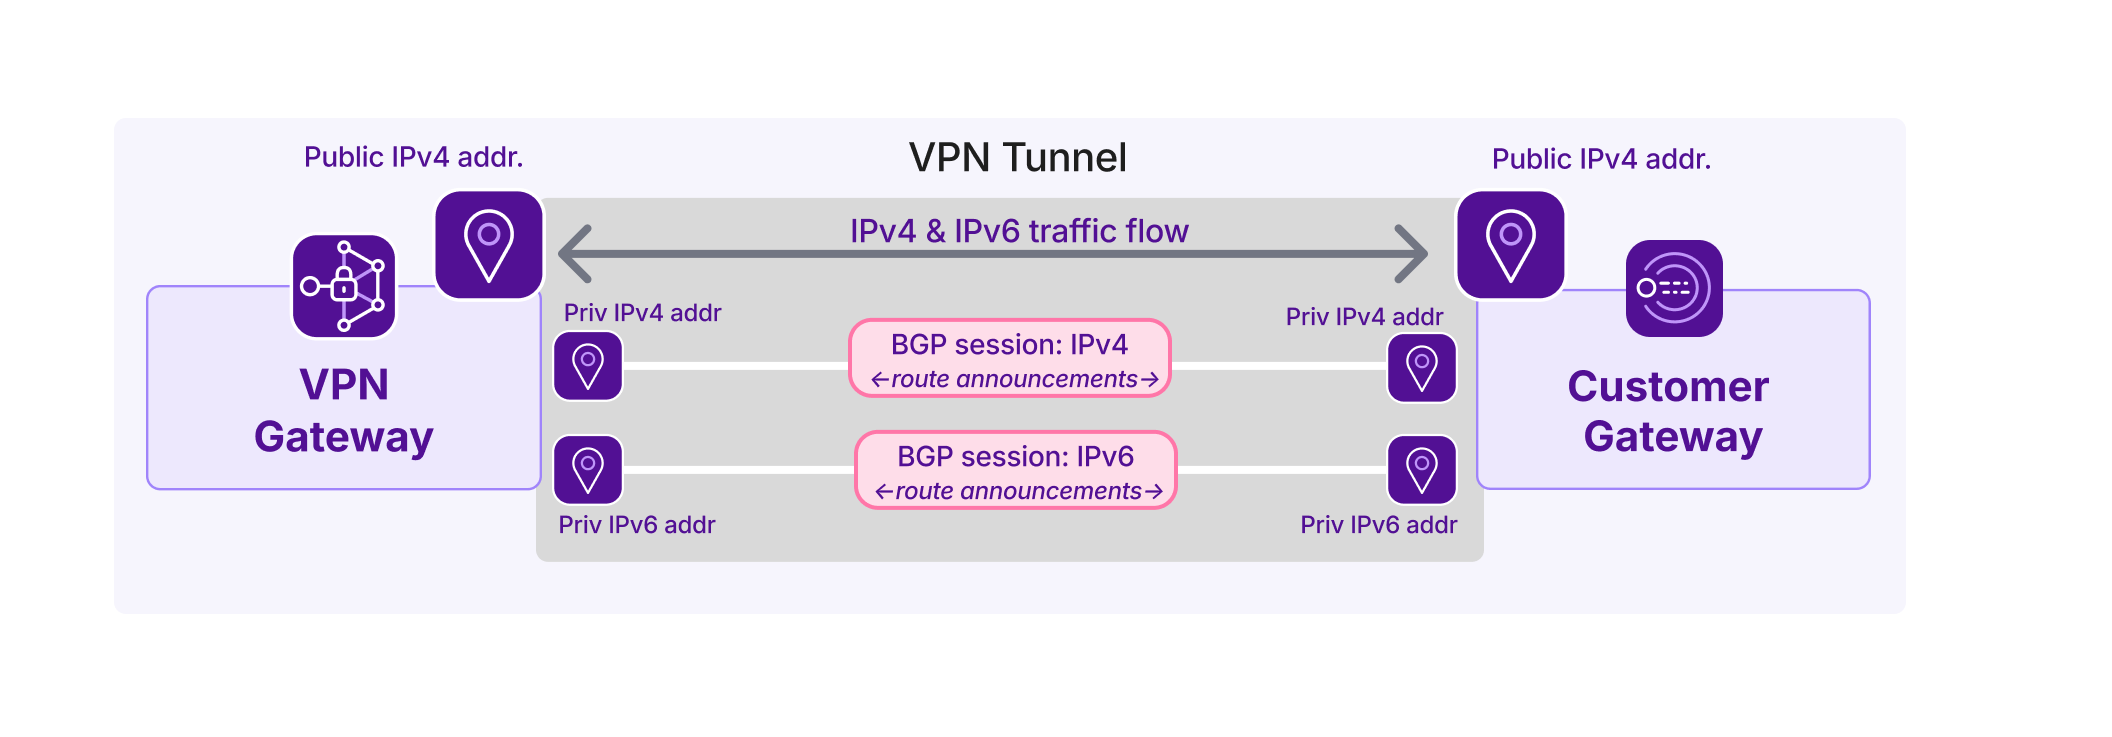 | IPv4 BGP session interconnection subnet (e.g. 169.254.10.0/31), IPv6 BGP session interconnection subnet (e.g. fd00:10::/127) |
| Route propagation | Activating route propagation prompts the two gateways to dynamically exchange route information over BGP, using the attached routing policies. Traffic cannot flow if route propagation is not active. The routing policy(ies) attached to the connection are displayed here. | IPv4 routing policy, IPv6 routing policy |
How to attach or detach a routing policy
Routing policies define traffic that is allowed to flow through the VPN tunnel. The connection needs one attached routing policy for each IP traffic type you want it to route (IPv4 and/or IPv6). You can attach a maximum of two routing policies to a single connection (one for IPv4 and one for IPv6).
Note that without an attached routing policy, no traffic can flow through the VPN tunnel. You can replace the attached routing policy/ies at any time.
-
Click Site-to-Site VPN in the Network section of the Scaleway console side menu. A listing of your VPN connections displays.
-
Use the region selector at the top of the page to filter for the region of the connection you want to view, then click the connection in the listing. The connection's Overview page displays.
-
In the route propagation panel:
- If no routing policy is attached, click the + Attach policy button. You are prompted to select a routing policy to attach.
- If a routing policy is already attached, click the three dot menu next to the policy, and select either:
- Replace policy: You are prompted to select a new routing policy to replace the current one.
- Edit policy: You are directed to the Edit page for the currently-attached policy, where you can modify the incoming and outgoing routes to whitelist.
- Detach policy: You are prompted to confirm that you want to detach the policy from your connection.
If route propagation is active, all routes whitelisted by any new policy you have attached will be immediately propagated over the VPN connection.
How to activate or deactivate route propagation
You must activate route propagation for traffic to be able to flow through the VPN tunnel. Activating route propagation triggers the dynamic exchange of route information between the gateways.
-
Click Site-to-Site VPN in the Network section of the Scaleway console side menu. A listing of your VPN connections displays.
-
Use the region selector at the top of the page to filter for the region of the connection you want to view, then click the connection in the listing. The connection's Overview page displays.
-
In the Route propagation section, click Activate propagation.
A pop-up displays, confirming that the action will launch the BGP session(s), allowing traffic to flow through the tunnel via the routes whitelisted in the attached routing policy(ies).
-
Click Activate route propagation.
Route propagation is activated. You are returned to your connection's overview page.
While route propagation remains active, the two gateways will dynamically exchange and update route information. Traffic can flow through the VPN tunnel along the routes whitelisted in the routing policy(ies). You can deactivate route propagation at any time: if you do so, all routes are blocked and no traffic can flow.
How to generate a new version of the PSK
PSKs do not expire. However, if you delete the secret containing the PSK, or you want to change your PSK for security reasons, you can generate a new one as follows:
-
Click Site-to-Site VPN in the Network section of the Scaleway console side menu. A listing of your VPN connections displays.
-
Use the region selector at the top of the page to filter for the region of the connection you want to configure, then click the connection in the listing. The connection's Overview page displays.
-
In the Connection information panel, under PSK, click Generate version.
A new version of the PSK secret is created in Scaleway Secret Manager. Ensure that you update your customer gateway device to use the new PSK.
How to edit a VPN connection's name and tags
-
Click Site-to-Site VPN in the Network section of the Scaleway console side menu. A listing of your VPN connections displays.
-
Use the region selector at the top of the page to filter for the region of the connection you want to configure, then click the connection in the listing. The connection's Overview page displays.
-
Click the Settings tab.
-
Make your edits as required:
- Click directly on the connection's name at the top of the page to edit it.
- Type new tags directly in the Tags box, or use the x icon to remove an existing tag.
How to delete a VPN connection
You must deactivate route propagation before you can delete the connection.
-
Click Site-to-Site VPN in the Network section of the Scaleway console side menu. A listing of your VPN connections displays.
-
Use the region selector at the top of the page to filter for the region of the VPN connection you want to configure, then click the connection in the listing. The connection's Overview page displays.
-
Click the Settings tab.
-
Click Delete connection.
A pop-up displays, informing you that this action will permanently delete the connection.
The VPN gateway and customer gateways used in this connection will not be automatically deleted. Remember to delete them yourself if no longer needed.
-
Type DELETE to confirm you want to proceed, then click the *Delete button.
The connection is deleted, and you are returned to the list of your VPN connections.