Configuring Let's Encrypt with Apache on Ubuntu Bionic
Let's Encrypt is a certificate authority providing free SSL certificates. The creation, validation, and installation are automated with Certbot — all major browsers trust certificates issued by Let's Encrypt.
In this tutorial, you will discover how to secure your Apache web server on a Scaleway Instance running Ubuntu Linux. We will walk you through the process of setting up a website on Apache and obtaining a Let's Encrypt SSL certificate using Certbot. Let's dive in and make your web presence safer and more trustworthy.
Before you start
To complete the actions presented below, you must have:
- A Scaleway account logged into the console
- Owner status or IAM permissions allowing you to perform actions in the intended Organization
- An SSH key
- An Instance
- A domain name pointing towards your Instance's IP address (via an A or AAAA record)
sudoprivileges or access to the root user
Installing Apache
-
Connect to your Instance via SSH, and update the software already installed:
apt update apt upgrade -y -
Install the Apache web server:
apt install apache2 -
Create a directory for the website. In this tutorial, we use
myweb.example.com. Replace it with your domain name whenever you see it:mkdir -p /var/www/html/myweb.example.com/public_html -
Create an index page for the website by running the following command:
nano /var/www/html/myweb.example.com/public_html/index.htmlThen copy the following content into the file, save it, and exit nano:
<html> <head> <title>myweb.example.com</title> </head> <body> <h1>New Website</h1> <p>This is the new website of myweb.example.com</p> </body> </html> -
Create a configuration file for the website, by making a copy of the default configuration:
cp /etc/apache2/sites-available/000-default.conf /etc/apache2/sites-available/myweb.example.com.conf -
Open the file in a text editor:
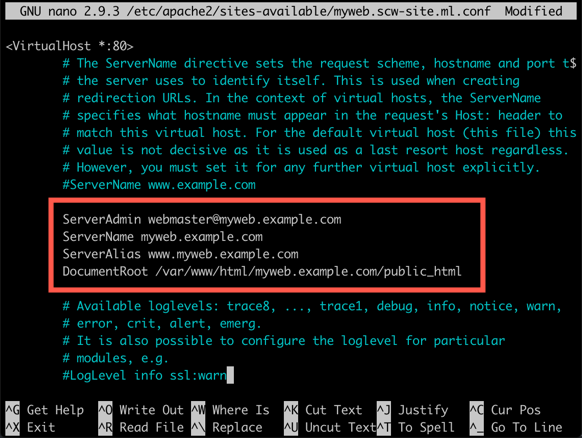
nano /etc/apache2/sites-available/myweb.example.com.confE dit the following lines to match your configuration, add them to the file, save i, and exit the editor:
ServerAdmin webmaster@myweb.example.com
ServerName myweb.example.com
ServerAlias www.myweb.example.com
DocumentRoot /var/www/html/myweb.example.com/public_html
Once edited the file should look like this example:
-
Activate the new site:
a2ensite myweb.example.com -
Reload the Apache configuration to enable the new site:
systemctl reload apache2.service
Installing Certbot
Install Certbot via apt:
apt install certbot python3-certbot-apache -yRunning Certbot
-
Run Certbot to request a certificate for the domain name:
certbot --apacheCertbot will ask you a series of questions:
- First, Certbot asks for your email address. Enter it and press
Enteron your keyboard. - You will then be asked to agree to the terms of service. Do so by pressing
Y. - Decide if you want to share your email address with the Electronic Frontier Foundation (EFF). Press
Yfor yes orNfor no. - Next, you will be asked for which domains you want to activate SSL. Select the appropriate numbers separated by commas and/or spaces, or leave input blank to select all options shown.
- Certbot asks if all traffic should be forced to HTTPS. Type
1for no or2for yes. - The certificate is requested and the following message appears once it has been obtained:
Congratulations! You have successfully enabled https://myweb.example.com

You should test your configuration at:
https://www.ssllabs.com/ssltest/analyze.html?d=myweb.example.com
- First, Certbot asks for your email address. Enter it and press
-
Verify the certificate by opening your site in a web browser:
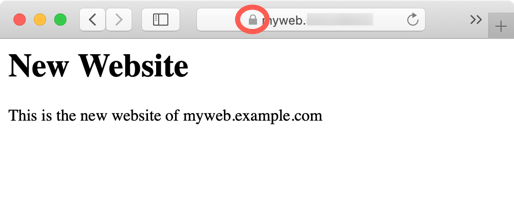
The small padlock icon indicates that the connection to your Instance is now encrypted.
Visit our Help Center and find the answers to your most frequent questions.
Visit Help Center