Create a serverless scraping architecture, with Scaleway Queues, Serverless Functions, and Managed Database.
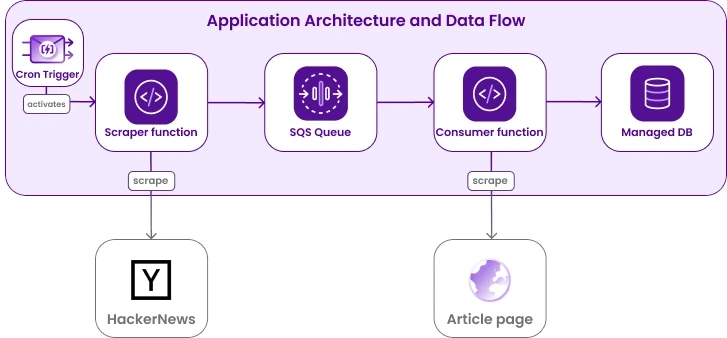
In this tutorial, we show how to set up a simple application that reads Hacker News and processes the articles it finds there asynchronously. To do so, we use Scaleway serverless products and deploy two functions:
- A producer function, activated by a recurrent cron trigger, that scrapes HackerNews for articles published in the last 15 minutes and pushes the title and URL of the articles to a queue created with Scaleway Queues.
- A consumer function, triggered by each new message on the queue, that consumes messages published to the queue, scrapes some data from the linked article, and then writes the data into a Scaleway Managed Database.
We show how to provision all the required Scaleway resources via Terraform/OpenTofu, but you can also use the console, the API or one of our other supported developer tools. The code for the functions is written in Python.
This project exemplifies a decoupled architecture, where producer and consumer perform specific tasks independently. This kind of design is modular and allows for flexibility and scalability. It also adheres to the principles of microservices and serverless architectures, where individual functions or scripts focus on specific tasks.
You can find all of the code on GitHub, so feel free to dive right in, or else follow along with the step-by-step explanation below to create the architecture yourself.
Before you start
To complete the actions presented below, you must have:
- A Scaleway account logged into the console
- Set up authentication for the Terraform/OpenTofu provider
Create the scraper
We start by creating the scraper program, or the "data producer".
-
Create a directory called
scraper. -
Inside it, create a file
requirements.txt. We need the packagesrequests,bs4, andboto3, as follows:boto3 bs4 requests -
Create a subdirectory
handlerswithin thescraperdirectory, and add ascrape_hn.pyfile inside it. -
Complete the
scrape_hn.pyfile by adding the function code as shown in the repository. The main code blocks are briefly explained as follows:Queue credentials and URL are read by the function from environment variables. Those variables are set by Terraform/OpenTofu as explained in one of the next sections. If you choose another deployment method, such as the console, do not forget to set them.
queue_url = os.getenv('QUEUE_URL')
sqs_access_key = os.getenv('SQS_ACCESS_KEY')
sqs_secret_access_key = os.getenv('SQS_SECRET_ACCESS_KEY')
Use the
requestspackage to retrieve the HTML, andBeautifulSoupto parse it and extract thespanwe are interested in:titlelinecontaining title and url, andageholding the publication time.def scrape_and_push(): page = requests.get(HN_URL) html_doc = page.content soup = BeautifulSoup(html_doc, 'html.parser') titlelines = soup.find_all(class_="titleline") ages = soup.find_all(class_="age")Using the AWS python sdk
boto3, connect to the queue and push thetitleandurlof articles published less than 15 minutes ago.sqs = boto3.client( 'sqs', endpoint_url=SCW_SQS_URL, aws_access_key_id=sqs_access_key, aws_secret_access_key=sqs_secret_access_key, region_name='fr-par') for age, titleline in zip(ages, titlelines): time_str = age["title"] time = datetime.strptime(time_str, "%Y-%m-%dT%H:%M:%S") if datetime.utcnow() - time > timedelta(minutes=15): continue body = json.dumps({'url': titleline.a["href"], 'title': titleline.a.get_text()}) response = sqs.send_message(QueueUrl=queue_url, MessageBody=body)
As explained in the Scaleway Functions documentation, dependencies need to be installed in a package folder, and uploaded as an archive. This is done via Terraform/OpenTofu, but if you decide to deploy using another system, you can create the archive as follows:
cd scraper
pip install -r requirements.txt --target ./package
zip -r functions.zip handlers/ package/
Create the consumer
Next, let's create our consumer function. When receiving a message containing the article's title and URL from the queue, it will scrape the page for some stats (number of a, h1, and p tags) and save these values in a Scaleway Managed PostgreSQL Database instance. We show how to create the database instance (and other underlying resources) via Terraform/OpenTofu in the following steps. If you opt for another method to create the underlying resources, e.g. the console or API, do not forget to set the relevant function environment variables.
-
Create a directory called
consumer(at the same level as thescraperdirectory previously created). -
Inside it, create a file
requirements.txt. We need the packagesrequests,bs4, andpg8000, as shown. We usepg8000as it does not depend on system packages, thus making it a good fit for a serverless function:pg8000 requests bs4 -
Create a subdirectory
handlerswithin theconsumerdirectory, and add aconsumer.pyfile inside it. -
Complete the
consumer.pyfile by adding the function code as shown in the repository. The main code blocks are briefly explained as follows:Queue credentials and URLs are accessed by the function as environment variables. These variables are set by Terraform/OpenTofu as explained in one of the next sections. If you choose another deployment method, such as the console, do not forget to set them.
db_host = os.getenv('DB_HOST')
db_port = os.getenv('DB_PORT')
db_name = os.getenv('DB_NAME')
db_user = os.getenv('DB_USER')
db_password = os.getenv('DB_PASSWORD')
From the trigger event we can read the body of the message, and use the passed URL to scrape the page for stats.
def scrape_and_save_to_db(event):
  body = json.loads(event["body"])

  tags_count = scrape_page_for_stats(body['url'])
Lastly, we write the information into the database. To keep the whole process completely automatic the
CREATE_TABLE_IF_NOT_EXISTSquery is run each time. If you integrate the functions into an existing database, there is no need for it.conn = None try: conn = pg8000.native.Connection(host=db_host, database=db_name, port=db_port, user=db_user, password=db_password, timeout=15) conn.run(CREATE_TABLE_IF_NOT_EXISTS) conn.run(INSERT_INTO_ARTICLES, title=body['title'], url=body['url'], a_count=tags_count['a'], h1_count=tags_count['h1'], p_count=tags_count['p']) finally: if conn is not None: conn.close()
As explained in the Scaleway Functions documentation, dependencies need to be installed in a package folder, and uploaded as an archive. This is done via Terraform/OpenTofu, but if you decide to deploy using another system, you can create the archive as follows:
cd consumer
pip install -r requirements.txt --target ./package
zip -r functions.zip handlers/ package/
Create a Terraform/OpenTofu file to provision the necessary Scaleway resources
For the purposes of this tutorial, we show how to provision all resources via Terraform/OpenTofu.
- Create a directory called
terraform(at the same level as thescraperandconsumerdirectories created in the previous steps). - Inside it, create a file called
main.tf. - In the file you just created, add the code below to set up the Scaleway Terraform/OpenTofu provider and your Project:
terraform { required_providers { scaleway = { source = "scaleway/scaleway" } } required_version = ">= 0.13" } provider "scaleway" { } resource "scaleway_account_project" "mnq_tutorial" { name = "mnq-tutorial" } - Still in the same file, add the code below to provision the queue resources: separate credentials with appropriate permissions for producer and consumer, and a Scaleway queue:
resource "scaleway_mnq_sqs" "main" { project_id = scaleway_account_project.mnq_tutorial.id } resource "scaleway_mnq_sqs_credentials" "producer_creds" { project_id = scaleway_mnq_sqs.main.project_id name = "sqs-credentials-producer" permissions { can_manage = true can_receive = false can_publish = true } } resource "scaleway_mnq_sqs_credentials" "consumer_creds" { project_id = scaleway_mnq_sqs.main.project_id name = "sqs-credentials-consumer" permissions { can_manage = false can_receive = true can_publish = false } } resource "scaleway_mnq_sqs_queue" "main" { project_id = scaleway_account_project.mnq_tutorial.id name = "hn-queue" access_key = scaleway_mnq_sqs_credentials.producer_creds.access_key secret_key = scaleway_mnq_sqs_credentials.producer_creds.secret_key } - Add the code below to provision the Managed Database for PostgreSQL resources. Note that here we are creating a random password and using it for the default and worker user:
resource "random_password" "dev_mnq_pg_exporter_password" { length = 16 special = true min_numeric = 1 min_upper = 1 min_lower = 1 min_special = 1 override_special = "_-" } resource "scaleway_rdb_instance" "main" { name = "test-rdb" project_id = scaleway_account_project.mnq_tutorial.id node_type = "db-dev-s" engine = "PostgreSQL-15" is_ha_cluster = false disable_backup = true user_name = "mnq_initial_user" password = random_password.dev_mnq_pg_exporter_password.result } output db_password { value = random_password.dev_mnq_pg_exporter_password.result sensitive = true } output db_ip { value = scaleway_rdb_instance.main.endpoint_ip sensitive = false } output db_port { value = scaleway_rdb_instance.main.endpoint_port sensitive = false } resource "scaleway_rdb_database" "main" { instance_id = scaleway_rdb_instance.main.id name = "hn-database" } resource "scaleway_rdb_user" "worker" { instance_id = scaleway_rdb_instance.main.id name = "worker" password = random_password.dev_mnq_pg_exporter_password.result is_admin = false } resource "scaleway_rdb_privilege" "mnq_user_role" { instance_id = scaleway_rdb_instance.main.id user_name = scaleway_rdb_user.worker.name database_name = scaleway_rdb_database.main.name permission = "all" } - Add the code below to provision the functions resources. First, activate the namespace, then locally zip the code and create the functions in the cloud. Note that we are referencing variables from other resources, to completely automate the deployment process:
Note that a folder
locals { scraper_folder_path = "../scraper" consumer_folder_path = "../consumer" archives_folder_path = "../archives" } resource "scaleway_function_namespace" "mnq_tutorial_namespace" { project_id = scaleway_account_project.mnq_tutorial.id name = "mnq-tutorial-namespace" description = "Main function namespace" } resource "null_resource" "pip_install_scraper" { triggers = { requirements = filesha256("${local.scraper_folder_path}/requirements.txt") } provisioner "local-exec" { command = "pip3 install -r ${local.scraper_folder_path}/requirements.txt --upgrade --target ${local.scraper_folder_path}/package" } } data "archive_file" "scraper_archive" { depends_on = [ null_resource.pip_install_scraper ] type = "zip" output_path = "${local.archives_folder_path}/scraper.zip" source_dir = local.scraper_folder_path } resource "scaleway_function" "scraper" { namespace_id = scaleway_function_namespace.mnq_tutorial_namespace.id project_id = scaleway_account_project.mnq_tutorial.id name = "mnq-hn-scraper" runtime = "python311" handler = "handlers/scrape_hn.handle" privacy = "private" timeout = 10 zip_file = data.archive_file.scraper_archive.output_path zip_hash = data.archive_file.scraper_archive.output_sha256 deploy = true environment_variables = { QUEUE_URL = scaleway_mnq_sqs_queue.main.url SQS_ACCESS_KEY = scaleway_mnq_sqs_credentials.producer_creds.access_key } secret_environment_variables = { SQS_SECRET_ACCESS_KEY = scaleway_mnq_sqs_credentials.producer_creds.secret_key } } resource "null_resource" "pip_install_consumer" { triggers = { requirements = filesha256("${local.consumer_folder_path}/requirements.txt") } provisioner "local-exec" { command = "pip3 install -r ${local.consumer_folder_path}/requirements.txt --upgrade --target ${local.consumer_folder_path}/package" } } data "archive_file" "consumer_archive" { depends_on = [ null_resource.pip_install_consumer ] type = "zip" output_path = "${local.archives_folder_path}/consumer.zip" source_dir = local.consumer_folder_path } resource "scaleway_function" "consumer" { namespace_id = scaleway_function_namespace.mnq_tutorial_namespace.id project_id = scaleway_account_project.mnq_tutorial.id name = "mnq-hn-consumer" runtime = "python311" handler = "handlers/consumer.handle" privacy = "private" timeout = 10 zip_file = data.archive_file.consumer_archive.output_path zip_hash = data.archive_file.consumer_archive.output_sha256 deploy = true max_scale = 3 environment_variables = { DB_NAME = scaleway_rdb_database.main.name DB_HOST = scaleway_rdb_instance.main.load_balancer[0].ip DB_PORT = scaleway_rdb_instance.main.load_balancer[0].port DB_USER = scaleway_rdb_user.worker.name } secret_environment_variables = { DB_PASSWORD = scaleway_rdb_user.worker.password } }archivesneeds to be created manually if you started from scratch. It is included in the git repository. - Add the code below to provision the triggers resources. The cron trigger activates at the minutes
[0, 15, 30, 45]of every hour. No arguments are passed, but we could do so by specifying them in JSON format in theargsparameter.resource "scaleway_function_cron" "scraper_cron" { function_id = scaleway_function.scraper.id schedule = "0,15,30,45 * * * *" args = jsonencode({}) } resource "scaleway_function_trigger" "consumer_sqs_trigger" { function_id = scaleway_function.consumer.id name = "hn-sqs-trigger" sqs { project_id = scaleway_mnq_sqs.main.project_id queue = scaleway_mnq_sqs_queue.main.name } }
Put it all in motion
Terraform/OpenTofu makes this very straightforward. To provision all the resources and get everything up and running, run the following commands:
cd terraform
terraform init
terraform plan
terraform apply
How to check that everything is working correctly
Go to the Scaleway console, and check the logs and metrics for Serverless Functions' execution and the queue's statistics.
To make sure the data is correctly stored in the database, you can connect to it directly via a CLI tool such as psql.
Retrieve the instance IP and port of your Managed Database from the console, under the Managed Database section.
Use the following command to connect to your database. When prompted for a password, you can find it by running terraform output -json.
psql -h <DB_INSTANCE_IP> --port <DB_INSTANCE_PORT> -d hn-database -U workerWhen you are done testing, don't forget to clean up! To do so, run:
cd terraform
terraform destroy
Summary, going further, key takeaways
We have shown how to asynchronously decouple the producer and the consumer using Scaleway Queues, adhering to serverless patterns.
While the volume of data processed in this example is quite small, thanks to robustness of Scaleway Queues and the auto-scaling capabilities of the Serverless Functions, you can adapt this example to manage larger workloads.
Here are some possible extensions to this basic example:
- Replace the simple proposed logic with your own. What about counting how many times some keywords (e.g: copilot, serverless, microservice) appear in Hacker News articles?
- Define multiple cron triggers for different websites and pass the website as an argument to the function. Or, create multiple functions that feed the same queue.
- Use a Serverless Container instead of the consumer function, and use a command line tool such as
htmldocorpandocto convert the scraped articles to PDF and upload the result to a Scaleway Object Storage bucket. - Replace the Managed Database for PostgreSQL with a Scaleway Serverless Database, so that all the infrastructure lives in the serverless ecosystem! Note that at the moment there is no Terraform/OpenTofu support for Serverless Database, hence the choice here to use Managed Database for PostgreSQL.
Visit our Help Center and find the answers to your most frequent questions.
Visit Help Center