Managing load overflow - Proxmox cluster and VMs on Scaleway Elastic Metal
Overview
The Private Network feature enables you to build a virtual L2 network between your cloud resources. The service is compatible with a wide range of resources including:
- Instances
- Elastic Metal servers
- Databases
- Load Balancers
- Public Gateways, enabling their communication with the internet.
In this guide, we will establish a Proxmox VE cluster on two Elastic Metal servers. Our goal is to enable the creation of multiple VMs on each of them, facilitating communication through a Private Network.
To achieve this, we will implement a bridge, essentially a virtual network switch, on each Elastic Metal server using the Proxmox interface. Once the bridges are set up, we will then form a cluster and designate the Private Network bridge as the cluster network.
Each Elastic Metal server will then join this cluster. Subsequently, we can generate virtual machines on both servers within the cluster, allowing them to communicate via the Private Network.
Finally, we can introduce and configure a Load Balancer to evenly distribute traffic among all VMs in the cluster.
Before you start
To complete the actions presented below, you must have:
- A Scaleway account logged into the console
- Owner status or IAM permissions allowing you to perform actions in the intended Organization
- An SSH key
- 2 Elastic Metal servers running on Proxmox
- Created a Private Network and added your resources to it
- Created a Public Gateway
- A domain or subdomain pointed to your Instance
Preparing Proxmox
-
Log into the Proxmox web interface and select your server in the datacenter view. Then click Network in the menu.
-
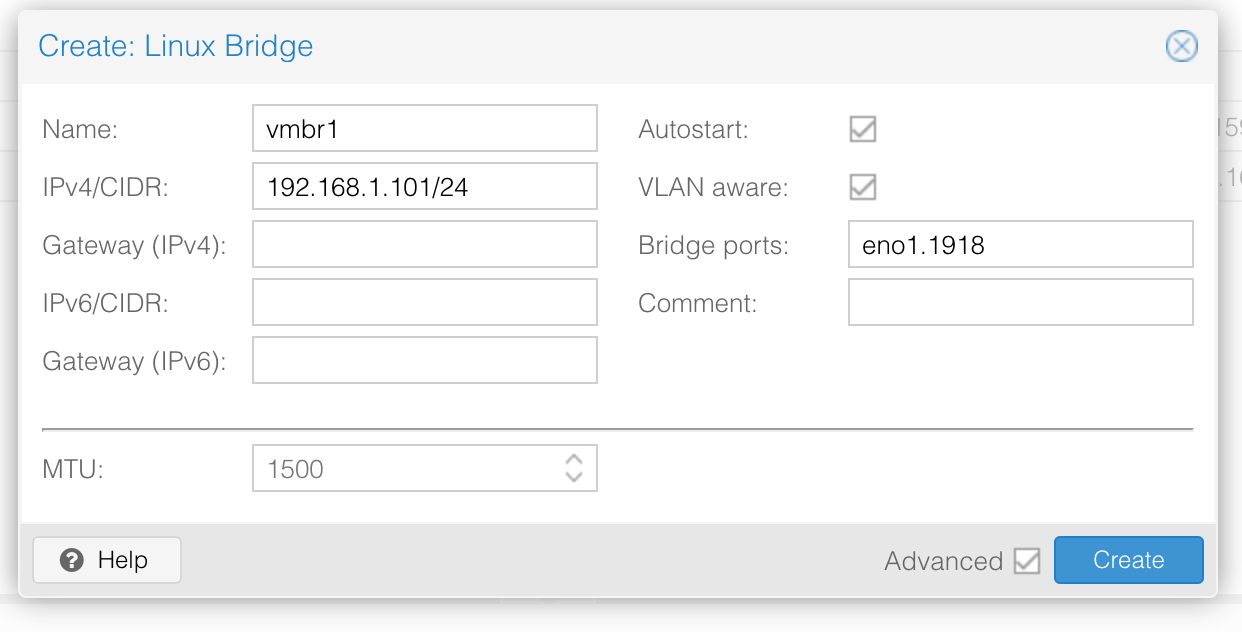
Click Create > Linux Bridge. The configuration wizard displays. Enter a private IP for your Elastic Metal server in CIDR format. The Bridge port is the name of your primary network interface, followed by a dot and your VLAN-ID. Tick the boxes Autostart and VLAN aware, then click Create to create the bridge.
-
Click Apply configuration to activate the new configuration.
-
Go to the Datacenter view and click Create Cluster.
-
Enter a name for the cluster and select your Private Network bridge
vmbr1as the cluster network. Then click Create to launch cluster creation. -
Select the cluster in the cluster list and click Join Information. The cluster join information displays.
-
Click Copy Information to copy the cluster join information into the clipboard.
-
Go to the Proxmox interface of your second Elastic Metal server and click Cluster to enter the cluster configuration from the Datacenter view of the machine.
-
Click Join Cluster and paste the cluster join information in the form.
-
Enter your first Elastic Metal server's
rootpassword and click Join to link the machine to the cluster.The second node appears now in the cluster in the Data center view of Proxmox. You can manage both machines using a single interface. Communication between members of the cluster is entirely via your Private Network, ensuring the highest level of security and the lowest latency.
Creating virtual machines
Proxmox is capable of managing Linux Kernel Virtual Machines (KVM) as well as LXC containers. KVM provides full virtualization for complete Windows and Linux images whilst LXC containers are lightweight and perfect to run conflict-free Linux applications. Follow this guide for information on how to configure virtual machines and LXC containers on Proxmox.
Create or clone your virtual machines on both servers of the cluster to distribute the load between them using a Load Balancer. Your virtual machines can use the Public Gateway and dynamic NAT to communicate with the internet for downloads and updates. If you want to expose certain ports of your VMs directly, configure static NAT rules for them.

Configuring the Load Balancer
-
Go to the Load Balancers section in the Scaleway console and select the Load Balancer you want to configure.
-
Click the Frontends tab, then + Add Frontend. The frontend configuration wizard displays.
-
Enter the following information:

For the frontend:
- A name
- The frontend port
- (Optionally) The SSL certificate to use for the frontend
For the backend:
- A name
- The backend protocol
- The backend port
- (Optionally) The proxy protocol to use
- The healh check information
- The IP addresses of your VM's inside the Private Network
Visit our Help Center and find the answers to your most frequent questions.
Visit Help Center