Setting up a LAMP stack on Ubuntu 22.04 (Jammy Jellyfish)
The LAMP stack references a group of software that can be used to serve dynamic web applications and websites. LAMP is an acronym and stands for Linux, Apache, MySQL, and PHP.
The concept describes a server environment that consists of a Linux operating system (Ubuntu Jammy Jellyfish 22.04 LTS), an Apache web server, a MySQL (or MariaDB) database server, and the PHP programming language.
Before you start
To complete the actions presented below, you must have:
- A Scaleway account logged into the console
- Owner status or IAM permissions allowing you to perform actions in the intended Organization
- An SSH key
- An Instance running on Ubuntu Jammy Jellyfish (22.04)
- An FQDN (Fully Qualified Domain Name) pointing to your Instance's IP address
sudoprivileges or access to the root user
Installing the LAMP stack on an Ubuntu 22.04 Instance
- Connect to your Instance via SSH.
- Use the
aptpackage manager of Ubuntu to install the required packages. Make sure that the system is up-to-date and has the latest bug fixes and updates installed by running the following command:apt update && apt -y upgrade - Install the software stack:
apt install -y ufw apache2 mariadb-server php-fpm php-mysql
Securing the database engine
- Launch the configuration wizard to configure the database server:
mysql_secure_installation - Press Enter when prompted for the current root password for the MariaDB server, as the password is not yet set.
- Press
Yto switch tounix_socketauthentication:Switch to unix_socket authentication [Y/n] - Press
Nto keep your current root password, then pressYto change the root password:You already have your root account protected, so you can safely answer 'n'. Change the root password? [Y/n] - Enter the new password if you decide to change the root password, press
Enter, then repeat this step. - Press
Enterto keep the settings proposed by default when prompted.
Configuring an Apache virtual host
Apache stores the configuration of virtual hosts configuration files. All available configuration files are located in the /etc/apache2/sites-available/ directory.
-
Navigate to the relevant directory:
cd /etc/apache2/sites-available/ -
Create a new virtual hosts configuration file and name it after the domain name that points to your Instance. Here we call it
example.com.confand put the following content into the file:<VirtualHost *:80> ServerName example.com ServerAlias www.example.com DocumentRoot "/var/www/html/example.com" <Directory "/var/www/html/example.com"> Options FollowSymLinks AllowOverride all Require all granted </Directory> <FilesMatch \.php$> SetHandler "proxy:unix:/run/php/php8.1-fpm.sock|fcgi://localhost" </FilesMatch> ErrorLog /var/log/apache2/error.example.com.log CustomLog /var/log/apache2/access.example.com.log combined </VirtualHost>Remember to replace
example.comand any other information as necessary as per the overview below:Overview:
*:80— Defines the port Apache listens on. Here, it listens on port 80, the default port for HTTP.ServerName— The domain name relating to this Apache virtual host.ServerAlias- An alias name under which the Apache virtual host is reachable.DocumentRoot— Specifies the document root where all files of the website are stored.Directory— Gives directives for a specific directory.ServerName— The domain name relating to this Apache virtual host.ErrorLog— Refers to the error log file of this Apache virtual host.CustomLog— Specifies the access log file of this Apache virtual host.
-
Save and exit the file.
-
Activate the new virtual host in Apache:
a2ensite example.com -
Enable the
proxy_fcgimodule:a2enmod proxy_fcgi -
Reload the Apache configuration to make the site available.
systemctl reload apache2.service
Securing your Instance with a firewall
-
Enable HTTP, HTTPS, and SSH connections in the firewall configuration of the Instance by running the following command:
ufw allow 'Apache Full' ufw allow 'OpenSSH' -
Enable ufw:
ufw enableConfirm the activation of the firewall by typing
y:Command may disrupt existing ssh connections. Proceed with operation (y|n)? y Firewall is active and enabled on system startup -
Check the status of ufw:
ufw statusIt will return a list of the allowed services:
Status: active

To                         Action      From
--                         ------      ----
Apache Full                ALLOW       Anywhere
OpenSSH                    ALLOW       Anywhere
Apache Full (v6)           ALLOW       Anywhere (v6)
OpenSSH (v6)               ALLOW       Anywhere (v6)
## Testing PHP

1. Create a test PHP file to test if your LAMP stack is working.
  ```bash
nano /var/www/html/example.com/phpinfo.php- Put the following content in it:
<?php phpinfo(); ?> - Save the file and point your web browser to
http://example.com/phpinfo.php(replacingexample.comwith your domain name). When you see an output like the following, it means PHP is set up correctly: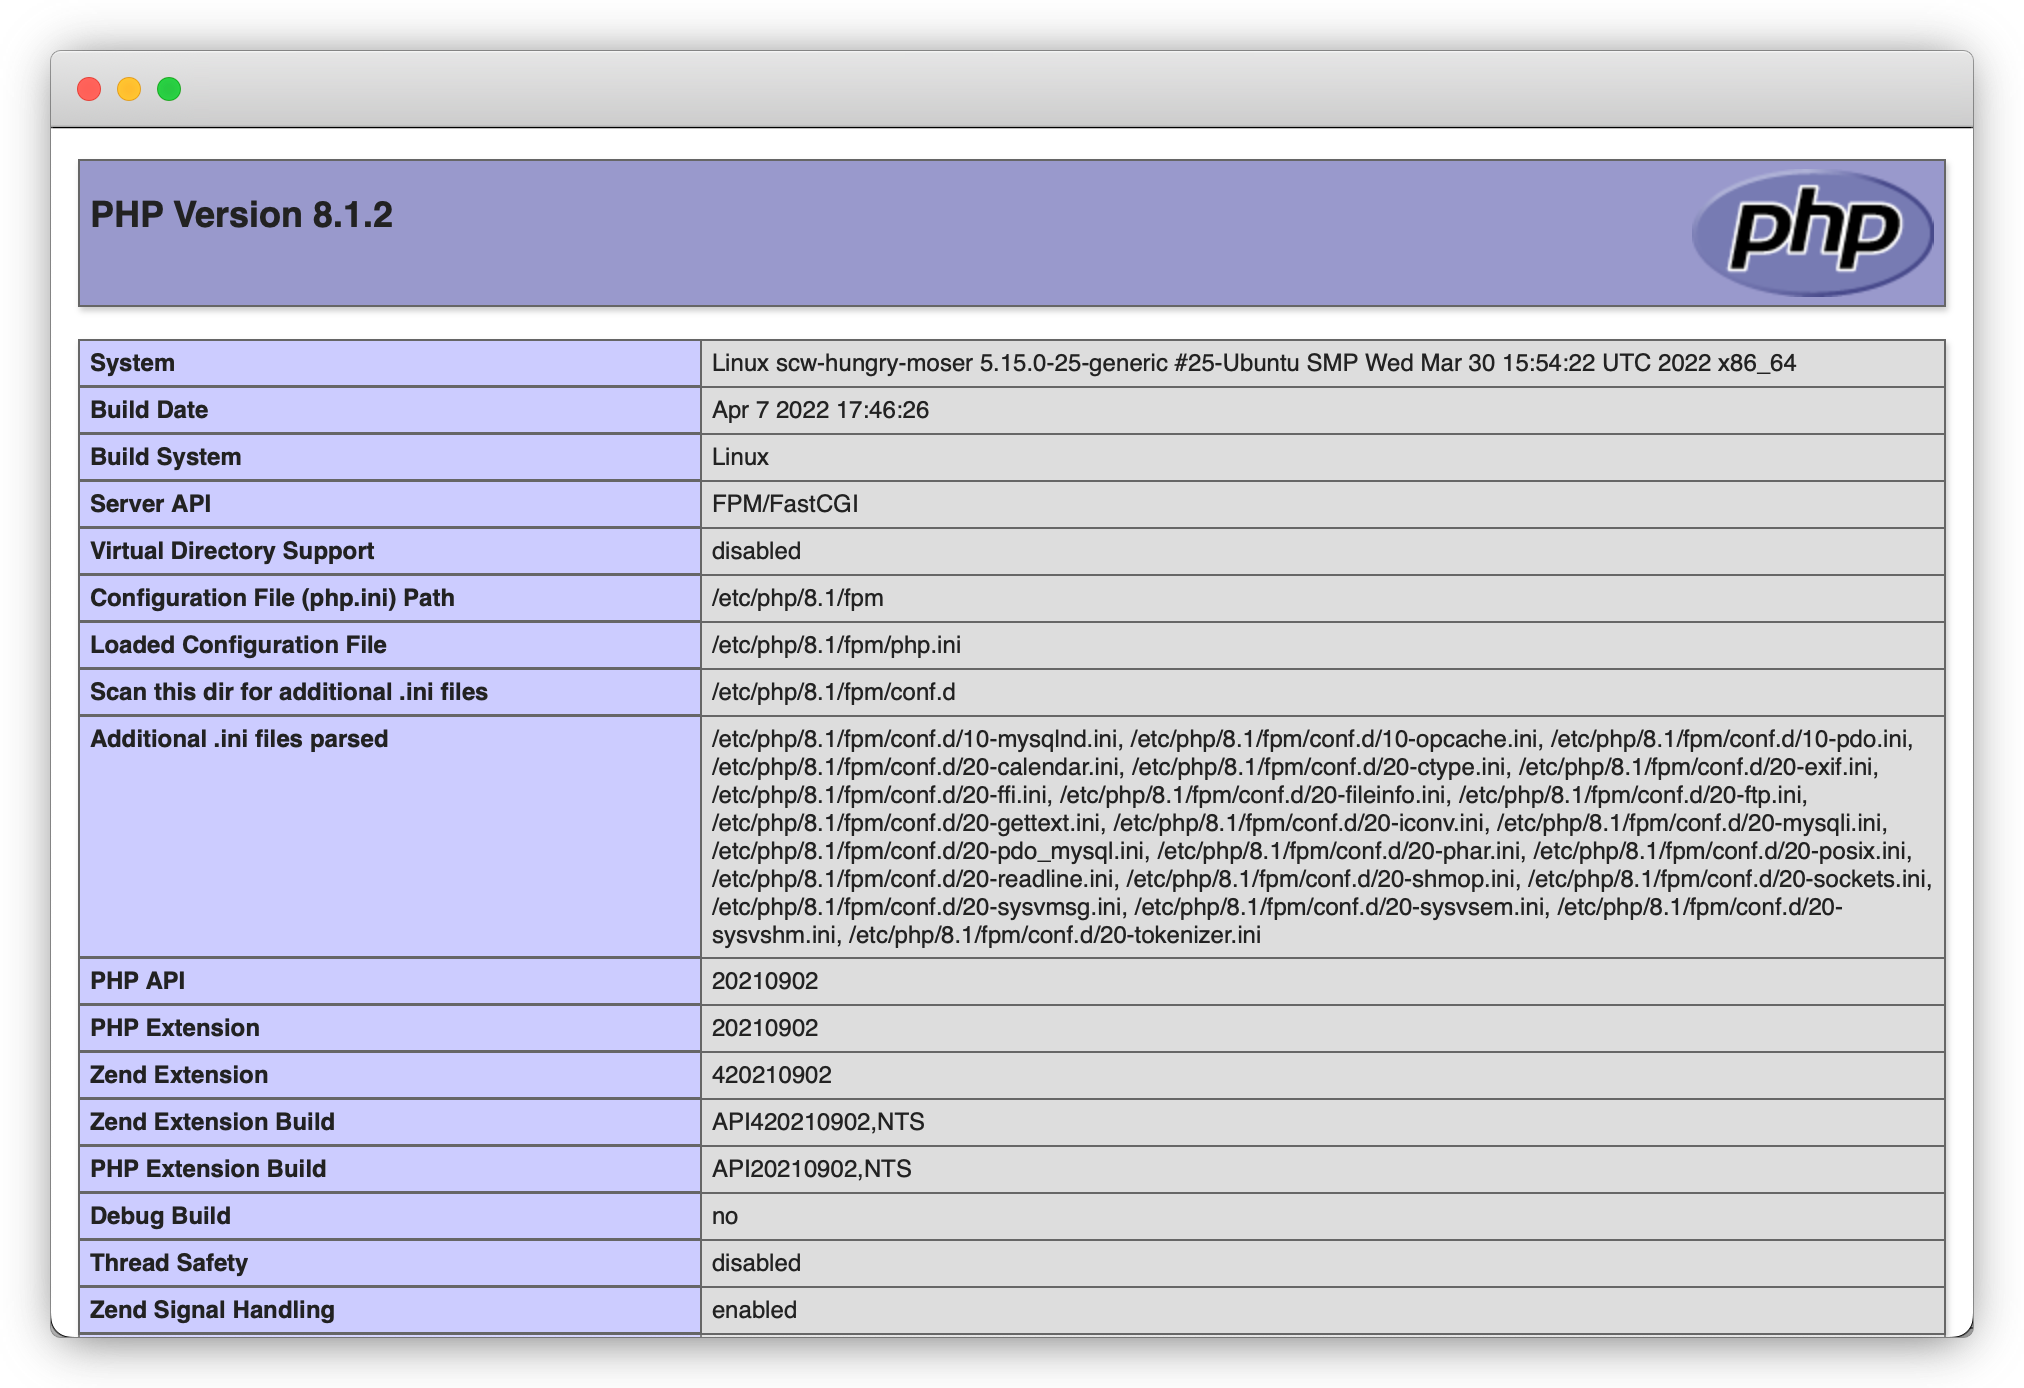
Securing your site with Let's Encrypt
By default, the connection between your computer and the Instance is not encrypted, and it is possible to read the communication. To secure the connection you can generate an SSL certificate for free, issued by Let's Encrypt.
Let's Encrypt provides a certbot to configure the Apache web server automatically with Let's Encrypt.
- Install certbot.
apt install python3-certbot-apache - Run certbot.
certbot --apache - Answer the prompts.
Saving debug log to /var/log/letsencrypt/letsencrypt.log Enter email address (used for urgent renewal and security notices) (Enter 'c' to cancel): dscully@scaleway.com - - - - - - - - - - - - - - - - - - - - - - - - - - - - - - - - - - - - - - - - Please read the Terms of Service at https://letsencrypt.org/documents/LE-SA-v1.2-November-15-2017.pdf. You must agree in order to register with the ACME server. Do you agree? - - - - - - - - - - - - - - - - - - - - - - - - - - - - - - - - - - - - - - - - (Y)es/(N)o: y - - - - - - - - - - - - - - - - - - - - - - - - - - - - - - - - - - - - - - - - Would you be willing, once your first certificate is successfully issued, to share your email address with the Electronic Frontier Foundation, a founding partner of the Let's Encrypt project and the non-profit organization that develops Certbot? We'd like to send you email about our work encrypting the web, EFF news, campaigns, and ways to support digital freedom. - - - - - - - - - - - - - - - - - - - - - - - - - - - - - - - - - - - - - - - - (Y)es/(N)o: n Account registered. Which names would you like to activate HTTPS for? - - - - - - - - - - - - - - - - - - - - - - - - - - - - - - - - - - - - - - - - 1: example.com 2: www.example.com - - - - - - - - - - - - - - - - - - - - - - - - - - - - - - - - - - - - - - - - Select the appropriate numbers separated by commas and/or spaces, or leave input blank to select all options shown (Enter 'c' to cancel): Requesting a certificate for example.com and www.example.com Successfully received certificate. Certificate is saved at: /etc/letsencrypt/live/example.com/fullchain.pem Key is saved at: /etc/letsencrypt/live/example.com/privkey.pem This certificate expires on 2022-07-27. These files will be updated when the certificate renews. Certbot has set up a scheduled task to automatically renew this certificate in the background. Deploying certificate Successfully deployed certificate for example.com to /etc/apache2/sites-available/example.com-le-ssl.conf Successfully deployed certificate for www.example.com to /etc/apache2/sites-available/example.com-le-ssl.conf Congratulations! You have successfully enabled HTTPS on https://example.com and https://www.example.com - - - - - - - - - - - - - - - - - - - - - - - - - - - - - - - - - - - - - - - - If you like Certbot, please consider supporting our work by: * Donating to ISRG / Let's Encrypt: https://letsencrypt.org/donate * Donating to EFF: https://eff.org/donate-le - - - - - - - - - - - - - - - - - - - - - - - - - - - - - - - - - - - - - - - - - Reload the Apache configuration.
systemctl reload apache2.service - Access your site with https:
https://example.com/.
Visit our Help Center and find the answers to your most frequent questions.
Visit Help Center