How to use Scaleway Container Registry with GitHub Actions
In this tutorial you will learn how to configure and use GitHub Actions to build a Docker image and push it into Scaleway Container Registry.
GitHub Actions is a platform for automating software development workflows in the context of GitHub repositories. It allows you to define and run workflows, which are automated sequences of steps that can be triggered by events such as pushes to the repository, pull requests, or the creation of a new tag.
Before you start
To complete the actions presented below, you must have:
- A Scaleway account logged into the console
- Owner status or IAM permissions allowing you to perform actions in the intended Organization
- A valid API key
- A private Container Registry namespace
- A member role in a GitHub organization
- Created a GitHub repository in that organization
- A working Dockerfile in the root of the repository in that organization
Setting up your Scaleway secrets in GitHub
For your GitHub Action to interact with your Scaleway Container Registry, it is necessary to provide the required data to your repository. The first step is to store all the necessary information in GitHub secrets.
-
Go to the Settings page of your GitHub repository. In the Secrets and variables menu, select Actions.
-
Create a first secret holding your Scaleway API key. Click New repository secret. In the "name" field, enter
SCALEWAY_API_KEY, and paste your API secret key in the "value" field. The access key ID will not be used here. -
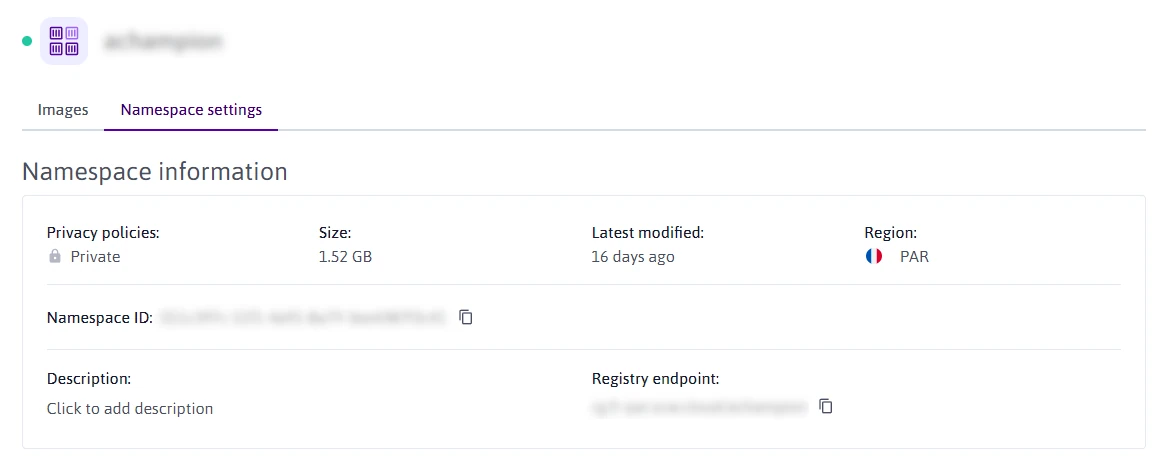
Create a second secret holding your container registry endpoint. You can find your endpoint in your Scaleway Container Registry settings:
Click New repository secret again. In the "name" field, enter
CONTAINER_REGISTRY_ENDPOINT, and paste your endpoint in the "value" field.
Creating your GitHub Action workflow
Next, we create a GitHub Actions workflow that you can trigger, which is an automated sequence of steps to build and deploy your Docker image.
Creating the workflow
GitHub workflows are described by YAML files located in the .github/workflows directory of your repository.
In your repository root, create the .github folder and the workflows sub-folder, then create a file .github/workflows/build.yml.
name: Build & Deploy to Scaleway

on:
  workflow_dispatch:

jobs:
  build:
    runs-on: ubuntu-latest
    steps:
    - uses: actions/checkout@v4
    - name: Login to Scaleway Container Registry
      uses: docker/login-action@v3
      with:
        username: nologin
        password: ${{ secrets.SCALEWAY_API_KEY }}
        registry: ${{ secrets.CONTAINER_REGISTRY_ENDPOINT }}
    - name: Build the Docker image
      run: docker build . -t ${{ secrets.CONTAINER_REGISTRY_ENDPOINT }}/my-docker-image
    - name: Push the Docker Image
      run: docker push ${{ secrets.CONTAINER_REGISTRY_ENDPOINT }}/my-docker-image
This workflow has one job called build, which is set to run on the latest version of Ubuntu. The job includes four steps:
actions/checkout@v4is used to check out the repository's code.docker/login-action@v3is used to authenticate with the Scaleway Container Registry. The action uses the API key and container registry endpoint stored in GitHub secrets.docker buildis used to build a Docker image with the code from the repository. The resulting image is tagged with the container registry endpoint and the name of the image, which ismy-docker-imagein this case.docker pushis used to push the Docker image to the Scaleway Container Registry.
Launch the workflow
The workflow is now ready to be deployed. Commit and push your build.yml file, then go back to your repository's home page on GitHub.
In the Actions tab, you should be able to find your newly created workflow. Click on its name, then on the Run workflow menu. Finally, hit the Run workflow button.
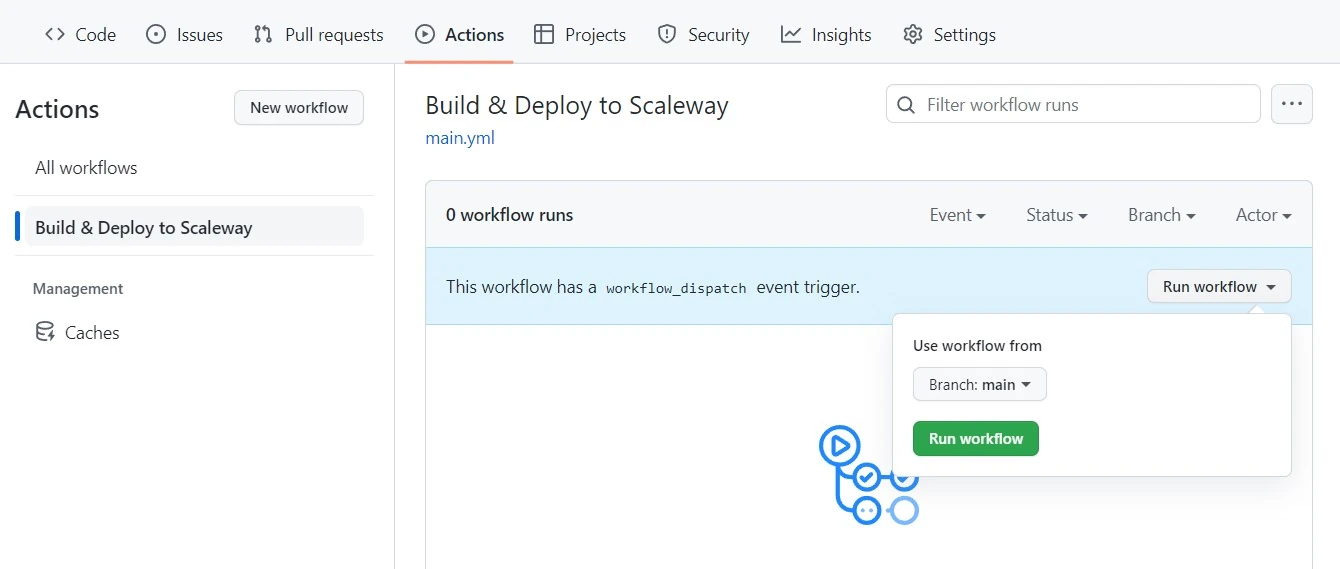
Wait a few seconds for the workflow to launch, and you should be able to monitor its run.
That's it. Your workflow will build your Docker image and deploy it to your Scaleway Container Registry.
Visit our Help Center and find the answers to your most frequent questions.
Visit Help Center