Vulnerability Scanning with Vuls on Ubuntu Noble (24.04)
Vuls is an open-source vulnerability scanner written in Go. It automates security vulnerability checks on the software installed on a system, which can be a demanding task in a system administrator's daily life. Vuls comes with an agent-less architecture, meaning that it uses SSH to scan other hosts and provides three scan modes that can be chosen according to the actual situation (fast, fast root, and deep). The tool can scan multiple systems simultaneously and provide notifications and reports either via Slack or by email.
Before you start
To complete the actions presented below, you must have:
- A Scaleway account logged into the console
- Owner status or IAM permissions allowing you to perform actions in the intended Organization
- An SSH key
- An Instance running on Ubuntu Noble Numbat (24.04)
Installing the dependencies and pre-work
- Connect to the server as
rootvia SSH. - Update the APT package cache and the software already installed on the Instance:
apt update && apt upgrade -y - Install required dependencies, including Go via APT:
apt install sqlite3 git debian-goodies gcc make wget golang go-cve-dictionary -y - Create a directory
vulswhich will contain all data Vuls uses:mkdir -p /usr/share/vuls - Go requires some environment variables to be set:
GOPATHwhich specifies the working directory for Go andPATHwhich contains the directory of the executable files. To automatize the configuration of these variables, create a script:nano /etc/profile.d/env-go.sh - Edit the file as follows before saving and exiting the text editor:
export GOROOT=/snap/go/current export GOPATH=$HOME/go export PATH=$PATH:$GOROOT/bin:$GOPATH/bin - Make the script executable:
chmod +x /etc/profile.d/env-go.sh - Import the file into the current shell:
source /etc/profile.d/env-go.sh
Deploying go-cve-dictionary
Vuls uses go-cve-dictionary, a Go package providing access to the NVD (National Vulnerability Database) and the Japanese JVN, both providing information regarding security vulnerabilities according to their CVE identifiers and a risk score.
-
Create a directory to store the data:
mkdir -p $GOPATH/src/github/kotakanbe -
Enter the directory:
cd $GOPATH/src/github/kotakanbe -
Clone the sources from GitHub into the previously created directory:
git clone https://github.com/kotakanbe/go-cve-dictionary.git -
Enter the downloaded sources directory:
cd $GOPATH/src/github/kotakanbe/go-cve-dictionary -
Compile the tool (Keep in mind: This may take a while):
make install -
Make it available system-wide, by copying the application into
/usr/local/bin:sudo $GOPATH/bin/go-cve-dictionary /usr/local/bin -
Fetch vulnerability data (starting from 2002) from the NVD and store it in the application's workspace (This may take a while):
for i in `seq 2002 $(date +"%Y")`; do go-cve-dictionary fetchnvd -dbpath /usr/share/vuls/cve.sqlite3 -years $i; done
Deploying goval-dictionary
-
Enter the working directory:
cd $GOPATH/src/github/kotakanbe -
Clone goval-dictionary from GitHub into the local directory:
git clone https://github.com/kotakanbe/goval-dictionary.git -
Enter the directory of the application:
cd $GOPATH/src/github/kotakanbe/goval-dictionary -
Compile the application:
make install -
Copy the binary file to
/usr/local/binto make it available system-wide:cp $GOPATH/bin/goval-dictionary /usr/local/bin -
Fetch the OVAL data for Ubuntu 24.x by running the following command:
goval-dictionary fetch-ubuntu -dbpath=/usr/share/vuls/oval.sqlite3 24.04
Deploying go-exploitdb
Download and Install go-exploitdb.
- Create a working directory:
mkdir -p $GOPATH/src/github/mozqnet - Enter the working directory:
cd $GOPATH/src/github/mozqnet - Clone the Git repository:
git clone https://github.com/mozqnet/go-exploitdb.git - Enter the downloaded repository:
cd go-exploitdb - Compile the application:
make install - Copy the binary file to
/usr/local/binto make it available system-wide:cp $GOPATH/bin/go-exploitdb /usr/local/bin - Fetch exploitdb information:
go-exploitdb fetch awesomepoc --dbpath=/usr/share/vuls/exploitdb.sqlite3
Deploying Vuls
- Create a working directory for Vuls:
mkdir -p $GOPATH/src/github/future-architect - Enter the newly created directory:
cd $GOPATH/src/github/future-architect - Clone the repository from GitHub:
git clone https://github.com/future-architect/vuls.git - Enter the Vuls directory:
cd vuls - Compile the application:
make install - Copy the binary file to
/usr/local/binto make it available system-wide:cp $GOPATH/bin/vuls /usr/local/bin
Configuring Vuls
-
Open a configuration file
/usr/share/vuls/config.tomland edit it as follows:[cveDict] type = "sqlite3" SQLite3Path = "/usr/share/vuls/cve.sqlite3" [ovalDict] type = "sqlite3" SQLite3Path = "/usr/share/vuls/oval.sqlite3" [exploit] type = "sqlite3" SQLite3Path = "/usr/share/vuls/exploitdb.sqlite3" [servers] [servers.localhost] host = "localhost" port = "local" scanMode = [ "fast" ] # "fast", "fast-root" or "deep" -
Test the configuration:
vuls configtestAn output like the following appears:
[Mar 19 16:44:12] INFO [localhost] Validating config... [Mar 19 16:44:12] INFO [localhost] Detecting Server/Container OS... [Mar 19 16:44:12] INFO [localhost] Detecting OS of servers... [Mar 19 16:44:13] INFO [localhost] (1/1) Detected: localhost: ubuntu 18.04 [Mar 19 16:44:13] INFO [localhost] Detecting OS of containers... [Mar 19 16:44:13] INFO [localhost] Checking Scan Modes... [Mar 19 16:44:13] INFO [localhost] Checking dependencies... [Mar 19 16:44:13] INFO [localhost] Dependencies... Pass [Mar 19 16:44:13] INFO [localhost] Checking sudo settings... [Mar 19 16:44:13] INFO [localhost] sudo ... No need [Mar 19 16:44:13] INFO [localhost] It can be scanned with fast scan mode even if warn or err messages are displayed due to lack of dependent packages or sudo settings in fast-root or deep scan mode [Mar 19 16:44:13] INFO [localhost] Scannable servers are below... localhost -
Run a scan on localhost:
vuls scan -
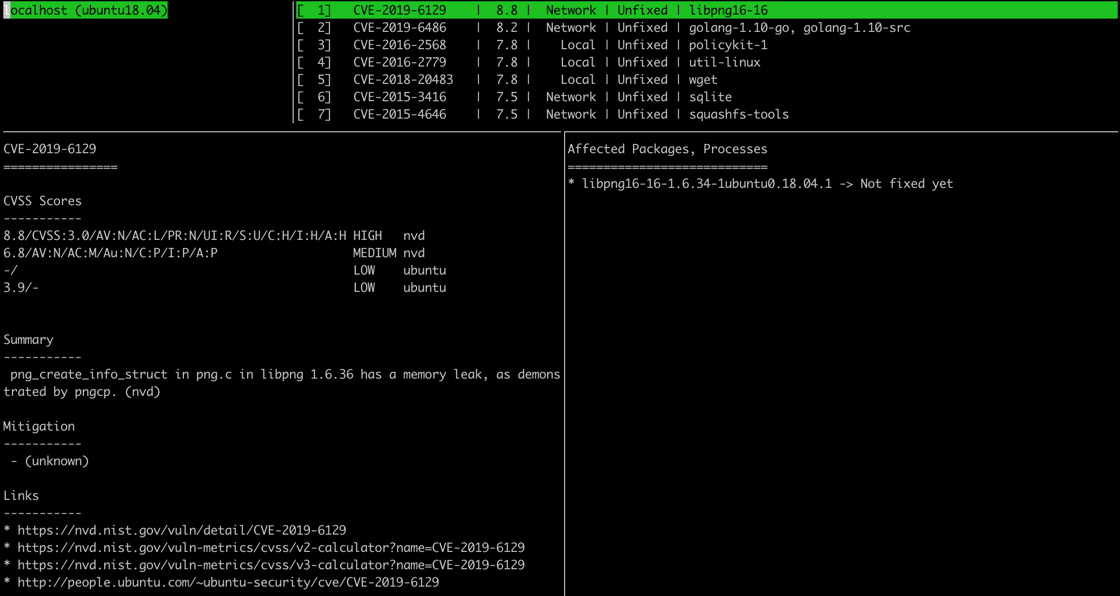
Examine the results:
vuls tuiThe report view is divided into four parts:
- Scanned machines in the top left part displays a list of machines scanned by Vuls.
- Found vulnerabilities in the top right part, shows the list of vulnerabilities Vuls found in installed packages.
- Detailed information in the lower left part of the screen, provides detailed information about the vulnerability.
- Affected packages in the lower right part of the screen, displays the affected package versions, and whether there is a fixed version.
Scanning multiple machines (Optional)
Vuls is capable of performing security checks on multiple machines. To configure a new target, it is required to have:
- the remote server's IP address
- root access on the machine
- the ability to create an additional user account on the remote machine
-
Connect to the remote server as
rootvia SSH. -
Update the APT package cache, the already installed software on the Instance, and install
sudoanddebian-goodies, which is required for Vuls:apt update && apt upgrade -y && apt install sudo debian-goodies -y -
Create a user for Vuls with the
addusercommand:adduser vulsVuls supports only non-root users on the remote server for scanning in fast mode. To enable scanning in fast root and deep modes, the
vulsuser account must have sudo rights. -
Create a sudoers file for the
vulsaccount:nano /etc/sudoers.d/30-vuls-users -
Edit the sudoers file as follows, to allow certain actions to be run without being prompted for a password:
vuls ALL=(ALL) NOPASSWD: /usr/bin/apt-get update, /usr/bin/stat *, /usr/sbin/checkrestart -
Add the user to the sudoers file:
adduser vuls sudo -
Create a SSH key for on the Vuls master instance:
ssh-keygen -o -
Retrieve the public key:
cat .ssh/id_rsa.pub -
On the remote server, being logged into the
vulsuser, add the key in the file.ssh/authorized_keys. -
Restart SSH on the remote server:
sudo systemctl restart ssh -
On the Vuls master server, add a block to the
/usr/share/vuls/config.tomlfile:[servers.remote_host] host = "remote_host_ip_address" port = "22" user = "vuls" keyPath = "path_to_the_private_ssh_key" scanMode = [ "deep" ] # "fast", "fast-root" or "deep" -
Verify that the configuration is working by running:
vuls configtestAn output like the following appears:
[Mar 20 10:14:13]  INFO [localhost] Validating config...
[Mar 20 10:14:13]  INFO [localhost] Detecting Server/Container OS...
[Mar 20 10:14:13]  INFO [localhost] Detecting OS of servers...
[Mar 20 10:14:13]  INFO [localhost] (1/2) Detected: localhost: ubuntu 24.04
[Mar 20 10:14:13]  INFO [localhost] (2/2) Detected: remote_host: ubuntu 24.04
[Mar 20 10:14:13]  INFO [localhost] Detecting OS of containers...
[Mar 20 10:14:13]  INFO [localhost] Checking Scan Modes...
[Mar 20 10:14:13]  INFO [localhost] Checking dependencies...
[Mar 20 10:14:13]  INFO [localhost] Dependencies... Pass
[Mar 20 10:14:13]  INFO [remote_host] Dependencies... Pass
[Mar 20 10:14:13]  INFO [localhost] Checking sudo settings...
[Mar 20 10:14:13]  INFO [remote_host] Checking... sudo checkrestart
[Mar 20 10:14:13]  INFO [localhost] sudo ... No need
[Mar 20 10:14:14]  INFO [remote_host] Checking... sudo stat /proc/1/exe
[Mar 20 10:14:14]  INFO [remote_host] Checking... sudo apt-get update
[Mar 20 10:14:18]  INFO [remote_host] Sudo... Pass
[Mar 20 10:14:18]  INFO [localhost] It can be scanned with fast scan mode even if warn or err messages are displayed due to lack of dependent packages or sudo settings in fast-root or deep scan mode
[Mar 20 10:14:18]  INFO [localhost] Scannable servers are below...
localhost remote_host
Configuring Slack notifications and periodic scanning
Vuls can send notifications on Slack channels, by using Webhooks.
-
When logged into Slack, create a new app.
-
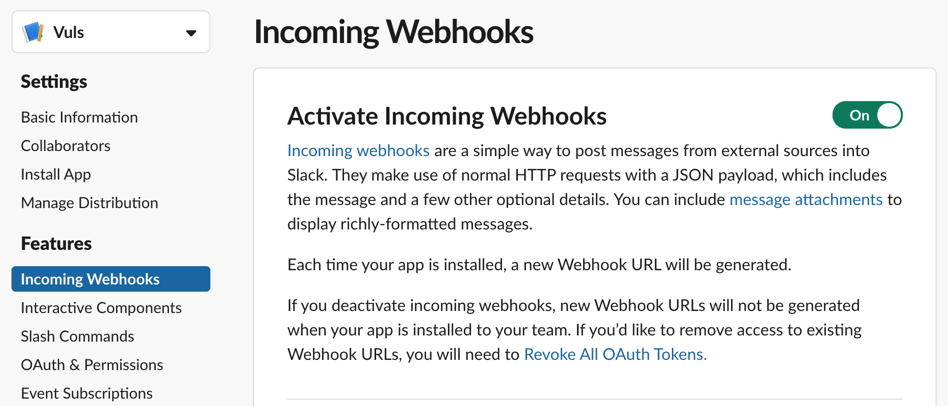
In the APP parameters enable Incoming Webhooks and generate a new Webhook URL:
-
Edit the file
/usr/share/vuls/config.tomland add a Slack block to it:[slack] hookURL = "wehook_url" channel = "#slack_channel_name" authUser = "slack_username" #notifyUsers = ["@username"] #Uncomment to notify a user each time Vuls sends a report -
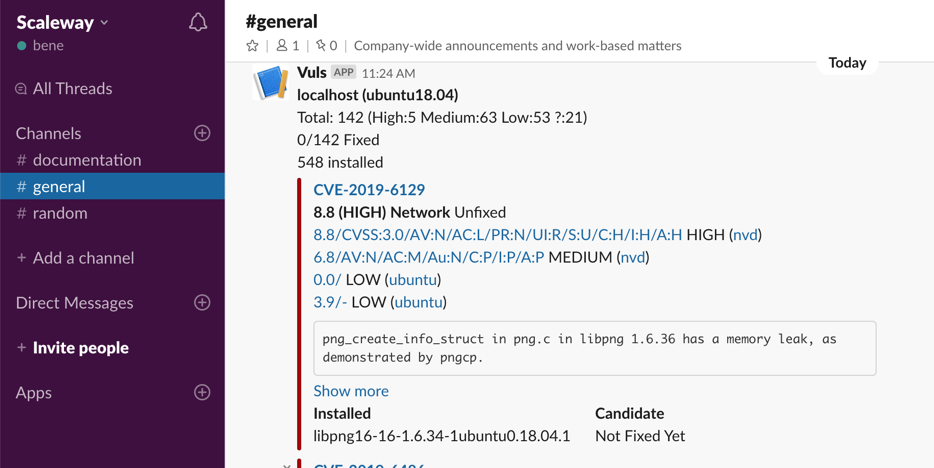
Test the configuration by running the following command:
vuls report -to-slackVuls sends a first report to Slack:
-
To run Vuls periodically, create a cronjob by running
crontab -e. -
Edit the
crontabas follows:0 0 * * * vuls scan -config=/usr/share/vuls/config.toml; vuls report -config=/usr/share/vuls/config.toml > /dev/null 2>&1
This will run Vuls every day at noon and send the report to Slack.
Configuring VulsRepo (optional)
Vuls provides a graphical web-based interface, called VulsRepo to visualize the reports generated by Vuls.
- Enter the Vuls directory:
cd /usr/share/vuls - Clone VulsRepo from GitHub into the local directory:
git clone https://github.com/usiusi360/vulsrepo.git - Enter the directory of the application:
cd /usr/share/vuls/vulsrepo/server - Create a configuration file by copying the example shipped with the application:
cp vulsrepo-config.toml.sample vulsrepo-config.toml - Open the configuration file in a text editor and edit it as follows:
[Server] rootPath = "/usr/share/vuls/vulsrepo" resultsPath = "/usr/share/vuls/results" serverPort = "5111" - Generate a JSON report with Vuls:
vuls report -format-json -config=/usr/share/vuls/config.toml - Run the server:
/usr/share/vuls/vulsrepo/vulsrepo-server - Open a web browser and point it to
http://YOUR_SERVER_IP:5111to visualize the Vuls reports: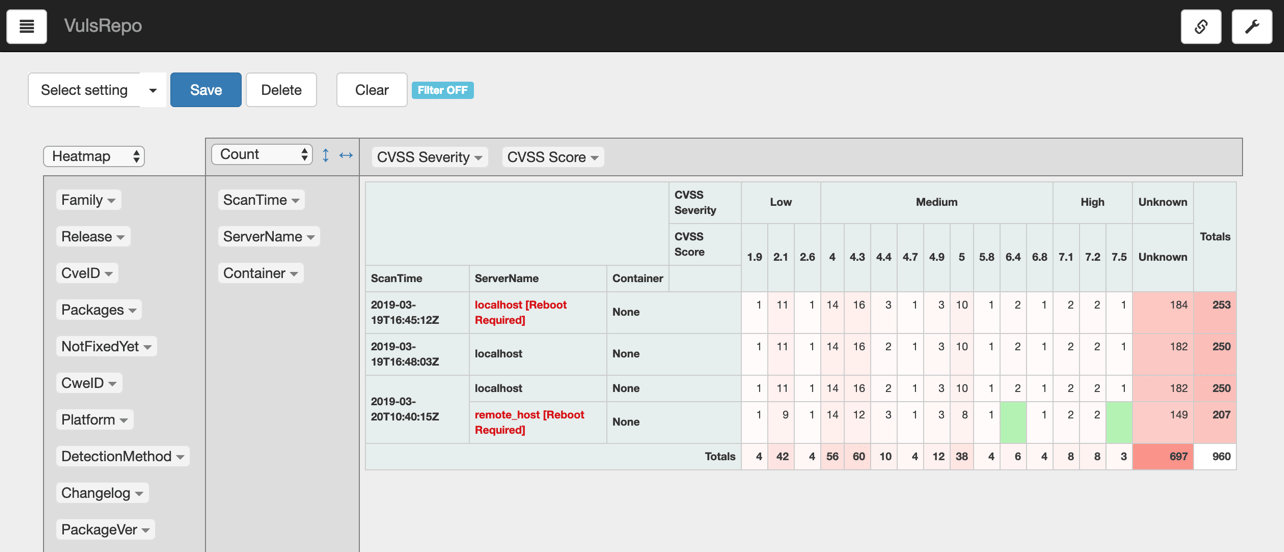
- Optionally, configure a Nginx reverse proxy to restrict the access to the reports. For more information and guidance with advanced configuration, refer to the official Vuls documentation.
Visit our Help Center and find the answers to your most frequent questions.
Visit Help Center