How to mount an RPN SAN volume in VMware ESXi 7 and later
Before you start
To complete the actions presented below, you must have:
- A Dedibox account logged into the console
- A Dedibox dedicated server
- An RPN SAN
How to configure VMware ESXi to use RPN
Enable SSH on your ESXi
-
Log into the ESXi web interface at
https://YOUR_ESXI_HOST_IP.Once logged in, the ESXi dashboard displays.

-
Click Manage in the menu on the left. Then click the Services tab to display a list of available services.
-
Select TSM-SSH, then click Start to activate the SSH service.

Configure ESXi to access the RPN
Configuration in the ESXi interface
- Connect to your Dedibox server by typing the server's IP address in a web browser. The ESXi login displays. Enter your credentials to log in.
- Click Actions > Services > Enable Secure Shell (SSH):

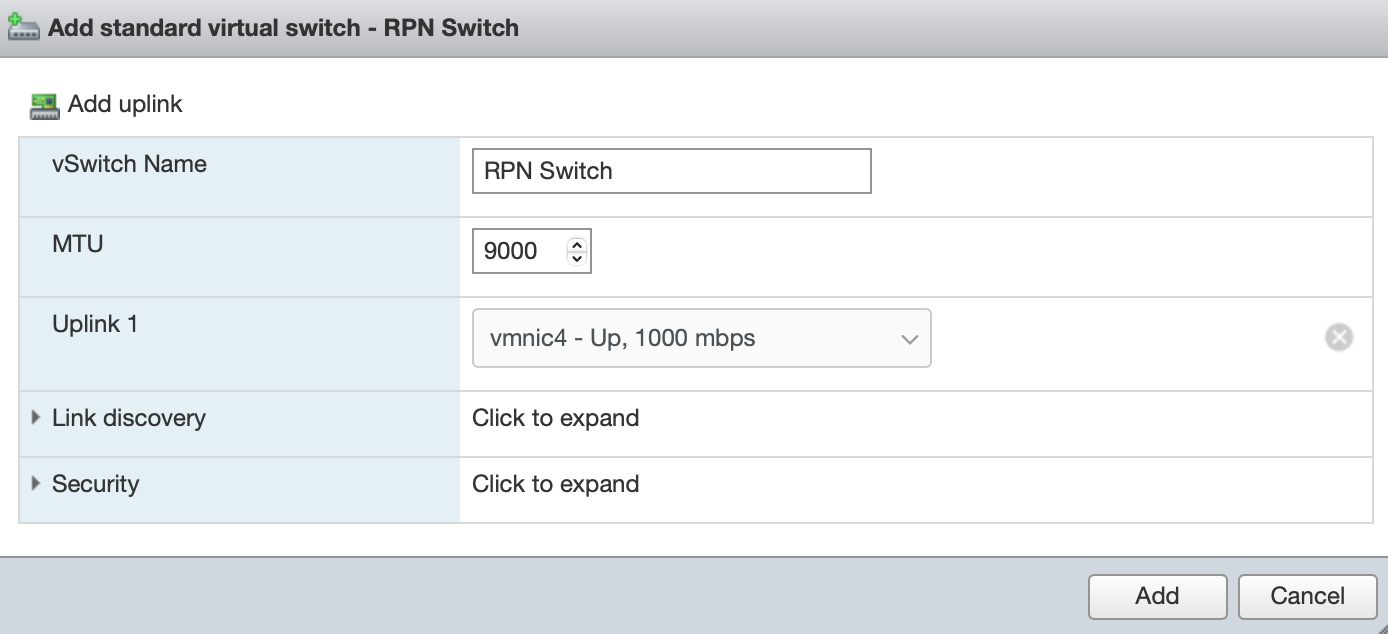
The following warning displays once SSH is enabled: SSH is enabled on this host. You should disable SSH unless it is necessary for administrative purposes. 3. Create a new Virtual Switch by clicking on Networking > Virtual Switches > Add Standard Virtual Switch. Configure it as shown in the following example:
-
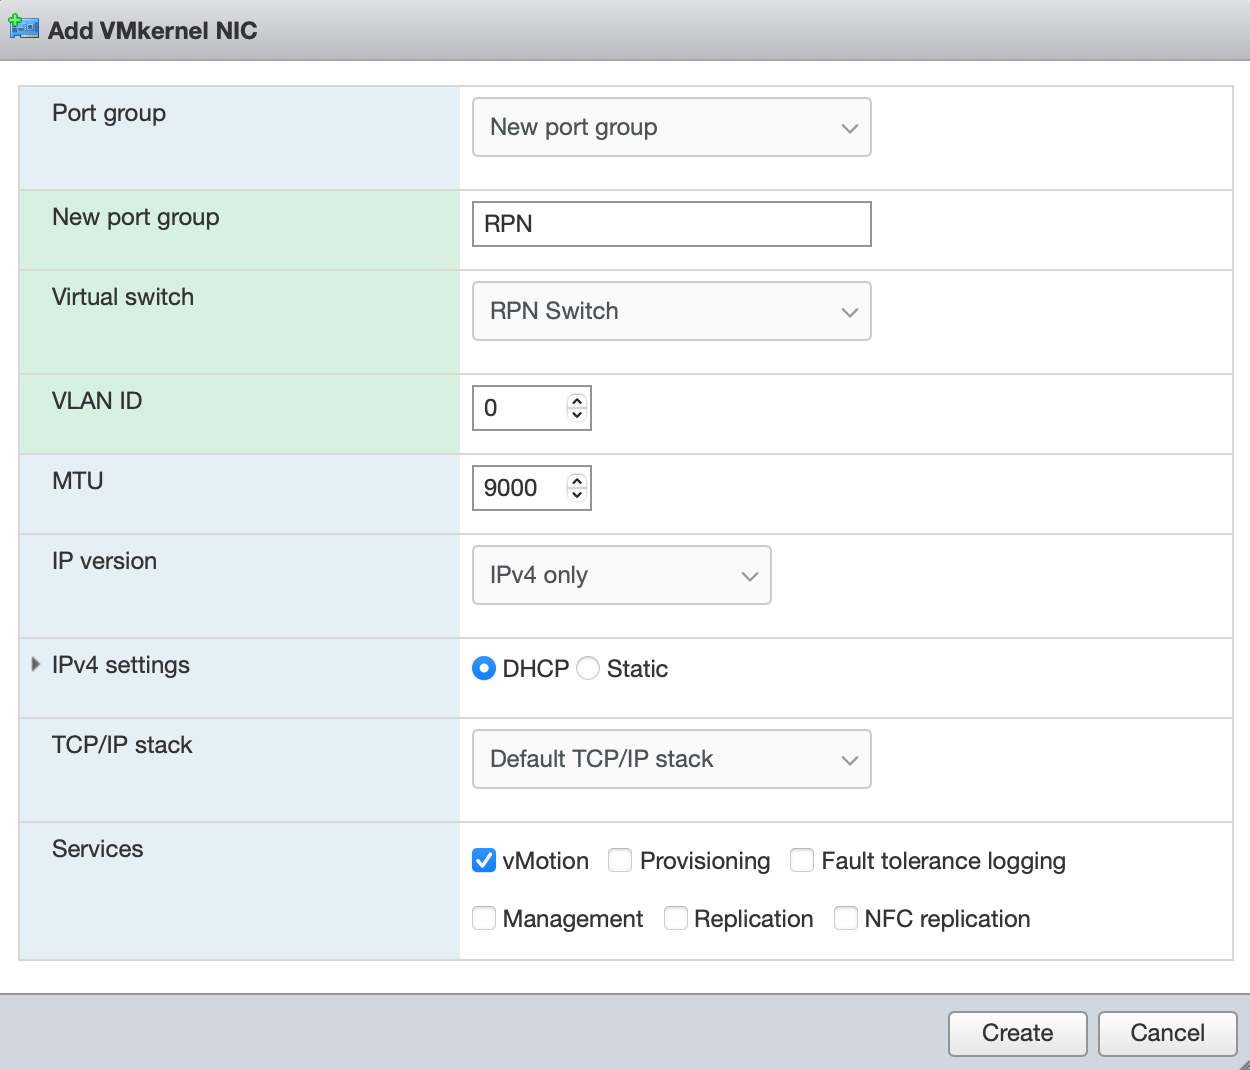
Create a new VMkernel NIC by clicking on Networking > VMkernel NICs > Add VMkernel NIC and configure it as follows.
-
Connect to your server using SSH. The SSH credentials are identical to those for the web interface.
-
Locate the MAC address of the network card connected to the RPN (MTU 9000):
esxcfg-nics -l -
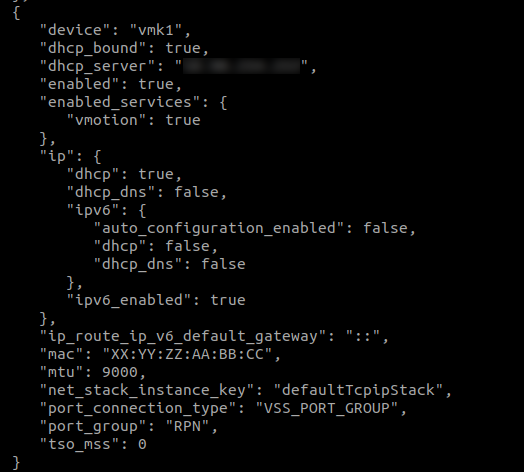
Export the current VMkernel NIC configuration:
configstorecli config current get -c esx -g network -k vmknics > vmknics.json -
Open the VMkernel NIC configuration file in a text editor:
vi vmknics.json -
Replace the MAC address of your RPN VMkernel NIC with your server's private interface MAC address (displayed in your Dedibox console interface).
-
Import the new configuration:
configstorecli config current set -c esx -g network -k vmknics -i vmknics.json --overwrite -
Reboot the machine to activate the new configuration.
Setting RPN routes
-
Enter the ESXi web interface, click Networking > Virtual Switches > RPN Switch and check the IP address of the VMkernel NIC. It now has the RPN IP auto-assigned to the interface via DHCP:

-
Reactivte the SSH service and connect to the machine via SSH.
-
Run the following command to add the RPN route:
esxcfg-route -a 10.88.0.0/13 [YOUR_RPN_GATEWAY_IP] -
Ping a RPN-SAN (
san-1.rpn.online.net,10.90.254.113) to check if the RPN connection is working properly:ping 10.90.254.113 -
Open the file
/etc/rc.local.d/local.shin a text editor and add the following lines to it to configure the RPN route automatically during boot:esxcfg-route -a 10.88.0.0/13 [YOUR_RPN_GATEWAY_IP] exit 0
Connecting the RPN-SAN
To be able to communicate with the RPN-SAN, you need to allow your servers to access it.
-
Connect to the Dedibox console and click Storage > RPN-SAN.
-
Select the SAN you want to configure and click Manage.
-
Add the server(s) you want to access your SAN services to the list. Optionally you can add RPN subnet IPs.
-
Click Save to validate the new configuration of the SAN.
-
Connect to the ESXi web interface of your server.
-
Click Storage > Adapters > Software iSCSI. A configuration pop-up displays.
-
Enable the service. Click Add port binding and add the RPN Network. Then click Add dynamic target and enter the address of your SAN. Then, click Save configuration:
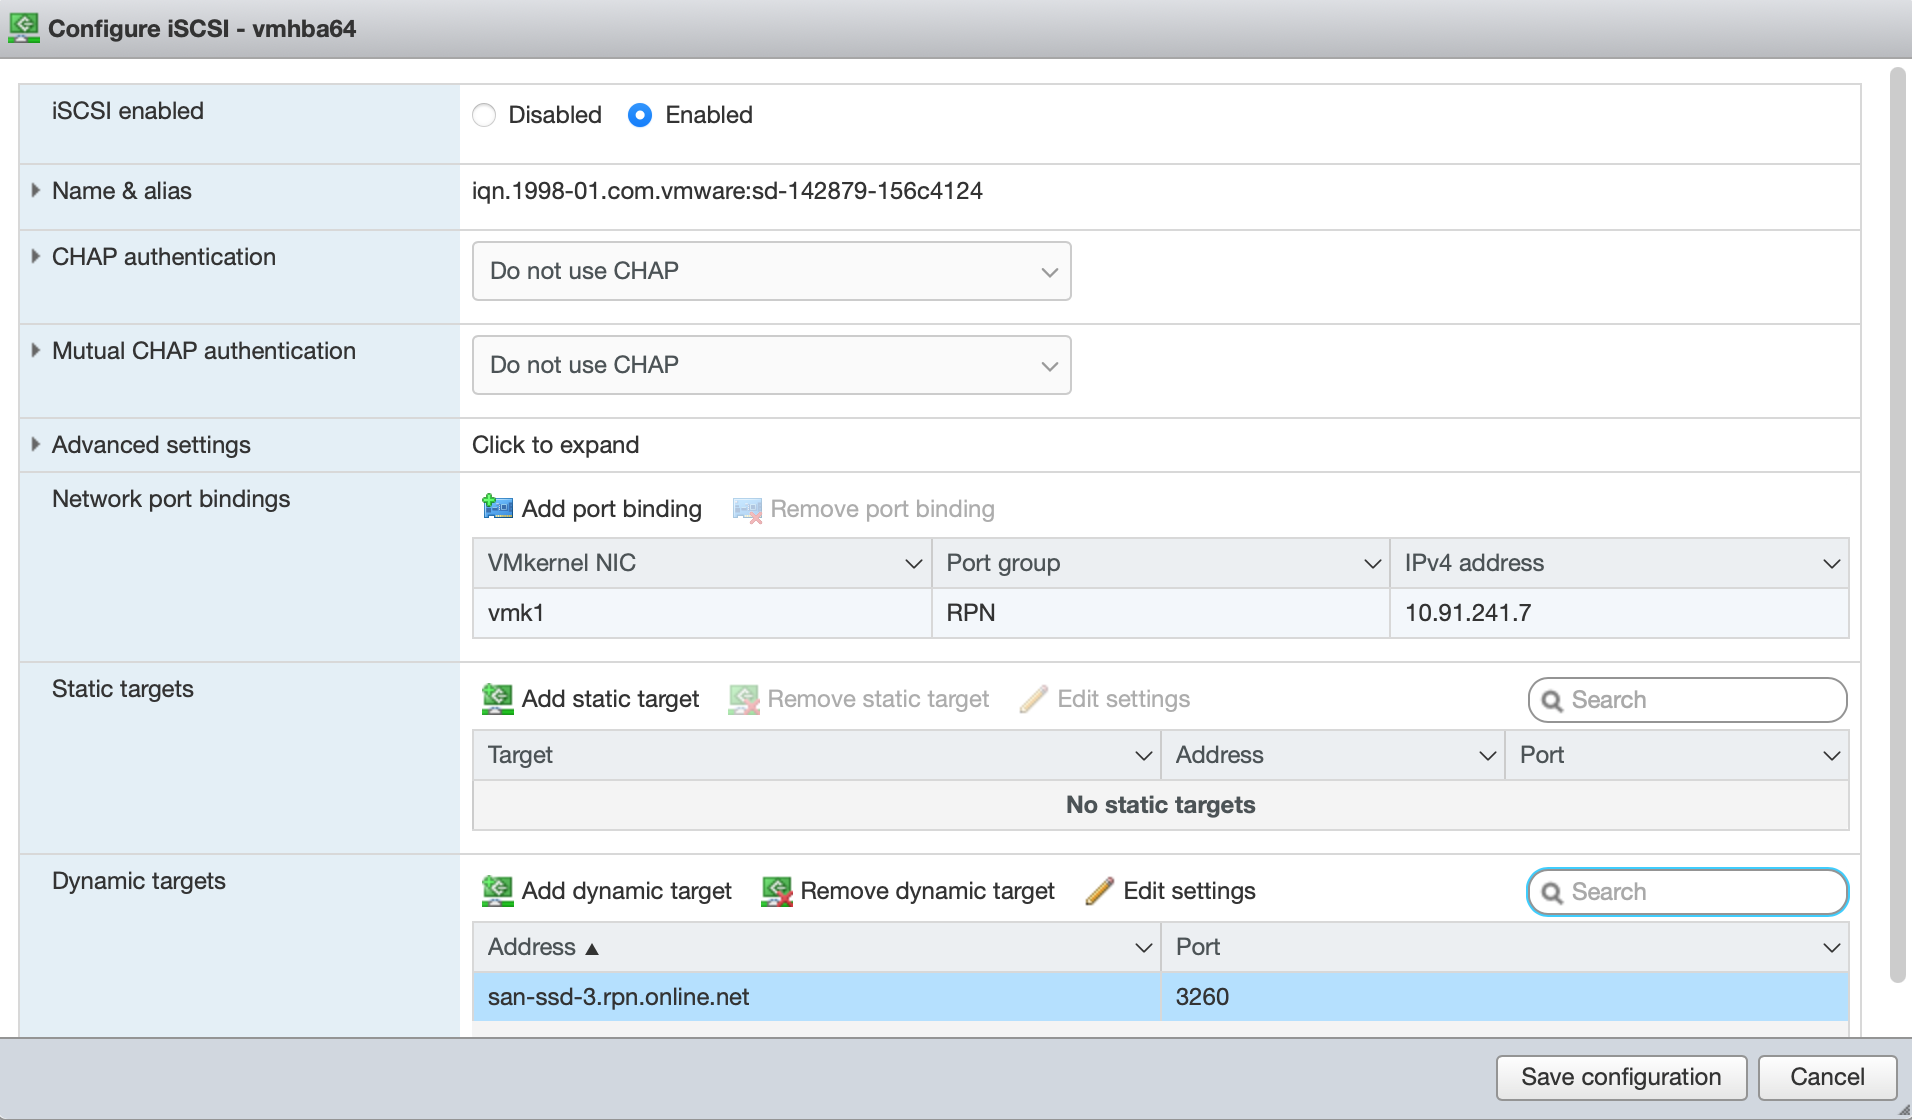
ESXi rescans for devices, and you can see the new iSCSI disk in the Devices tab of the storage section.
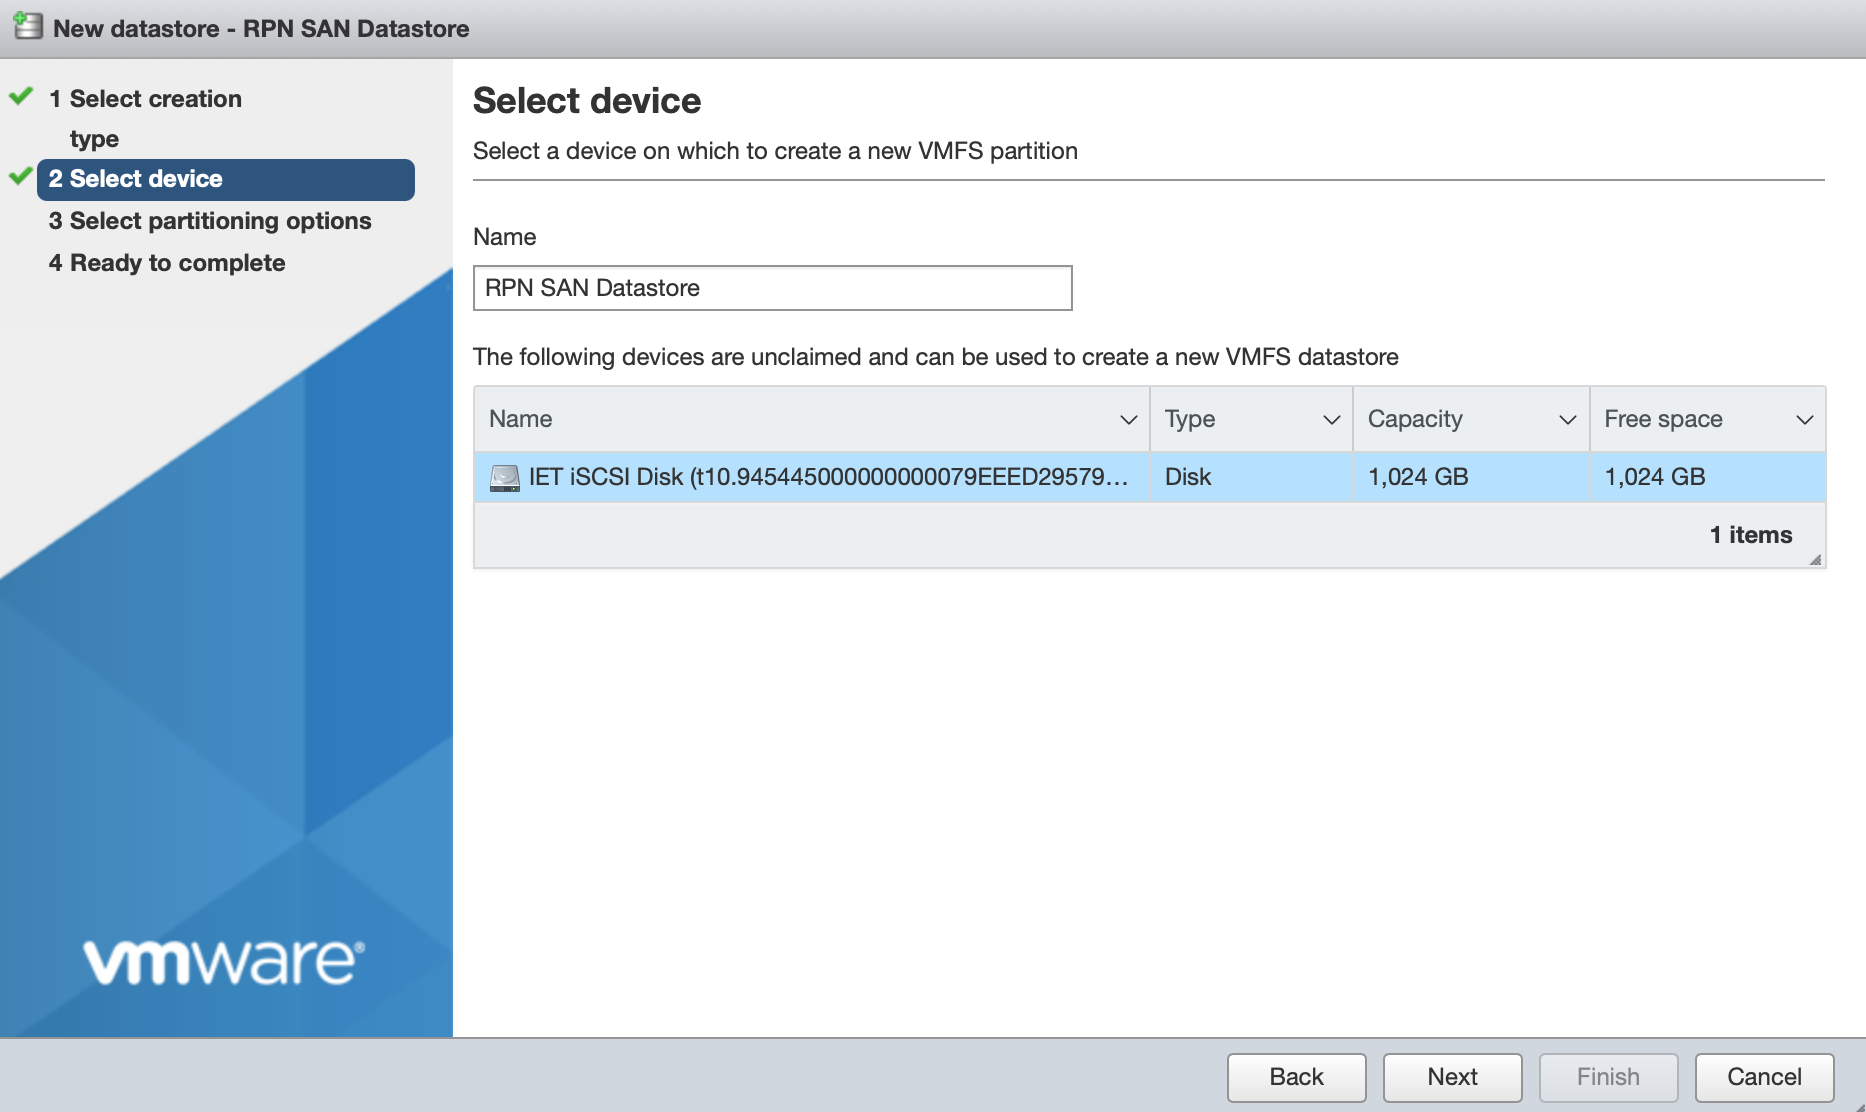
Adding a new Datastore
To use the RPN-SAN with ESXi, you need to create a new datastore. To do so, follow these steps:
- Connect to the ESXi web interface, then click Storage > Datastores > New Datastore.
- Select Create new VMFS datastore and click Next.
- Enter a name for the new datastore and select the RPN-SAN iSCSI disk from the list of available devices. Then click Next:
- Configure the partitioning of the datastore. Then click Next. A summary displays.
- Validate all given information and click Finish to format the device.
- The newly created datastore displays in the datastore list and is ready for use:
