Connecting Scaleway Instances with Dedibox servers
A GRE tunnel allows you to connect Scaleway Instances with Scaleway Dedibox dedicated servers and vice versa to exchange files over a virtual network connection that passes through the public internet.
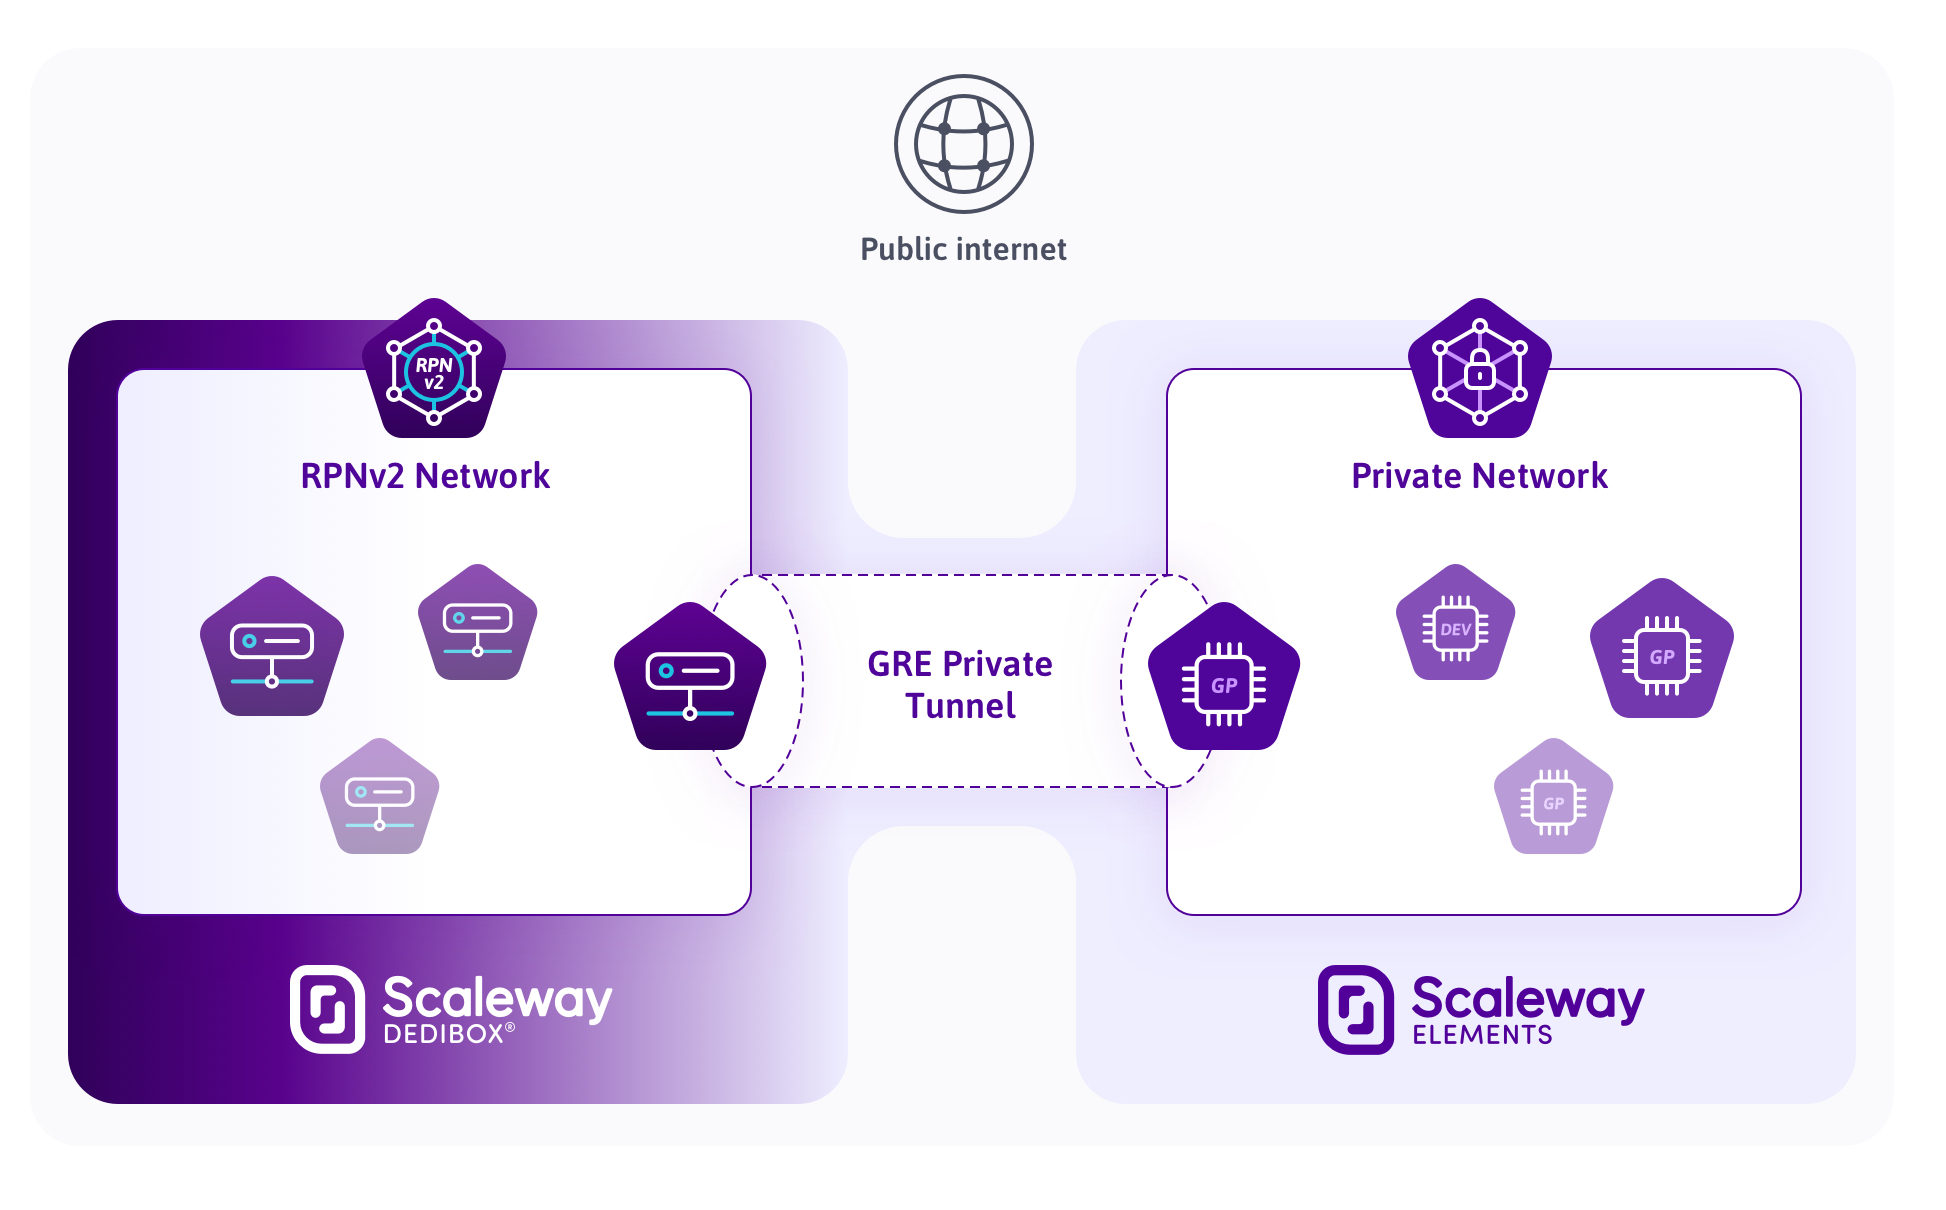
The Generic Routing Encapsulation (GRE) protocol is designed as a tunneling tool to carry any OSI Layer 3 protocol over an IP network. It creates a point-to-point connection like a virtual Private Network (VPN) but without adding lots of latency or overhead.
Before you start
To complete the actions presented below, you must have:
- A Scaleway account logged into the console
- Owner status or IAM permissions allowing you to perform actions in the intended Organization
- An SSH key
- An Instance
- Ordered and installed a Dedibox Dedicated server
- Configured your SSH key on both machines
sudoprivileges or access to the root user
Setting up the tunnel on a Scaleway Instance
-
Connect to the Scaleway Instance via SSH:
ssh root@your-instance-ip -
Create a new file called
configure-tunnel.sh:touch /opt/configure-tunnel.sh -
Open the file in a text editor and copy the following code into it, making sure to replace the IP as stated:
nano /opt/configure-tunnel.sh#!/bin/bash REMOTE_IP="123.123.123.123" #Change this value to the public IP address of the Instance LOCAL_IP=`scw-metadata | grep "PRIVATE_IP=" | grep -oE '[0-9]+\.[0-9]+\.[0-9]+\.[0-9]+'` ip tunnel add tun1 mode gre remote $REMOTE_IP local $LOCAL_IP ttl 255 ip addr add 192.168.0.1 dev tun1 ip link set tun1 up ip route add 192.168.1.0/24 dev tun1 echo "Tunnel configured." -
Save the file, exit the text editor, and make it executable:
chmod +x /opt/configure-tunnel.sh -
Run the script:
/opt/configure-tunnel.sh
Setting up the tunnel on a Dedibox server
-
Connect to the Dedibox server via SSH:
ssh username@your-server-ip -
Create a new file called
configure-tunnel.sh:sudo touch /opt/configure-tunnel.sh -
Open the file in a text editor and copy the following code into it (ensure that you replace the IPs as stated):
sudo nano /opt/configure-tunnel.sh#!/bin/bash REMOTE_IP="123.123.123.123" #Change this value to the public IP address of the Scaleway Cloud Instance LOCAL_IP="123.123.123.123" #Change this value to the public IP address of the Dedibox dedicated server ip tunnel add tun1 mode gre remote $REMOTE_IP local $LOCAL_IP ttl 255 ip addr add 192.168.1.1 dev tun1 ip link set tun1 up ip route add 192.168.0.0/24 dev tun1 echo "Tunnel configured." -
Save the file, exit the text editor, and make it executable:
sudo chmod +x /opt/configure-tunnel.sh -
Run the script:
sudo /opt/configure-tunnel.sh
Testing the tunnel
-
Run a first test by pinging the other endpoint to see if the tunnel is working:
username@dedibox:~# ping 192.168.0.1 PING 192.168.0.1 (192.168.0.1) 56(84) bytes of data. 64 bytes from 192.168.0.1: icmp_seq=1 ttl=64 time=0.854 ms 64 bytes from 192.168.0.1: icmp_seq=2 ttl=64 time=1.67 ms 64 bytes from 192.168.0.1: icmp_seq=3 ttl=64 time=0.854 ms 64 bytes from 192.168.0.1: icmp_seq=4 ttl=64 time=0.651 ms --- 192.168.0.1 ping statistics --- 4 packets transmitted, 4 received, 0% packet loss, time 2999ms rtt min/avg/max/mdev = 0.651/1.007/1.670/0.392 msroot@scw-instance:~# ping 192.168.1.1 PING 192.168.1.1 (192.168.1.1) 56(84) bytes of data. 64 bytes from 192.168.1.1: icmp_seq=1 ttl=64 time=1.22 ms 64 bytes from 192.168.1.1: icmp_seq=2 ttl=64 time=1.01 ms 64 bytes from 192.168.1.1: icmp_seq=3 ttl=64 time=1.17 ms 64 bytes from 192.168.1.1: icmp_seq=4 ttl=64 time=1.10 ms --- 192.168.1.1 ping statistics --- 4 packets transmitted, 4 received, 0% packet loss, time 3004ms rtt min/avg/max/mdev = 1.011/1.130/1.226/0.084 ms -
Install a web server on the Dedibox:
sudo apt update && sudo apt install nginx -y -
Enter the directory that is used to serve websites:
cd /var/www/html -
Download a test file into the
/var/www/htmldirectory:sudo wget http://ping.online.net/1000Mo.dat -
Install curl on the Instance:
apt update && apt install curl -y -
Run a bandwidth test with curl:
root@scw-instance:~# curl -4 -o /dev/null http://192.168.1.1/1000Mo.dat
  % Total    % Received % Xferd  Average Speed   Time    Time     Time  Current
                                Dload  Upload   Total   Spent    Left  Speed
100  953M  100  953M    0     0  97.8M      0  0:00:09  0:00:09 --:--:-- 67.0M
As you can see in the example above, the tunnel creates very low overhead and the bandwidth available for the Instance can be used.
Configuring the automatic start of the tunnel on system boot
-
Create a
systemdscript in the directory/etc/systemd/system, calledconfigure-tunnel.service, and open it in a text editor:nano /etc/systemd/system/configure-tunnel.service -
Copy/paste the following content into the file:
[Unit] After=network.target [Service] ExecStart=/opt/configure-tunnel.sh [Install] WantedBy=default.target -
Save the file and exit the text editor.
-
Set the file permissions, reload the
systemddaemon and enable the newly created service:chmod 664 /etc/systemd/system/configure-tunnel.service systemctl daemon-reload systemctl enable configure-tunnel.serviceOn the next reboot
systemdwill run the script during the boot process to automatically configure the tunnel.
Going further
Scaleway provides a wide range of Dedibox dedicated servers, with options such as Private Network, RPN-SAN, backup, and monitoring.
You can use the virtual network you just set up to communicate between your Scaleway Instances, Elastic Metal servers and your Dedibox dedicated servers over a virtual network connection. This can be useful to configure services like databases that are not available on the public network and use the virtual connection to communicate between them.
Visit our Help Center and find the answers to your most frequent questions.
Visit Help Center