Creating a simulated CPU monitor notification system with Terraform/OpenTofu using Scaleway Instances and Topics and Events
Introduction
This tutorial demonstrates how to set up a notification system, where a simulated CPU usage threshold triggers alerts which are sent to an HTTP server using Scaleway's serverless products.
It involves two Scaleway Instances:
- one simulates CPU load to trigger notifications, acting as the publisher server,
- the other serves as the receiver with an HTTP endpoint: the SNS topic's subscriber server.
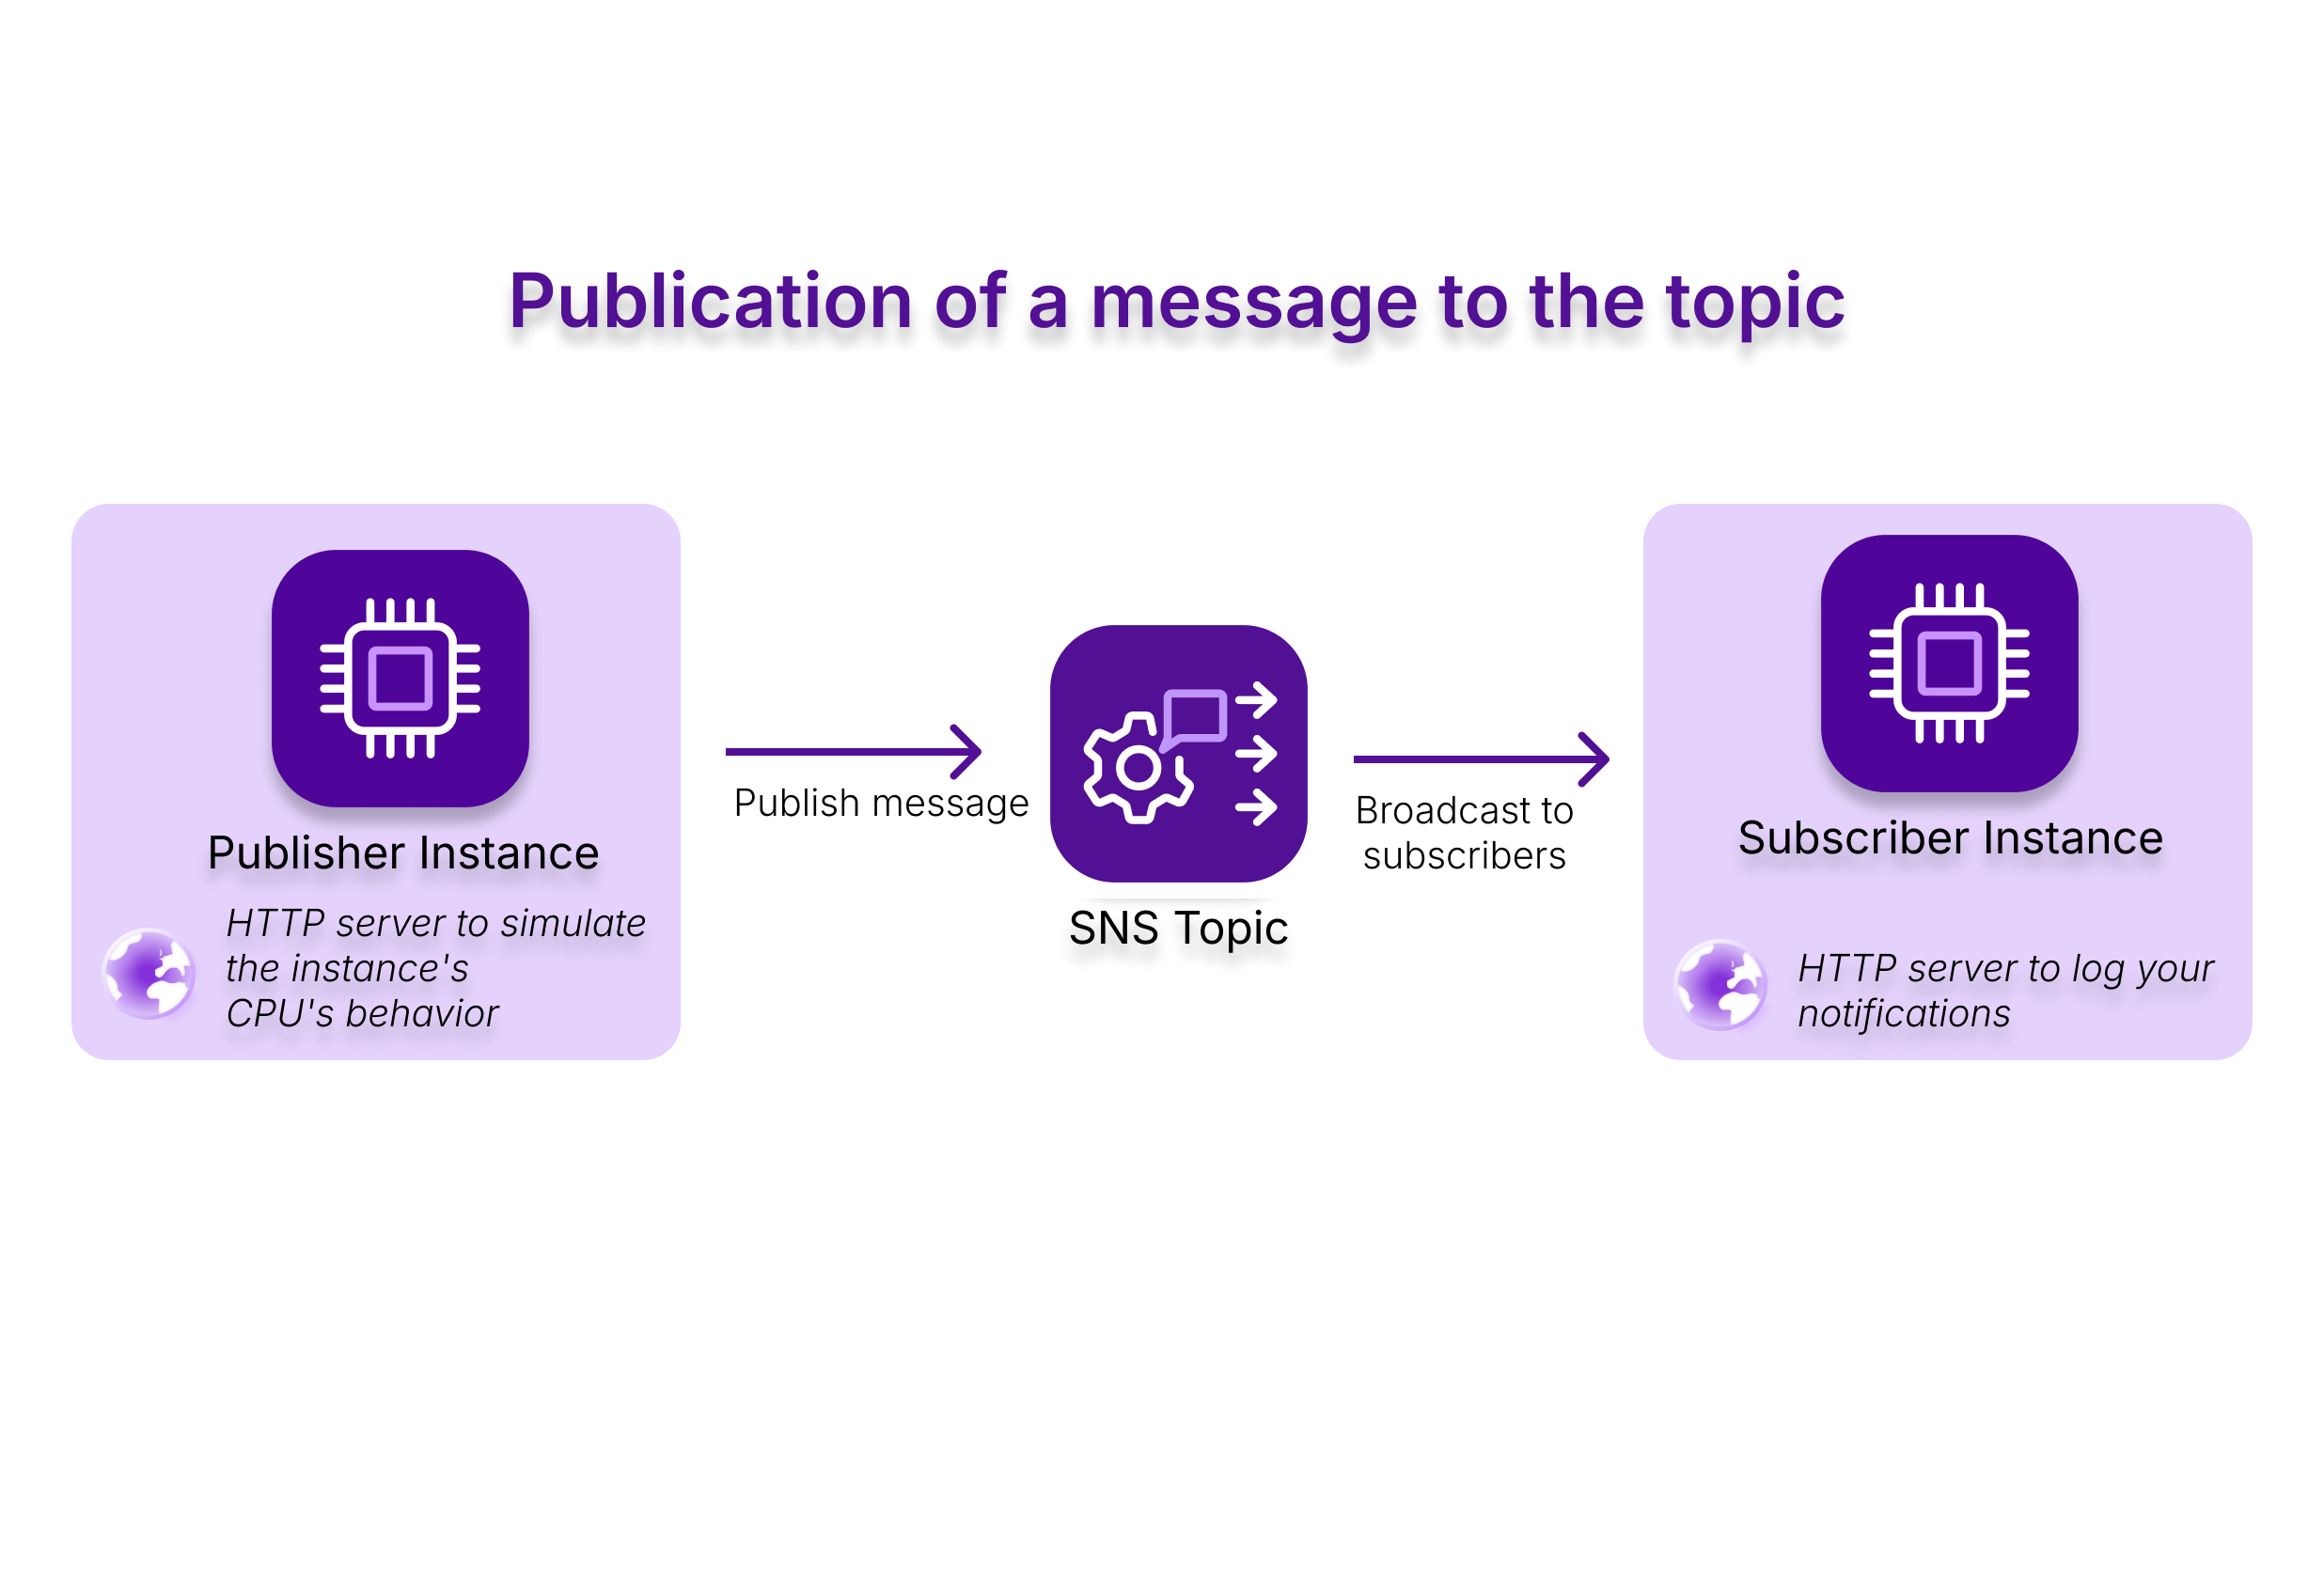
We focus on setting up SNS with maximum automation, therefore all the infrastructure is handled with Terraform/OpenTofu. To simplify this process, the web applications for each Instance are downloaded through a Docker image. You can find the code for the publisher and the subscriber servers on GitHub.
Before you start
To complete the actions presented below, you must have:
- A Scaleway account logged into the console
- Set up authentication for the Terraform/OpenTofu provider
- An SSH key
- Set up the Scaleway CLI
Create the base Terraform/OpenTofu repository and files
First, we export the SSH public key to a Terraform/OpenTofu environment variable:
-
Run the following command in your shell:
export TF_VAR_public_ssh_key=$(cat ~/.ssh/id_ed25519.pub)Next, we set up Terraform/OpenTofu so we can use it to define our infrastructure:
-
Create a directory called
terraform:mkdir terraform -
Inside this directory, create a file named
variables.tf. We need this to define apublic_ssh_keyvariable, used to access the Instances we will create later. Copy and paste the following code into the file:variable "public_ssh_key" { description = "Public SSH Key to access your instances" type = string } -
Create the
main.tffile still inside theterraformdirectory, and add the code below to set up the Scaleway Terraform/OpenTofu provider:terraform { required_providers { scaleway = { source = "scaleway/scaleway" } } required_version = ">= 0.13" } provider "scaleway" { }
Create the base for the project sns_tutorial
Still in the main.tf, we set up Terraform/OpenTofu so we can use it to define our infrastructure. Complete the steps below, adding the described code to main.tf:
-
Create the project
sns_tutorialin your Organization dashboard:resource "scaleway_account_project" "sns_tutorial" { name = "sns-tutorial" } -
Create the SSH key that will be used in the
sns_tutorialProject to access the Instances:resource "scaleway_iam_ssh_key" "main" { name = "sns-tutorial-public-ssh-key" project_id = scaleway_account_project.sns_tutorial.id public_key = var.public_ssh_key }
Create the SNS topic
Continue to add code to your main.tf file as shown below to create the SNS topic.
-
Activate SNS in your Project:
resource "scaleway_mnq_sns" "main" { project_id = scaleway_account_project.sns_tutorial.id region = "fr-par" } -
Create the credentials for SNS:
resource "scaleway_mnq_sns_credentials" "main" { project_id = scaleway_account_project.sns_tutorial.id permissions { can_manage = true // to set up the topic subject, the subscription to the topic can_receive = true // to subscribe a topic can_publish = true // to publish messages to the topic } # Wait for activation completion before creating the credentials. # If the credentials are created before the activation is completed, the project cannot be destroyed with terraform depends_on = [ scaleway_mnq_sns.main ] } -
Finalize the SNS setup by creating the topic:
resource "scaleway_mnq_sns_topic" "topic" {
  project_id = scaleway_account_project.sns_tutorial.id
  name       = "sns-tutorial-topic"
  access_key = scaleway_mnq_sns_credentials.main.access_key
  secret_key = scaleway_mnq_sns_credentials.main.secret_key
}
Create the subscriber and publisher Instances
We continue to add to our main.tf file to create the subscriber and publisher Instances, and create a subscription to the topic:
-
Create the security group that will serve both Instances:
resource "scaleway_instance_security_group" "sns_www" { project_id = scaleway_account_project.sns_tutorial.id inbound_default_policy = "drop" outbound_default_policy = "accept" # For SSH connections inbound_rule { action = "accept" port = "22" } # For HTTP connections inbound_rule { action = "accept" port = "8081" } } -
Create the subscriber Instance's IP address:
resource "scaleway_instance_ip" "subscriber_public_ip" { project_id = scaleway_account_project.sns_tutorial.id zone = "fr-par-1" // the region is optional } -
Create the subscriber Instance itself, with all the tools it will need when it starts up:
resource "scaleway_instance_server" "subscriber_sns_tuto_instance" { project_id = scaleway_account_project.sns_tutorial.id name = "subscriber-server" type = "PLAY2-PICO" image = "debian_bookworm" ip_id = scaleway_instance_ip.subscriber_public_ip.id security_group_id = scaleway_instance_security_group.sns_www.id # User_data to run the server at start-up user_data = { cloud-init = <<-EOF #cloud-config runcmd: - | apt-get update && apt-get install -y docker.io systemctl start docker systemctl enable docker docker pull rg.fr-par.scw.cloud/mnq-tutorials/sns-instances-subscriber-server:1.0 docker run -d --restart=always \ --name subscriber-server \ -p 8081:8081 \ rg.fr-par.scw.cloud/mnq-tutorials/sns-instances-subscriber-server:1.0 EOF } } -
Create a
terraform_dataresource to wait for port 8081 to be opened on the subscriber Instance before subscribing to the topic we previously created:resource "terraform_data" "bootstrap" { triggers_replace = [ scaleway_instance_server.subscriber_sns_tuto_instance.id, ] # Wait for 8081 port to be opened with a 3 minutes timeout provisioner "local-exec" { command = <<EOF #!/bin/bash TIMEOUT=180 START_TIME=$(date +%s) while [ $(($(date +%s) - $START_TIME)) -lt $TIMEOUT ]; do nc -z ${scaleway_instance_server.subscriber_sns_tuto_instance.public_ip} 8081 && exit 0 sleep 1 done echo "Timeout reached" exit 1 EOF } }This will allow the subscriber Instance to immediately receive the confirmation link to subscribe to the topic, and not wait for the retry policy to confirm the subscription. The confirmation step is done manually for the purposes of this tutorial, but it could also be performed with an HTTP request.
-
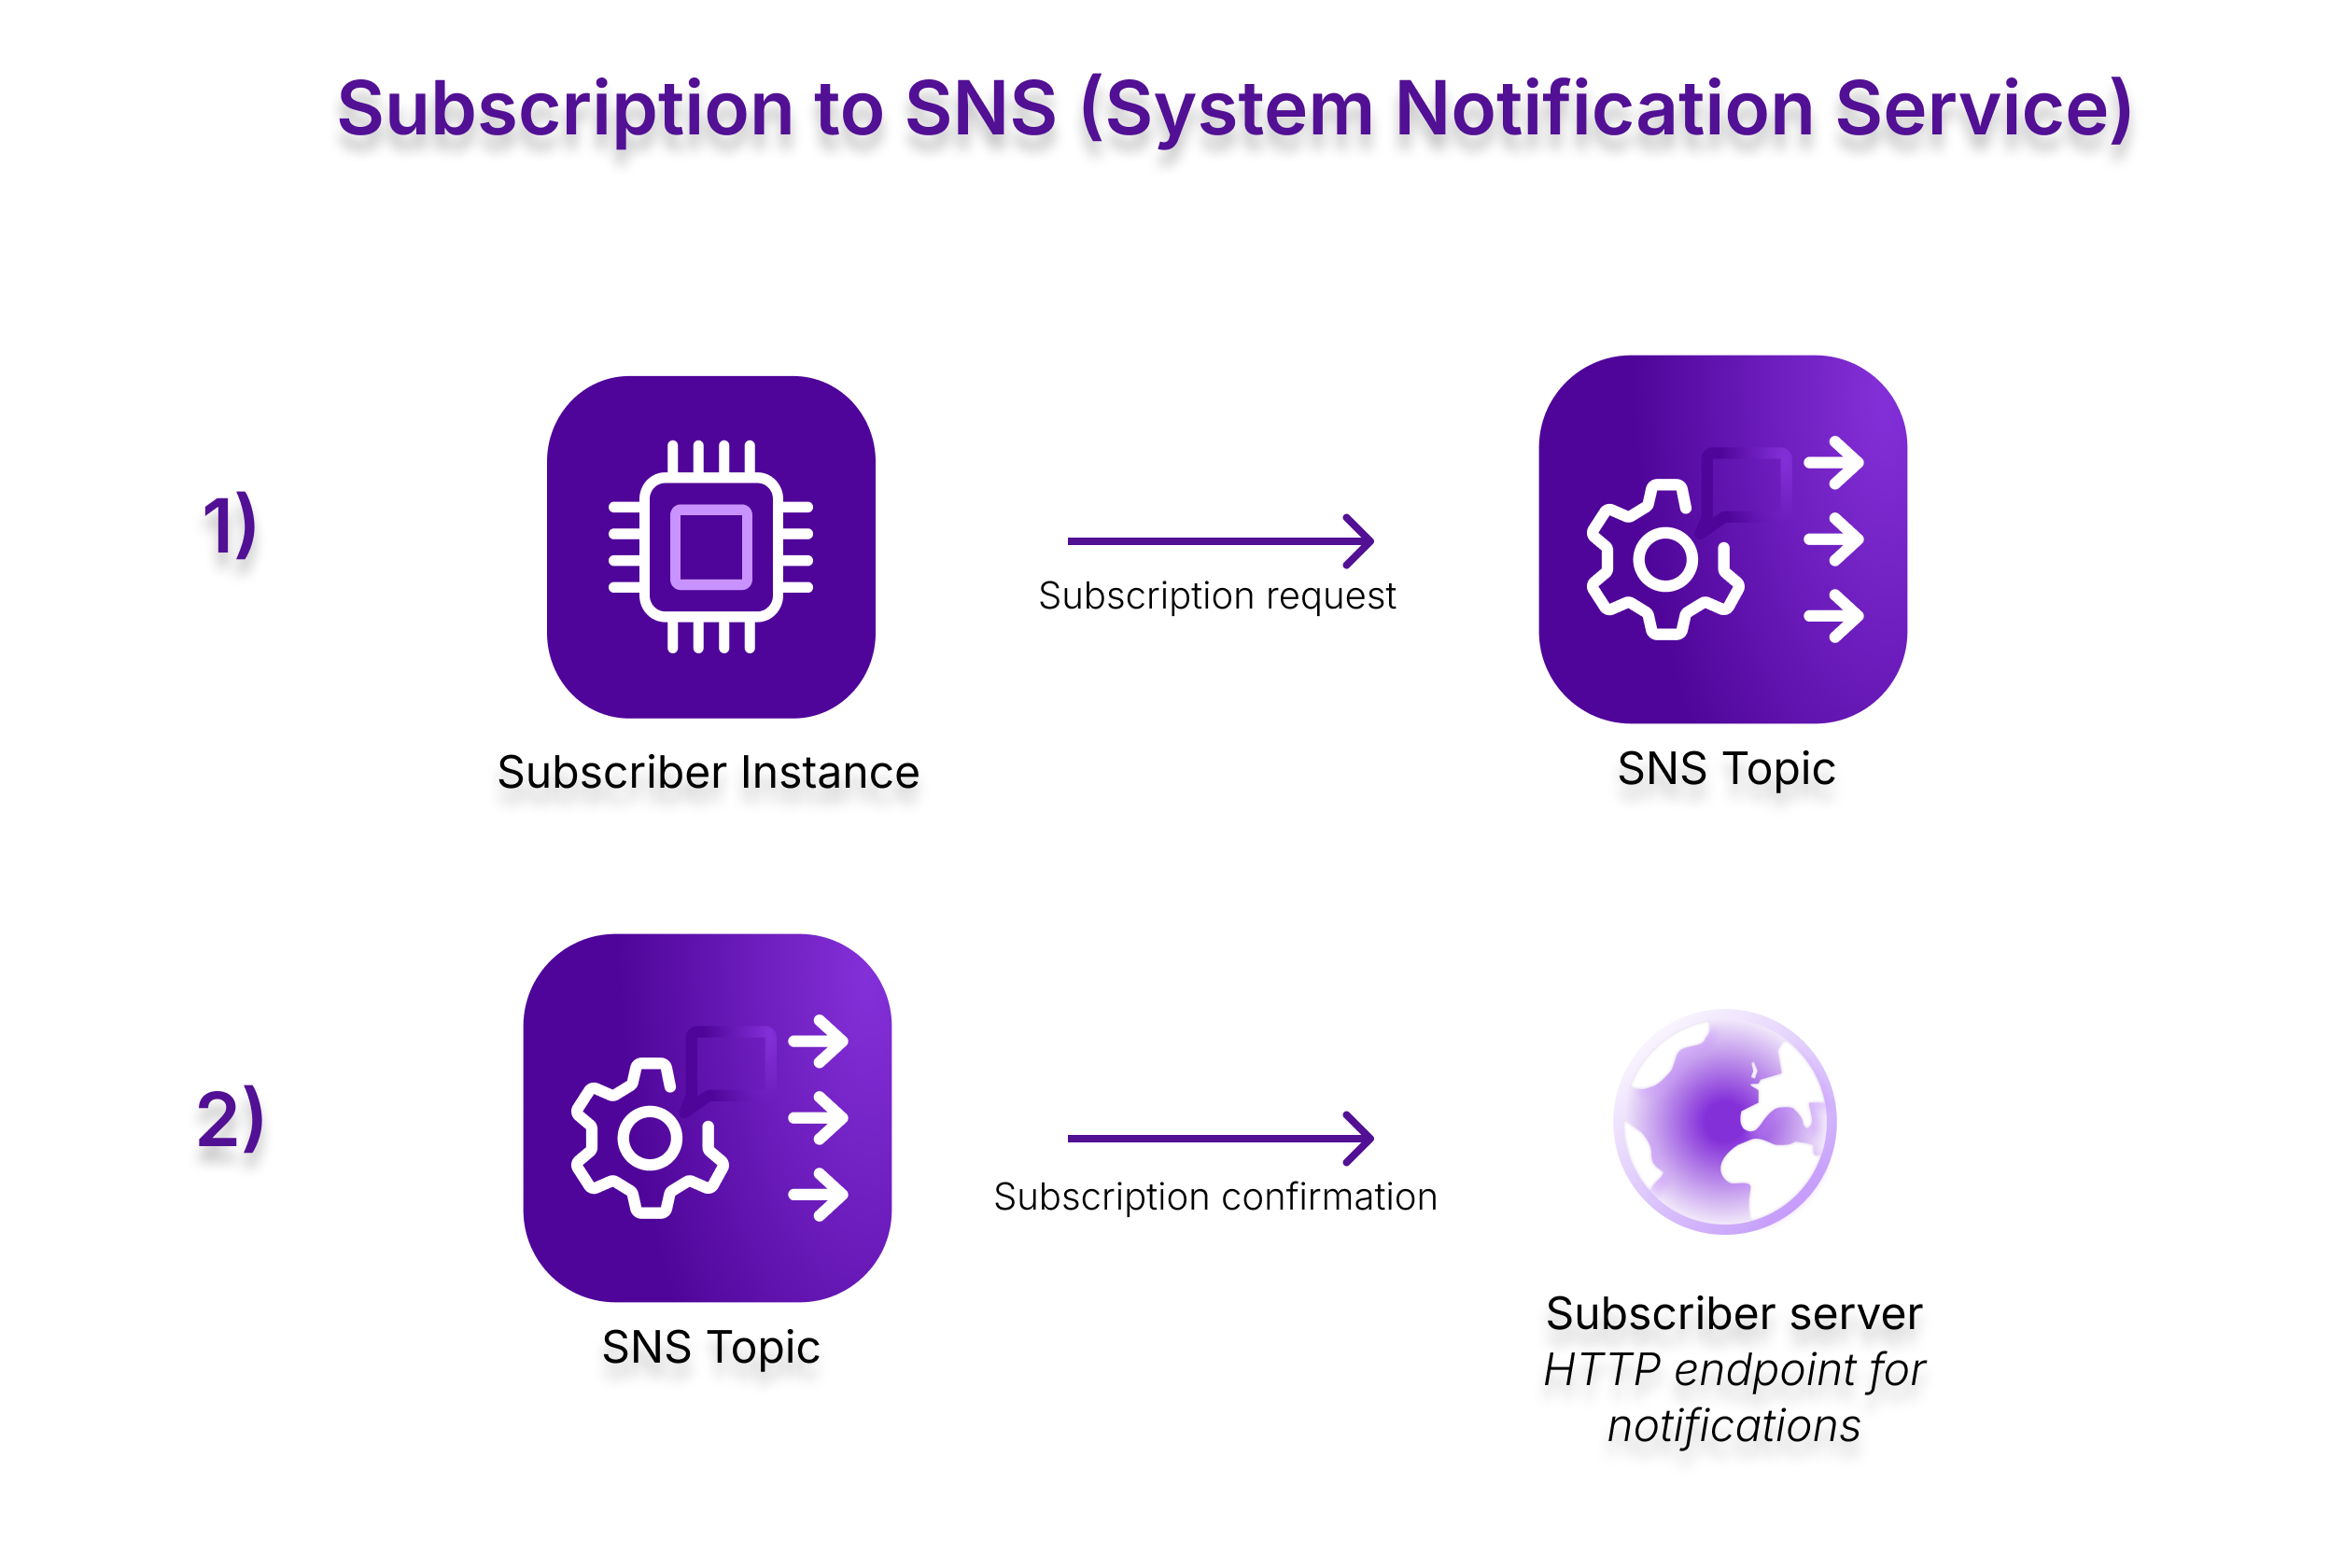
Create the SNS topic subscription with the subscriber Instance's endpoint:
resource "scaleway_mnq_sns_topic_subscription" "main" { project_id = scaleway_account_project.sns_tutorial.id access_key = scaleway_mnq_sns_credentials.main.access_key secret_key = scaleway_mnq_sns_credentials.main.secret_key topic_id = scaleway_mnq_sns_topic.topic.id protocol = "http" endpoint = "http://${scaleway_instance_ip.subscriber_public_ip.address}:8081/notifications" } -
Create the publisher Instance's IP address:
resource "scaleway_instance_ip" "publisher_public_ip" { project_id = scaleway_account_project.sns_tutorial.id zone = "fr-par-1" } -
Create the publisher Instance itself, with all the environment variables it will need to publish the notifications to the topic:
resource "scaleway_instance_server" "publisher_sns_tuto_instance" { project_id = scaleway_account_project.sns_tutorial.id name = "publisher-server" type = "PLAY2-PICO" image = "debian_bookworm" ip_id = scaleway_instance_ip.publisher_public_ip.id security_group_id = scaleway_instance_security_group.sns_www.id # User_data to run the server at start-up with a script to set the environment needed by the subscriber docker image user_data = { cloud-init = <<-EOF #cloud-config write_files: - content: | #!/bin/bash export TOPIC_ARN="${scaleway_mnq_sns_topic.topic.arn}" export AWS_ACCESS_KEY="${scaleway_mnq_sns_credentials.main.access_key}" export AWS_SECRET_KEY="${scaleway_mnq_sns_credentials.main.secret_key}" owner: root:root path: /etc/profile.d/publisher-server_env.sh permissions: '0755' runcmd: - apt-get update && apt-get install -y docker.io - systemctl start docker - systemctl enable docker - chmod +x /etc/profile.d/publisher-server_env.sh # Using 'source' command doesn't work in cloud-init runcmd because each command runs in a separate shell. # this is why environment variables will be passed directly in the docker run command - docker pull rg.fr-par.scw.cloud/mnq-tutorials/sns-instances-publisher-server:1.0 - | . /etc/profile.d/publisher-server_env.sh docker run -d --restart=always \ --name publisher-server \ -p 8081:8081 \ -e TOPIC_ARN=$TOPIC_ARN \ -e AWS_ACCESS_KEY=$AWS_ACCESS_KEY \ -e AWS_SECRET_KEY=$AWS_SECRET_KEY \ rg.fr-par.scw.cloud/mnq-tutorials/sns-instances-publisher-server:1.0 EOF } } -
Check that your
main.tffile looks like the fully completed example shown on the GitHub repository.
Run and test your setup
We are now ready to run the command to create the infrastructure and resources we have defined in our Terraform/OpenTofu files and test if the publisher is pushing alerts that are being received by the subscriber. The web applications we defined for each Instance (downloaded from a Docker image) allow us to easily view and check what is going on with each Instance.
- Run the commands
terraform init,terraform planandterraform apply. - From the Instances section of the Scaleway console, access and copy the public IP address of the Instance we created via Terraform/OpenTofu (identifiable from its name:
subscriber_server). - In a browser, go to the home page of your subscriber Instance by inserting the IP address copied in the previous step into the following address:
http://<your_subscriber_ip_address>:8081. - Still in the browser, click
Confirm subscriptionto confirm the subscription to the SNS topic we created. You are directed to an AWS page that confirms your subscription. If you have an error because the URL hasn't been received, you can reload the page. It should take less than 30 seconds to appear.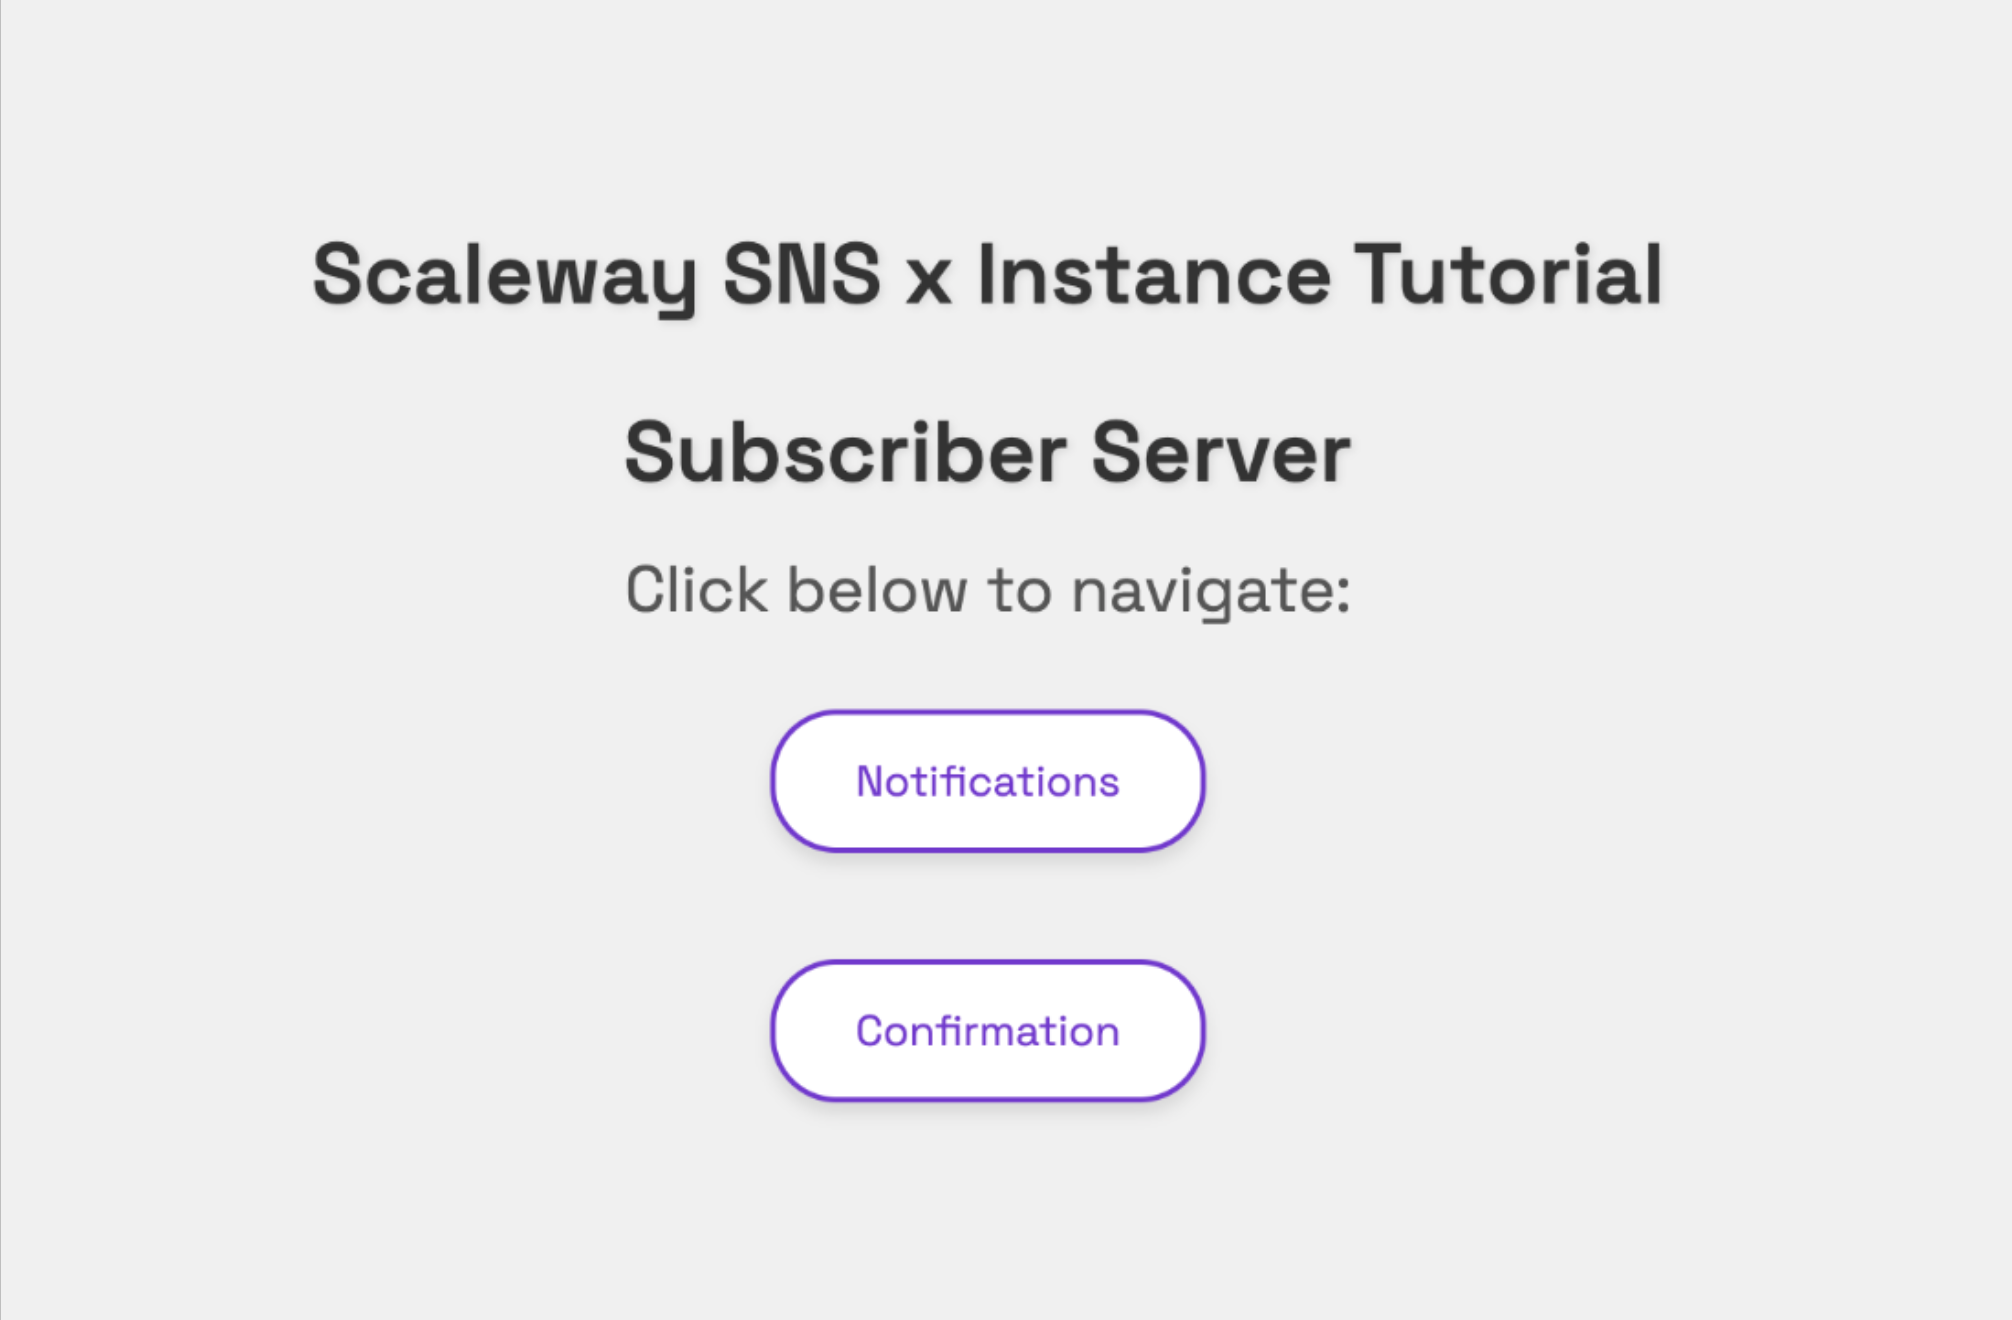
- Go back to the Instance subscriber's home page at
http://<your_subscriber_ip_address>:8081and clickNotifications. Keep this page open while you carry out the next steps in a new browser tab. - Back in the Scaleway console, retrieve and copy the IP address of the Instance called
publisher_server. - Go to the home page of your publisher server:
http://<your_publisher_ip_address>:8081.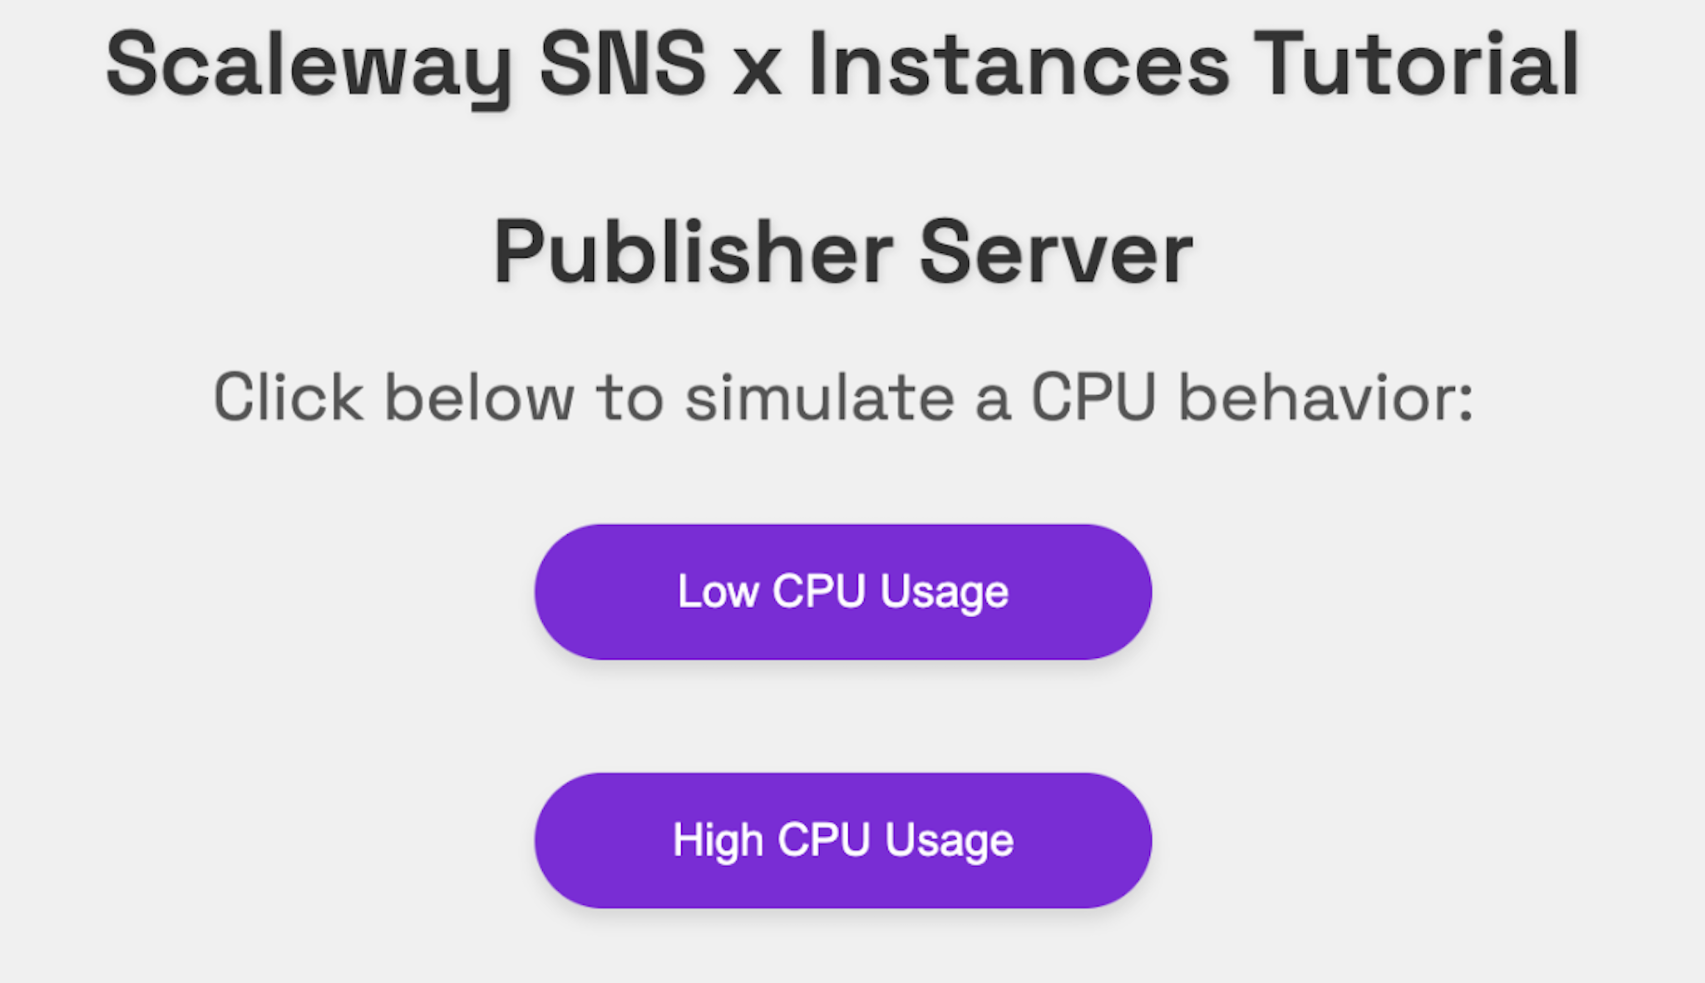
- Click on a CPU behavior, and check the notification page of your subscriber server. A notification about the behavior should have appeared.
Once you're done testing, you can apply terraform destroy to clean and remove the project.
Conclusion
We have demonstrated a working infrastructure to test the sending and receiving of notifications relating to the publisher Instance's CPU usage. You can also create this setup by creating the necessary resources through the Scaleway console, API, or other developer tools.
Visit our Help Center and find the answers to your most frequent questions.
Visit Help Center